Injector Circuit
Circuit diagnosis · Vehicles built from Jan 2012
DESCRIPTION
The injector driver drives the injectors at high speeds with a high-voltage DC/DC converter. The ECM constantly monitors the injector driver and stops the engine if an abnormal condition is detected.WIRING DIAGRAM
Refer to DTC P0201 (Click here).INSPECTION PROCEDURE
| 1. CHECK TERMINAL VOLTAGE (POWER SOURCE) |

Turn the engine switch off.
- HINT:
- Powering of the EDU relay may be prohibited by the fail-safe function. Therefore, turn the engine switch off to disable the failsafe function before performing this inspection.
Disconnect the No. 1 or No. 2 injector driver (EDU) connector.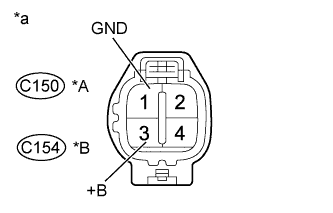

Turn the engine switch on (IG).
Measure the voltage according to the value(s) in the table below.
- Standard Voltage:
Tester Connection
Switch Condition
Specified Condition
C150-3 (+B) - C150-1 (GND)
Engine switch on (IG)
11 to 14 V
C154-3 (+B) - C154-1 (GND)
Engine switch on (IG)
11 to 14 V
Text in Illustration *A
for Bank 1 (No. 1 injector Driver (EDU))
*B
for Bank 2 (No. 2 injector Driver (EDU))
*a
Front view of wire harness connector
(to Injector Driver (EDU))
Reconnect the No. 1 or No. 2 injector driver (EDU) connector.
|
|
||||

| OK | ||
 |
||
| ||
| 2. INSPECT FUSE (EFI MAIN AND EFI MAIN 2) |
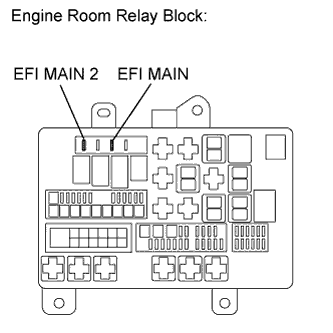 |
Remove the EFI MAIN and EFI MAIN 2 fuse from the engine room relay block.
Measure the resistance according to the value(s) in the table below.
- Standard Resistance:
Tester Connection
Condition
Specified Condition
EFI MAIN fuse
Always
Below 1 Ω
EFI MAIN 2 fuse
Always
Below 1 Ω
|
|
||||

| OK | |
 |
| 3. INSPECT EDU RELAY (EDU 1 OR EDU 2) |
Inspect the EDU relay (EDU 1 or EDU 2) (Click here).
|
|
||||
| OK | |
|
| 4. INSPECT INTEGRATION RELAY (EFI OR EFI MAIN 2) |
Inspect the integration relay (EFI or EFI MAIN 2) (Click here).
|
|
||||
| OK | |
|
| 5. CHECK HARNESS AND CONNECTOR (EDU RELAY - EDU) |
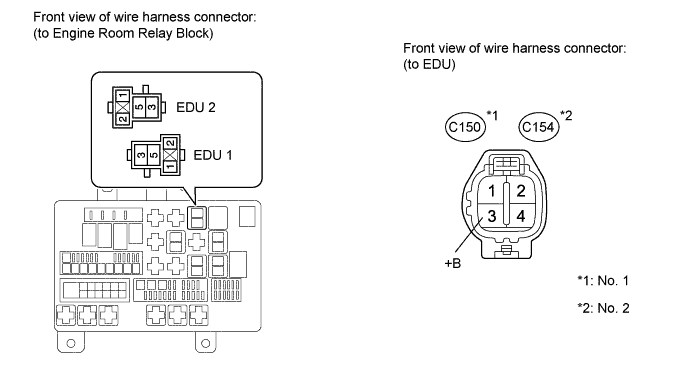
Remove the EDU relay (EDU 1 or EDU 2) from the engine room relay block.
Remove the EDU connector.
Measure the resistance according to the value(s) in the table below.
- Standard Resistance:
No. 1 Tester Connection
Condition
Specified Condition
EDU 1 relay (5) - C150-3 (+B)
Always
Below 1 Ω
EDU 1 relay (5) or C150-3 (+B) - Body ground
Always
10 kΩ or higher
No. 2 Tester Connection
Condition
Specified Condition
EDU 2 relay (5) - C154-3 (+B)
Always
Below 1 Ω
EDU 2 relay (5) or C154-3 (+B) - Body ground
Always
10 kΩ or higher
|
|
||||
| OK | |
|
| 6. CHECK HARNESS AND CONNECTOR (EDU RELAY - ECM) |
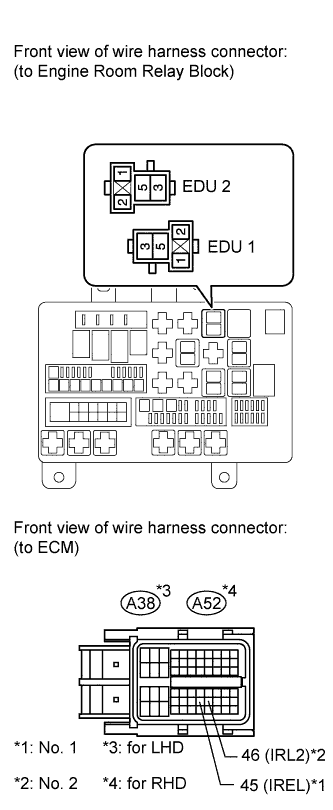 |
Remove the EDU relay (EDU 1 or EDU 2) from the engine room relay block.
Disconnect the ECM connector.
Measure the resistance according to the value(s) in the table below.
- Standard Resistance:
No. 1 (LHD) Tester Connection
Condition
Specified Condition
EDU 1 relay (2) - A38-45 (IREL)
Always
Below 1 Ω
EDU 1 relay (2) or A38-45 (IREL) - Body ground
Always
10 kΩ or higher
No. 2 (LHD) Tester Connection
Condition
Specified Condition
EDU 2 relay (2) - A38-46 (IRL2)
Always
Below 1 Ω
EDU 2 relay (2) or A38-46 (IRL2) - Body ground
Always
10 kΩ or higher
No. 1 (RHD) Tester Connection
Condition
Specified Condition
EDU 1 relay (2) - A52-45 (IREL)
Always
Below 1 Ω
EDU 1 relay (2) or A52-45 (IREL) - Body ground
Always
10 kΩ or higher
No. 2 (RHD) Tester Connection
Condition
Specified Condition
EDU 2 relay (2) - A52-46 (IRL2)
Always
Below 1 Ω
EDU 2 relay (2) or A52-46 (IRL2) - Body ground
Always
10 kΩ or higher
|
|
||||
| OK | |
|
| 7. CHECK HARNESS AND CONNECTOR (INTEGRATION RELAY - EDU RELAY, ECM, BODY GROUND) |
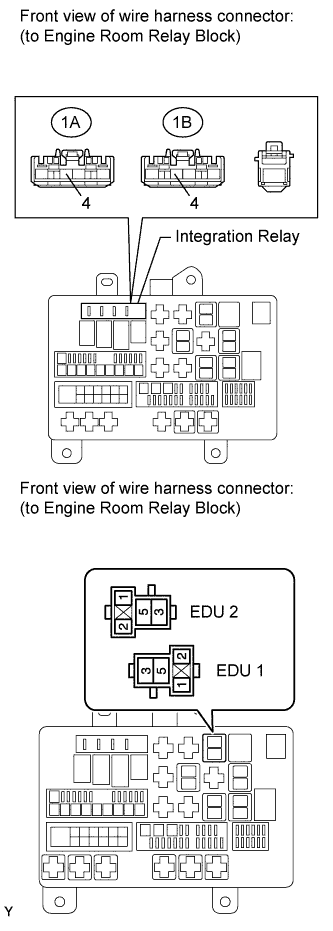 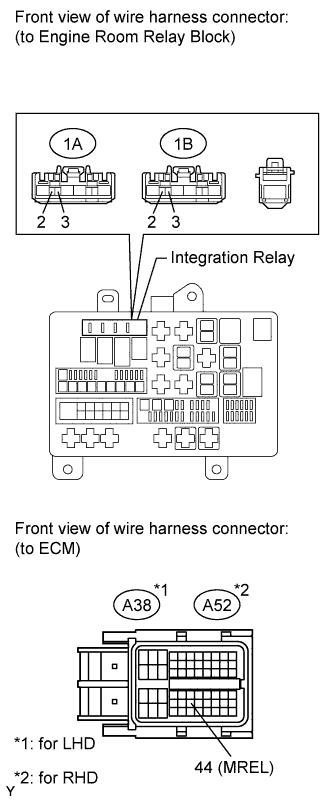 |
Remove the integration relay from the engine room relay block.
Remove the EDU relay (EDU 1 or EDU 2).
Measure the resistance according to the value(s) in the table below.
- Standard Resistance:
No. 1 Tester Connection
Condition
Specified Condition
1B-4 - EDU 1 relay (1)
Always
Below 1 Ω
1B-4 - EDU 1 relay (3)
Always
Below 1 Ω
1B-4 or EDU 1 relay (1) - Body ground
Always
10 kΩ or higher
1B-4 or EDU 1 relay (3) - Body ground
Always
10 kΩ or higher
No. 2 Tester Connection
Condition
Specified Condition
1A-4 - EDU 2 relay (1)
Always
Below 1 Ω
1A-4 - EDU 2 relay (3)
Always
Below 1 Ω
1A-4 or EDU 2 relay (1) - Body ground
Always
10 kΩ or higher
1A-4 or EDU 2 relay (3) - Body ground
Always
10 kΩ or higher
Disconnect the ECM connector.
Measure the resistance according to the value(s) in the table below.
- Standard Resistance (Check for Open):
No. 1 (LHD) Tester Connection
Condition
Specified Condition
1B-2 - A38-44 (MREL)
Always
Below 1 Ω
1B-3 - Body ground
Always
Below 1 Ω
1B-2 or A38-44 (MREL) - Body ground
Always
10 kΩ or higher
No. 2 (LHD) Tester Connection
Condition
Specified Condition
1A-2 - A38-44 (MREL)
Always
Below 1 Ω
1A-3 - Body ground
Always
Below 1 Ω
1A-2 or A38-44 (MREL) - Body ground
Always
10 kΩ or higher
No. 1 (RHD) Tester Connection
Condition
Specified Condition
1B-2 - A52-44 (MREL)
Always
Below 1 Ω
1B-3 - Body ground
Always
Below 1 Ω
1B-2 or A52-44 (MREL) - Body ground
Always
10 kΩ or higher
No. 2 (RHD) Tester Connection
Condition
Specified Condition
1A-2 - A52-44 (MREL)
Always
Below 1 Ω
1A-3 - Body ground
Always
Below 1 Ω
1A-2 or A52-44 (MREL) - Body ground
Always
10 kΩ or higher
|
|
||||
| OK | |
|
| 8. CHECK HARNESS AND CONNECTOR (EDU - BODY GROUND) |
Disconnect the EDU connector.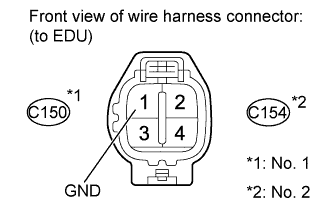
Measure the resistance according to the value(s) in the table below.
- Standard Resistance:
No. 1 Tester Connection
Condition
Specified Condition
C150-1 (GND) - Body ground
Always
Below 1 Ω
- Standard Resistance:
No. 2 Tester Connection
Condition
Specified Condition
C154-1 (GND) - Body ground
Always
Below 1 Ω
|
|
||||
| OK | ||
|
||
| ||