Taillight Circuit
Circuit diagnosis · Vehicles built Sep 2011 – Dec 2011
Versions by build date: Sep 2011 – Dec 2011 from Jan 2012
DESCRIPTION
The main body ECU receives a light control switch information signal from the headlight dimmer switch, and illuminates the taillights.WIRING DIAGRAM
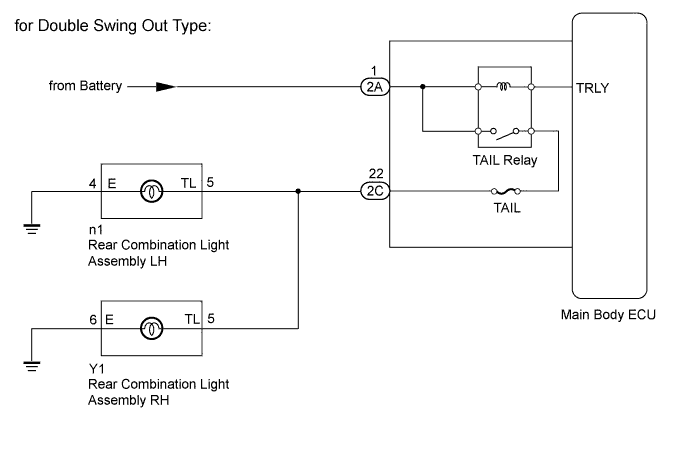

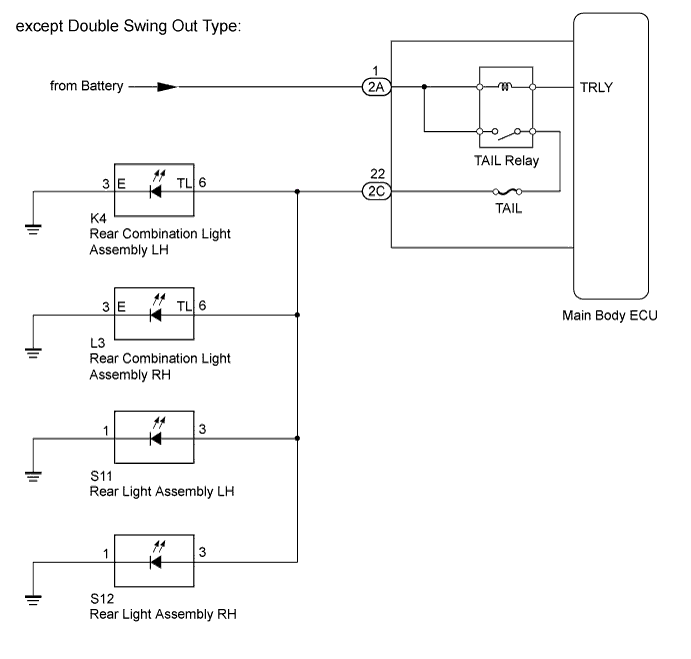
INSPECTION PROCEDURE
| 1. PERFORM ACTIVE TEST USING INTELLIGENT TESTER (TAILLIGHT RELAY) |
 |
Operate the intelligent tester according to the steps on the display and select "Active Test".
Main Body
Tester Display
|
Test Part
|
Control Range
|
Diagnostic Note
|
Taillight Relay
|
Taillight
|
ON or OFF
|
-
|
- OK:
- Taillight turns on/turns off.
|
NG |
 |
|
|
|
| OK |
|
 |
|
| PROCEED TO NEXT CIRCUIT INSPECTION SHOWN IN PROBLEM SYMPTOMS TABLE (Click here)
|
|
| 2. INSPECT FUSE (TAIL FUSE) |
|
Remove the TAIL fuse from the main body ECU.
Measure the resistance according to the value(s) in the table below.
- Standard Resistance:
Tester Connection
|
Condition
|
Specified Condition
|
TAIL fuse
|
Always
|
Below 1 Ω
|
|
NG |
 |
|
|
|
| OK |
|
 |
|
| 3. CHECK HARNESS AND CONNECTOR (MAIN BODY ECU - BATTERY) |
|
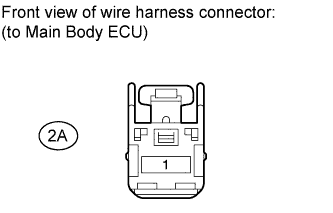
- Disconnect the 2A ECU connector.
Measure the voltage according to the value(s) in the table below.
- Standard Voltage:
Tester Connection
|
Condition
|
Specified Condition
|
2A-1 - Body ground
|
Always
|
11 to 14 V
|
|
NG |
|
|
| REPAIR OR REPLACE HARNESS OR CONNECTOR |
|
|
| OK |
|
|
|
| 4. CHECK VEHICLE TYPE |
|
Check the vehicle type.
Result
Result
|
Proceed to
|
for Double Swing Out Type
|
A
|
except Double Swing Out Type
|
B
|
|
B |
|
|
|
|
| A |
|
|
|
| 5. CHECK HARNESS AND CONNECTOR (REAR COMBINATION LIGHT - MAIN BODY ECU AND BODY GROUND) |
|
Disconnect the 2C ECU connector.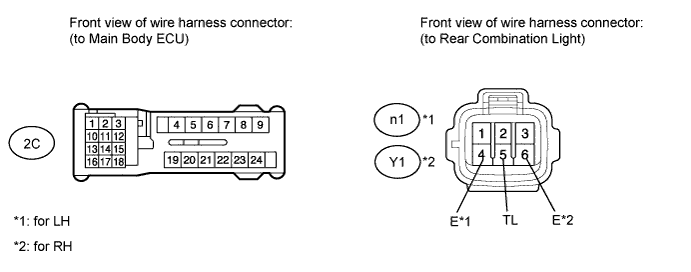
for LH:
Disconnect the n1 light connector.
Measure the resistance according to the value(s) in the table below.
- Standard Resistance:
Tester Connection
|
Condition
|
Specified Condition
|
2C-22 - n1-5 (TL)
|
Always
|
Below 1 Ω
|
n1-4 (E) - Body ground
|
n1-5 (TL) - Body ground
|
Always
|
10 kΩ or higher
|
for RH:
Disconnect the Y1 light connector.
Measure the resistance according to the value(s) in the table below.
- Standard Resistance:
Tester Connection
|
Condition
|
Specified Condition
|
2C-22 - Y1-5 (TL)
|
Always
|
Below 1 Ω
|
Y1-6 (E) - Body ground
|
Y1-5 (TL) - Body ground
|
Always
|
10 kΩ or higher
|
|
NG |
|
|
| REPAIR OR REPLACE HARNESS OR CONNECTOR |
|
|
| OK |
|
|
|
|
| 6. CHECK HARNESS AND CONNECTOR (REAR COMBINATION LIGHT - MAIN BODY ECU AND BODY GROUND) |
|
Disconnect the 2C ECU connector.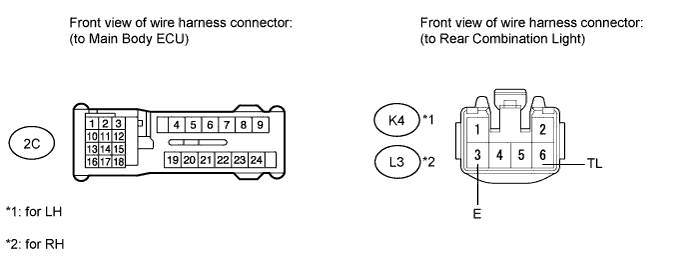
for LH:
Disconnect the K4 light connector.
Measure the resistance according to the value(s) in the table below.
- Standard Resistance:
Tester Connection
|
Condition
|
Specified Condition
|
2C-22 - K4-6 (TL)
|
Always
|
Below 1 Ω
|
K4-3 (E) - Body ground
|
K4-6 (TL) - Body ground
|
Always
|
10 kΩ or higher
|
for RH:
Disconnect the L3 light connector.
Measure the resistance according to the value(s) in the table below.
- Standard Resistance:
Tester Connection
|
Condition
|
Specified Condition
|
2C-22 - L3-6 (TL)
|
Always
|
Below 1 Ω
|
L3-3 (E) - Body ground
|
L3-6 (TL) - Body ground
|
Always
|
10 kΩ or higher
|
|
NG |
|
|
| REPAIR OR REPLACE HARNESS OR CONNECTOR |
|
|
| OK |
|
|
|
| 7. CHECK HARNESS AND CONNECTOR (REAR LIGHT - MAIN BODY ECU AND BODY GROUND) |
|
Disconnect the 2C ECU connector.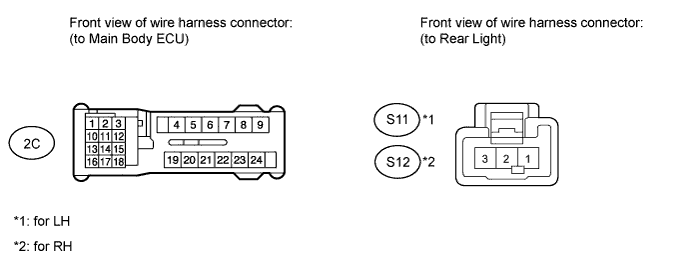
for LH:
Disconnect the S11 light connector.
Measure the resistance according to the value(s) in the table below.
- Standard Resistance:
Tester Connection
|
Condition
|
Specified Condition
|
2C-22 - S11-3
|
Always
|
Below 1 Ω
|
S11-1 - Body ground
|
S11-3 - Body ground
|
Always
|
10 kΩ or higher
|
for RH:
Disconnect the S12 light connector.
Measure the resistance according to the value(s) in the table below.
- Standard Resistance:
Tester Connection
|
Condition
|
Specified Condition
|
2C-22 - S12-3
|
Always
|
Below 1 Ω
|
S12-1 - Body ground
|
S12-3 - Body ground
|
Always
|
10 kΩ or higher
|
|
NG |
|
|
| REPAIR OR REPLACE HARNESS OR CONNECTOR |
|
|
| OK |
|
|
|
|