Starter Signal Circuit
Circuit diagnosis · Vehicles built from Jan 2012
DESCRIPTION
While the engine is being cranked, current flows from terminal STAR of the main body ECU to the park/neutral position switch and also flows to terminal STA of the ECM (STA signal).WIRING DIAGRAM
Refer to DTC P0617 (Click here).INSPECTION PROCEDURE
- NOTICE:
- Inspect the fuses for circuits related to this system before performing the following inspection procedure.
- HINT:
- This chart is based on the premise that the engine can crank normally. If the engine cannot crank normally, proceed to Problem Symptoms Table (Click here).
| 1. READ VALUE USING GTS (STARTER SIGNAL) |

Connect the GTS to the DLC3.
Turn the engine switch on (IG).
Turn the GTS on.
Enter the following menus: Powertrain / Engine and ECT / Data List / Starter Signal.
Read the value.
- OK:
Engine Switch Position
Starter Signal
On (IG)
Close
START
Open
|
|
||||

| OK | ||
 |
||
| ||
| 2. CHECK STARTER RELAY (ST) (POWER SOURCE) |
Remove the starter relay (ST) from the engine room relay block.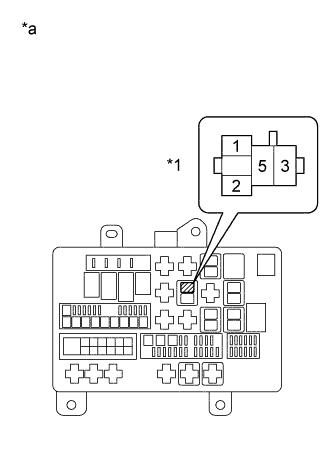

Measure the voltage according to the value(s) in the table below.
- Standard Voltage:
Tester Connection
Condition
Specified Condition
Starter relay (ST) terminal 1 - Body ground
Engine cranking
11 to 14 V
- HINT:
- The engine does not crank because the relay is not installed.
Text in Illustration *a
Starter Relay (ST)
*1
Engine Room Relay Block
Reinstall the starter relay (ST).
|
|
||||
| OK | |
 |
| 3. INSPECT STARTER RELAY (ST) |
Inspect the starter relay (ST) (Click here).
|
|
||||

| OK | |
|
| 4. CHECK HARNESS AND CONNECTOR (STARTER RELAY (ST) - BODY GROUND) |
Remove the starter relay (ST) from the engine room relay block.
Measure the resistance according to the value(s) in the table below.
- Standard Resistance:
Tester Connection
Condition
Specified Condition
Starter relay (ST) terminal 2 - Body ground
Always
Below 1 Ω
Reinstall the starter relay (ST).
|
|
||||
| OK | ||
|
||
| ||
| 5. CHECK HARNESS AND CONNECTOR (STARTER RELAY (ST) - PARK/NEUTRAL POSITION SWITCH) |
Remove the starter relay (ST) from the engine room relay block.
Disconnect the park/neutral position switch connector.
Measure the resistance according to the value(s) in the table below.
- Standard Resistance:
Tester Connection
Condition
Specified Condition
Starter relay (ST) terminal 1 - C24-5
Always
Below 1 Ω
Starter relay (ST) terminal 1 or C24-5 - Body ground
Always
10 kΩ or higher
Reinstall the starter relay (ST).
Reconnect the park/neutral position switch connector.
|
|
||||
| OK | |
|
| 6. INSPECT PARK/NEUTRAL POSITION SWITCH ASSEMBLY |
Inspect the park/neutral position switch assembly (Click here).
|
|
||||
| OK | |
|
| 7. CHECK HARNESS AND CONNECTOR (PARK/NEUTRAL POSITION SWITCH - MAIN BODY ECU) |
Disconnect the park/neutral position switch connector.
Disconnect the main body ECU connector.
Measure the resistance according to the value(s) in the table below.
- Standard Resistance:
Tester Connection
Condition
Specified Condition
C24-4 - E1-8 (STR)
Always
Below 1 Ω
C24-4 or E1-8 (STR) - Body ground
Always
10 kΩ or higher
Reconnect the park/neutral position switch connector.
Reconnect the main body ECU connector.
|
|
||||
| OK | ||
|
||
| ||