Driver Side Power Mirror cannot be Adjusted with Power Mirror Switch
Circuit diagnosis · Vehicles built Sep 2011 – Dec 2011
Versions by build date: Sep 2011 – Dec 2011 from Jan 2012
SYSTEM DESCRIPTION
This circuit detects the conditions of the outer mirror switch.The outer mirror switch sends information about the operating condition of the mirror switch (switch input signals) through the CAN communication line. Then the switch input signals are sent to the outer mirror control ECU. Mirror adjustment is controlled by the outer mirror control ECU.
WIRING DIAGRAM
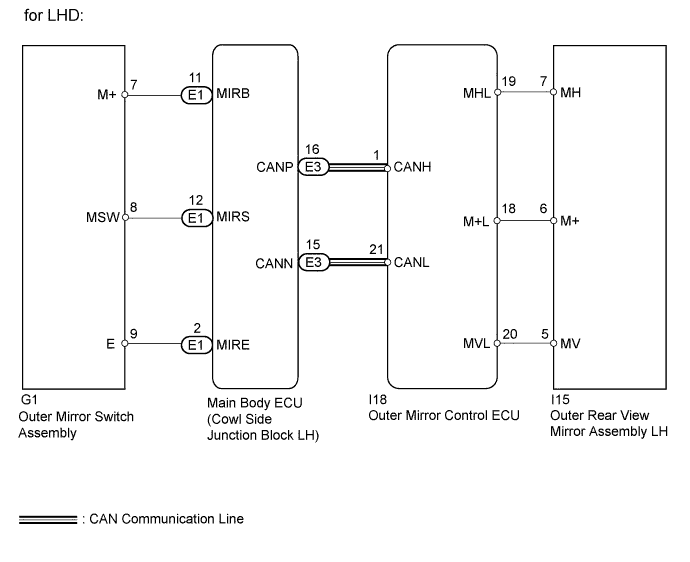

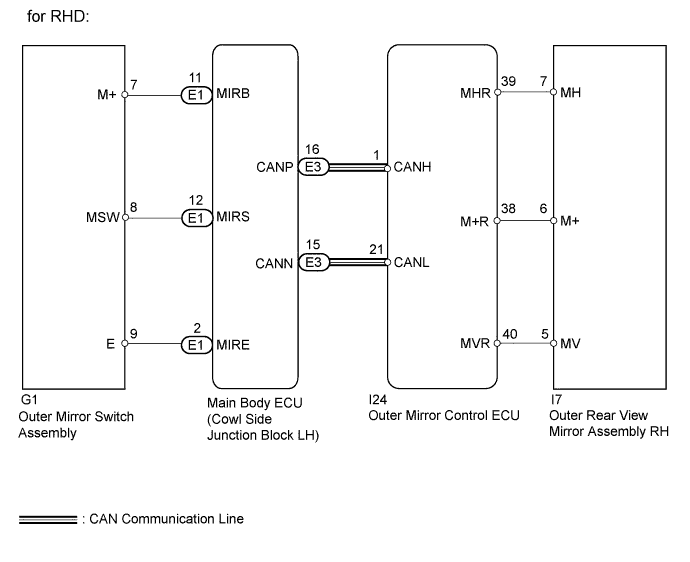
INSPECTION PROCEDURE
| 1. CHECK DTC |

Use the intelligent tester to check if the CAN communication system is functioning normally.
Result Result
Proceed to
CAN DTC is not output
A
CAN DTC is output (for LHD)
B
CAN DTC is output (for RHD)
C
|
|
||||
|
|
||||

| A | |
 |
| 2. READ VALUE USING INTELLIGENT TESTER (OUTER MIRROR SWITCH) |
Check the Data List for proper functioning of the mirror master switch and mirror control switch (Click here).
Main Body Tester Display
Measurement Item/Range
Normal Condition
Diagnostic Note
Mirror Selection SW (L)
Mirror master switch signal for LH mirror / ON or OFF
ON: Switch is in L position
OFF: Switch is off or in R position
-
Mirror Selection SW (R)
Mirror master switch signal for RH mirror / ON or OFF
ON: Switch is in R position
OFF: Switch is off or in L position
-
Mirror Position SW (R)
Mirror control switch signal (right) / ON or OFF
ON: Right switch is on
OFF: Any switch except right is on or all switches are off
-
Mirror Position SW (L)
Mirror control switch signal (left) / ON or OFF
ON: Left switch is on
OFF: Any switch except left is on or all switches are off
-
Mirror Position SW (Up)
Mirror control switch signal (up) / ON or OFF
ON: Up switch is on
OFF: Any switch except up is on or all switches are off
-
Mirror Position SW (Dwn)
Mirror control switch signal (down) / ON or OFF
ON: Down switch is on
OFF: Any switch except down is on or all switches are off
-
- OK:
- On tester screen, each item changes between ON and OFF according to above chart.
|
|
||||

| OK | |
|
| 3. PERFORM ACTIVE TEST USING INTELLIGENT TESTER (POWER MIRROR CONTROL FUNCTION) |
Select the Active Test, use the intelligent tester to generate a control command, and then check the power mirror control function (Click here).
Mirror Tester Display
Test Part
Control Range
Diagnostic Note
LH Mirror Up/Down
Mirror vertical operation
UP / OFF / DOWN
-
LH Mirror Right/Left
Mirror horizontal operation
RIGHT / OFF / LEFT
-
RH Mirror Up/Down
Mirror vertical operation
UP / OFF / DOWN
-
RH Mirror Right/Left
Mirror horizontal operation
RIGHT / OFF / LEFT
-
Result Result
Proceed to
Outer rear view mirror (for Driver Side) does not operate normally
A
Outer rear view mirror (for Driver Side) operates normally
B
|
|
||||
| A | |
|
| 4. INSPECT OUTER REAR VIEW MIRROR ASSEMBLY (for Driver Side) |
for LHD: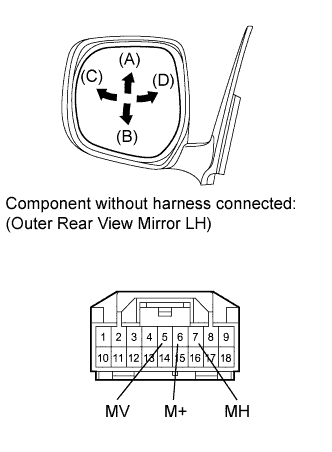
Remove the mirror LH (Click here).
Apply battery voltage and check the operation of the power mirror.
- OK:
Measurement Condition
Specified Condition
Battery positive (+) → Terminal 5 (MV)
Battery negative (-) → Terminal 6 (M+)
Turns upward (A)
Battery negative (-) → Terminal 5 (MV)
Battery positive (+) → Terminal 6 (M+)
Turns downward (B)
Battery positive (+) → Terminal 7 (MH)
Battery negative (-) → Terminal 6 (M+)
Turns left (C)
Battery negative (-) → Terminal 7 (MH)
Battery positive (+) → Terminal 6 (M+)
Turns right (D)
for RHD: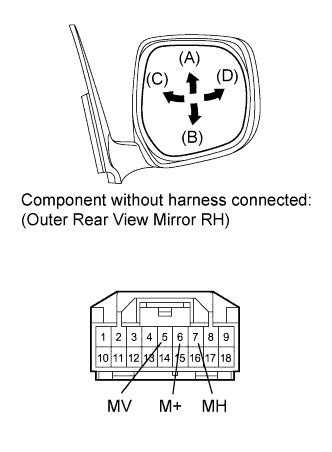
Remove the mirror RH (Click here).
Apply battery voltage and check the operation of the power mirror.
- OK:
Measurement Condition
Specified Condition
Battery positive (+) → Terminal 5 (MV)
Battery negative (-) → Terminal 6 (M+)
Turns upward (A)
Battery negative (-) → Terminal 5 (MV)
Battery positive (+) → Terminal 6 (M+)
Turns downward (B)
Battery positive (+) → Terminal 7 (MH)
Battery negative (-) → Terminal 6 (M+)
Turns left (C)
Battery negative (-) → Terminal 7 (MH)
Battery positive (+) → Terminal 6 (M+)
Turns right (D)
|
|
||||
| OK | |
|
| 5. CHECK HARNESS AND CONNECTOR (OUTER MIRROR CONTROL ECU - OUTER REAR VIEW MIRROR ASSEMBLY) |
for LHD: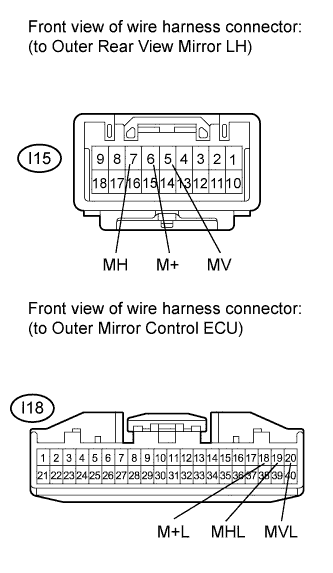
Disconnect the I18 ECU connector.
Disconnect the I15 mirror connector.
Measure the resistance according to the value(s) in the table below.
- Standard Resistance:
Tester Connection
Condition
Specified Condition
I18-18 (M+L) - I15-6 (M+)
Always
Below 1 Ω
I18-19 (MHL) - I15-7 (MH)
I18-20 (MVL) - I15-5 (MV)
I15-6 (M+) - Body ground
Always
10 kΩ or higher
I15-7 (MH) - Body ground
I15-5 (MV) - Body ground
for RHD: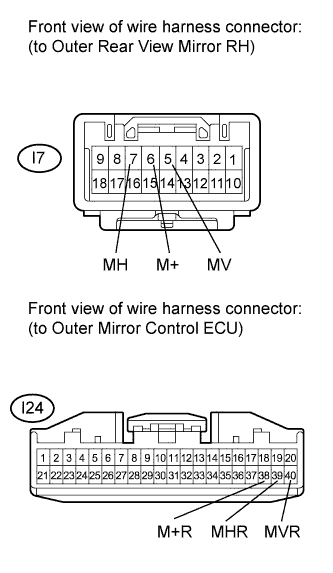
Disconnect the I24 ECU connector.
Disconnect the I7 mirror connector.
Measure the resistance according to the value(s) in the table below.
- Standard Resistance:
Tester Connection
Condition
Specified Condition
I24-38 (M+R) - I7-6 (M+)
Always
Below 1 Ω
I24-39 (MHR) - I7-7 (MH)
I24-40 (MVR) - I7-5 (MV)
I7-6 (M+) - Body ground
Always
10 kΩ or higher
I7-7 (MH) - Body ground
I7-5 (MV) - Body ground
|
|
||||
| OK | ||
 |
||
| ||
| 6. INSPECT OUTER MIRROR SWITCH ASSEMBLY |
Remove the switch (Click here).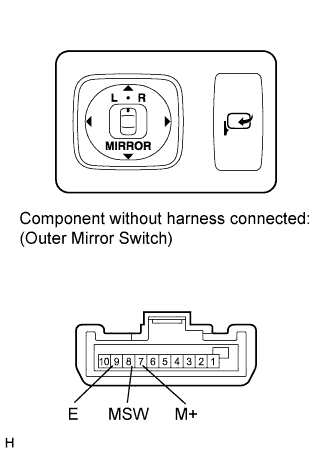
Measure the resistance according to the value(s) in the table below.
- Standard Resistance:
Tester Connection
Switch Condition
Specified Condition
7 (M+) - 9 (E)
Up switch pushed
95 to 105 Ω
Down switch pushed
446 to 493 Ω
Left switch pushed
760 to 840 Ω
Right switch pushed
237 to 262 Ω
No switches pushed
10 kΩ or higher
8 (MSW) - 9 (E)
Mirror master switch L
95 to 105 Ω
Mirror master switch R
Below 1 Ω
Mirror master switch off
10 kΩ or higher
|
|
||||
| OK | |
|
| 7. CHECK HARNESS AND CONNECTOR (OUTER MIRROR SWITCH - MAIN BODY ECU) |
Disconnect the E1 ECU connector.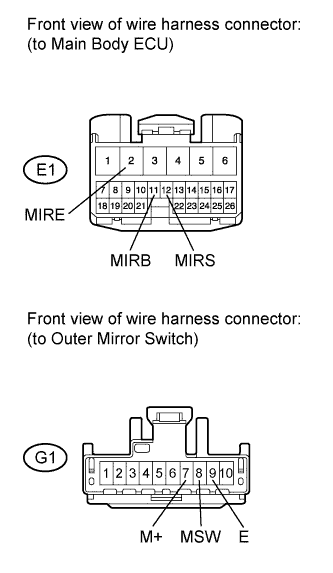
Disconnect the G1 switch connector.
Measure the resistance according to the value(s) in the table below.
- Standard Resistance:
Tester Connection
Condition
Specified Condition
E1-2 (MIRE) - G1-9 (E)
Always
Below 1 Ω
E1-11 (MIRB) - G1-7 (M+)
Always
Below 1 Ω
E1-12 (MIRS) - G1-8 (MSW)
Always
Below 1 Ω
G1-7 (M+) - Body ground
Always
10 kΩ or higher
G1-9 (E) - Body ground
Always
10 kΩ or higher
G1-8 (MSW) - Body ground
Always
10 kΩ or higher
|
|
||||
| OK | ||
|
||
| ||