Operating Light Control Rheostat does not Change Light Brightness
Circuit diagnosis · Vehicles built from Sep 2011
DESCRIPTION
w/ Multi-information Display:When the light control rheostat knob is turned to the left, the combination meter and vehicle interior illumination will become brighter. When the light control rheostat knob is turned to the right, the combination meter and vehicle illumination will dim.
WIRING DIAGRAM
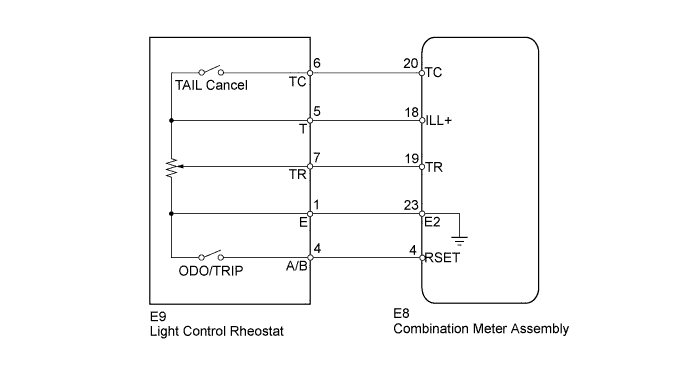

INSPECTION PROCEDURE
| 1. READ VALUE USING INTELLIGENT TESTER (LIGHT CONTROL RHEOSTAT) |

Operate the intelligent tester according to the display and select Data List (Click here).
Combination Meter Tester Display
Measurement Item/Range
Normal Condition
Diagnostic Note
Tail Cancel SW*
TAIL cancel switch condition/ON or OFF
ON: TAIL cancel switch ON
OFF: TAIL cancel switch OFF
-
Rheostat value
Light control rheostat switch input/Min.: 0, Max.: 100
Light control rheostat switch is fully turned right (0) → fully turned left (100)
Unit: %
- HINT:
- *: w/ TAIL Cancel Switch
- OK:
- Light brightness can be changed within specified range by manual operation.
|
|
||||

| OK | ||
 |
||
| ||
| 2. INSPECT LIGHT CONTROL RHEOSTAT |
Inspect the light control rheostat.
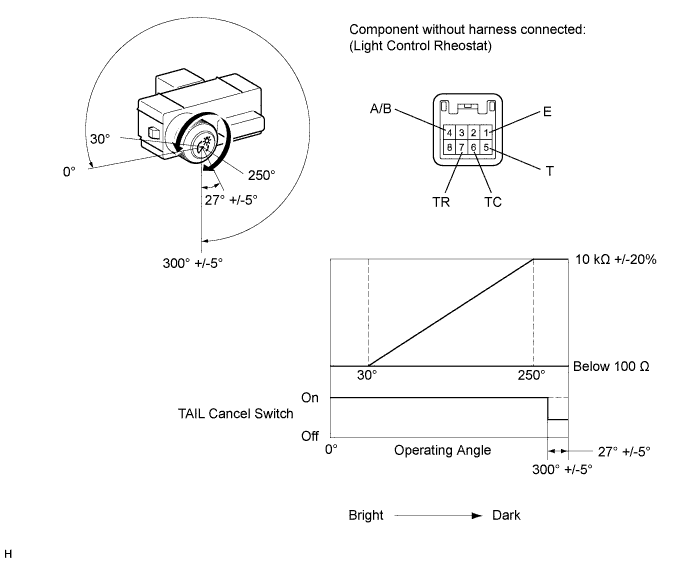
Remove the light control rheostat (Click here).
Measure the resistance according to the table below.
- Standard Resistance:
Tester Connection
Switch Condition
Specified Condition
6 (TC) - 1 (E)
TAIL cancel switch off → on
10 kΩ or higher → Below 1 Ω
5 (T) - 1 (E)
Always
10 kΩ or higher
7 (TR) - 1 (E)
Light control rheostat fully turned right → fully turned left
10 kΩ or higher → Below 100 Ω
Inspect the trip switch.
Measure the resistance according to the table below.
- Standard Resistance:
Tester Connection
Switch Condition
Specified Condition
4 (A/B) - 1 (E)
TRIP switch on (Pushed)
Below 200 Ω
TRIP switch off (Not Pushed)
1 MΩ or higher
|
|
||||

| OK | |
 |
| 3. CHECK HARNESS AND CONNECTOR (COMBINATION METER - LIGHT CONTROL RHEOSTAT) |
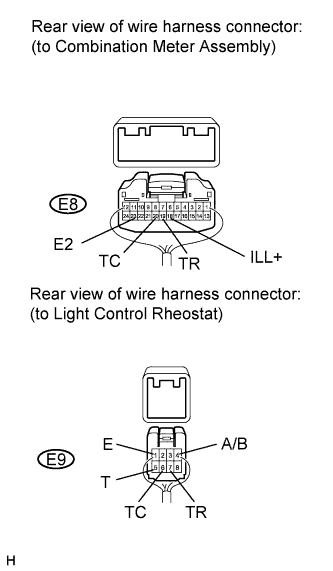 |
Disconnect the E8 meter connector.
Disconnect the E9 rheostat connector.
Measure the resistance according to the value(s) in the table below.
- Standard Resistance:
Tester Connection
Condition
Specified Condition
E8-18 (ILL+) - E9-5 (T)
Always
Below 1 Ω
E8-19 (TR) - E9-7 (TR)
E8-23 (E2) - E9-1 (E)
E8-20 (TC) - E9-6 (TC)
|
|
||||
| OK | ||
|
||
| ||