Home › Vehicle Exterior › LIGHTING (EXT) › LIGHTING SYSTEMTurn Signal Light Circuit
Circuit diagnosis · Vehicles built from Jan 2012
Versions by build date: Sep 2011 – Dec 2011 from Jan 2012
DESCRIPTION
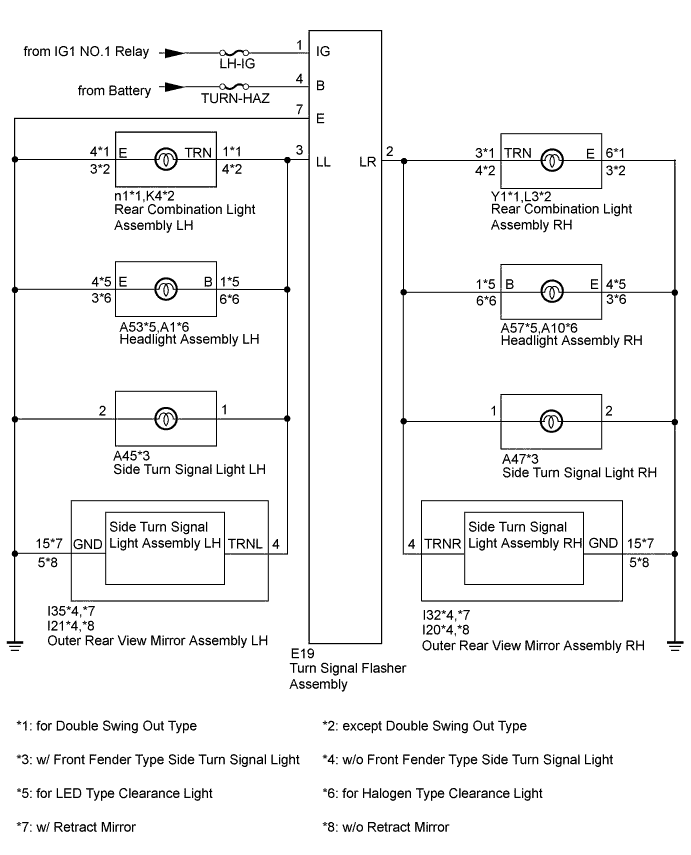
The turn signal flasher receives a turn signal switch signal from the headlight dimmer switch, and illuminates the front turn signal light, side turn signal light and rear turn signal light. WIRING DIAGRAM
INSPECTION PROCEDURE
NOTICE:
Inspect the fuses and bulbs for circuits related to this system before performing the following inspection procedure.
1. CHECK TURN SIGNAL LIGHT FUNCTION
Check that the turn signal lights blink.
Result
Result
Proceed to
All turn signal lights do not blink
A
LH side turn signal light does not blink
B
RH side turn signal light does not blink
C
B
C
A
2. CHECK HARNESS AND CONNECTOR (TURN SIGNAL FLASHER ASSEMBLY - BATTERY AND BODY GROUND)
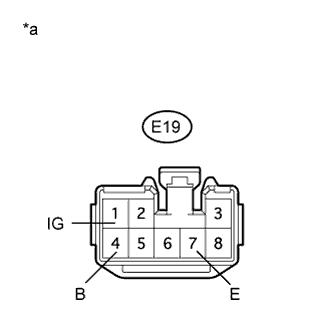
Disconnect the turn signal flasher connector. Measure the voltage according to the value(s) in the table below.
Standard Voltage:
Tester Connection
Condition
Specified Condition
E19-1 (IG) - Body ground
Ignition switch ON
11 to 14 V
Ignition switch off
Below 1 V
E19-4 (B) - Body ground
Always
11 to 14 V
Measure the resistance according to the value(s) in the table below.
Standard Resistance:
Tester Connection
Condition
Specified Condition
E19-7 (E) - Body ground
Always
Below 1 Ω
Text in Illustration
*a
Front view of wire harness connector
NG
REPAIR OR REPLACE HARNESS OR CONNECTOR
OK
PROCEED TO NEXT SUSPECTED AREA SHOWN IN PROBLEM SYMPTOMS TABLE (Click here )
3. CHECK HARNESS AND CONNECTOR (REAR COMBINATION LIGHT ASSEMBLY LH - TURN SIGNAL FLASHER ASSEMBLY AND BODY GROUND)
Disconnect the E19 turn signal flasher connector.
for Double Swing Out Type:
Disconnect the n1 rear combination light LH connector.
Measure the resistance according to the value(s) in the table below.
Standard Resistance:
Tester Connection
Condition
Specified Condition
n1-1 (TRN) - E19-3 (LL)
Always
Below 1 Ω
n1-4 (E) - Body ground
n1-1 (TRN) - Body ground
Always
10 kΩ or higher
except Double Swing Out Type:
Disconnect the K4 rear combination light LH connector.
Measure the resistance according to the value(s) in the table below.
Standard Resistance:
Tester Connection
Condition
Specified Condition
K4-4 (TRN) - E19-3 (LL)
Always
Below 1 Ω
K4-3 (E) - Body ground
K4-4 (TRN) - Body ground
Always
10 kΩ or higher
NG
REPAIR OR REPLACE HARNESS OR CONNECTOR
OK
PROCEED TO NEXT SUSPECTED AREA SHOWN IN PROBLEM SYMPTOMS TABLE (Click here )
4. CHECK HARNESS AND CONNECTOR (REAR COMBINATION LIGHT ASSEMBLY RH - TURN SIGNAL FLASHER ASSEMBLY AND BODY GROUND)
Disconnect the E19 turn signal flasher connector.
for Double Swing Out Type:
Disconnect the Y1 rear combination light RH connector.
Measure the resistance according to the value(s) in the table below.
Standard Resistance:
Tester Connection
Condition
Specified Condition
Y1-3 (TRN) - E19-2 (LR)
Always
Below 1 Ω
Y1-6 (E) - Body ground
Y1-3 (TRN) - Body ground
Always
10 kΩ or higher
except Double Swing Out Type:
Disconnect the L3 rear combination light RH connector.
Measure the resistance according to the value(s) in the table below.
Standard Resistance:
Tester Connection
Condition
Specified Condition
L3-4 (TRN) - E19-2 (LR)
Always
Below 1 Ω
L3-3 (E) - Body ground
L3-4 (TRN) - Body ground
Always
10 kΩ or higher
NG
REPAIR OR REPLACE HARNESS OR CONNECTOR
OK
PROCEED TO NEXT SUSPECTED AREA SHOWN IN PROBLEM SYMPTOMS TABLE (Click here )