INSTALLATION
Removal / installation · Vehicles built from Jan 2012
| 1. INSTALL OIL COOLER SPACER |

Apply a light coat of engine oil to a new gasket.
Install the gasket to the oil cooler spacer.
Install the oil cooler spacer to the oil filter bracket with the bolt.
- Torque:
- 10 N*m{ 102 kgf*cm , 7 ft.*lbf }
| 2. INSTALL OIL COOLER ASSEMBLY |
Apply a light coat of engine oil to 2 new O-rings.
Install the 2 O-rings to the oil cooler.
Install the oil cooler with the 5 nuts.
- Torque:
- 21 N*m{ 214 kgf*cm , 15 ft.*lbf }
| 3. INSTALL OIL FILTER BRACKET |
Apply a light coat of engine oil to 2 new O-rings.
Install the 2 O-rings to the timing chain cover.
Install the oil filter bracket with the 2 nuts and 2 bolts.
- Torque:
- 35 N*m{ 357 kgf*cm , 26 ft.*lbf }
| 4. INSTALL NO. 1 OIL COOLER BRACKET |
Connect the ground wire to the cylinder block.
Install the oil cooler bracket with the 2 nuts.
- Torque:
- 21 N*m{ 214 kgf*cm , 15 ft.*lbf }
| 5. INSTALL NO. 2 WATER BY-PASS PIPE SUB-ASSEMBLY |
Connect the 4 hoses.
Install the water by-pass pipe with the 2 bolts.
- Torque:
- 10 N*m{ 102 kgf*cm , 7 ft.*lbf }
| 6. INSTALL OIL PRESSURE SENDER GAUGE ASSEMBLY |
Apply adhesive to 2 or 3 threads of the oil pressure sender gauge.
- Adhesive:
- Toyota Genuine Adhesive 1344, Three Bond 1344 or equivalent
- NOTICE:
-
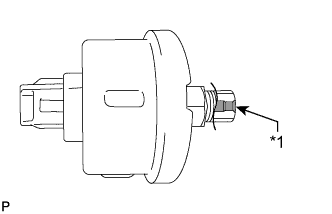

- Do not apply adhesive to the oil inlet port of the oil pressure sender gauge.
Text in Illustration *1
Oil Inlet Port
Install the oil pressure sender gauge.
- Torque:
- 15 N*m{ 153 kgf*cm , 11 ft.*lbf }
- NOTICE:
- Do not start the engine within 1 hour after installation.
Connect the oil pressure sender gauge connector.
| 7. INSTALL OIL FILTER ELEMENT |
Clean the inside of the oil filter cap, threads and O-ring groove.
Apply a light coat of engine oil to a new O-ring for the cap, and then install the O-ring to the groove of the oil filter cap.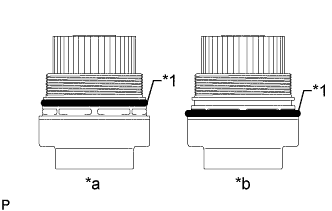
Text in Illustration *1
O-Ring
*a
CORRECT
*b
INCORRECT
- NOTICE:
- Be sure to install the O-ring in the proper location, otherwise oil may leak.
- Do not twist the O-ring.
- Be sure to install the O-ring in the proper location, otherwise oil may leak.
Set a new oil filter element to the oil filter cap.
Remove any dirt or foreign matter from the installation surface of the engine.
Apply a small amount of engine oil to the O-ring again and temporarily install the oil filter cap.
- NOTICE:
- Do not remove the oil filter bracket clip.
- Do not pinch the O-ring for the cap.
- Do not remove the oil filter bracket clip.
Using SST, tighten the oil filter cap.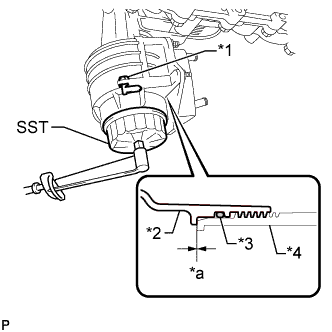
- SST
- 09228-06501
- Torque:
- 25 N*m{ 255 kgf*cm , 18 ft.*lbf }
Text in Illustration *1
Oil Filter Bracket Clip
*2
Oil Filter Cap
*3
O-Ring
*4
Oil Filter Bracket
*a
No Gap
- NOTICE:
- When tightening the oil filter cap, do not remove the oil filter bracket clip.
- After tightening the oil filter cap, make sure that there is no gap and that the O-ring is not protruding.
- When tightening the oil filter cap, do not remove the oil filter bracket clip.
Apply a small amount of engine oil to a new drain plug O-ring, and install it to the oil filter cap.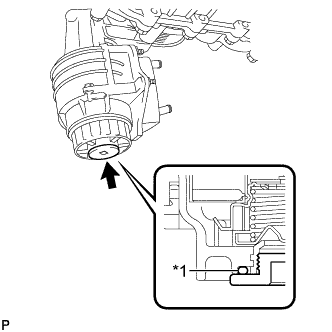
Text in Illustration *1
O-Ring
- NOTICE:
- Before installing the O-ring, remove any dirt or foreign matter from the installation surface of the oil filter cap.
Install the oil filter drain plug.
- Torque:
- 13 N*m{ 127 kgf*cm , 9 ft.*lbf }
- NOTICE:
- Be careful that the O-ring does not get caught between any surrounding parts.
| 8. CONNECT COOLER COMPRESSOR ASSEMBLY |
Install the cooler compressor with the stud bolt.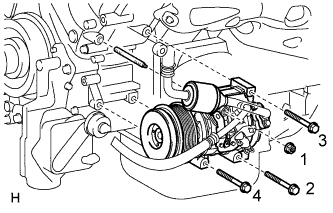
- Torque:
- 10 N*m{ 102 kgf*cm , 7 ft.*lbf }
Install the 3 bolts and nut.
- Torque:
- 25 N*m{ 250 kgf*cm , 18 ft.*lbf }
- NOTICE:
- Tighten the bolts and nut in the order shown in the illustration to install the cooler compressor.
| 9. INSTALL RADIATOR ASSEMBLY |
| 10. ADD ENGINE OIL |
Add fresh oil and install the oil filler cap.
- Standard Oil Grade:
Oil Grade
Oil Viscosity (SAE)
API grade SL "energy-conserving", SM "energy-conserving", SN "resource-conserving" or ILSAC multigrade engine oil
0W-20
5W-20
5W-30
10W-30
API grade SL, SM or SN multigrade engine oil
15W-40
20W-50
- Standard Oil Capacity:
Item
Specified Condition
Drain and refill without oil filter change
7.1 liters (7.5 US qts, 6.2 Imp. qts)
Drain and refill with oil filter change
7.5 liters (7.9 US qts, 6.6 Imp. qts)
Dry fill
9.3 liters (9.8 US qts, 8.2 Imp. qts)
| 11. INSPECT ENGINE OIL LEVEL |
Warm up the engine. Then stop the engine and wait for 5 minutes.
Check that the engine oil level is between the low level and full level marks on the dipstick.
If low, check for leakage and add oil up to the full level mark.- NOTICE:
- Do not fill engine oil above the full level mark.
| 12. INSPECT FOR OIL LEAK |
Start the engine. Make sure that there are no oil leaks from the area that was worked on.