DISASSEMBLY
Removal / installation · Vehicles built from Sep 2011
| 1. INSPECT RUNOUT OF REAR DRIVE PINION COMPANION FLANGE |

Using a dial indicator, measure the runout of the companion flange vertically and laterally.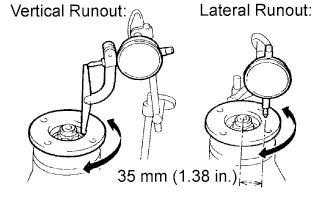

- Maximum Runout:
Runout
Specified Condition
Vertical runout
0.10 mm (0.00394 in.)
Lateral runout
0.10 mm (0.00394 in.)
| 2. INSPECT RUNOUT OF DIFFERENTIAL RING GEAR |
Using a dial indicator, measure the ring gear runout.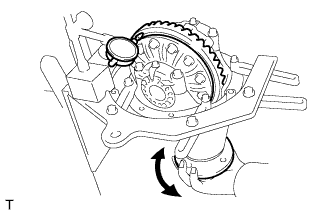
- Maximum runout:
- 0.05 mm (0.00197 in.)
| 3. INSPECT DIFFERENTIAL RING GEAR BACKLASH |
Using a dial indicator, measure the ring gear backlash.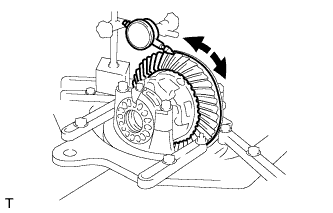
- Standard backlash:
- 0.10 to 0.20 mm (0.00394 to 0.00787 in.)
- HINT:
- Measure at 3 or more positions around the circumference of the ring gear.
| 4. REMOVE DRIVE PINION COMPANION FLANGE REAR NUT |
Using SST and a hammer, unstake the nut.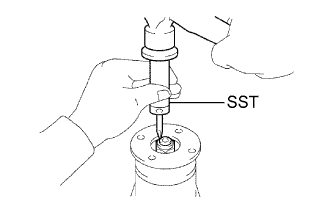
- SST
- 09930-00010
Using SST to hold the flange, remove the nut.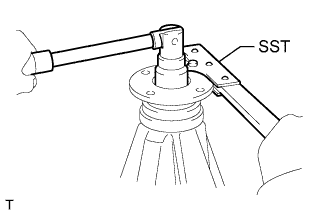
- SST
- 09330-00021
(09330-00030)
| 5. REMOVE REAR DRIVE PINION REAR COMPANION FLANGE SUB-ASSEMBLY |
Using SST, remove the companion flange.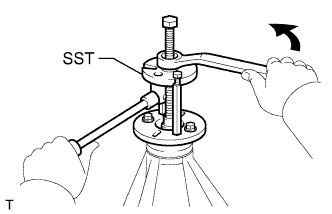
- SST
- 09950-30012
(09951-03010, 09953-03010, 09954-03010, 09955-03030, 09956-03040)
| 6. REMOVE REAR DIFFERENTIAL CARRIER OIL SEAL |
Using SST, remove the oil seal from the differential carrier.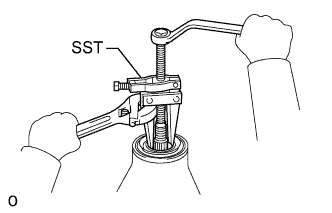
- SST
- 09308-10010
| 7. REMOVE REAR DIFFERENTIAL DRIVE PINION OIL SLINGER |
| 8. REMOVE REAR DRIVE PINION FRONT TAPERED ROLLER BEARING |
Using SST, remove the front bearing (inner race) from the drive pinion.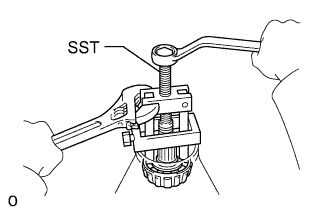
- SST
- 09556-22010
| 9. REMOVE REAR DIFFERENTIAL BEARING ADJUSTING NUT LOCK |
Remove the 2 bolts and 2 adjusting nut locks.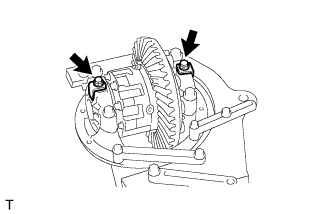
| 10. REMOVE DIFFERENTIAL CASE ASSEMBLY |
Place matchmarks on the bearing caps and differential carrier.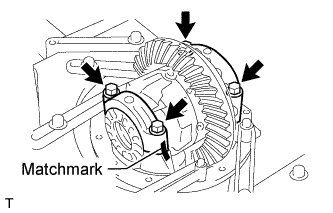
Remove the 4 bolts, 2 bearing caps, 2 adjusting nuts and 2 bearings (outer race).
Remove the differential case from the differential carrier.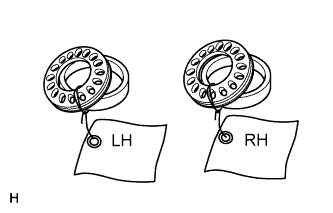
- HINT:
- Tag the 2 case bearing outer races to show the location for reassembly.
| 11. REMOVE DIFFERENTIAL DRIVE PINION |
Remove the differential drive pinion from the differential carrier.
| 12. REMOVE REAR DIFFERENTIAL DRIVE PINION BEARING SPACER |
| 13. REMOVE REAR DRIVE PINION REAR TAPERED ROLLER BEARING |
Using SST and a press, press out the bearing (inner race).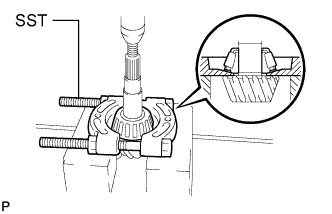
- SST
- 09950-00020
| 14. REMOVE REAR DIFFERENTIAL DRIVE PINION PLATE WASHER |
| 15. REMOVE REAR DRIVE PINION FRONT TAPERED ROLLER BEARING |
Using a brass bar and hammer, tap out the bearing (outer race).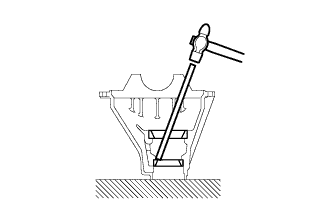
| 16. REMOVE REAR DRIVE PINION REAR TAPERED ROLLER BEARING |
Using a brass bar and hammer, tap out the bearing (outer race).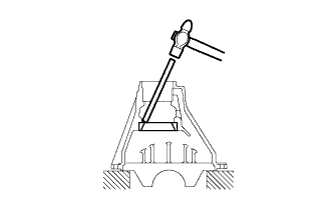
| 17. REMOVE DIFFERENTIAL RING GEAR |
Place matchmarks on the ring gear and differential case.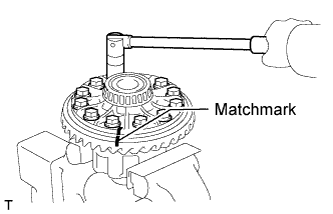
Remove the 12 ring gear set bolts.
Using a plastic-faced hammer, tap on the ring gear to separate it from the differential case.
| 18. INSPECT RUNOUT OF DIFFERENTIAL CASE |
- HINT:
- If the ring gear runout is at the maximum or less (refer to the "Inspect Runout of Differential Ring Gear" procedure), this inspection is not necessary.
Install the differential case to the differential carrier.
Using a dial indicator, measure the differential case runout.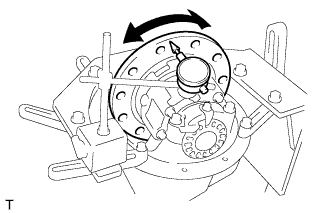
- Maximum runout:
- 0.04 mm (0.00157 in.)
Remove the differential case from the differential carrier.
| 19. REMOVE REAR DIFFERENTIAL CASE BEARING |
Using SST, remove the 2 side bearings (inner race) from the differential case.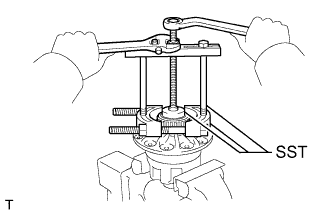
- SST
- 09950-00020
09950-00030
09950-40011 (09957-04010)
09950-60010 (09951-00480)
| 20. DISASSEMBLE DIFFERENTIAL CASE |
Place matchmarks on the differential case LH and RH.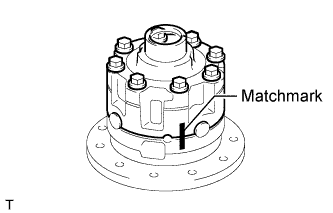
Remove the 8 bolts uniformly, a little at a time.
Using a plastic-faced hammer, separate the differential case LH and RH.
Remove the 2 side gears, 6 side gear thrust washers, 4 clutch plates, 2 spring retainers, compression spring, 4 pinion gears, 4 pinion gear thrust washers and spider from the differential case.
- HINT:
- Keep the disassembled parts in order.
- If the side gear backlash has been adjusted by a TOYOTA dealer, adjusting shims are installed between the side gear thrust washer and the differential case.
- Keep the disassembled parts in order.
| 21. INSPECT REAR DIFFERENTIAL SIDE GEAR THRUST WASHER |
- HINT:
- If replacing the thrust washer, also replace the clutch plate that contacts it.
Using a micrometer, check that the thickness of the thrust washer is even.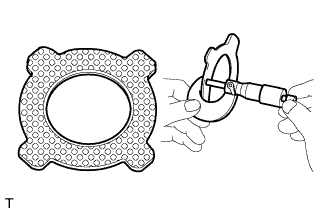
- Thickness (Reference):
- 1.97 to 2.06 mm (0.0776 to 0.0811 in.)
Visually check the thrust washer.
If bare metal is showing, replace the thrust washer.
| 22. INSPECT CLUTCH PLATE |
Using a micrometer, check that the thickness of the clutch plate is even.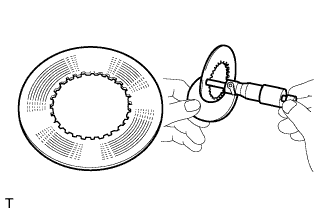
- Thickness (Reference):
- 1.97 to 2.03 mm (0.0776 to 0.0799 in.)
| 23. INSPECT COMPRESSION SPRING |
Using vernier caliper, measure the free length of the spring.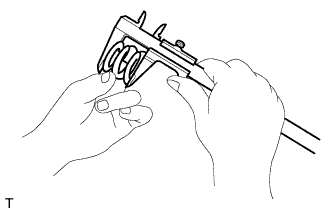
- Length (Reference):
- 32.8 mm (1.29134 in.)