INSTALLATION
Removal / installation · Vehicles built Sep 2011 – Dec 2011
Versions by build date: Sep 2011 – Dec 2011 from Jan 2012
| 1.
INSTALL REAR CRANKSHAFT OIL SEAL |
 |
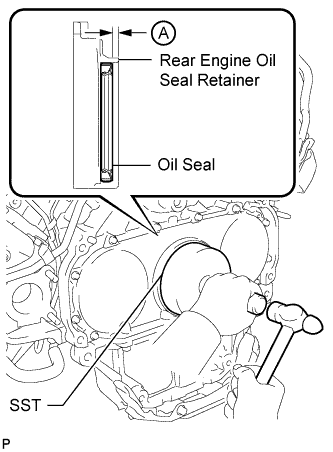
- Using SST and a hammer, tap in a new oil seal as shown in the illustration.
- SST
- 09223-56010
- Standard depth A:
- 2.7 to 3.7 mm (0.106 to 0.147 in.)
- NOTICE:
- Keep the lip free from foreign matter.
- Do not tap on the seal at an angle.
- Make sure that the lip of the oil seal is properly installed.
| 2.
INSTALL DRIVE PLATE AND RING GEAR SUB-ASSEMBLY (for Automatic Transmission)
|
|
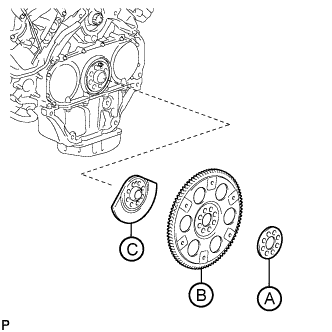
- Install the rear crankshaft balancer weight labeled C, ring gear labeled B and rear drive plate spacer labeled A with 8 new bolts.
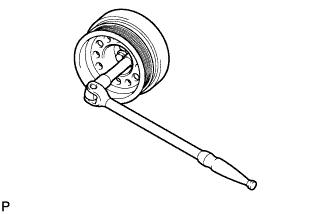
- Using a wrench, hold the crankshaft.
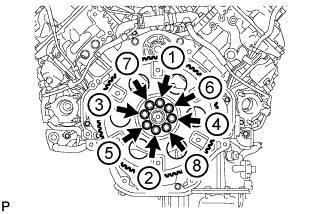
- Uniformly install and tighten the 8 bolts in the sequence shown in the illustration.
-
Torque:
- 182 N*m{
1856 kgf*cm
, 134 ft.*lbf
}
| 3.
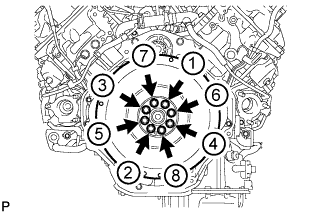
INSTALL FLYWHEEL SUB-ASSEMBLY (for Manual Transmission)
|
|
- Temporarily install the flywheel with 8 new bolts.
- NOTICE:
- Align the crankshaft knock pin and flywheel knock pin hole.
- Do not strike or damage the flywheel installation bolts. Be sure to handle them carefully.
- Make sure there is no oil on the bolts.
- Using a wrench, hold the crankshaft.
Uniformly install and tighten the 8 bolts in the sequence shown in the illustration.
-
Torque:
- 182 N*m{
1856 kgf*cm
, 134 ft.*lbf
}
| 4.
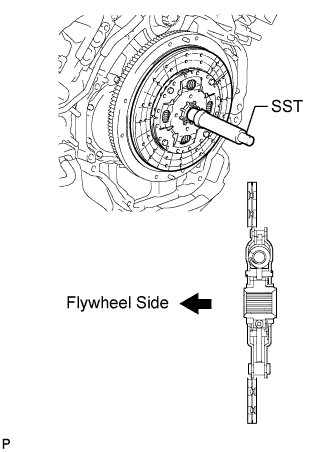
INSTALL CLUTCH DISC ASSEMBLY (for Manual Transmission)
|
|
Insert SST into the clutch disc, then insert the clutch disc into the flywheel.
- SST
- 09301-00120
- NOTICE:
- Take care not to insert the clutch disc in the wrong direction.
| 5.
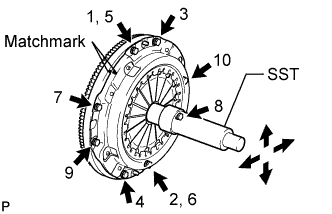
INSTALL CLUTCH COVER ASSEMBLY (for Manual Transmission)
|
|
Align the matchmark on the clutch cover with the one on the flywheel.
In the order shown in the illustration, temporarily install the 8 bolts starting from the bolt located near the knock pin on the top.
Check that the disc is in the center by lightly moving SST up and down, and left and right.
- SST
- 09301-00120
Evenly tighten the bolts by following the order shown in the illustration.
-
Torque:
- 39 N*m{
400 kgf*cm
, 29 ft.*lbf
}
| 6.
INSTALL AUTOMATIC TRANSMISSION ASSEMBLY |
|
Install the automatic transmission assembly (Click here).
| 7.
INSTALL MANUAL TRANSMISSION UNIT ASSEMBLY |
|
Install the manual transmission unit assembly (Click here).
| 8.
CONNECT CABLE TO NEGATIVE BATTERY TERMINAL |
|
- NOTICE:
- When disconnecting the cable, some systems need to be initialized after the cable is reconnected (Click here).
Connect the cables to the negative (-) main battery and sub-battery terminals.