REASSEMBLY
Removal / installation · Vehicles built Sep 2011 – Dec 2011
Versions by build date: Sep 2011 – Dec 2011 from Jan 2012
- NOTICE:
- Before performing these installation procedures, sufficiently clean and remove any foreign matter from the cylinder block, cylinder head, crankshaft, connecting rod, camshaft and other parts.
- When replacing an injector (including interchanging injectors between cylinders), common rail, cylinder head, or intake manifold, replace the corresponding injection pipes with a new one.
- Before performing these installation procedures, sufficiently clean and remove any foreign matter from the cylinder block, cylinder head, crankshaft, connecting rod, camshaft and other parts.
| 1. SELECT NO. 2 CYLINDER HEAD GASKET |

Set the 2 crankshaft pulley set bolts to the crankshaft.
Clean the cylinder block with solvent.
Inspect the protrusion for each cylinder.
Set the piston of the cylinder to be measured to slightly before TDC.
Place a dial indicator on the cylinder block, and set the measuring tip as shown in the illustration.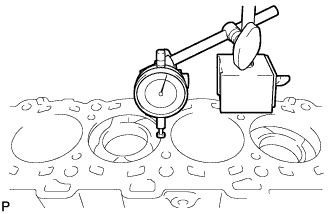

- NOTICE:
- Make sure that the dial indicator is at a right angle to the cylinder block top surface.
Set the dial indicator at 0 mm (0 in.).
- HINT:
- Make sure that the measuring tip is flat against the cylinder block surface and piston head when taking the measurements.
Find where the piston head protrudes most by slowly turning the crankshaft clockwise and counterclockwise.
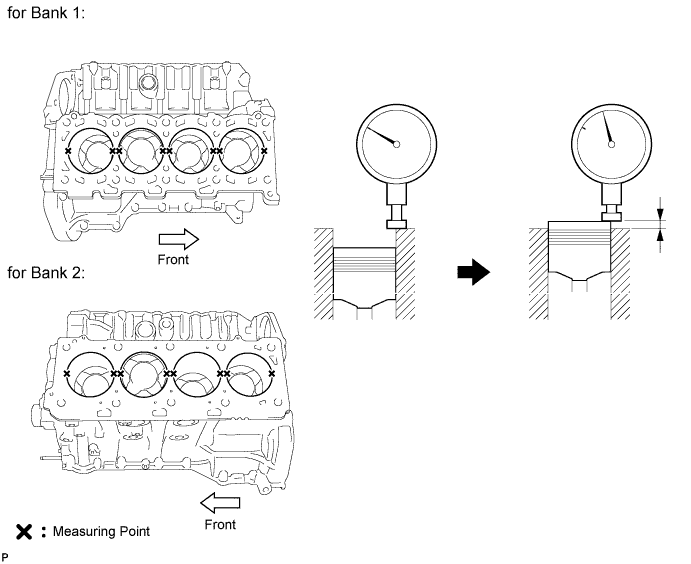
Measure the piston protrusion value of each cylinder at 2 places as shown in the illustration below, making a total of 8 measurements.
- Standard piston protrusion:
- 0.520 to 0.780 mm (0.0205 to 0.0307 in.)
Select a new cylinder head gasket.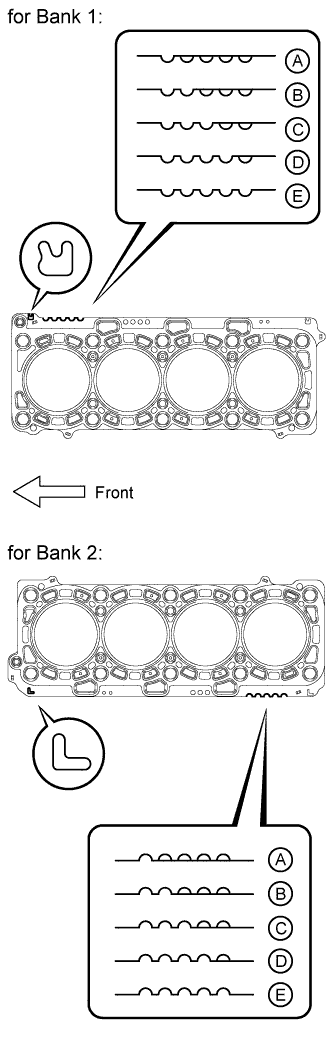
- HINT:
- Cylinder head gaskets are marked A, B, C, D or E accordingly.
- New Installed Cylinder Head Gasket Thickness:
Item
Cutout
Specified Condition*
A
1
1.20 to 1.30 mm (0.0472 to 0.0512 in.)
B
2
1.25 to 1.35 mm (0.0492 to 0.0394 in.)
C
3
1.30 to 1.40 mm (0.0512 to 0.0551 in.)
D
4
1.35 to 1.45 mm (0.0531 to 0.0571 in.)
E
5
1.40 to 1.50 mm (0.0551 to 0.0591 in.)
- HINT:
- *: The specified condition indicates the thickness of the gasket after tightening the cylinder head.
Select the largest piston protrusion value from the measurements and then select a new appropriate gasket according to the table below.
- Standard Piston Protrusion:
Item
Specified Condition
A
0.520 to 0.575 mm (0.0205 to 0.0226 in.)
B
0.575 to 0.625 mm (0.0226 to 0.0246 in.)
C
0.625 to 0.675 mm (0.0246 to 0.0266 in.)
D
0.675 to 0.725 mm (0.0266 to 0.0285 in.)
E
0.725 to 0.780 mm (0.0285 to 0.0307 in.)
| 2. INSTALL NO. 2 CYLINDER HEAD GASKET |
Remove any oil from the contact surface.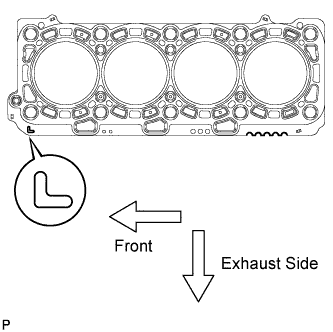
Place the cylinder head gasket on the cylinder block surface with the front face of the indicated mark "L" upward and facing the exhaust side.
| 3. INSTALL CYLINDER HEAD SUB-ASSEMBLY LH |
Place the cylinder head on the cylinder head gasket.
- NOTICE:
- Ensure that no oil is on the mounting surface of the cylinder head.
Inspect the cylinder head bolts (Click here).
Apply a light coat of engine oil to the threads and under the heads of the cylinder head bolts.
Step 1:
Install and uniformly tighten the 10 cylinder head bolts with the spacers in several steps, in the sequence shown in the illustration.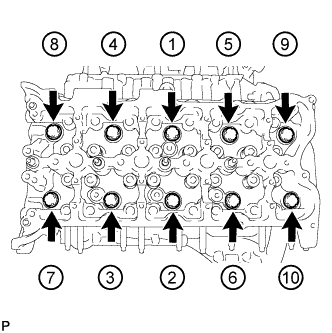
- Torque:
- 80 N*m{ 816 kgf*cm , 59 ft.*lbf }
- HINT:
- The cylinder head bolts are tightened in 4 progressive steps.
- If a cylinder head bolt is broken or deformed, replace it.
- The cylinder head bolts are tightened in 4 progressive steps.
Step 2: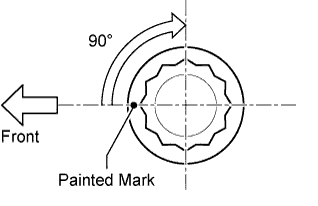
Mark the cylinder head bolt heads with paint as shown in the illustration.
Tighten the cylinder head bolts 90° in the sequence shown in step 1.
Step 3: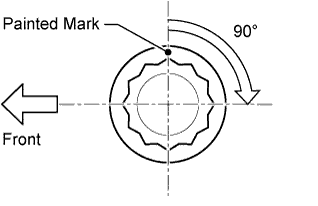
Tighten the cylinder head bolts another 90° in the sequence shown in step 1.
Step 4: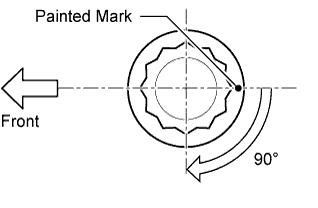
Tighten the cylinder head bolts by an additional 90° in the sequence shown in step 1.
Check that the painted marks are now facing the exhaust port side.
| 4. INSTALL NO. 2 VALVE LASH ADJUSTER ASSEMBLY |
- NOTICE:
- Be sure to inspect the valve lash adjuster before installing it (Click here).
Install the 16 No. 2 valve lash adjusters to the cylinder head.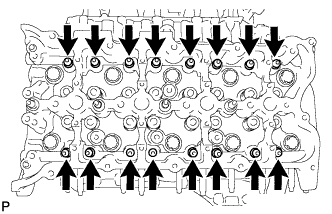
- HINT:
- Install the lash adjuster at the same place it was removed from.
| 5. INSTALL NO. 2 VALVE ROCKER ARM |
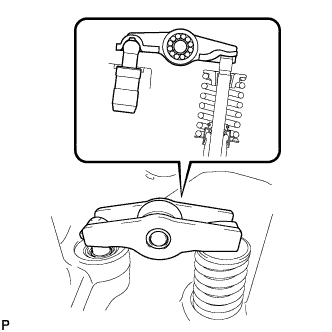
Apply engine oil to the lash adjuster tips and valve stem ends.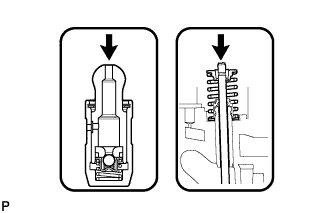
Install the 16 No. 2 valve rocker arms as shown in the illustration.
- HINT:
-
- Install the valve rocker arm at the same place it was removed from.
| 6. INSTALL NO. 5 CAMSHAFT BEARING CAP |
Align the camshaft bearing cap and the ring pins of the cylinder head, and install the cap.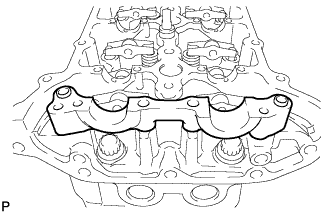
| 7. SELECT NO. 1 CYLINDER HEAD GASKET |
Set the 2 crankshaft pulley set bolts to the crankshaft.
Clean the cylinder block with solvent.
Inspect the protrusion for each cylinder.
Set the piston of the cylinder to be measured to slightly before TDC.
Place a dial indicator on the cylinder block, and set the measuring tip as shown in the illustration.
- NOTICE:
- Make sure that the dial indicator is at a right angle to the cylinder block top surface.
Set the dial indicator at 0 mm (0 in.).
- HINT:
- Make sure that the measuring tip is flat against the cylinder block surface and piston head when taking the measurements.
Find where the piston head protrudes most by slowly turning the crankshaft clockwise and counterclockwise.
Measure the piston protrusion value of each cylinder at 2 places as shown in the illustration below, making a total of 8 measurements.
- Standard piston protrusion:
- 0.520 to 0.780 mm (0.0205 to 0.0307 in.)
Select a new cylinder head gasket.
- HINT:
- Cylinder head gaskets are marked A, B, C, D or E accordingly.
- New Installed Cylinder Head Gasket Thickness:
Item
Cutout
Specified Condition*
A
1
1.20 to 1.30 mm (0.0472 to 0.0512 in.)
B
2
1.25 to 1.35 mm (0.0492 to 0.0394 in.)
C
3
1.30 to 1.40 mm (0.0512 to 0.0551 in.)
D
4
1.35 to 1.45 mm (0.0531 to 0.0571 in.)
E
5
1.40 to 1.50 mm (0.0551 to 0.0591 in.)
- HINT:
- *: The specified condition indicates the thickness of the gasket after tightening the cylinder head.
Select the largest piston protrusion value from the measurements and then select a new appropriate gasket according to the table below.
- Standard Piston Protrusion:
Item
Specified Condition
A
0.520 to 0.575 mm (0.0205 to 0.0226 in.)
B
0.575 to 0.625 mm (0.0226 to 0.0246 in.)
C
0.625 to 0.675 mm (0.0246 to 0.0266 in.)
D
0.675 to 0.725 mm (0.0266 to 0.0285 in.)
E
0.725 to 0.780 mm (0.0285 to 0.0307 in.)
| 8. INSTALL NO. 1 CYLINDER HEAD GASKET |
Remove any oil from the contact surface.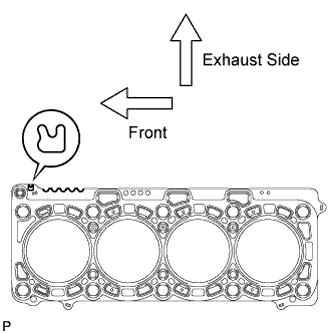
Place the cylinder head gasket on the cylinder block surface with the front face of the indicated mark "R" upward and facing the exhaust side.
| 9. INSTALL CYLINDER HEAD SUB-ASSEMBLY RH |
Place the cylinder head on the cylinder head gasket.
- NOTICE:
- Ensure that no oil is on the mounting surface of the cylinder head.
Inspect the cylinder head bolts (Click here).
Apply a light coat of engine oil to the threads and under the heads of the cylinder head bolts.
Step 1:
Install and uniformly tighten the 10 cylinder head bolts with the spacers in several steps, in the sequence shown in the illustration.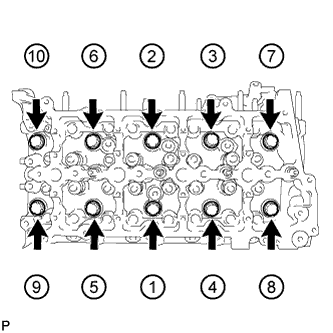
- Torque:
- 80 N*m{ 816 kgf*cm , 59 ft.*lbf }
- HINT:
- The cylinder head bolts are tightened in 4 progressive steps.
- If a cylinder head bolt is broken or deformed, replace it.
- The cylinder head bolts are tightened in 4 progressive steps.
Step 2:
Mark the cylinder head bolt heads with paint as shown in the illustration.
Tighten the cylinder head bolts 90° in the sequence shown in step 1.
Step 3:
Tighten the cylinder head bolts another 90° in the sequence shown in step 1.
Step 4:
Tighten the cylinder head bolts by an additional 90° in the sequence shown in step 1.
Check that the painted marks are now facing the intake port side.
| 10. INSTALL NO. 1 VALVE LASH ADJUSTER ASSEMBLY |
- NOTICE:
- Be sure to inspect the valve lash adjuster before installing it (Click here).
Install the 16 No. 1 valve lash adjusters to the cylinder head.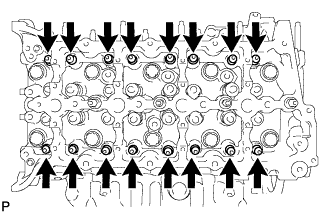
- HINT:
- Install the lash adjuster at the same place it was removed from.
| 11. INSTALL NO. 1 VALVE ROCKER ARM |
Apply engine oil to the lash adjuster tips and valve stem ends.
Install the 16 No. 1 valve rocker arms as shown in the illustration.
- HINT:
-
- Install the valve rocker arm at the same place it was removed from.
| 12. INSTALL NO. 2 CAMSHAFT BEARING CAP |
Align the camshaft bearing cap and the ring pins of the cylinder head, and install the cap.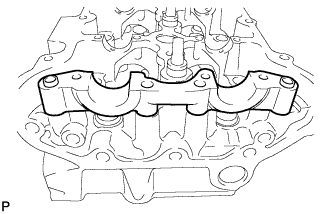
| 13. SET NO. 1 CYLINDER TO 45° BEFORE TDC |
Turn the crankshaft counterclockwise until the No. 1 cylinder is at a position 45° before TDC.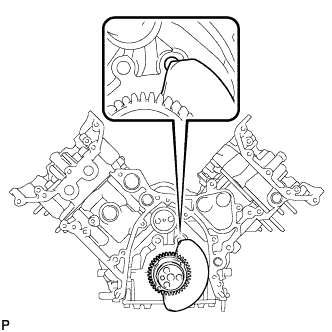
- NOTICE:
- Do not turn the crankshaft again until after the timing gear is installed.
- HINT:
- The No. 1 cylinder is at a position 45° before TDC if the crankshaft counterweight is overlapping the cylinder block hole as shown in the illustration.
| 14. INSTALL NO. 1 AND NO. 2 CAMSHAFTS |
Add more than 19 cc (1.16 cu. in.) of engine oil into the cylinder head side oil holes.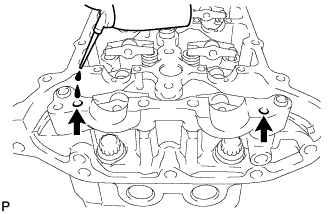
Apply engine oil to the rollers of the valve rocker arms and camshaft housing of the cylinder head.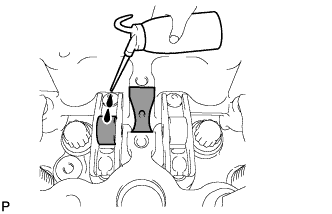
Install the camshafts.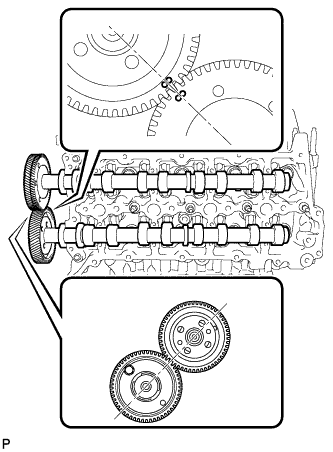
Apply engine oil to the camshaft journals, lobes, thrust portion and gears.
Align the timing marks (2 dot marks) on the back side of the No. 1 and No. 2 camshaft timing gears as shown in the illustration.
Place the camshafts into the cylinder head.
- NOTICE:
-
- Before and after setting the camshafts, firmly set the rocker arms to the lash adjusters.
Install the No. 1 camshaft bearing cap.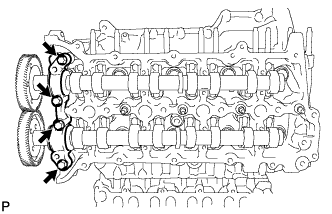
Align the No. 1 camshaft bearing cap and the ring pins of the No. 2 camshaft bearing cap.
Temporarily install the 4 bolts by hand.
Install the No. 3 camshaft bearing caps.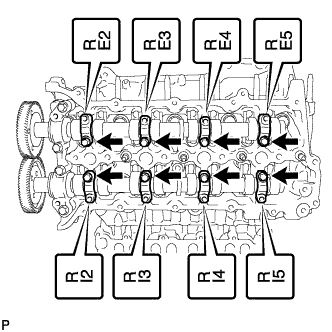
Confirm the marks and numbers on the camshaft bearing caps and place them in their proper position and direction.
Temporarily install the 8 bolts, which are not installed with the oil feed pipe, by hand.
Temporarily install the No. 1 and No. 2 camshaft oil feed pipes with the 8 bolts by hand.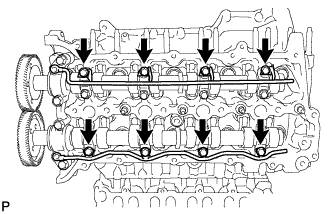
- NOTICE:
- If even one of the pipe bolt holes does not match its camshaft bearing cap bolt hole, replace the camshaft oil feed pipe.
- HINT:
- The pipe is bent on the intake side, and straight on the exhaust side.
Temporarily install the 2 union bolts by hand.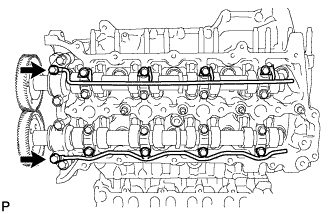
Uniformly tighten the 20 bolts in several steps in the order shown in the illustration.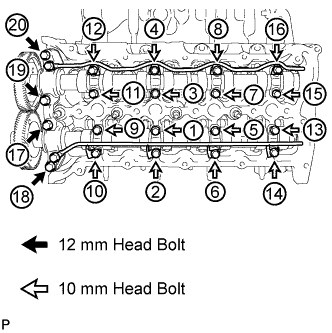
- Torque:
- for 12 mm head bolt of No. 1 camshaft bearing cap:
- 21 N*m{ 214 kgf*cm , 15 ft.*lbf }
- for 10 mm head bolt of No. 3 camshaft bearing cap:
- 10 N*m{ 102 kgf*cm , 7 ft.*lbf }
Tighten the 2 union bolts.
- Torque:
- 17 N*m{ 173 kgf*cm , 13 ft.*lbf }
Remove the service bolt from the No. 1 camshaft timing gear.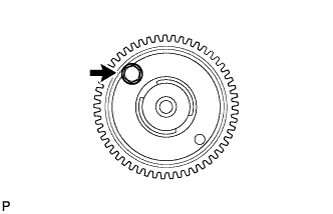
- NOTICE:
- Do not drop the bolt into the engine.
| 15. INSTALL NO. 3 AND NO. 4 CAMSHAFTS |
Add more than 19 cc (1.16 cu. in.) of engine oil into the cylinder head side oil holes.
Apply engine oil to the rollers of the valve rocker arms and camshaft housing of the cylinder head.
Install the camshafts.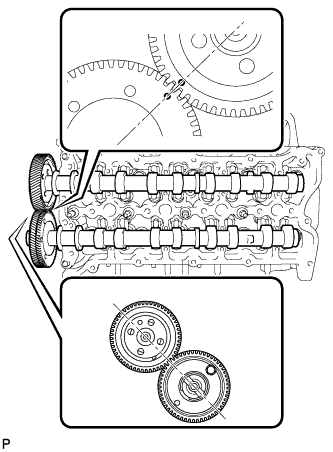
Apply engine oil to the camshaft journals, lobes, thrust portion and gears.
Align the timing marks (1 dot mark) on the back side of the No. 3 and No. 4 camshaft timing gears as shown in the illustration.
Place the camshafts into the cylinder head.
- NOTICE:
-
- Before and after setting the camshafts, firmly set the rocker arms to the lash adjusters.
Install the No. 4 camshaft bearing cap.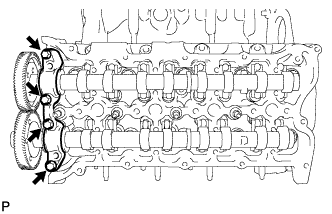
Align the No. 4 camshaft bearing cap and the ring pins of the No. 5 camshaft bearing cap.
Temporarily install the 4 bolts by hand.
Install the No. 3 camshaft bearing caps.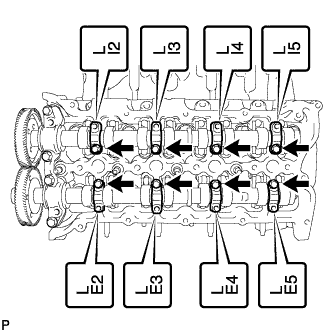
Confirm the marks and numbers on the camshaft bearing caps and place them in their proper position and direction.
Temporarily install the 8 bolts, which are not installed with the oil feed pipe, by hand.
Temporarily install the No. 3 and No. 4 camshaft oil feed pipes with the 8 bolts by hand.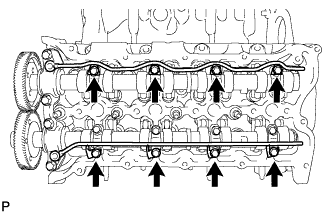
- NOTICE:
- If even one of the pipe bolt holes does not match its camshaft bearing cap bolt hole, replace the camshaft oil feed pipe.
- HINT:
- The pipe is bent on the intake side, and straight on the exhaust side.
Temporarily install the 2 union bolts by hand.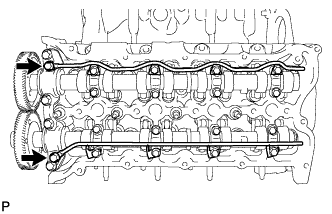
Uniformly tighten the 20 bolts in several steps in the order shown in the illustration.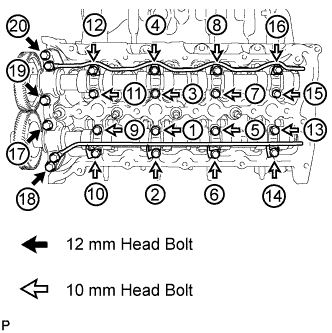
- Torque:
- for 12 mm head bolt of No. 4 camshaft bearing cap:
- 21 N*m{ 214 kgf*cm , 15 ft.*lbf }
- for 10 mm head bolt of No. 3 camshaft bearing cap:
- 10 N*m{ 102 kgf*cm , 7 ft.*lbf }
Tighten the 2 union bolts.
- Torque:
- 17 N*m{ 173 kgf*cm , 13 ft.*lbf }
Remove the service bolt from the No. 4 camshaft timing gear.
- NOTICE:
- Do not drop the bolt into the engine.
| 16. INSTALL NO. 2 TIMING GEAR CASE INSULATOR (w/ Intercooler) |
Install the No. 2 timing gear case insulator.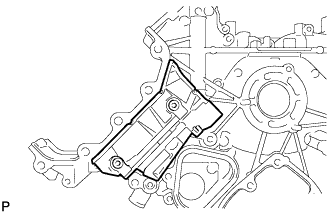
| 17. INSTALL NO. 2 VACUUM TRANSMITTING PIPE SUB-ASSEMBLY (w/ Intercooler) |
Install the No. 2 vacuum transmitting pipe with the 3 bolts.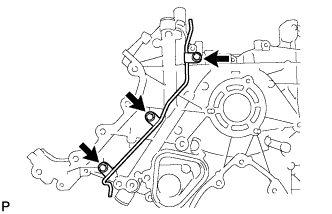
- Torque:
- 6.0 N*m{ 61 kgf*cm , 53 in.*lbf }
| 18. INSTALL NO. 1 VACUUM TRANSMITTING PIPE SUB-ASSEMBLY (w/ Intercooler) |
Install the No. 1 vacuum transmitting pipe with the 2 bolts.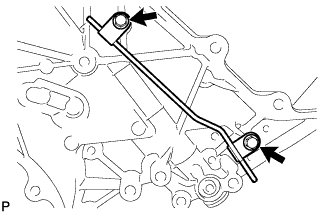
- Torque:
- 6.0 N*m{ 61 kgf*cm , 53 in.*lbf }
| 19. CONNECT NO. 3 VACUUM TRANSMITTING HOSE (w/ Intercooler) |
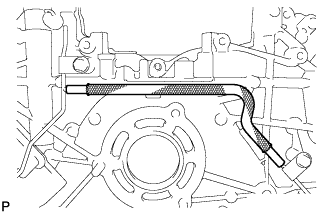 |
| 20. CONNECT NO. 2 VACUUM TRANSMITTING HOSE (w/ Intercooler) |
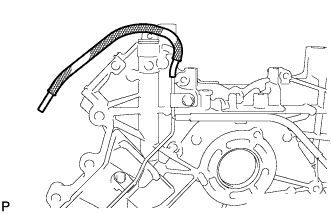 |
| 21. INSTALL TIMING GEAR CASE SUB-ASSEMBLY |
- NOTICE:
- When the contact surfaces shown below are wet, wipe them with an oil-free cloth before applying seal packing.
-
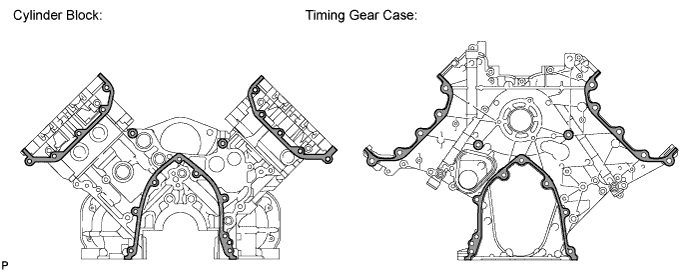
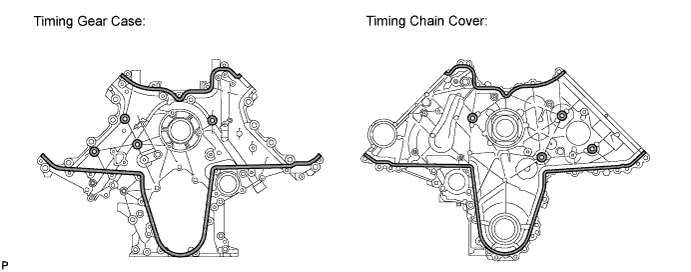
Apply seal packing to the timing gear case as shown in the following illustration.
- Standard seal diameter:
- 4 to 5 mm (0.157 to 0.197 in.)
- Seal packing:
- Toyota Genuine Seal Packing Black, Three Bond 1207B or equivalent
- NOTICE:
- After applying seal packing, align the timing gear case with the engine within 3 minutes and tighten the bolts and nuts within 15 minutes.
- Apply the seal packing in a continuous line.
- After applying seal packing, align the timing gear case with the engine within 3 minutes and tighten the bolts and nuts within 15 minutes.
- HINT:
- The FIPG line is shown below.
- Apply packing to the 5 seal surface areas.
- The FIPG line is shown below.
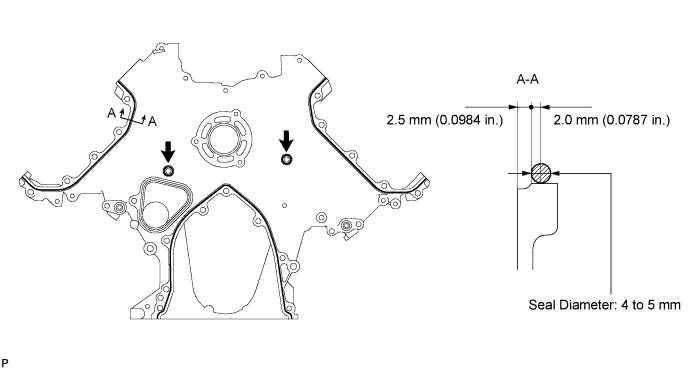
Install a new timing gear case gasket.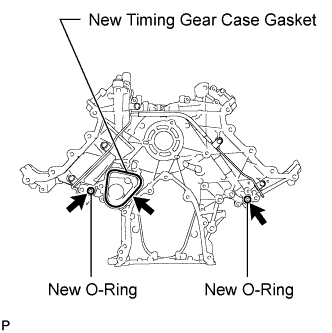
Apply engine oil to 2 new O-rings and install them to the timing gear case.
Install the timing gear case with the 22 bolts and 2 nuts.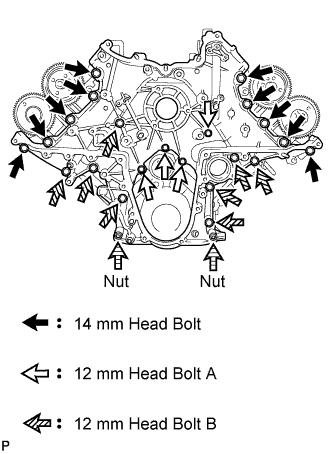
- Torque:
- for 14 mm head bolt (case is dry):
- 46 N*m{ 469 kgf*cm , 34 ft.*lbf }
- for 14 mm head bolt (case is wet):
- 42 N*m{ 428 kgf*cm , 31 ft.*lbf }
- for 12 mm head bolt A and B:
- 29 N*m{ 296 kgf*cm , 21 ft.*lbf }
- for nut:
- 29 N*m{ 296 kgf*cm , 21 ft.*lbf }
- NOTICE:
- The case is "dry" when there is absolutely no engine oil on the 14 mm head bolts and cylinder head bolt holes.
- The case is "wet" when there is engine oil on the 14 mm head bolts and cylinder head bolt holes.
- The case is "dry" when there is absolutely no engine oil on the 14 mm head bolts and cylinder head bolt holes.
Bolt Length Item
Quantity
Length
A
4
20 mm (0.787 in.)
B
8
45 mm (1.77 in.)
| 22. INSTALL V-BANK SILENCER |
Align the alignment areas of the V-bank silencer and cylinder block, and install the V-bank silencer.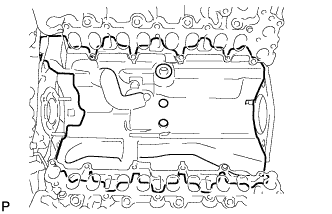
- NOTICE:
- Verify that the V-bank silencer is below the top surface of the intake port of the cylinder head RH and LH.
| 23. INSTALL FUEL SUPPLY PUMP ASSEMBLY |
Using an 8 mm x 1.25 pitch tap, remove the adhesive from the timing gear case side bolt hole.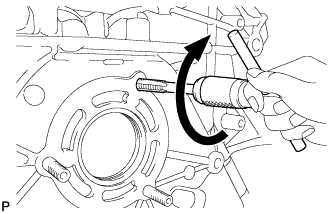
Apply adhesive to 2 or more threads of the timing gear case bolt hole.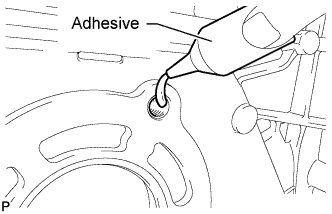
- Adhesive:
- Toyota Genuine Adhesive 1344, Three Bond 1344 or equivalent
Apply engine oil to a new O-ring and install it to the supply pump.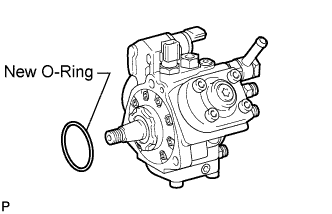
Install the supply pump to the timing gear case.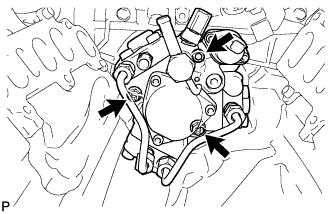
- NOTICE:
- When installing the supply pump, do not hold the fuel pipe to prevent fuel leaks.
Temporarily install the 2 nuts.
Using a 6 mm hexagon wrench, install the hexagon bolt, and then tighten the 2 nuts.
- Torque:
- 21 N*m{ 214 kgf*cm , 15 ft.*lbf }
| 24. INSTALL STRAIGHT PIN |
Install the straight pin.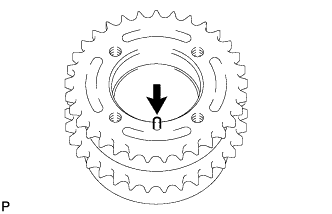
- Standard protrusion height:
- 4.5 to 7.0 mm (0.177 to 0.276 in.)
| 25. ASSEMBLE FUEL SUPPLY PUMP DRIVE GEAR AND FUEL SUPPLY PUMP SHAFT SPROCKET |
Align the fuel supply pump drive gear to the fuel supply pump shaft sprocket straight pin and temporarily install it with the 4 bolts.
Hold the fuel supply pump shaft sprocket in a vise between aluminum plates.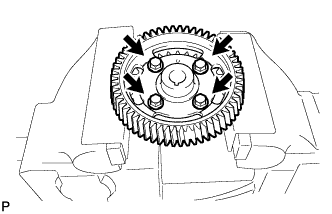
- NOTICE:
- Be careful not to damage the gears.
Tighten the 4 bolts.
- Torque:
- 25 N*m{ 250 kgf*cm , 18 ft.*lbf }
| 26. INSTALL RADIAL BALL BEARING |
Using SST and a press, press in the radial ball bearing to the fuel supply pump shaft sprocket.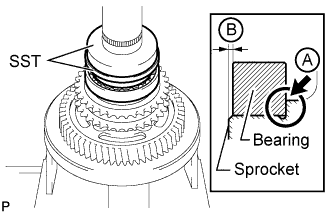
- SST
- 09316-12010
09950-60010 (09951-00580)
- NOTICE:
- Make sure to press in the bearing until the bearing contacts the fuel supply pump shaft sprocket, as shown in A in the illustration.
- Make sure the sprocket outer edge is further outward than the bearing outer edge, as shown in B in the illustration.
- Make sure to press in the bearing until the bearing contacts the fuel supply pump shaft sprocket, as shown in A in the illustration.
| 27. TEMPORARILY INSTALL FUEL SUPPLY PUMP DRIVE GEAR |
Align the cutout of the supply pump drive gear and key of the supply pump, and temporarily install the nut.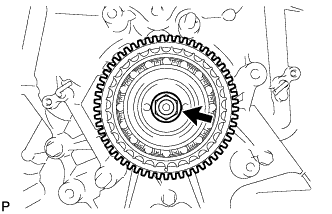
| 28. SET NO. 1 AND NO. 2 CAMSHAFTS TO TDC |
Using a wrench, turn the No. 1 camshaft and align the timing marks (1 dot mark) on the back side of the timing gears as shown in the illustration.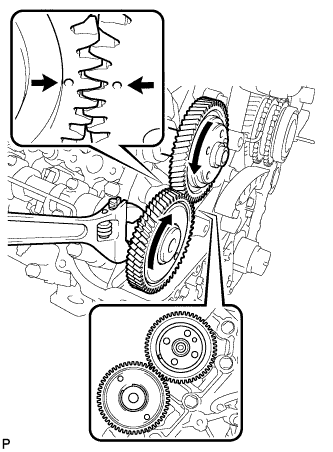
| 29. INSTALL NO. 1 IDLE GEAR SHAFT |
Apply engine oil to the contact surface of the idle gear shaft.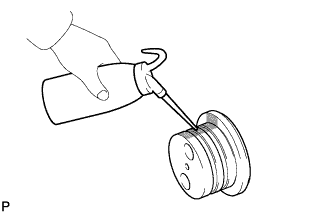
Install the idle gear shaft to the cylinder block.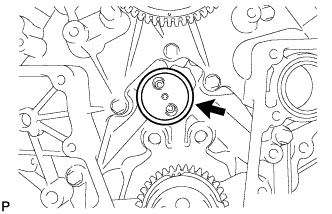
| 30. ASSEMBLE SUB GEAR, IDLE GEAR SPRING AND IDLE GEAR (w/ Intercooler) |
Hold the idle gear in a vise between aluminum plates.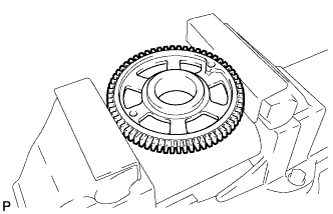
- NOTICE:
- Be careful not to damage the gears.
Align the right end of the idle gear spring to the notch of the idle gear and set it to the gear.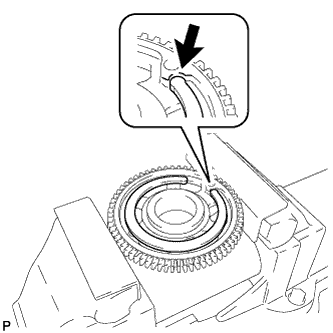
Install the sub idle gear.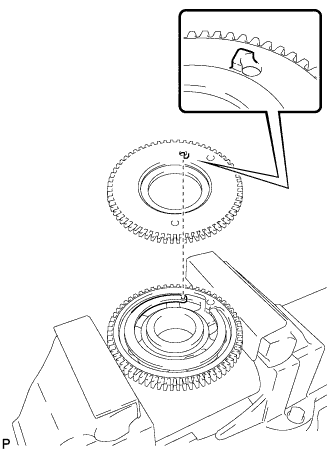
Align the notch of the sub idle gear protrusion with the left end of the idle gear spring and install the sub idle gear to the idle gear.
Using SST, turn the sub idle gear counterclockwise, and install an 8 mm x 1.25 pitch bolt with a length of 15 mm or more to the service hole.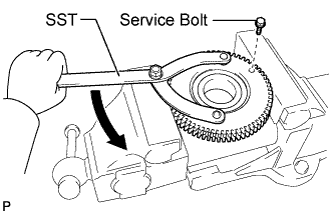
- SST
- 09960-10010
(09962-01000, 09963-00700)
- Torque:
- 13 N*m{ 133 kgf*cm , 10 ft.*lbf }
| 31. INSTALL IDLE GEAR ASSEMBLY |
Temporarily install the 2 crankshaft pulley set bolts to the crankshaft.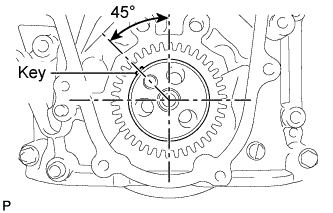
Using a bar, turn the crankshaft clockwise to the No. 1 cylinder TDC position.
Align the timing marks of the supply pump drive gear and idle gear, and the timing marks of the crankshaft timing gear and idle gear as shown in the illustration.
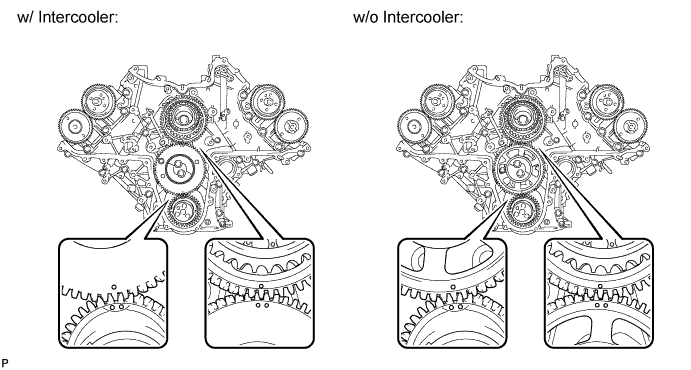
Apply engine oil to the idle gear thrust plate and gears.
Install the idle gear thrust plate with the 2 bolts.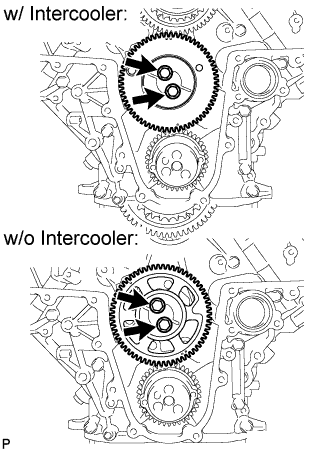
- Torque:
- 47 N*m{ 479 kgf*cm , 35 ft.*lbf }
w/ Intercooler: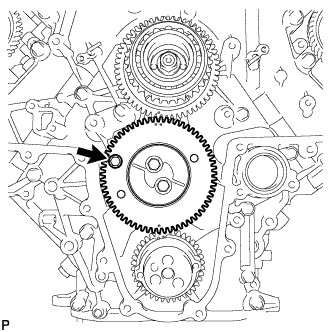
Remove the service bolt.
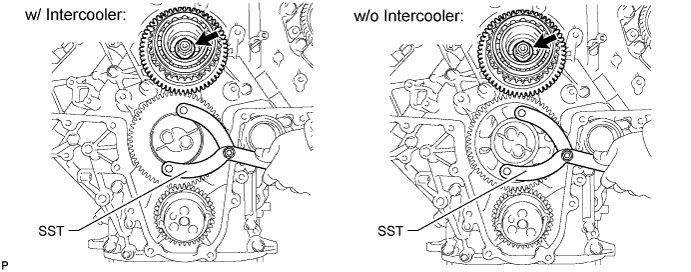
| 32. TIGHTEN FUEL SUPPLY PUMP DRIVE GEAR NUT |
Using SST, hold the idle gear and tighten the nut.
- SST
- 09960-10010
(09962-01000, 09963-00700)
- Torque:
- 68 N*m{ 693 kgf*cm , 50 ft.*lbf }
| 33. CHECK NO. 1 CYLINDER TO TDC/COMPRESSION |
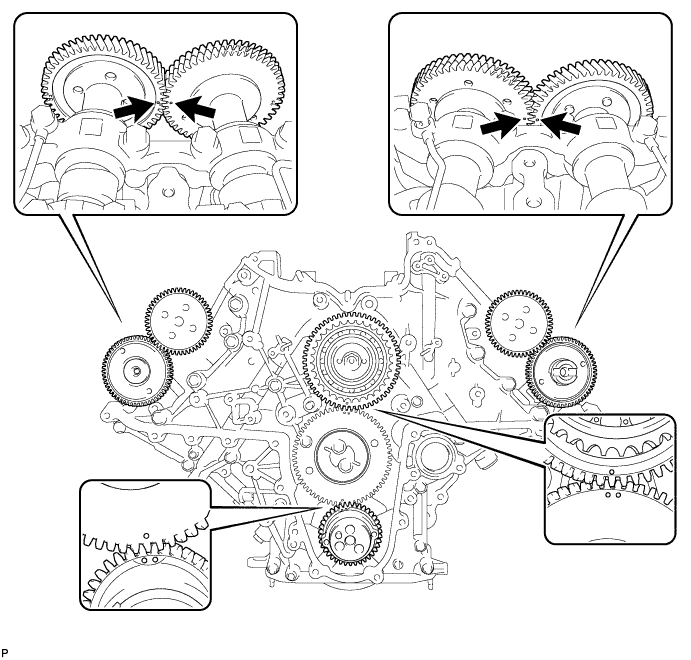
Check that the timing marks of the following pairs of parts are aligned: 1) supply pump drive gear and idle gear: 2) crankshaft timing gear and idle gear: 3) RH and LH camshaft timing gears.
| 34. INSTALL NO. 2 CAMSHAFT TIMING SPROCKET AND NO. 2 TIMING CHAIN |
Align the 2 mark plates (yellow) on the No. 2 timing chain with the timing mark (1 dot mark) of the No. 2 camshaft timing sprocket as shown in the illustration.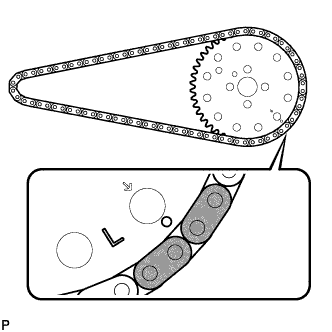
Align the No. 2 timing chain mark plate (yellow) with the supply pump drive gear timing mark, and temporarily install the No. 2 camshaft timing sprocket with the 4 bolts.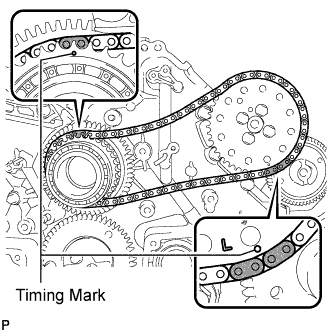
Using SST, hold the No. 2 camshaft timing sprocket, and tighten the 4 bolts.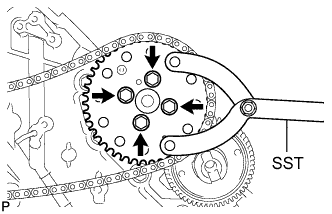
- SST
- 09960-10010
(09962-01000, 09963-01000)
- Torque:
- 25 N*m{ 250 kgf*cm , 18 ft.*lbf }
| 35. INSTALL NO. 1 CAMSHAFT TIMING SPROCKET AND NO. 1 TIMING CHAIN |
Align the 2 mark plates (yellow) on the No. 1 timing chain with the timing mark (1 dot mark) of the No. 1 camshaft timing sprocket as shown in the illustration.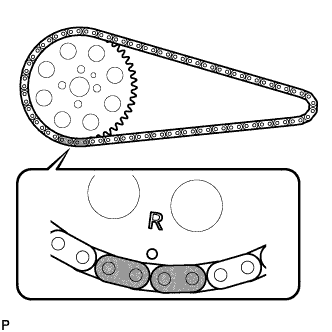
Align the No. 1 timing chain mark plate (yellow) with the supply pump drive gear timing mark, and temporarily install the No. 1 camshaft timing sprocket.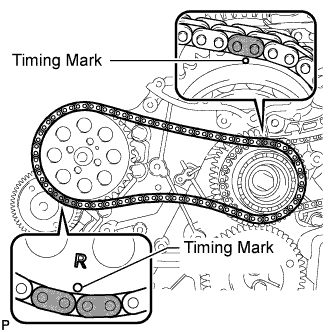
| 36. INSTALL PUMP DRIVE SHAFT GEAR |
Temporarily install the pump drive shaft gear with the 4 bolts.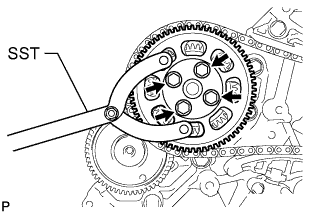
Using SST, hold the pump drive shaft gear and tighten the 4 bolts.
- SST
- 09960-10010
(09962-01000, 09963-01000)
- Torque:
- 25 N*m{ 250 kgf*cm , 18 ft.*lbf }
| 37. INSTALL NO. 2 CHAIN VIBRATION DAMPER |
Install the No. 2 chain vibration damper with the 2 bolts.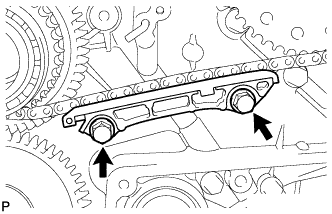
- Torque:
- 21 N*m{ 214 kgf*cm , 15 ft.*lbf }
| 38. INSTALL NO. 2 CHAIN TENSIONER SLIPPER |
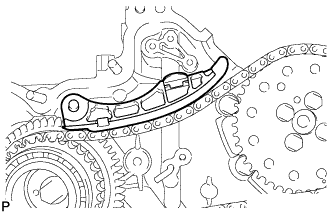 |
| 39. INSTALL NO. 2 CHAIN TENSIONER ASSEMBLY |
Move the stopper plate clockwise to release the lock, and push the plunger into the tensioner.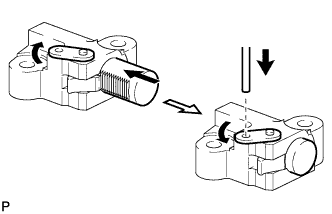
Move the stopper plate counterclockwise to set the lock, and insert a hexagon wrench into the stopper plate hole.
Install the No. 2 chain tensioner with the 2 bolts.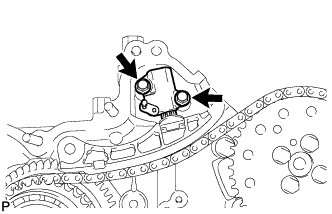
- Torque:
- 10 N*m{ 102 kgf*cm , 7 ft.*lbf }
Remove the hexagon wrench.
| 40. INSTALL NO. 1 CHAIN VIBRATION DAMPER |
Install the No. 1 chain vibration damper with the 2 bolts.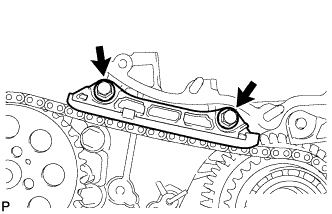
- Torque:
- 21 N*m{ 214 kgf*cm , 15 ft.*lbf }
| 41. INSTALL NO. 1 CHAIN TENSIONER SLIPPER |
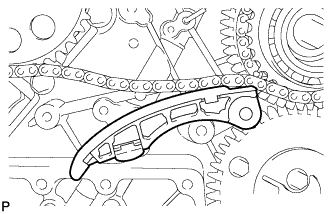 |
| 42. INSTALL NO. 1 CHAIN TENSIONER ASSEMBLY |
Move the stopper plate clockwise to release the lock, and push the plunger into the tensioner.
Move the stopper plate counterclockwise to set the lock, and insert a hexagon wrench into the stopper plate hole.
Install the No. 1 chain tensioner with the 2 bolts.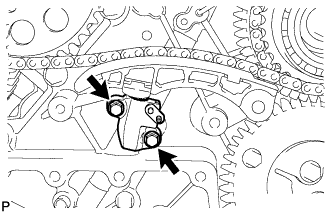
- Torque:
- 10 N*m{ 102 kgf*cm , 7 ft.*lbf }
Remove the hexagon wrench.
| 43. INSTALL NO. 1 CRANKSHAFT POSITION SENSOR PLATE |
Remove the adhesive from the threads of the 2 screws and the bolt holes of the crankshaft.
Apply adhesive to 2 or 3 threads of the 2 screws.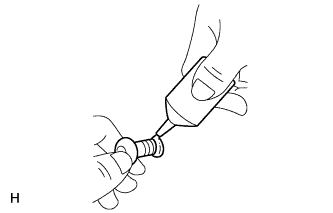
- Adhesive:
- Toyota Genuine Adhesive 1344, Three Bond 1344 or equivalent
Using a T30 "TORX" wrench, install the No. 1 crankshaft position sensor plate with the 2 screws.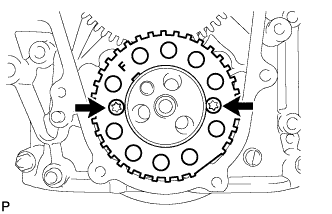
- Torque:
- 10 N*m{ 102 kgf*cm , 7 ft.*lbf }
- NOTICE:
- Make sure the "F" mark on the plate is facing towards the front side of the engine.
| 44. CHECK NO. 1 CYLINDER TO TDC/COMPRESSION |
Temporarily install the 2 crankshaft pulley set bolts to the crankshaft.
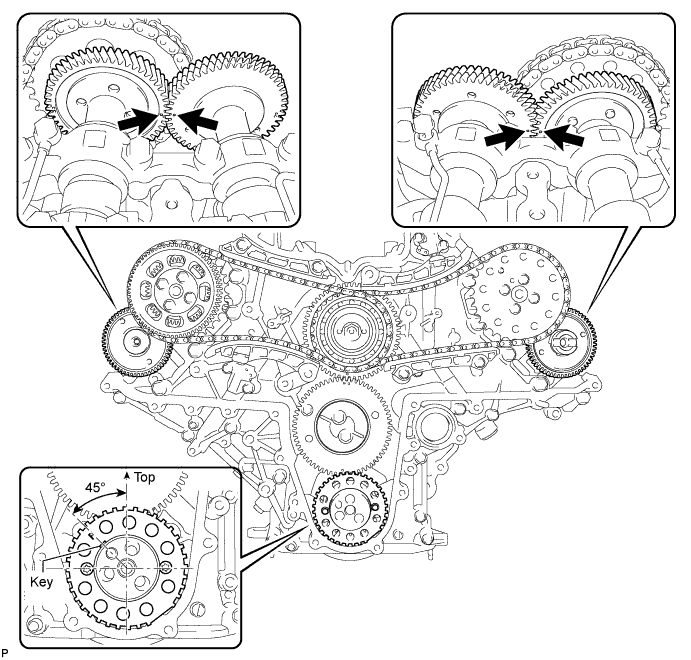
Rotate the crankshaft 2 revolutions or more so that the crankshaft key is 45° counterclockwise from the top. Check that the timing marks (1 dot mark each) of the RH and LH camshaft timing gears align. If not as specified, turn the crankshaft 1 revolution (360°) and align the timing marks. If the timing marks are deviated, reinstall the chain and camshaft.
| 45. INSTALL FRONT CRANKSHAFT OIL SEAL |
Place the timing chain cover on wooden blocks.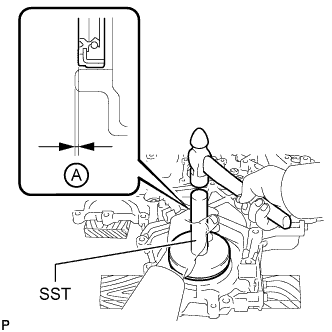
Using SST and a hammer, tap in a new oil seal as shown in the illustration.
- SST
- 09316-12010
09950-70010 (09951-07100)
09950-60020 (09951-00890)
- Standard depth A:
- 0.6 to 1.4 mm (0.0236 to 0.0551 in.)
| 46. INSTALL TIMING CHAIN COVER SUB-ASSEMBLY |
- NOTICE:
- When the contact surfaces shown below are wet, wipe them with an oil-free cloth before applying seal packing.
-
Install a new O-ring to the timing gear case.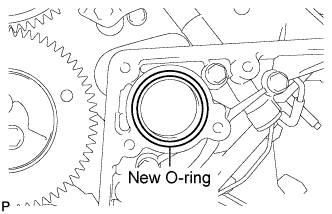
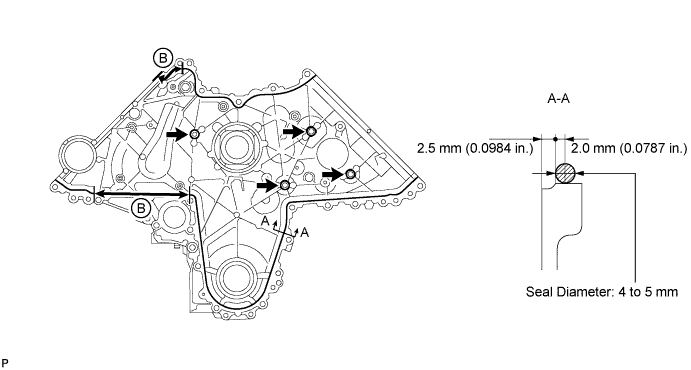
Apply seal packing to the timing chain cover as shown in the following illustration.
- Standard seal diameter:
- 4 to 5 mm (0.157 to 0.197 in.)
- Seal packing:
- Toyota Genuine Seal Packing Black, Three Bond 1207B or equivalent
- NOTICE:
- After applying seal packing, align the timing chain cover with the timing gear case within 3 minutes and tighten the bolts and nuts within 15 minutes.
- Apply the seal packing in a continuous line.
- Make sure the seal packing does not become thinner than 4 mm (0.157 in.) at the areas labeled "B" in the illustration below.
- After applying seal packing, align the timing chain cover with the timing gear case within 3 minutes and tighten the bolts and nuts within 15 minutes.
- HINT:
- The FIPG line is shown below.
- Apply packing to the 6 seal surface areas.
- The FIPG line is shown below.
-
Apply engine oil to the lip of the oil seal.
Align and install the timing chain cover to the timing gear case knock pin and supply pump bearing.
- NOTICE:
- Make sure that the lip of the oil seal is properly installed.
If the stud bolts are loose, tighten them using an E7 "TORX" wrench.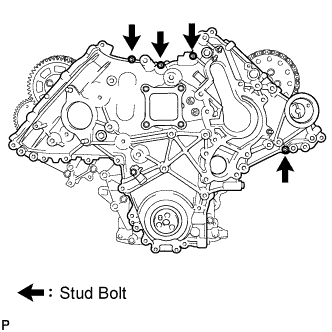
- Torque:
- 6.0 N*m{ 61 kgf*cm , 53 in.*lbf }
Install and uniformly tighten the 16 bolts and 4 nuts in the order shown in the illustration.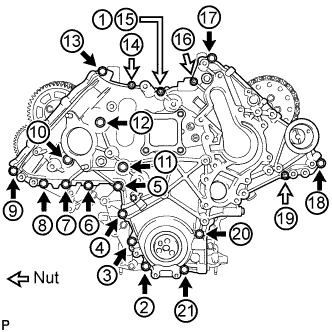
- Torque:
- 25 N*m{ 250 kgf*cm , 18 ft.*lbf }
| 47. INSTALL TIMING CHAIN COVER PLATE |
Install a new gasket and the timing chain cover plate with the 4 bolts.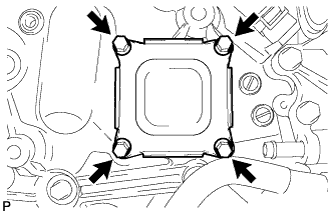
- Torque:
- 9.1 N*m{ 93 kgf*cm , 81 in.*lbf }
| 48. INSTALL WATER PUMP ASSEMBLY |
Temporarily install a new gasket and the water pump with the 9 bolts and 2 nuts.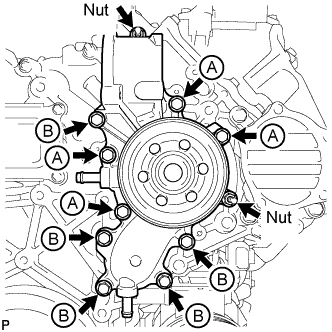
Bolt Length Item
Length
Bolt A
30 mm (1.18 in.)
Bolt B
80 mm (3.15 in.)
Uniformly tighten the 9 bolts and 2 nuts of the water pump in the order shown in the illustration.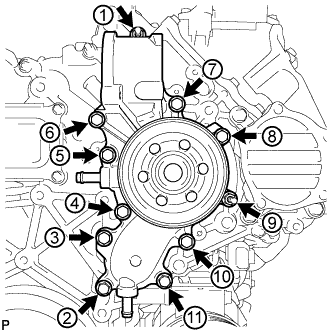
- Torque:
- 25 N*m{ 250 kgf*cm , 18 ft.*lbf }
- NOTICE:
- After installing all of the bolts and nuts, check that all of the bolts and nuts are tightened to the torque specification.
| 49. TEMPORARILY INSTALL INTAKE MANIFOLD |
Install the gasket and temporarily install the No. 2 intake manifold with the 9 bolts.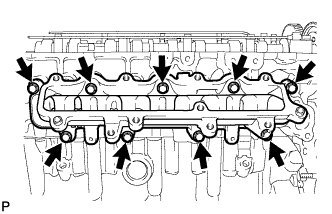
Install the gasket and temporarily install the No. 1 intake manifold with the 9 bolts.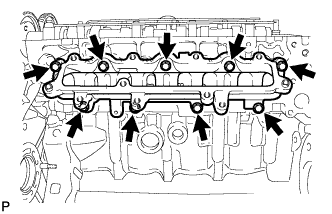
Install the 2 gaskets and temporarily install the No. 3 intake manifold with the 16 bolts.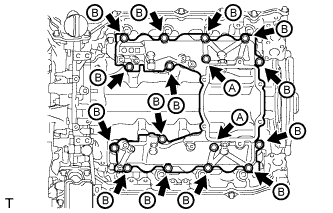
Bolt Length Item
Length
Bolt A
70 mm (2.76 in.)
Bolt B
25 mm (0.984 in.)
| 50. INSTALL FUEL INJECTOR LH |
- NOTICE:
- Be sure to install the injector, holder clamp and bolt in their original positions.
Install 4 new injection nozzle seats to the cylinder head.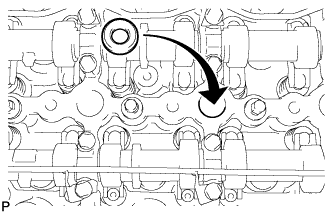
Apply a light coat of clean engine oil to 4 new O-rings.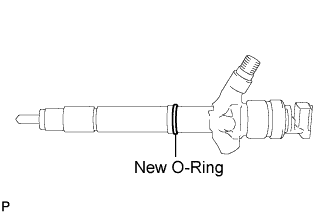
Install an O-ring to each injector as shown in the illustration.
Insert the 4 injectors into the cylinder head.
- NOTICE:
- Insert the injector until it touches the nozzle seat surface.
- After installing the injector to the cylinder head, the O-ring may prevent the injector from fully seating. If so, pull out the injector and reinstall it.
- Always return an injector to the same place it was removed from.
- Insert the injector until it touches the nozzle seat surface.
For an injector that has been replaced with a new injector, register the new injector compensation code.
Temporarily install 4 new washers and the 4 nozzle clamps with the 4 clamp bolts.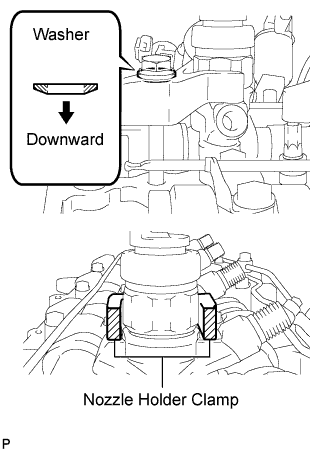
- NOTICE:
- The fork portion of the nozzle holder clamp must be set to the injector.
- Before tightening the bolts, check that the nozzle holder clamps are set properly.
- To tighten the clamp bolts, first tighten them by hand until they cannot be turned further. Then, tighten the bolts to the specified torque in a later step.
- When tightening the bolts, pay attention not to tilt the bolt and clamp.
- Do not reuse the washer.
- The fork portion of the nozzle holder clamp must be set to the injector.
Temporarily install the common rail LH with the 2 bolts.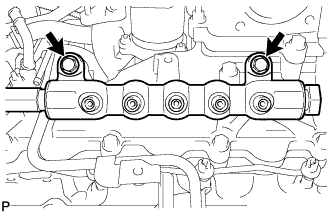
Temporarily install the 4 new injector pipes to the common rail and injectors.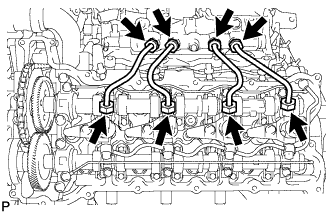
Check the nozzle leakage pipe. Check that there are no scratches or dents on the 5 union seal surfaces. If scratches or dents are present, replace the nozzle leakage pipe.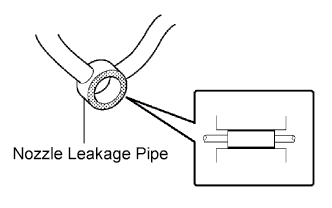
Set the leakage pipe and 5 new gaskets in place.
Temporarily install the leakage pipe with the 4 hollow screws and union bolt.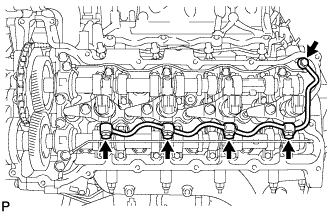
- HINT:
- To position the injectors, loosely tighten the 4 hollow screws and union bolt.
Tighten the 4 holder clamp bolts.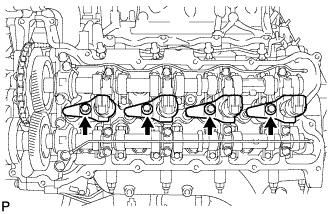
- Torque:
- 25 N*m{ 255 kgf*cm , 18 ft.*lbf }
Remove the 4 injection pipes.
Remove the 2 bolts and common rail LH.
Tighten the 4 hollow screws.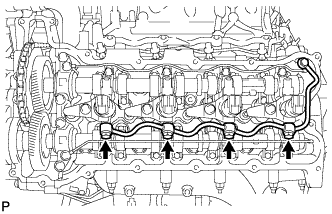
- Torque:
- 18 N*m{ 184 kgf*cm , 13 ft.*lbf }
- NOTICE:
- If a hollow screw is accidentally tightened beyond the torque specification, it must be replaced.
Tighten the union bolt.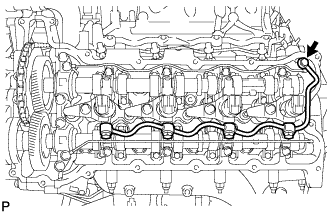
- Torque:
- 21 N*m{ 214 kgf*cm , 15 ft.*lbf }
- NOTICE:
- If the union bolt is accidentally tightened beyond the torque specification, it must be replaced.
| 51. INSTALL FUEL INJECTOR RH |
- NOTICE:
- Be sure to install the injector, holder clamp and bolt in their original positions.
Install 4 new injection nozzle seats to the cylinder head.
Apply a light coat of clean engine oil to 4 new O-rings.
Install an O-ring to each injector as shown in the illustration.
Insert the 4 injectors into the cylinder head.
- NOTICE:
- Insert the injector until it touches the nozzle seat surface.
- After installing the injector to the cylinder head, the O-ring may prevent the injector from fully seating. If so, pull out the injector and reinstall it.
- Always return an injector to the same place it was removed from.
- Insert the injector until it touches the nozzle seat surface.
For an injector that has been replaced with a new injector, register the injector compensation code.
Temporarily install 4 new washers and the 4 nozzle clamps with the 4 clamp bolts.
- NOTICE:
- The fork portion of the nozzle holder clamp must be set to the injector.
- Before tightening the bolts, check that the nozzle holder clamp is set properly.
- To tighten the clamp bolts, first tighten them by hand until they cannot be turned further. Then, tighten the bolts to the specified torque in a later step.
- When tightening the bolts, pay attention not to tilt the bolt and clamp.
- Do not reuse the washer.
- The fork portion of the nozzle holder clamp must be set to the injector.
Temporarily install the common rail RH with the 2 bolts.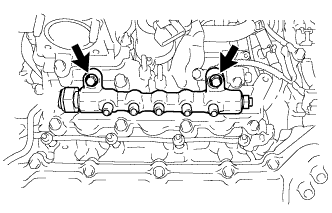
Temporarily install the 4 new injector pipes to the common rail and injectors.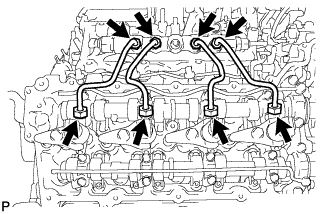
Check the nozzle leakage pipe. Check that there are no scratches or dents on the 5 union seal surfaces. If scratches or dents are present, replace the nozzle leakage pipe.
Set the leakage pipe and 5 new gaskets in place.
Temporarily install the leakage pipe with the 4 hollow screws and union bolt.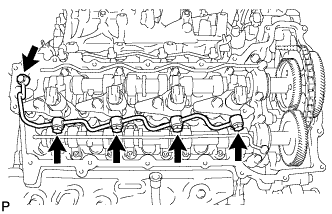
- HINT:
- To position the injectors, loosely tighten the 4 hollow screws and union bolt.
Tighten the 4 holder clamp bolts.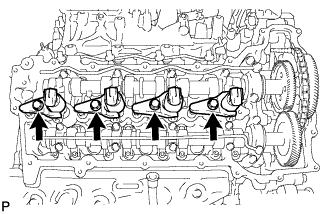
- Torque:
- 25 N*m{ 255 kgf*cm , 18 ft.*lbf }
Remove the 4 injection pipes.
Remove the 2 bolts and common rail RH.
Tighten the 4 hollow screws.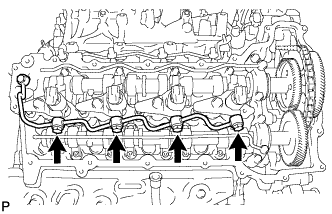
- Torque:
- 18 N*m{ 184 kgf*cm , 13 ft.*lbf }
- NOTICE:
- If a hollow screw is accidentally tightened beyond the torque specification, it must be replaced.
Tighten the union bolt.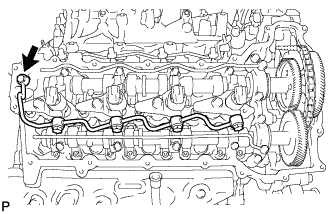
- Torque:
- 21 N*m{ 214 kgf*cm , 15 ft.*lbf }
- NOTICE:
- If the union bolt is accidentally tightened beyond the torque specification, it must be replaced.
| 52. REMOVE INTAKE MANIFOLD |
Remove the 16 bolts, 2 gaskets and intake manifold.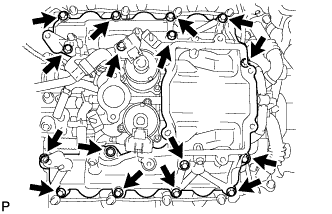
Remove the 9 bolts, No. 1 intake manifold and gasket.
Remove the 9 bolts, No. 2 intake manifold and gasket.
| 53. INSTALL NOZZLE HOLDER GASKET LH |
Press 4 new nozzle holder gaskets into the cylinder head cover LH.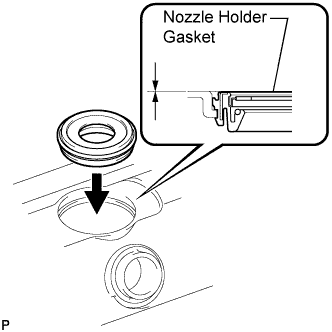
- NOTICE:
- After installing the nozzle holder gasket, check that it does not protrude from the cylinder head cover.
| 54. INSTALL CYLINDER HEAD COVER SUB-ASSEMBLY LH |
Apply seal packing as shown in the illustration.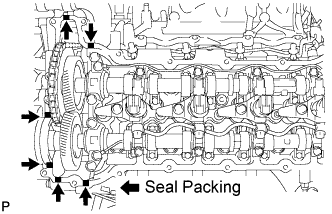
- Seal packing:
- Toyota Genuine Seal Packing Black, Three Bond 1207B or equivalent
- NOTICE:
- Remove any oil from the contact surface.
- Install the cylinder head cover within 3 minutes and tighten the bolts within 15 minutes after applying seal packing.
- Do not start the engine for at least 2 hours after the installation.
- Remove any oil from the contact surface.
Install a new gasket to the cylinder head cover.
- NOTICE:
- Remove any oil from the contact surface.
Temporarily install the cylinder head cover with the 17 bolts. Tighten the 17 bolts in the order shown in the illustration.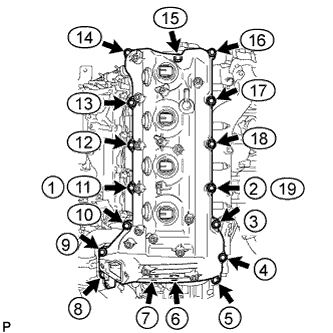
- Torque:
- 10 N*m{ 102 kgf*cm , 7 ft.*lbf }
- HINT:
- After tightening the bolts, check that the bolts at step 11 and 19 are tightened to the specified torque.
| 55. INSTALL NOZZLE HOLDER SEAL LH |
Press 4 new holder seals into the cylinder head cover LH.
| 56. INSTALL OIL SEPARATOR ASSEMBLY |
Install a new gasket to the oil separator.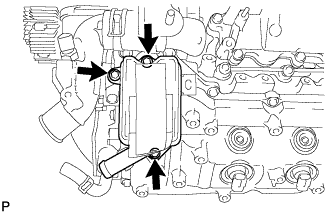
- NOTICE:
- Remove any oil from the contact surface.
Install the oil separator with the 3 bolts.
- Torque:
- 10 N*m{ 102 kgf*cm , 7 ft.*lbf }
| 57. INSTALL NOZZLE HOLDER GASKET RH |
Press 4 new nozzle holder gaskets into the cylinder head cover RH.
- NOTICE:
- After installing the nozzle holder gasket, check that it does not protrude from the cylinder head cover.
| 58. INSTALL CYLINDER HEAD COVER SUB-ASSEMBLY RH |
Apply seal packing as shown in the illustration.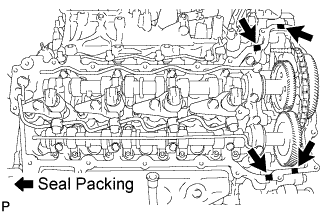
- Seal packing:
- Toyota Genuine Seal Packing Black, Three Bond 1207B or equivalent
- NOTICE:
- Remove any oil from the contact surface.
- Install the cylinder head cover within 3 minutes and tighten the bolts within 15 minutes after applying seal packing.
- Do not start the engine for at least 2 hours after the installation.
- Remove any oil from the contact surface.
Install a new gasket to the cylinder head cover.
- NOTICE:
- Remove any oil from the contact surface.
Temporarily install the cylinder head cover with the 18 bolts. Tighten the 18 bolts in the order shown in the illustration.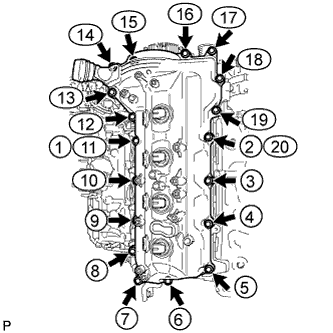
- Torque:
- 10 N*m{ 102 kgf*cm , 7 ft.*lbf }
- HINT:
- After tightening the bolts, check that the bolts at step 11 and 20 are tightened to the specified torque.
| 59. INSTALL NOZZLE HOLDER SEAL RH |
Press 4 new holder seals into the cylinder head cover RH.
| 60. INSTALL OIL FILLER CAP GASKET |
| 61. INSTALL OIL FILLER CAP SUB-ASSEMBLY |
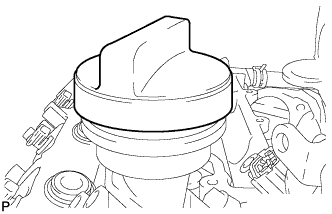 |
| 62. INSTALL SCAVENGING PUMP ASSEMBLY |
Install the scavenging pump with the 4 bolts.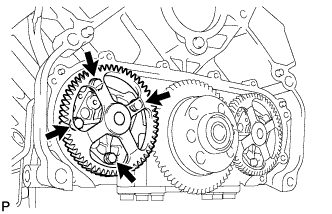
- Torque:
- 10 N*m{ 102 kgf*cm , 7 ft.*lbf }
| 63. INSTALL OIL PUMP ASSEMBLY |
Install the oil pump with the 4 bolts.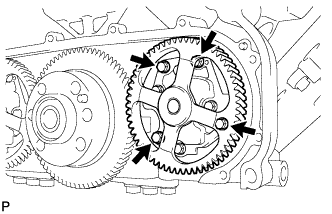
- Torque:
- 10 N*m{ 102 kgf*cm , 7 ft.*lbf }
| 64. INSTALL REAR CRANKSHAFT OIL SEAL |
Place the oil seal retainer on wooden blocks.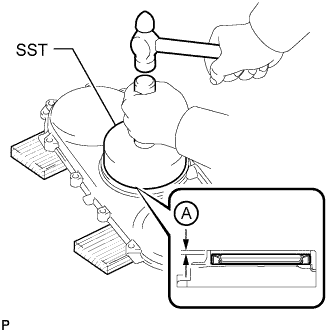
Using SST and a hammer, tap in a new oil seal as shown in the illustration.
- SST
- 09223-56010
- Standard depth A:
- 2.7 to 3.7 mm (0.106 to 0.147 in.)
- NOTICE:
- Keep the lip free from foreign matter.
- Do not tap on the seal at an angle.
- Keep the lip free from foreign matter.
| 65. INSTALL REAR ENGINE OIL SEAL RETAINER |
- NOTICE:
- When the contact surfaces shown below are wet, wipe them with an oil-free cloth before applying seal packing.
-
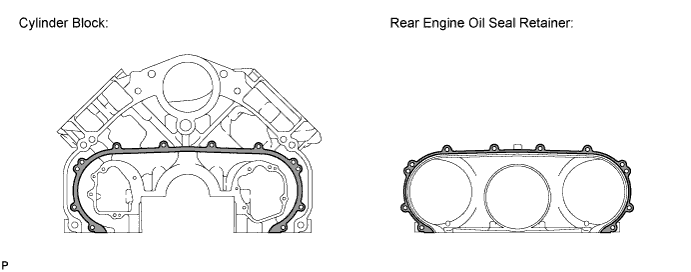
Apply seal packing in a continuous line as shown in the illustration.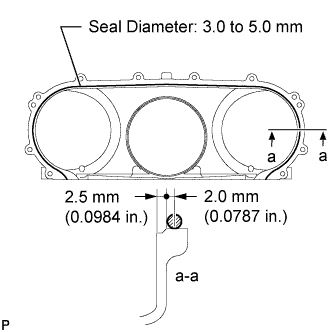
- Seal diameter:
- 3.0 to 5.0 mm (0.118 to 0.197 in.)
- Seal packing:
- Toyota Genuine Seal Packing Black, Three Bond 1207B or equivalent
- NOTICE:
- Remove any oil from the contact surface.
- Install the rear engine oil seal retainer within 3 minutes and tighten the bolts within 15 minutes after applying seal packing.
- Do not start the engine for at least 2 hours after installation.
- Remove any oil from the contact surface.
Apply engine oil to the lip of a new oil seal.
Install and uniformly tighten the 10 bolts in the order shown in the illustration.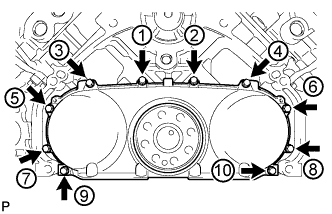
- Torque:
- 10 N*m{ 102 kgf*cm , 7 ft.*lbf }
- NOTICE:
- Make sure that the lip of the oil seal is properly installed.
- When installing the oil seal retainer, make sure the lip of the oil seal is not damaged.
- When installing the oil seal retainer, make sure the lip of the oil seal is not folded incorrectly.
- Make sure that the lip of the oil seal is properly installed.
| 66. INSTALL OIL REGULATOR ASSEMBLY |
Install the oil regulator with the 4 bolts.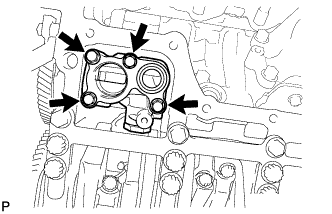
- Torque:
- 10 N*m{ 102 kgf*cm , 7 ft.*lbf }
| 67. INSTALL INLET OIL PUMP PIPE |
Apply a light coat of engine oil to a new O-ring, and install it to the inlet oil pump pipe.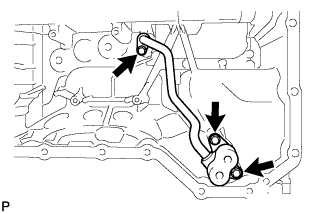
Install the inlet oil pump pipe with the 3 bolts.
- Torque:
- 10 N*m{ 102 kgf*cm , 7 ft.*lbf }
| 68. INSTALL NO. 1 OIL PAN BAFFLE PLATE |
Install the No. 1 oil pan baffle plate with the 5 bolts.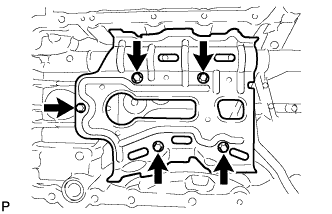
- Torque:
- 10 N*m{ 102 kgf*cm , 7 ft.*lbf }
| 69. INSTALL NO. 1 OIL PAN SUB-ASSEMBLY |
- NOTICE:
- When the contact surfaces shown below are wet, wipe them with an oil-free cloth before applying seal packing.
-
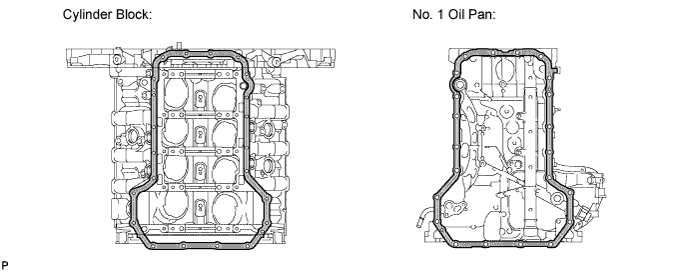
Install the cylinder block oil hole gasket.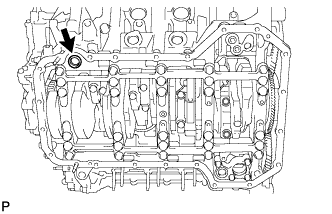
Apply a light coat of engine oil to 3 new O-rings and set the 3 O-rings to the oil regulator and scavenging pump.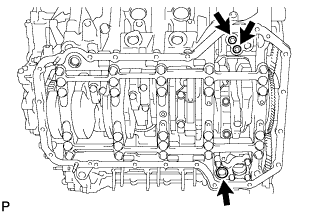
Apply seal packing to the No. 1 oil pan as shown in the illustration.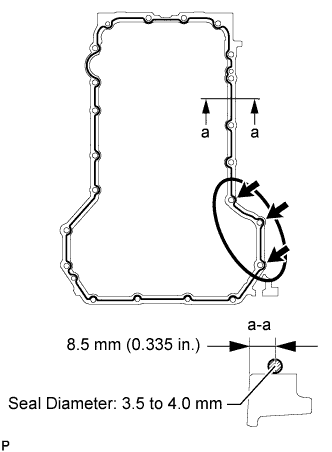
- Standard seal diameter:
- 3.5 to 4.0 mm (0.134 to 0.157 in.)
- Seal packing:
- Toyota Genuine Seal Packing Black, Three Bond 1207B or equivalent
- NOTICE:
- For the 3 bolt holes labeled with arrows, apply the seal packing on the outer edges. For the other bolt holes, apply the seal packing on the inner edges.
- Make sure to apply a continuous bead of seal packing as shown in the illustration. If the bead breaks, overlap 3 mm (0.118 in.) of seal packing and continue the bead.
- Install the No. 1 oil pan within 3 minutes and tighten the bolts and nuts within 15 minutes after applying seal packing.
- Remove any oil and old seal packing from the contact surface.
- Do not start the engine for at least 2 hours after installation.
- For the 3 bolt holes labeled with arrows, apply the seal packing on the outer edges. For the other bolt holes, apply the seal packing on the inner edges.
Install the No. 1 oil pan and oil reflector plate with the 20 bolts and 2 nuts.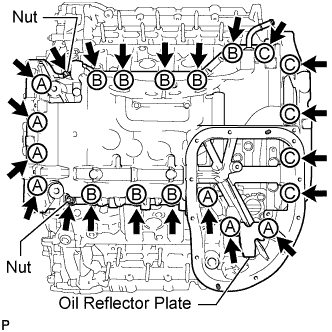
- NOTICE:
- If the oil reflector plate is deformed, replace it.
- Torque:
- 25 N*m{ 250 kgf*cm , 18 ft.*lbf }
Bolt Length Item
Quantity
Length
Bolt A
7
70 mm (2.76 in.)
Bolt B
8
20 mm (0.787 in.)
Bolt C
5
30 mm (1.18 in.)
| 70. INSTALL OIL STRAINER SUB-ASSEMBLY |
Apply a light coat of engine oil to a new O-ring, and install it to the oil strainer.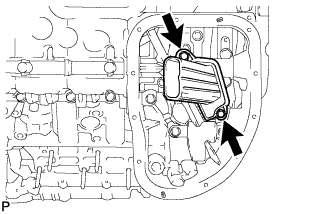
Install the oil strainer with the 2 bolts.
- Torque:
- 10 N*m{ 102 kgf*cm , 7 ft.*lbf }
| 71. INSTALL NO. 2 OIL PAN SUB-ASSEMBLY |
- NOTICE:
- When the contact surfaces shown below are wet, wipe them with an oil-free cloth before applying seal packing.
-
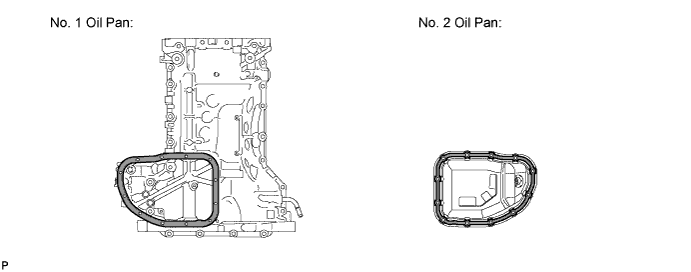
Apply seal packing to the No. 2 oil pan as shown in the illustration.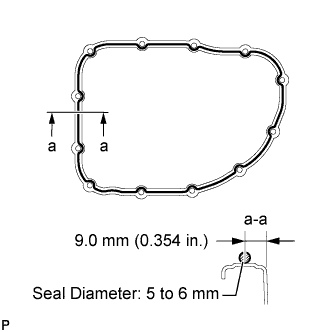
- Standard seal diameter:
- 5 to 6 mm (0.197 to 0.236 in.)
- Seal packing:
- Toyota Genuine Seal Packing Black, Three Bond 1207B or equivalent
- NOTICE:
- For the bolt and pin holes, make sure to apply seal packing to the inner sides.
- Make sure to apply a continuous bead of seal packing as shown in the illustration. If the bead breaks, overlap 3 mm (0.118 in.) of seal packing and continue the bead.
- Install the No. 2 oil pan within 3 minutes and tighten the bolts and nuts within 15 minutes after applying seal packing.
- Remove any oil from the contact surface.
- Do not start the engine for at least 2 hours after installation.
- For the bolt and pin holes, make sure to apply seal packing to the inner sides.
Install the No. 2 oil pan with the 10 bolts and 2 nuts.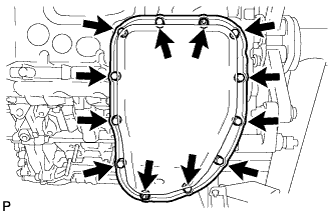
- Torque:
- 10 N*m{ 102 kgf*cm , 7 ft.*lbf }
| 72. INSTALL OIL PAN DRAIN PLUG |
Install a new gasket and the oil pan drain plug.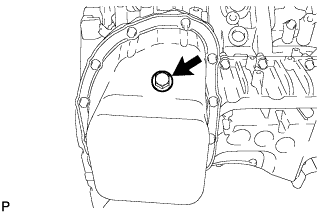
- Torque:
- 38 N*m{ 387 kgf*cm , 28 ft.*lbf }
| 73. INSTALL ENGINE OIL LEVEL SENSOR |
Install a new gasket and the engine oil level sensor with the 4 bolts.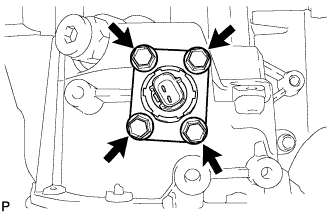
- Torque:
- 10 N*m{ 102 kgf*cm , 7 ft.*lbf }
| 74. INSTALL OIL FILTER BRACKET SUB-ASSEMBLY |
Apply a light coat of engine oil to 2 new O-rings, and set them to the oil filter bracket.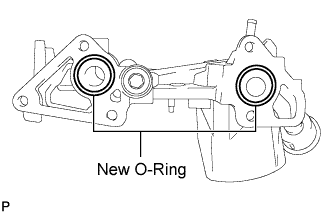
Install the oil filter bracket with the 3 bolts and 2 nuts.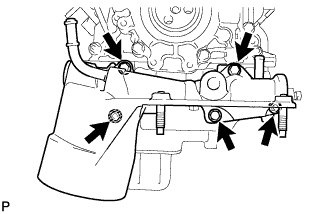
- Torque:
- 21 N*m{ 214 kgf*cm , 15 ft.*lbf }
| 75. INSTALL OIL FILTER ELEMENT |
Clean the inside of the oil filter cap, its threads and its O-ring groove.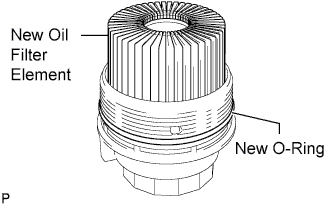
Apply a small amount of engine oil to a new O-ring and install it to the oil filter cap.
Set a new oil filter element in the oil filter cap.
Remove any dirt or foreign matter from the installation surface of the engine.
Apply a small amount of engine oil to the O-ring again and temporarily install the oil filter cap by hand.
Using SST, tighten the oil filter cap.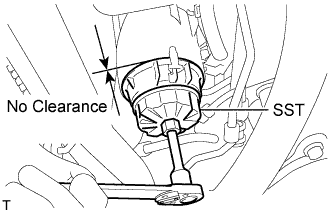
- SST
- 09228-06501
- Torque:
- 25 N*m{ 255 kgf*cm , 18 ft.*lbf }
- NOTICE:
- Make sure that the oil filter is installed securely as shown in the illustration.
- Be careful that the O-ring does not get caught between any surrounding parts.
- Make sure that the oil filter is installed securely as shown in the illustration.
Install the No. 2 engine under cover seal to the No. 2 engine under cover with the 2 bolts.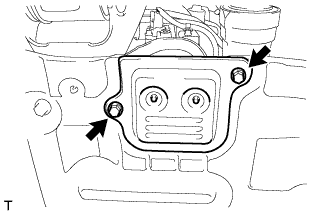
- Torque:
- 10 N*m{ 102 kgf*cm , 7 ft.*lbf }
| 76. INSTALL OIL COOLER RELIEF VALVE ASSEMBLY |
Install a new gasket and the oil cooler relief valve.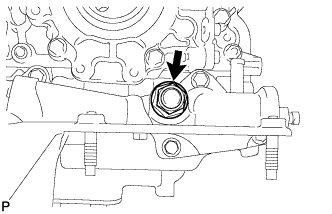
- Torque:
- 25 N*m{ 250 kgf*cm , 18 ft.*lbf }
| 77. INSTALL OIL COOLER ASSEMBLY |
Apply a light coat of engine oil to 2 new O-rings and a new oil cooler gasket, and install them to the oil cooler.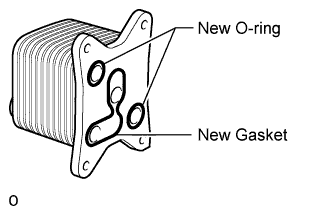
Install the oil cooler with the 2 bolts and 2 nuts.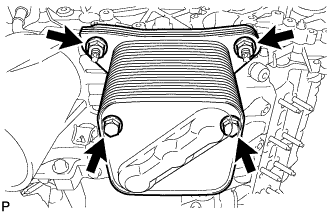
- Torque:
- 21 N*m{ 214 kgf*cm , 15 ft.*lbf }
| 78. INSTALL OIL PRESSURE SENDER GAUGE ASSEMBLY |
Remove the adhesive from the oil pressure sender gauge and the bolt hole f the oil filter bracket.
Apply adhesive to 2 or 3 threads of the oil pressure sender gauge.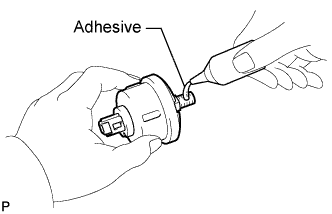
- Adhesive:
- Toyota Genuine Adhesive 1344, Three Bond 1344 or equivalent
Install the oil pressure sender gauge.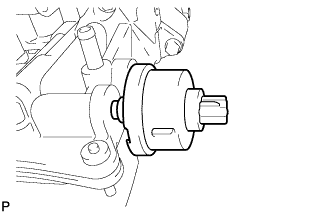
- Torque:
- 15 N*m{ 153 kgf*cm , 11 ft.*lbf }
| 79. INSTALL TIMING GEAR COVER SPACER (w/ Intercooler) |
Install the timing gear cover spacer with the 2 bolts.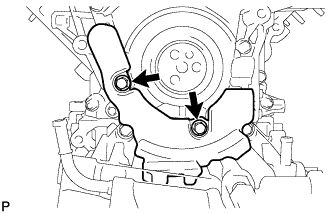
- Torque:
- 21 N*m{ 214 kgf*cm , 15 ft.*lbf }
| 80. INSTALL CRANKSHAFT PULLEY |
- NOTICE:
- This procedure is intended for removal/installation of the crankshaft pulley only. Do not use this procedure for removal/installation of the flywheel or the drive plate and ring gear.
Align the crankshaft pulley and the crankshaft knock pin, and temporarily install the crankshaft pulley with the 3 bolts.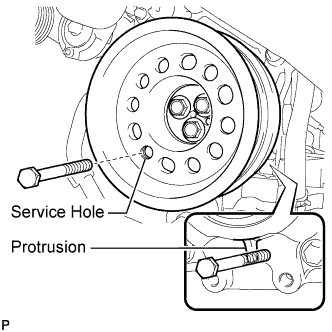
Install the 2 bolts to the bolt holes of the crankshaft rear side.
Using a bar, turn the crankshaft until the crankshaft pulley service hole is a little to the right of bottom dead center.
Install a 14 mm x 1.5 pitch service bolt with a length of 70 mm or more to the crankshaft pulley service hole, and hold the crankshaft using the timing chain cover protrusion.
Uniformly tighten the 3 bolts in 2 passes in the order shown in the illustration.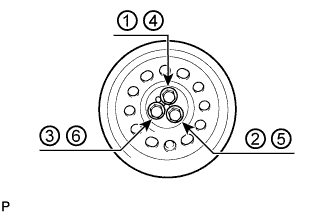
- Torque:
- 115 N*m{ 1168 kgf*cm , 84 ft.*lbf }
Remove the service bolt.
| 81. CONNECT NO. 2 OIL COOLER HOSE |
Align the white paint marks on the oil cooler hose and oil filter bracket and connect the hose. Then connect the other side to the water pump and attach the oil cooler hose to the clamp.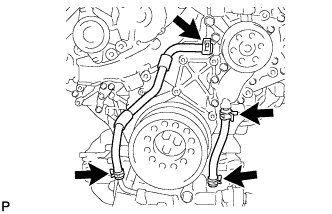
- NOTICE:
- Make sure to maintain a space between the oil cooler hose and crankshaft pulley, and the oil cooler hose and V-ribbed belt idler pulley.
| 82. CONNECT NO. 1 OIL COOLER HOSE |
Face the pink paint mark on the oil cooler hose toward the front side of the engine and connect the hose to the oil filter bracket. Then connect the other side to the water pump.
- NOTICE:
- Make sure to maintain a space between the oil cooler hose and crankshaft pulley.
| 83. INSTALL CRANKSHAFT POSITION SENSOR |
Apply a light coat of engine oil to the O-ring.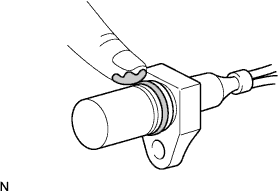
- NOTICE:
- When reusing the sensor, inspect the O-ring.
- If the O-ring has scratches of cuts, replace the crankshaft position sensor.
Install the sensor with the bolt.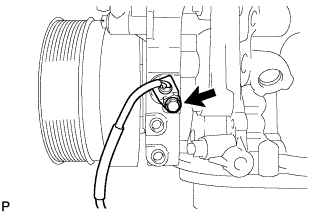
- Torque:
- 5.0 N*m{ 51 kgf*cm , 44 in.*lbf }
Connect the wire harness to the clamp.
| 84. INSTALL CAMSHAFT POSITION SENSOR |
Apply a light coat of engine oil to the O-ring.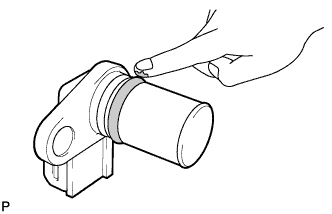
- NOTICE:
- When reusing the sensor, inspect the O-ring.
- If the O-ring has scratches of cuts, replace the crankshaft position sensor.
Install the sensor with the bolt.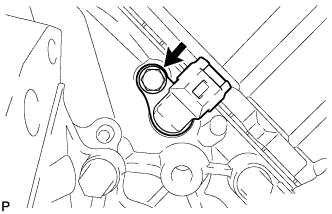
- Torque:
- 5.0 N*m{ 51 kgf*cm , 44 in.*lbf }