Clearance Sonar Main Switch Circuit
Circuit diagnosis · Vehicles built Sep 2011 – Dec 2011
Versions by build date: Sep 2011 – Dec 2011 from Jan 2012
DESCRIPTION
When the clearance sonar main switch turns on, the ON signal is input into the parking assist ECU*1 or clearance warning ECU*2.- HINT:
- *1: w/ Parking Assist Monitor System
- *2: w/o Parking Assist Monitor System
WIRING DIAGRAM
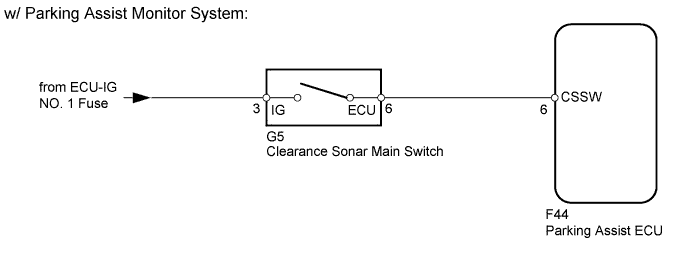

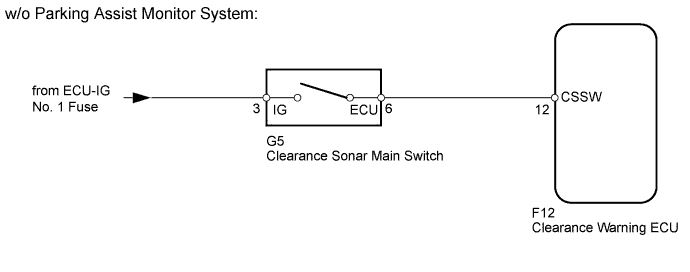
INSPECTION PROCEDURE
| 1. READ VALUE USING INTELLIGENT TESTER (CLEARANCE SONAR MAIN SWITCH) |

Check the Data List for proper functioning of the clearance sonar main switch.
Clearance Sonar Tester Display
Measurement Item/Range
Normal Condition
Diagnostic Note
Main Switch
Clearance sonar main switch/ON or OFF
OFF: Clearance sonar main switch off
ON: Clearance sonar main switch on
-
- OK:
- The intelligent tester display changes according to operation of clearance sonar main switch.
|
|
||||

| OK | ||
 |
||
| ||
| 2. INSPECT CLEARANCE SONAR MAIN SWITCH |
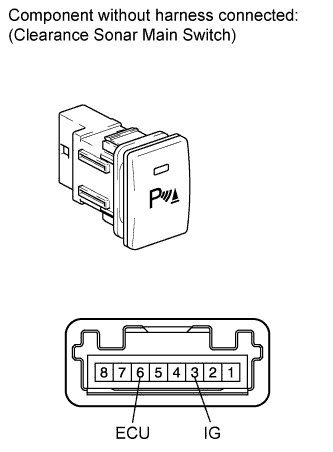 |
Remove the clearance sonar main switch (Click here).
Measure the resistance according to the value(s) in the table below.
- Standard Resistance:
Tester Connection
Switch Condition
Specified Condition
3 (IG) - 6 (ECU)
Clearance sonar main switch on
Below 1 Ω
3 (IG) - 6 (ECU)
Clearance sonar main switch off
10 kΩ or higher
Result Result
Proceed to
OK (w/ Park Assist Monitor System)
A
OK (w/o Park Assist Monitor System)
B
NG
C
|
|
||||
|
|
||||

| A | |
 |
| 3. CHECK HARNESS AND CONNECTOR (MAIN SWITCH - ECU AND BATTERY) |
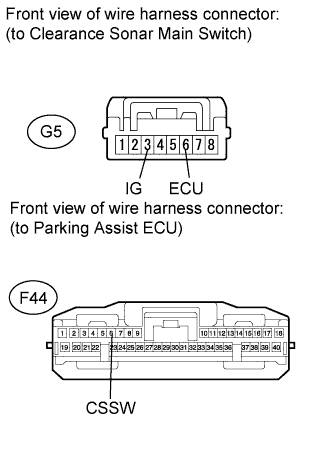 |
Disconnect the G5 switch connector.
Disconnect the F44 ECU connector.
Measure the voltage according to the value(s) in the table below.
- Standard Voltage:
Tester Connection
Condition
Specified Condition
G5-3 (IG) - Body ground
Engine switch on (IG)
11 to 14 V
G5-3 (IG) - Body ground
Engine switch off
Below 1 V
Measure the resistance according to the value(s) in the table below.
- Standard Resistance:
Tester Connection
Condition
Specified Condition
G5-6 (ECU) - F44-6 (CSSW)
Always
Below 1 Ω
G5-6 (ECU) - Body ground
Always
10 kΩ or higher
|
|
||||
| OK | ||
|
||
| ||
| 4. CHECK HARNESS AND CONNECTOR (MAIN SWITCH - ECU AND BATTERY) |
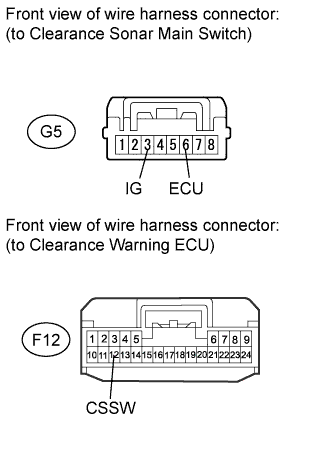 |
Disconnect the G5 switch connector.
Disconnect the F12 ECU connector.
Measure the voltage according to the value(s) in the table below.
- Standard Voltage:
Tester Connection
Condition
Specified Condition
G5-3 (IG) - Body ground
Engine switch on (IG)
11 to 14 V
G5-3 (IG) - Body ground
Engine switch off
Below 1 V
Measure the resistance according to the value(s) in the table below.
- Standard Resistance:
Tester Connection
Condition
Specified Condition
G5-6 (ECU) - F12-12 (CSSW)
Always
Below 1 Ω
G5-6 (ECU) - Body ground
Always
10 kΩ or higher
|
|
||||
| OK | ||
|
||
| ||