B1661/44 Roll Over Cut Off Indicator Malfunction
Diagnostic trouble codes · Vehicles built Sep 2011 – Dec 2011
Versions by build date: Sep 2011 – Dec 2011 from Jan 2012
DESCRIPTION
The curtain shield airbag cutoff switch is a mechanism that operates both the right and left sides of the curtain shield airbag and the front seat outer belt when the center airbag sensor detects a roll-over.The RSCA OFF indicator is installed in the combination meter.
If the curtain shield airbag cutoff switch is operated, the indicator comes on to inform the drive that the roll-over detection system is not working.
The initial setting of the roll-over detection system is on. It automatically operates every time the ignition switch is turned to ON.
| DTC Code |
DTC Detection Condition |
Trouble Area |
| B1661/44 |
When one of the following conditions is met:
|
|
WIRING DIAGRAM
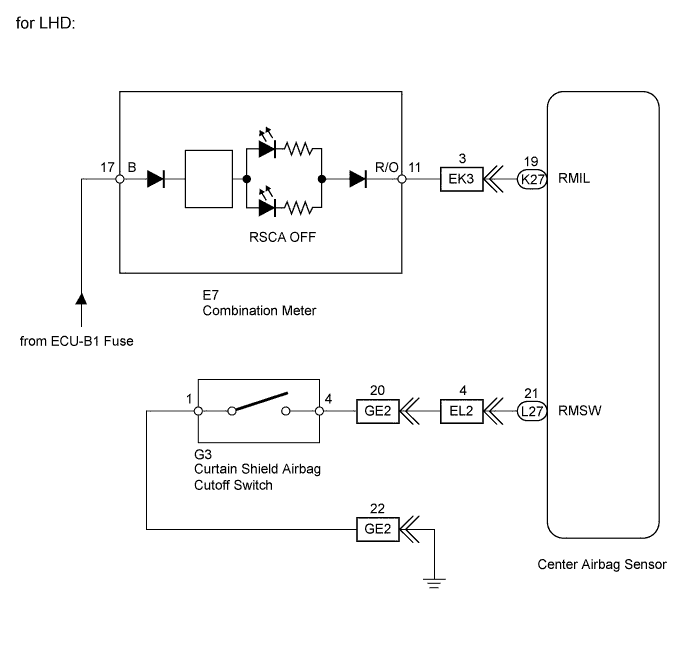

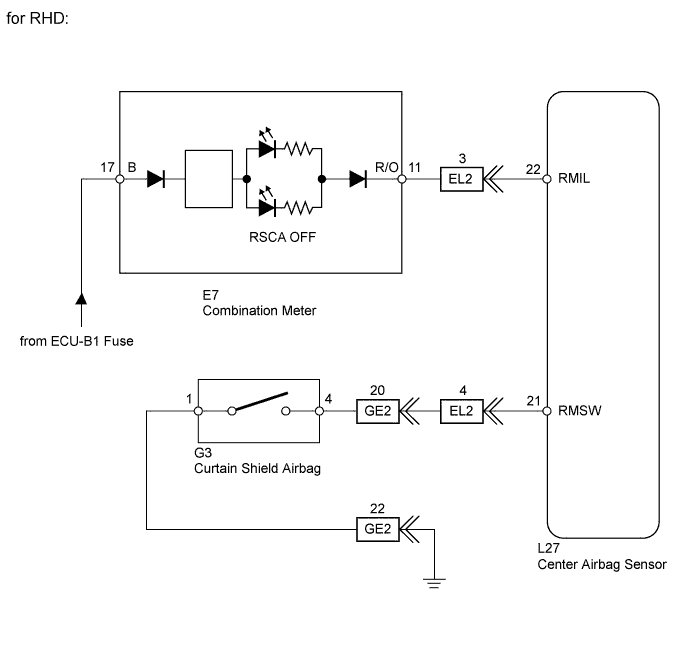
INSPECTION PROCEDURE
- NOTICE:
- When disconnecting the cable from the negative (-) battery terminal while performing repairs, some systems need to be initialized after the cable is reconnected (Click here).
| 1. CHECK COMBINATION METER (SOURCE VOLTAGE) |

Turn the ignition switch off.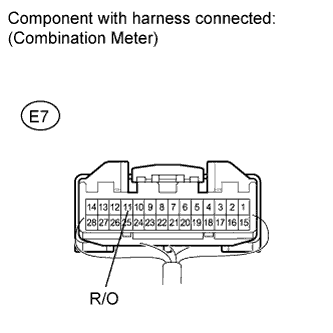
Disconnect the cable from the negative (-) battery terminal, and wait for at least 90 seconds.
Remove the combination meter with the connector connected.
Disconnect the connector from the center airbag sensor.
Connect the cable to the negative (-) battery terminal, and wait for at least 2 seconds.
Measure the voltage according to the value(s) in the table below.
- Standard Voltage:
Tester Connection
Switch Condition
Specified Condition
E7-11 (R/O) - Body ground
Ignition switch ON
11 to 14 V
|
|
||||

| OK | |
 |
| 2. CHECK RSCA OFF INDICATOR CIRCUIT |
Turn the ignition switch off.
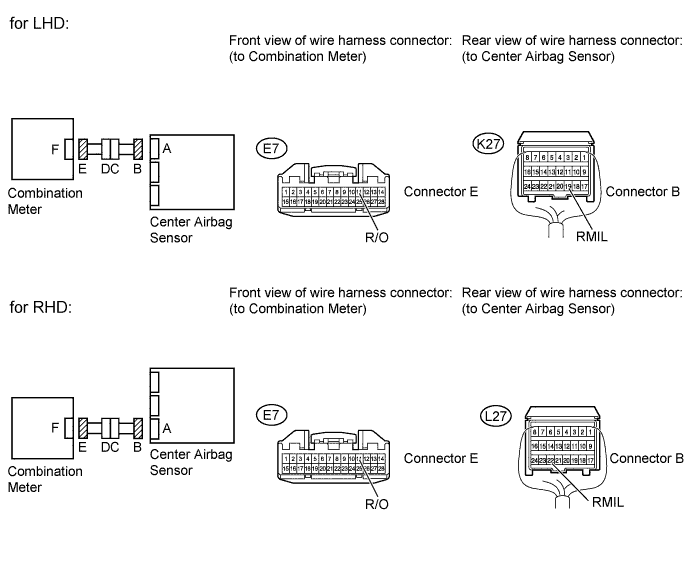
Disconnect the cable from the negative (-) battery terminal, and wait for at least 90 seconds.
Disconnect the connector from the center airbag sensor and combination meter.
Connect the cable to the negative (-) battery terminal, and wait for at least 2 seconds.
Measure the voltage according to the value(s) in the table below.
- Standard Voltage:
for LHD Tester Connection
Switch Condition
Specified Condition
E7-11 (R/O) - Body ground
Ignition switch ON
Below 1 V
for RHD Tester Connection
Switch Condition
Specified Condition
E7-11 (R/O) - Body ground
Ignition switch ON
Below 1 V
Turn the ignition switch off.
Disconnect the cable from the negative (-) battery terminal, and wait for at least 90 seconds.
Measure the resistance according to the value(s) in the table below.
- Standard Resistance:
for LHD Tester Connection
Condition
Specified Condition
E7-11 (R/O) - K27-19 (RMIL)
Always
Below 1 Ω
E7-11 (R/O) - Body ground
Always
1 MΩ or higher
for RHD Tester Connection
Condition
Specified Condition
E7-11 (R/O) - L27-22(RMIL)
Always
Below 1 Ω
E7-11 (R/O) - Body ground
Always
1 MΩ or higher
Result Result
Proceed to
OK
A
NG (for LHD)
B
NG (for RHD)
C
|
|
||||
|
|
||||

| A | |
|
| 3. INSPECT CURTAIN SHIELD AIRBAG CUTOFF SWITCH |
Turn the ignition switch off.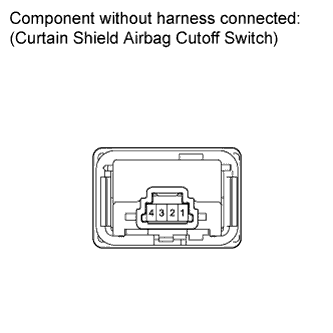
Disconnect the cable from the negative (-) battery terminal, and wait for at least 90 seconds.
Remove the curtain shield airbag cutoff switch (Click here).
Measure the resistance according to the value(s) in the table below.
- Standard Resistance:
Tester Connection
Switch Condition
Specified Condition
4 - 1
Curtain shield airbag cutoff switch is in on position
Below 1 Ω
4 - 1
Curtain shield airbag cutoff switch is in off position
1 MΩ or higher
|
|
||||
| OK | |
|
| 4. CHECK CURTAIN SHIELD AIRBAG CUTOFF SWITCH CIRCUIT |
Turn the ignition switch off.
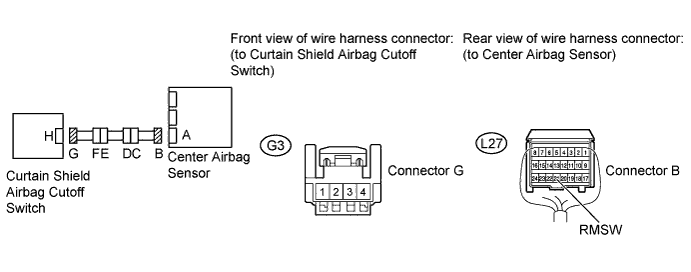
Disconnect the cable from the negative (-) battery terminal, and wait for at least 90 seconds.
Disconnect the connector from the center airbag sensor and curtain shield airbag cutoff switch.
Connect the cable to the negative (-) battery terminal, and wait for at least 2 seconds.
Measure the voltage according to the value(s) in the table below.
- Standard Voltage:
Tester Connection
Switch Condition
Specified Condition
G3-4 - Body ground
Ignition switch ON
Below 1 V
G3-1 - Body ground
Ignition switch ON
Below 1 V
Turn the ignition switch off.
Disconnect the cable from the negative (-) battery terminal, and wait for at least 90 seconds.
Measure the resistance according to the value(s) in the table below.
- Standard Resistance:
Tester Connection
Condition
Specified Condition
L27-21 (RMSW) - G3-4
Always
Below 1 Ω
G3-4 - Body ground
Always
1 MΩ or higher
G3-1 - Body ground
Always
Below 1 Ω
|
|
||||
| OK | ||
 |
||
| ||
| 5. CHECK FLOOR WIRE (CENTER AIRBAG SENSOR - INSTRUMENT PANEL WIRE) |
Disconnect the floor wire connector from the instrument panel wire.
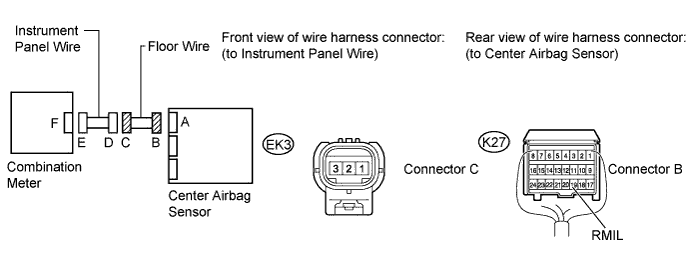
Connect the cable to the negative (-) battery terminal, and wait for at least 2 seconds.
Measure the voltage according to the value(s) in the table below.
- Standard Voltage:
Tester Connection
Switch Condition
Specified Condition
EK3-3 - Body ground
Ignition switch ON
Below 1 V
Turn the ignition switch off.
Disconnect the cable from the negative (-) battery terminal, and wait for at least 90 seconds.
Measure the resistance according to the value(s) in the table below.
- Standard Resistance:
Tester Connection
Condition
Specified Condition
EK3-3 - K27-19 (RMIL)
Always
Below 1 Ω
EK3-3 - Body ground
Always
1 MΩ or higher
|
|
||||
| OK | ||
|
||
| ||
| 6. CHECK NO. 2 FLOOR WIRE (CENTER AIRBAG SENSOR - INSTRUMENT PANEL WIRE) |
Disconnect the No. 2 floor wire connector from the instrument panel wire.
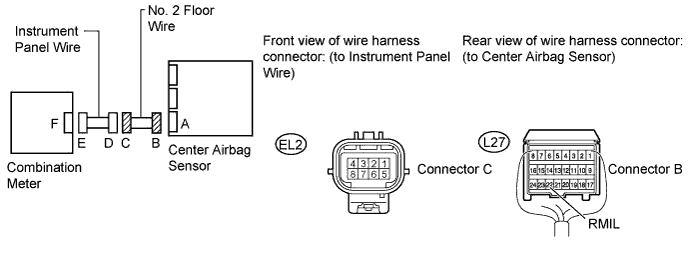
Connect the cable to the negative (-) battery terminal, and wait for at least 2 seconds.
Measure the voltage according to the value(s) in the table below.
- Standard Voltage:
Tester Connection
Switch Condition
Specified Condition
EL2-3 - Body ground
Ignition switch ON
Below 1 V
Turn the ignition switch off.
Disconnect the cable from the negative (-) battery terminal, and wait for at least 90 seconds.
Measure the resistance according to the value(s) in the table below.
- Standard Resistance:
Tester Connection
Condition
Specified Condition
EL2-3 - L27-22 (RMIL)
Always
Below 1 Ω
EL2-3 - Body ground
Always
1 MΩ or higher
|
|
||||
| OK | ||
|
||
| ||
| 7. CHECK NO. 2 FLOOR WIRE (CENTER AIRBAG SENSOR - INSTRUMENT PANEL WIRE) |
Disconnect the No. 2 floor wire connector from the instrument panel wire.
Connect the cable to the negative (-) battery terminal, and wait for at least 2 seconds.
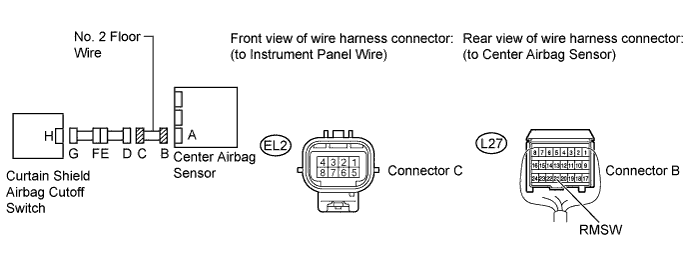
Measure the voltage according to the value(s) in the table below.
- Standard Voltage:
Tester Connection
Switch Condition
Specified Condition
EL2-4 - Body ground
Ignition switch ON
Below 1 V
Turn the ignition switch off.
Disconnect the cable from the negative (-) battery terminal, and wait for at least 90 seconds.
Measure the resistance according to the value(s) in the table below.
- Standard Resistance:
Tester Connection
Condition
Specified Condition
L27-21 (RMSW) - EL2-4
Always
Below 1 Ω
EL2-4 - Body ground
Always
1 MΩ or higher
|
|
||||
| OK | |
|
| 8. CHECK INSTRUMENT PANEL WIRE (NO. 2 FLOOR WIRE - NO. 3 INSTRUMENT PANEL WIRE AND BODY GROUND) |
Disconnect the instrument panel wire connector from the No. 3 instrument panel wire.
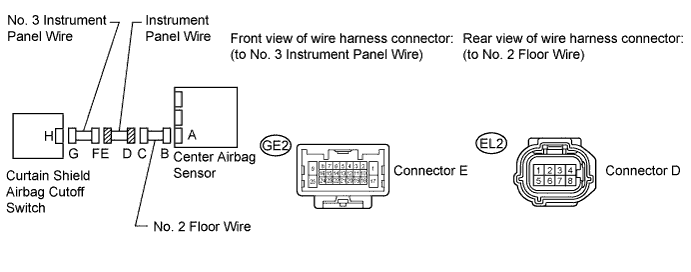
Connect the cable to the negative (-) battery terminal, and wait for at least 2 seconds.
Turn the ignition switch to ON.
Measure the voltage according to the value(s) in the table below.
- Standard Voltage:
Tester Connection
Switch Condition
Specified Condition
GE2-20 - Body ground
Ignition switch ON
Below 1 V
Turn the ignition switch off.
Disconnect the cable from the negative (-) battery terminal, and wait for at least 90 seconds.
Measure the resistance according to the value(s) in the table below.
- Standard Resistance:
Tester Connection
Condition
Specified Condition
EL2-4 - GE2-20
Always
Below 1 Ω
GE2-20 - Body ground
Always
1 MΩ or higher
|
|
||||
| OK | ||
|
||
| ||