B1660/43 Passenger Airbag ON/OFF Indicator Circuit Malfunction
Diagnostic trouble codes · Vehicles built from Jan 2012
Versions by build date: Sep 2011 – Dec 2011 from Jan 2012
DESCRIPTION
The passenger airbag ON/OFF indicator circuit consists of the center airbag sensor and the passenger airbag ON/OFF indicator.The passenger airbag ON/OFF indicator indicates the operation condition of the front passenger airbag, front passenger side knee airbag, front seat airbag RH and front seat outer belt RH.
DTC B1660/43 is stored when a malfunction is detected in the passenger airbag ON/OFF indicator circuit.
| DTC Code |
DTC Detection Condition |
Trouble Area |
| B1660/43 |
When one of the following conditions is met:
|
|
- HINT:
- *1: w/ Navigation System
- *2: w/o Navigation System
WIRING DIAGRAM
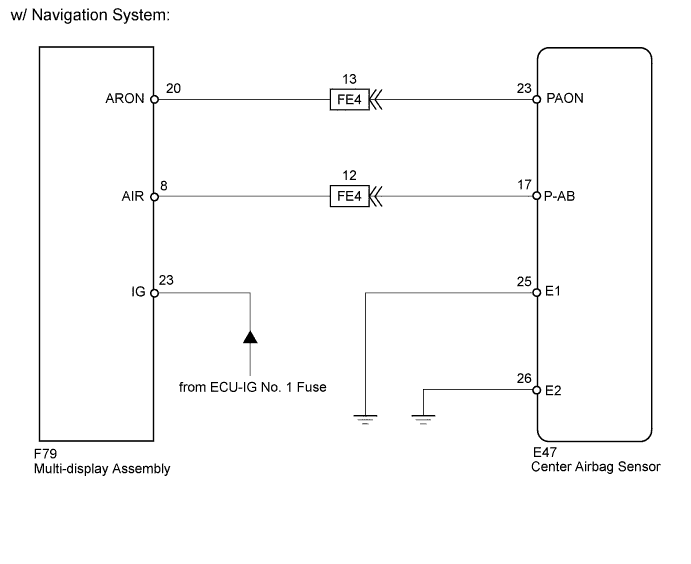

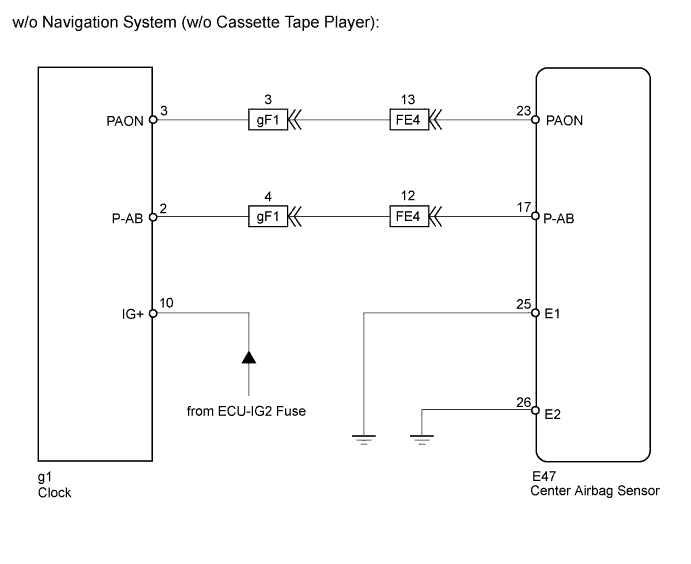
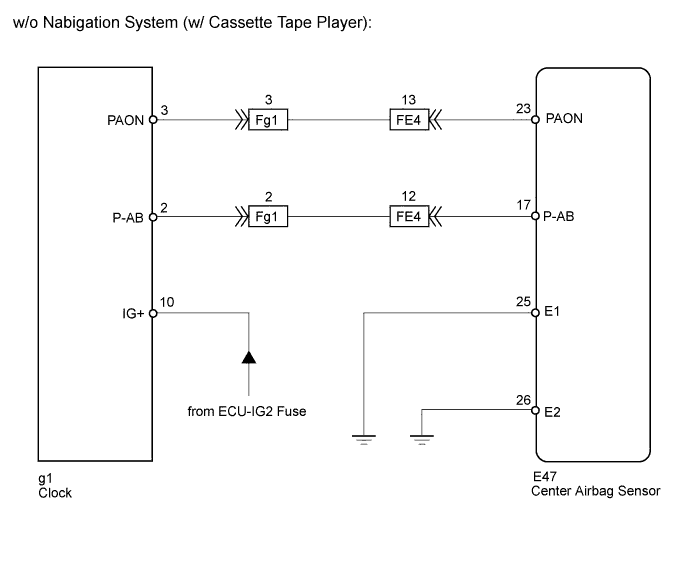
INSPECTION PROCEDURE
- NOTICE:
- After turning the ignition switch off, waiting time may be required before disconnecting the cable from the battery terminal. Therefore, make sure to read the disconnecting the cable from the battery terminal notice before proceeding with work (Click here).
- When disconnecting the cable, some systems need to be initialized after the cable is reconnected (Click here).
- After turning the ignition switch off, waiting time may be required before disconnecting the cable from the battery terminal. Therefore, make sure to read the disconnecting the cable from the battery terminal notice before proceeding with work (Click here).
| 1. CHECK PASSENGER AIRBAG ON/OFF INDICATOR CONDITION |

Turn the ignition switch to ON.
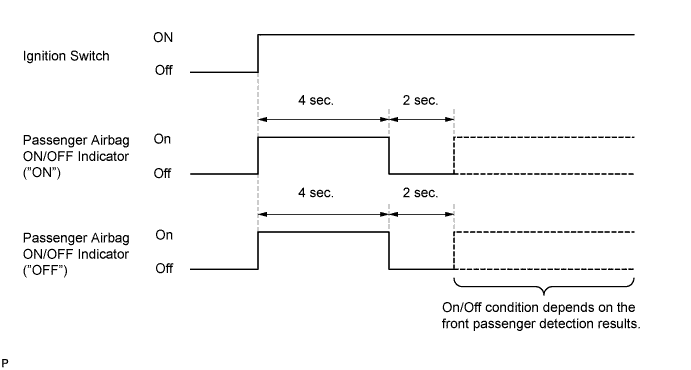
Check the passenger airbag ON/OFF indicator operation.
- HINT:
- Refer to the normal condition of the passenger airbag ON/OFF indicator (Click here).
Result Result
Proceed to
Always on
A
Off
B
|
|
||||

| A | |
 |
| 2. CHECK CONNECTION OF CONNECTORS |
Turn the ignition switch off.
Disconnect the cable from the negative (-) battery terminal, and wait for at least 90 seconds.
Check that the connectors are properly connected to the center airbag sensor and the multi-display assembly or clock.
- OK:
- The connectors are properly connected.
|
|
||||

| OK | |
|
| 3. CHECK CONNECTORS |
Disconnect the connectors from the center airbag sensor and the multi-display assembly or clock.
Check that the connectors (on the center airbag sensor side and multi-display assembly side or clock side) are not damaged.
- OK:
- The connectors are not deformed or damaged.
|
|
||||
| OK | |
|
| 4. CHECK PASSENGER AIRBAG ON/OFF INDICATOR |
Connect the connector to the multi-display assembly or clock.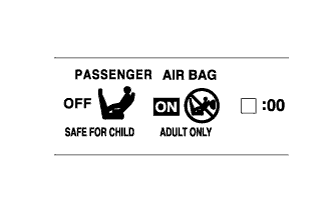
Connect the cable to the negative (-) battery terminal, and wait for at least 2 seconds.
Turn the ignition switch to ON.
Check the passenger airbag ON/OFF indicator operation.
- OK:
- The passenger airbag ON/OFF indicator does not come on.
|
|
||||
| OK | |
|
| 5. CHECK CENTER AIRBAG SENSOR |
Connect the connector to the center airbag sensor.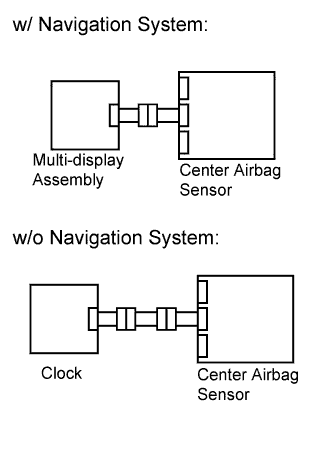
Connect the cable to the negative (-) battery terminal, and wait for at least 2 seconds.
Turn the ignition switch to ON, and wait for at least 60 seconds.
Clear the DTCs (Click here).
Turn the ignition switch off.
Turn the ignition switch to ON, and wait for at least 60 seconds.
Check for DTCs (Click here).
- OK:
- DTC B1660 is not output.
- HINT:
- Codes other than DTC B1660 may be output at this time, but they are not related to this check.
|
|
||||
| OK | ||
 |
||
| ||
| 6. CHECK PASSENGER AIRBAG ON/OFF INDICATOR CIRCUIT |
Turn the ignition switch off.
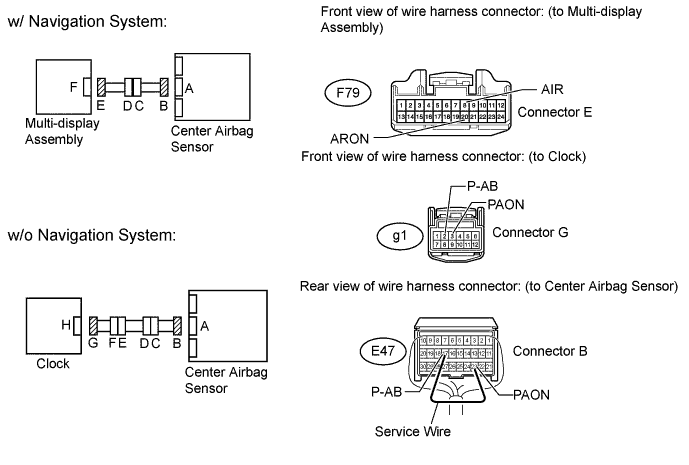
Disconnect the cable from the negative (-) battery terminal, and wait for at least 90 seconds.
Disconnect the connector from the center airbag sensor and multi-display assembly or clock.
Connect the cable to the negative (-) battery terminal, and wait for at least 2 seconds.
Measure the voltage according to the value(s) in the table below.
- Standard Voltage:
w/ Navigation System Tester Connection
Switch Condition
Specified Condition
F79-20 (ARON) - Body ground
Ignition switch ON
Below 1 V
F79-8 (AIR) - Body ground
Ignition switch ON
Below 1 V
w/o Navigation System Tester Connection
Switch Condition
Specified Condition
g1-3 (PAON) - Body ground
Ignition switch ON
Below 1 V
g1-2 (P-AB) - Body ground
Ignition switch ON
Below 1 V
Turn the ignition switch off.
Disconnect the cable from the negative (-) battery terminal, and wait for at least 90 seconds.
Using a service wire, connect terminals 23 (PAON) and 17 (P-AB) of connector B.
- NOTICE:
- Do not forcibly insert the service wire into the terminals of the connector when connecting a service wire.
Measure the resistance according to the value(s) in the table below.
- Standard Resistance:
w/ Navigation System Tester Connection
Condition
Specified Condition
F79-20 (ARON) - F79-8 (AIR)
Always
Below 1 Ω
w/o Navigation System Tester Connection
Condition
Specified Condition
g1-3 (PAON) - g1-2 (P-AB)
Always
Below 1 Ω
Disconnect the service wire from connector B.
Measure the resistance according to the value(s) in the table below.
- Standard Resistance:
w/ Navigation System Tester Connection
Condition
Specified Condition
F79-20 (ARON) - F79-8 (AIR)
Always
1 MΩ or higher
F79-20 (ARON) - Body ground
Always
1 MΩ or higher
F79-8 (AIR) - Body ground
Always
1 MΩ or higher
w/o Navigation System Tester Connection
Condition
Specified Condition
g1-3 (PAON) - g1-2 (P-AB)
Always
1 MΩ or higher
g1-3 (PAON) - Body ground
Always
1 MΩ or higher
g1-2 (P-AB) - Body ground
Always
1 MΩ or higher
Result Result
Proceed to
OK (w/ Navigation System)
A
OK (w/o Navigation System)
B
NG
C
|
|
||||
|
|
||||
| A | ||
|
||
| ||
| 7. CHECK INSTRUMENT PANEL WIRE (CENTER AIRBAG SENSOR - NO. 2 INSTRUMENT PANEL WIRE) |
Disconnect the instrument panel wire connector from the No. 2 instrument panel wire.
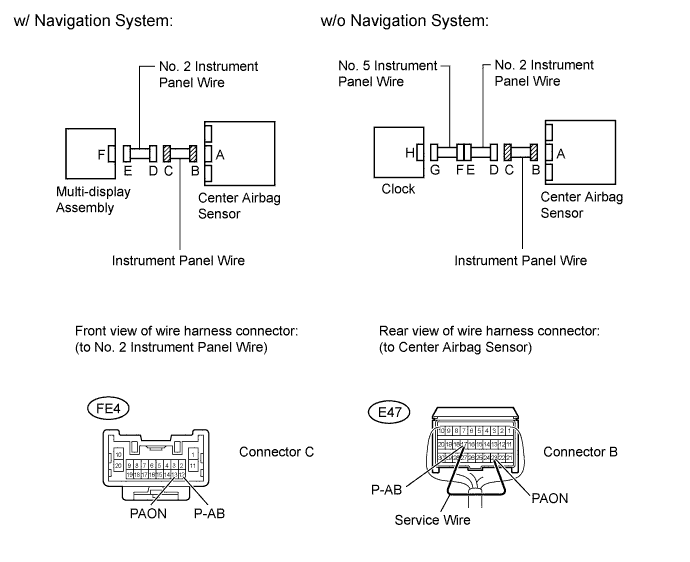
Connect the cable to the negative (-) battery terminal, and wait for at least 2 seconds.
Measure the voltage according to the value(s) in the table below.
- Standard Voltage:
Tester Connection
Switch Condition
Specified Condition
FE4-13 (PAON) - Body ground
Ignition switch ON
Below 1 V
FE4-12 (P-AB) - Body ground
Ignition switch ON
Below 1 V
Turn the ignition switch off.
Disconnect the cable from the negative (-) battery terminal, and wait for at least 90 seconds.
Using a service wire, connect terminals 23 (PAON) and 17 (P-AB) of connector B.
- NOTICE:
- Do not forcibly insert the service wire into the terminals of the connector when connecting a service wire.
Measure the resistance according to the value(s) in the table below.
- Standard Resistance:
Tester Connection
Condition
Specified Condition
FE4-13 (PAON) - FE4-12 (P-AB)
Always
Below 1 Ω
Disconnect the service wire from connector B.
Measure the resistance according to the value(s) in the table below.
- Standard Resistance:
Tester Connection
Condition
Specified Condition
FE4-13 (PAON) - FE4-12 (P-AB)
Always
1 MΩ or higher
FE4-13 (PAON) - Body ground
Always
1 MΩ or higher
FE4-12 (P-AB) - Body ground
Always
1 MΩ or higher
Result Result
Proceed to
OK (w/ Navigation System)
A
OK (w/o Navigation System)
B
NG
C
|
|
||||
|
|
||||
| A | ||
|
||
| ||
| 8. CHECK NO. 2 INSTRUMENT PANEL WIRE (INSTRUMENT PANEL WIRE - NO. 5 INSTRUMENT PANEL WIRE) |
Disconnect the No. 2 instrument panel wire connector from the No. 5 instrument panel wire.
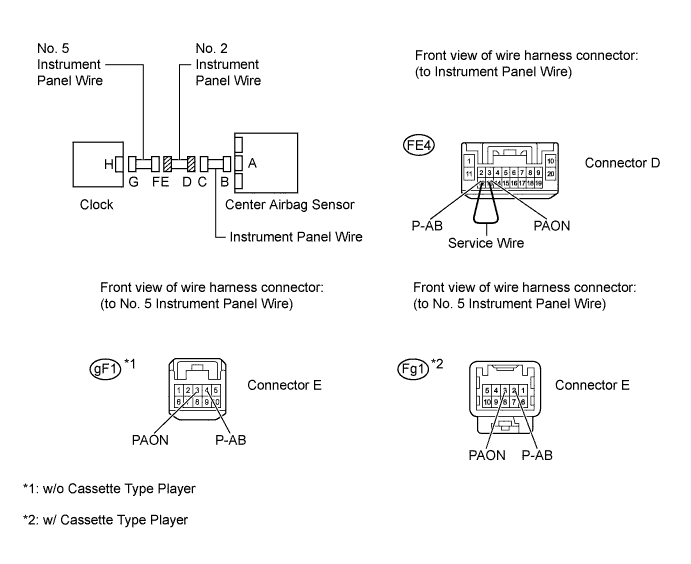
Connect the cable to the negative (-) battery terminal, and wait for at least 2 seconds.
Measure the voltage according to the value(s) in the table below.
- Standard Voltage:
w/o Cassette Type Player Tester Connection
Switch Condition
Specified Condition
gF1-3 (PAON) - Body ground
Ignition switch ON
Below 1 V
gF1-4 (P-AB) - Body ground
Ignition switch ON
Below 1 V
w/ Cassette Type Player Tester Connection
Switch Condition
Specified Condition
Fg1-3 (PAON) - Body ground
Ignition switch ON
Below 1 V
Fg1-2 (P-AB) - Body ground
Ignition switch ON
Below 1 V
Turn the ignition switch off.
Disconnect the cable from the negative (-) battery terminal, and wait for at least 90 seconds.
Using a service wire, connect terminals 13 (PAON) and 12 (P-AB) of connector D.
- NOTICE:
- Do not forcibly insert the service wire into the terminals of the connector when connecting a service wire.
Measure the resistance according to the value(s) in the table below.
- Standard Resistance:
w/o Cassette Type Player Tester Connection
Condition
Specified Condition
gF1-3 (PAON) - gF1-4 (P-AB)
Always
Below 1 Ω
w/ Cassette Type Player Tester Connection
Condition
Specified Condition
Fg1-3 (PAON) - Fg1-2 (P-AB)
Always
Below 1 Ω
Disconnect the service wire from connector D.
Measure the resistance according to the value(s) in the table below.
- Standard Resistance:
w/o Cassette Type Player Tester Connection
Condition
Specified Condition
gF1-3 (PAON) - gF1-4 (P-AB)
Always
1 MΩ or higher
gF1-3 (PAON) - Body ground
Always
1 MΩ or higher
gF1-4 (P-AB) - Body ground
Always
1 MΩ or higher
w/ Cassette Type Player Tester Connection
Condition
Specified Condition
Fg1-3 (PAON) - Fg1-2 (P-AB)
Always
1 MΩ or higher
Fg1-3 (PAON) - Body ground
Always
1 MΩ or higher
Fg1-2 (P-AB) - Body ground
Always
1 MΩ or higher
|
|
||||
| OK | ||
|
||
| ||
| 9. CHECK CONNECTION OF CONNECTORS |
Turn the ignition switch off.
Disconnect the cable from the negative (-) battery terminal, and wait for at least 90 seconds.
Check that the connectors are properly connected to the center airbag sensor and the multi-display assembly or clock.
- OK:
- The connectors are properly connected.
|
|
||||
| OK | |
|
| 10. CHECK CONNECTORS |
Disconnect the connectors from the center airbag sensor and the multi-display assembly or clock.
Check that the connectors (on the center airbag sensor side and multi-display assembly side or clock side) are not damaged.
- OK:
- The connectors are not deformed or damaged.
|
|
||||
| OK | |
|
| 11. CHECK PASSENGER AIRBAG ON/OFF INDICATOR CIRCUIT |
Connect the cable to the negative (-) battery terminal, and wait for at least 2 seconds.
Measure the voltage according to the value(s) in the table below.
- Standard Voltage:
w/ Navigation System Tester Connection
Switch Condition
Specified Condition
F79-20 (ARON) - Body ground
Ignition switch ON
Below 1 V
F79-8 (AIR) - Body ground
Ignition switch ON
Below 1 V
w/o Navigation System Tester Connection
Switch Condition
Specified Condition
g1-3 (PAON) - Body ground
Ignition switch ON
Below 1 V
g1-2 (P-AB) - Body ground
Ignition switch ON
Below 1 V
Turn the ignition switch off.
Disconnect the cable from the negative (-) battery terminal, and wait for at least 90 seconds.
Using a service wire, connect terminals 23 (PAON) and 17 (P-AB) of connector B.
- NOTICE:
- Do not forcibly insert the service wire into the terminals of the connector when connecting a service wire.
Measure the resistance according to the value(s) in the table below.
- Standard Resistance:
w/ Navigation System Tester Connection
Condition
Specified Condition
F79-20 (ARON) - F79-8 (AIR)
Always
Below 1 Ω
w/o Navigation System Tester Connection
Condition
Specified Condition
g1-3 (PAON) - g1-2 (P-AB)
Always
Below 1 Ω
Disconnect the service wire from connector B.
Measure the resistance according to the value(s) in the table below.
- Standard Resistance:
w/ Navigation System Tester Connection
Condition
Specified Condition
F79-20 (ARON) - F79-8 (AIR)
Always
1 MΩ or higher
F79-20 (ARON) - Body ground
Always
1 MΩ or higher
F79-8 (AIR) - Body ground
Always
1 MΩ or higher
w/o Navigation System Tester Connection
Condition
Specified Condition
g1-3 (PAON) - g1-2 (P-AB)
Always
1 MΩ or higher
g1-3 (PAON) - Body ground
Always
1 MΩ or higher
g1-2 (P-AB) - Body ground
Always
1 MΩ or higher
|
|
||||
| OK | |
|
| 12. CHECK PASSENGER AIRBAG ON/OFF INDICATOR (SOURCE VOLTAGE) |
Turn the ignition switch off.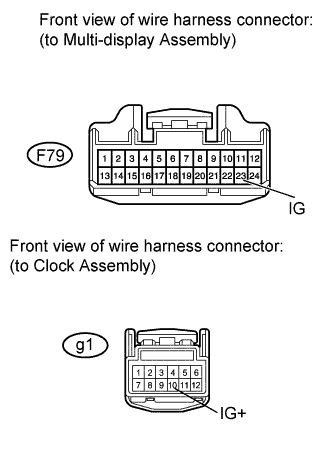
Connect the connectors to the center airbag sensor.
Connect the cable to the negative (-) battery terminal, and wait for at least 2 seconds.
Measure the voltage according to the value(s) in the table below.
- Standard Voltage:
w/ Navigation System Tester Connection
Switch Condition
Specified Condition
F64-3 (IG) - Body ground
Ignition switch ON
11 to 14 V
w/o Navigation System Tester Connection
Switch Condition
Specified Condition
g1-10 (IG+) - Body ground
Ignition switch ON
11 to 14 V
Result Result
Proceed to
OK
A
NG (w/ Navigation System)
B
NG (w/o Navigation System)
C
|
|
||||
|
|
||||
| A | |
|
| 13. CHECK PASSENGER AIRBAG ON/OFF INDICATOR |
Turn the ignition switch off.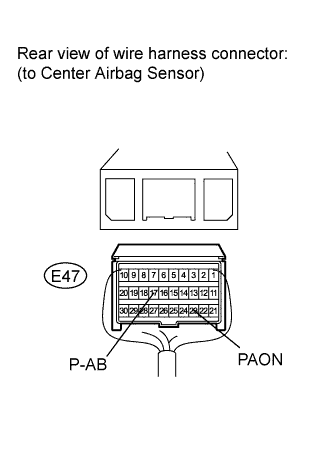
Disconnect the cable from the negative (-) battery terminal, and wait for at least 90 seconds.
Connect the connector to the multi-display assembly or clock.
Disconnect the connectors from the center airbag sensor.
Connect the cable to the negative (-) battery terminal, and wait for at least 2 seconds.
Check the indicator according to the table below.
- OK:
Tester Connection
Switch Condition
Passenger airbag ON/OFF indicator
E47-23 (PAON) - Body ground
Ignition switch ON
"ON" comes on
E47-17 (P-AB) - Body ground
Ignition switch ON
"OFF" comes on
Result Result
Proceed to
OK
A
NG (w/ Navigation System)
B
NG (w/o Navigation System)
C
|
|
||||
|
|
||||
| A | |
|
| 14. CHECK CENTER AIRBAG SENSOR |
Turn the ignition switch off.
Disconnect the cable from the negative (-) battery terminal, and wait for at least 90 seconds.
Connect the connectors to the center airbag sensor.
Connect the cable to the negative (-) battery terminal, and wait for at least 2 seconds.
Turn the ignition switch to ON, and wait for at least 60 seconds.
Clear the DTCs (Click here).
Turn the ignition switch off.
Turn the ignition switch to ON, and wait for at least 60 seconds.
Check for DTCs (Click here).
- OK:
- DTC B1660 is not output.
- HINT:
- Codes other than DTC B1660 may be output at this time, but they are not related to this check.
|
|
||||
| OK | ||
|
||
| ||
| 15. CHECK INSTRUMENT PANEL WIRE (CENTER AIRBAG SENSOR - NO. 2 INSTRUMENT PANEL WIRE) |
Disconnect the instrument panel wire connector from the No. 2 instrument panel wire.
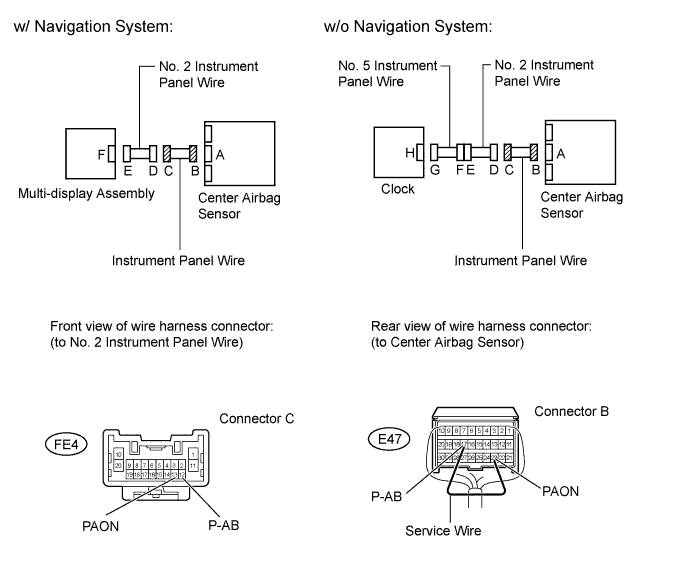
Connect the cable to the negative (-) battery terminal, and wait for at least 2 seconds.
Measure the voltage according to the value(s) in the table below.
- Standard Voltage:
Tester Connection
Switch Condition
Specified Condition
FE4-13 (PAON) - Body ground
Ignition switch ON
Below 1 V
FE4-12 (P-AB) - Body ground
Ignition switch ON
Below 1 V
Turn the ignition switch off.
Disconnect the cable from the negative (-) battery terminal, and wait for at least 90 seconds.
Using a service wire, connect terminals 23 (PAON) and 17 (P-AB) of connector B.
- NOTICE:
- Do not forcibly insert the service wire into the terminals of the connector when connecting a service wire.
Measure the resistance according to the value(s) in the table below.
- Standard Resistance:
Tester Connection
Condition
Specified Condition
FE4-13 (PAON) - FE4-12 (P-AB)
Always
Below 1 Ω
Disconnect the service wire from connector B.
Measure the resistance according to the value(s) in the table below.
- Standard Resistance:
Tester Connection
Condition
Specified Condition
FE4-13 (PAON) - FE4-12 (P-AB)
Always
1 MΩ or higher
FE4-13 (PAON) - Body ground
Always
1 MΩ or higher
FE4-12 (P-AB) - Body ground
Always
1 MΩ or higher
Result Result
Proceed to
OK (w/ Navigation System)
A
OK (w/o Navigation System)
B
NG
C
|
|
||||
|
|
||||
| A | ||
|
||
| ||
| 16. CHECK NO. 2 INSTRUMENT PANEL WIRE (INSTRUMENT PANEL WIRE - NO. 5 INSTRUMENT PANEL WIRE) |
Disconnect the No. 2 instrument panel wire connector from the No. 5 instrument panel wire.
Connect the cable to the negative (-) battery terminal, and wait for at least 2 seconds.
Measure the voltage according to the value(s) in the table below.
- Standard Voltage:
w/o Cassette Type Player Tester Connection
Switch Condition
Specified Condition
gF1-3 (PAON) - Body ground
Ignition switch ON
Below 1 V
gF1-4 (P-AB) - Body ground
Ignition switch ON
Below 1 V
w/ Cassette Type Player Tester Connection
Switch Condition
Specified Condition
Fg1-3 (PAON) - Body ground
Ignition switch ON
Below 1 V
Fg1-2 (P-AB) - Body ground
Ignition switch ON
Below 1 V
Turn the ignition switch off.
Disconnect the cable from the negative (-) battery terminal, and wait for at least 90 seconds.
Using a service wire, connect terminals 13 (PAON) and 12 (P-AB) of connector D.
- NOTICE:
- Do not forcibly insert the service wire into the terminals of the connector when connecting a service wire.
Measure the resistance according to the value(s) in the table below.
- Standard Resistance:
w/o Cassette Type Player Tester Connection
Condition
Specified Condition
gF1-3 (PAON) - gF1-4 (P-AB)
Always
Below 1 Ω
w/ Cassette Type Player Tester Connection
Condition
Specified Condition
Fg1-3 (PAON) - Fg1-2 (P-AB)
Always
Below 1 Ω
Disconnect the service wire from connector D.
Measure the resistance according to the value(s) in the table below.
- Standard Resistance:
w/o Cassette Type Player Tester Connection
Condition
Specified Condition
gF1-3 (PAON) - gF1-4 (P-AB)
Always
1 MΩ or higher
gF1-3 (PAON) - Body ground
Always
1 MΩ or higher
gF1-4 (P-AB) - Body ground
Always
1 MΩ or higher
w/ Cassette Type Player Tester Connection
Condition
Specified Condition
Fg1-3 (PAON) - Fg1-2 (P-AB)
Always
1 MΩ or higher
Fg1-3 (PAON) - Body ground
Always
1 MΩ or higher
Fg1-2 (P-AB) - Body ground
Always
1 MΩ or higher
|
|
||||
| OK | ||
|
||
| ||