ON-VEHICLE INSPECTION
Inspection · Vehicles built from Sep 2011
| MEASURE VEHICLE HEIGHT |

- NOTICE:
- Perform the inspection on a level surface.
- Ensure that the wheels are on the ground and facing straight ahead.
- Perform the inspection with the vehicle load completely on the suspension.
- Perform the inspection on a level surface.
- HINT:
- Perform this step with the fuel tank full.
- If there are any parts installed to the vehicle which place any unbalanced load on the left or right side of the vehicle, remove them.
- Perform this step with the fuel tank full.
Set the tire pressure to the specified value(s) (Click here).
Bounce the vehicle to stabilize the suspension.
Measure the distance from the ground to the top of the bumper and calculate the difference in the vehicle height between left and right. Perform this procedure for both the front and rear wheels.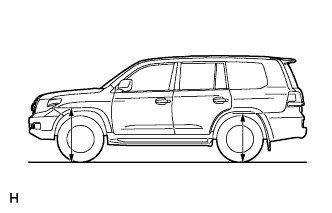

- Height difference of left and right sides:
- 15 mm (0.591 in.) or less
- HINT:
- If not as specified, perform the vehicle tilt calibration.
| VEHICLE TILT CALIBRATION |
- NOTICE:
- Perform the inspection on a level surface.
- Ensure that the wheels are on the ground and facing straight ahead.
- Perform the inspection with the vehicle load completely on the suspension.
- Perform the inspection on a level surface.
- HINT:
- Perform this step with the fuel tank full.
- If there are any parts installed to the vehicle which place any unbalanced load on the left or right side of the vehicle, remove them.
- Perform this step with the fuel tank full.
Remove the stabilizer control valve protector (Click here).
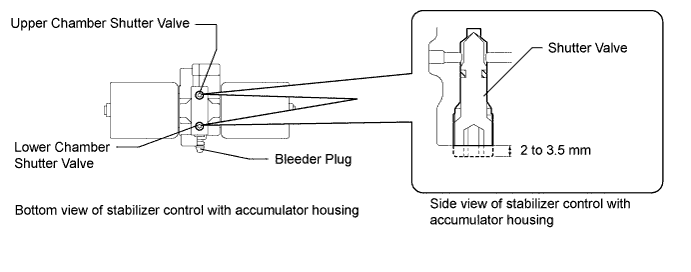
Using a 5 mm socket hexagon wrench, loosen the lower and upper chamber shutter valves of the stabilizer control with accumulator housing 2.0 to 3.5 turns.
- NOTICE:
- When loosening a shutter valve, make sure that the end protrudes 2 to 3.5 mm (0.0787 to 0.137 in.) from the surface of the block, and do not turn the shutter valve any further.
- Do not remove the shutter valves.
- When loosening a shutter valve, make sure that the end protrudes 2 to 3.5 mm (0.0787 to 0.137 in.) from the surface of the block, and do not turn the shutter valve any further.
- HINT:
- By loosening the shutter valves, the upper and lower chamber will be fully connected, and the vehicle height is corrected by the equalization of the upper and lower chamber oil pressure.
Bounce the vehicle to stabilize the suspension.
Check the difference in height between the left and right sides of the vehicle. Refer to Measure Vehicle Height.
- HINT:
- When the vehicle height of the left and right side of the vehicle is not within the specified range, bleed the air (Click here).
Using a 5 mm socket hexagon wrench, tighten the lower and upper chamber shutter valves of the stabilizer control with accumulator housing.
- Torque:
- 14 N*m{ 143 kgf*cm , 10 ft.*lbf }
Install the stabilizer control valve protector (Click here).
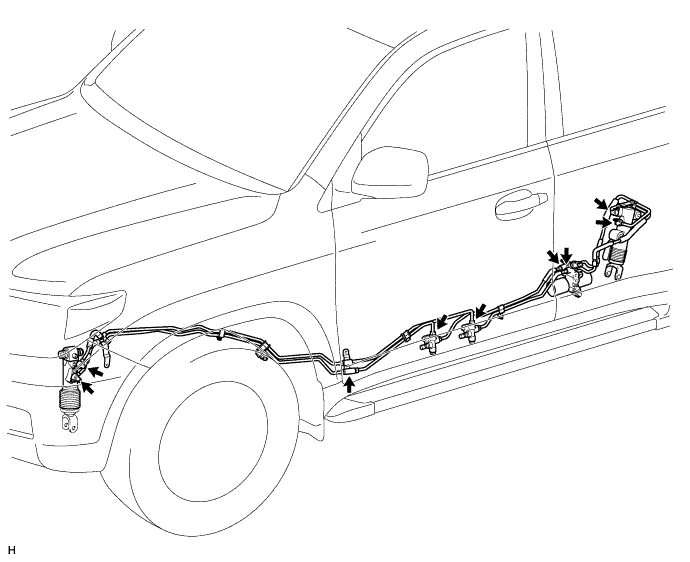
| INSPECT FOR SUSPENSION FLUID LEAK |
- CAUTION:
- Fluid is pumped into the system at a high pressure of approximately 3 MPa (30.6 kgf/cm2, 435 psi). If a fluid leak is discovered, immediately release the pressure and repair the fluid leak.
Perform a driving test.
Check for fluid leakage from the parts and connections.