Cooling Box Sensor Circuit
Circuit diagnosis · Vehicles built from Sep 2011
DESCRIPTION
The No. 3 cooler thermistor is installed on the evaporator in the cooling box unit to detect the cooled air temperature that has passed through the evaporator and control the cooling box. It sends appropriate signals to the air conditioning amplifier assembly (for cool box). The resistance of the No. 3 cooler thermistor changes in accordance with the cooled air temperature that has passed through the evaporator. As the temperature decreases, the resistance increases. As the temperature increases, the resistance decreases.The air conditioning amplifier assembly (for cool box) applies voltage (12 V) to the No. 3 cooler thermistor and reads voltage changes as the resistance of the No. 3 cooler thermistor changes.
WIRING DIAGRAM
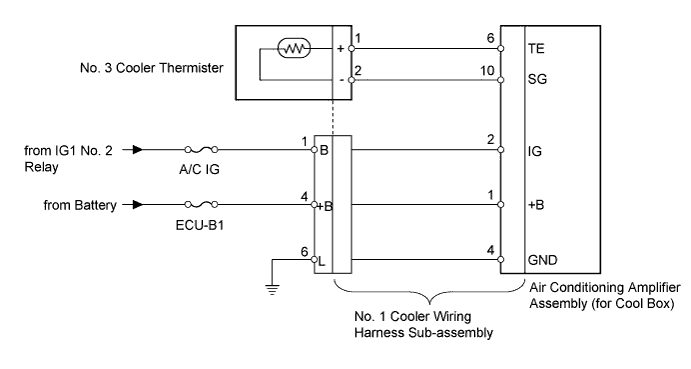

INSPECTION PROCEDURE
| 1. INSPECT FUSE (A/C IG, ECU-B1) |

Remove the A/C IG fuse from the cowl side junction block LH.
Remove the ECU-B1 fuse from the engine room relay block.
Measure the resistance according to the value(s) in the table below.
- Standard Resistance:
Tester Connection
Condition
Specified Condition
A/C IG fuse
Always
Below 1 Ω
ECU-B1 fuse
Always
Below 1 Ω
|
|
||||

| OK | |
 |
| 2. CHECK HARNESS AND CONNECTOR (NO. 1 COOLER WIRING HARNESS - BATTERY) |
Disconnect the No. 1 cooler wiring harness sub-assembly connector.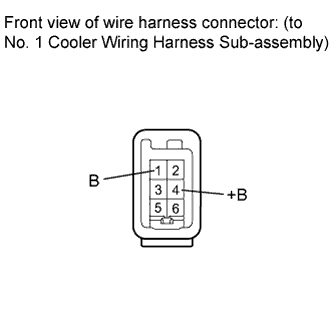
Measure the voltage according to the value(s) in the table below.
- Standard Voltage:
Tester Connection
Condition
Specified Condition
4 (+B) - Body ground
Always
11 to 14 V
1 (B) - Body ground
Engine switch off
Below 1 V
Engine switch on (IG)
11 to 14 V
|
|
||||
| OK | |
|
| 3. CHECK HARNESS AND CONNECTOR (NO. 1 COOLER WIRING HARNESS - BODY GROUND) |
Disconnect the No. 1 cooler wiring harness sub-assembly connector.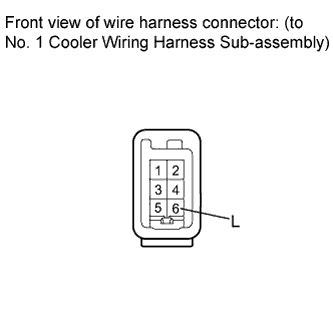
Measure the resistance according to the value(s) in the table below.
- Standard Resistance:
Tester Connection
Condition
Specified Condition
6 (L) - Body ground
Always
Below 1 Ω
|
|
||||
| OK | |
|
| 4. CHECK NO. 1 COOLER WIRING HARNESS SUB-ASSEMBLY (OPERATION) |
Replace the No. 1 cooler wiring harness sub-assembly with a normal one and check that the condition returns to normal.
- OK:
- Same problem does not occur.
|
|
||||

| OK | ||
 |
||
| ||
| 5. CHECK NO. 3 COOLER THERMISTOR |
Remove the No. 3 cooler thermistor (Click here).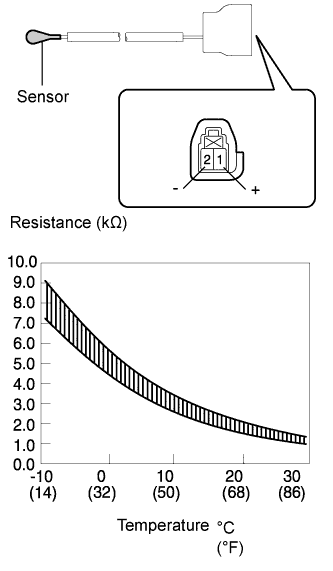
Measure the resistance according to the value(s) in the table below.
- Standard Resistance:
Tester Connection
Condition
Specified Condition
1 (+) - 2 (-)
-10°C (14°F)
7.30 to 9.10 kΩ
-5°C (23°F)
5.65 to 6.95 kΩ
0°C (32°F)
4.40 to 5.35 kΩ
5°C (41°F)
3.40 to 4.15 kΩ
10°C (50°F)
2.70 to 3.25 kΩ
15°C (59°F)
2.14 to 2.58 kΩ
20°C (68°F)
1.71 to 2.05 kΩ
25°C (77°F)
1.38 to 1.64 kΩ
30°C (86°F)
1.11 to 1.32 kΩ
- NOTICE:
- Even slightly touching the sensor may change the resistance value. Be sure to hold the connector of the sensor.
- When measuring, the sensor temperature must be the same as the ambient temperature.
- Even slightly touching the sensor may change the resistance value. Be sure to hold the connector of the sensor.
- HINT:
- As the temperature increases, the resistance decreases (see the graph).
|
|
||||
| OK | ||
|
||
| ||