1VD-FTV LUBRICATION OIL PUMP REMOVAL
CAUTION / NOTICE / HINT
- NOTICE:
- ·
When replacing an injector (including interchanging injectors between cylinders) or common rail, replace the corresponding injection pipes with new ones.
·w/DPF
When fuel lines are disconnected, air may enter the fuel lines, leading to engine starting trouble. Therefore, perform forced regeneration and bleed the air from the fuel lines.
PROCEDURE

 1. PRECAUTION
- NOTICE:
-
After turning the ignition switch off, waiting time may be required before disconnecting the cable from the battery terminal. Therefore, make sure to read the disconnecting the cable from the battery terminal notice before proceeding with work (See page General>INTRODUCTION>REPAIR INSTRUCTION>PRECAUTION).
2.DISCONNECT CABLE FROM NEGATIVE BATTERY TERMINAL
- CAUTION:
-
Wait at least 90 seconds after disconnecting the cable from the negative (-) battery terminal to disable the SRS system.
- NOTICE:
-
When disconnecting the cable, some systems need to be initialized after the cable is reconnected (See page General>INTRODUCTION>REPAIR INSTRUCTION>INITIALIZATION).
Disconnect the cables from the negative (-) main battery and sub-battery terminals.
3.REMOVE ENGINE ASSEMBLY
Remove the engine assembly from the vehicle (See page Engine / Hybrid System>1VD-FTV (ENGINE MECHANICAL)>ENGINE ASSEMBLY>REMOVAL).
17875
4.REMOVE NO. 1 INTAKE AIR CONNECTOR PIPE
27020
5.REMOVE GENERATOR ASSEMBLY
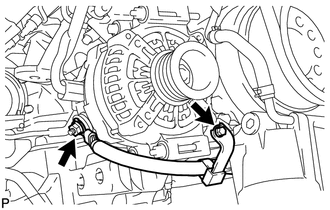
Remove the nut and bolt, and disconnect the generator positive (+) cable.
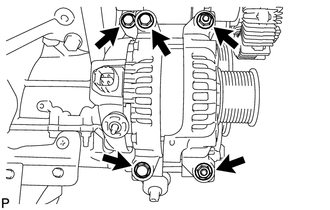
Remove the 3 bolts, 2 nuts and generator.
15474A
6.DISCONNECT NO. 1 OUTLET TURBO OIL HOSE
11452
7.REMOVE NO. 1 ENGINE OIL LEVEL DIPSTICK GUIDE
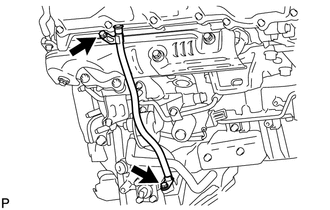
Remove the 2 bolts and No. 1 engine oil level dipstick guide.
15492
8.DISCONNECT NO. 2 OUTLET TURBO OIL HOSE
15408G
9.DISCONNECT NO. 2 INLET TURBO OIL PIPE SUB-ASSEMBLY
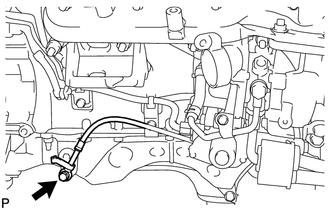
Remove the union bolt and gasket, and disconnect the No. 2 inlet turbo oil pipe.
12158
10.REMOVE STIFFENER INSULATOR RH (w/ Intercooler)
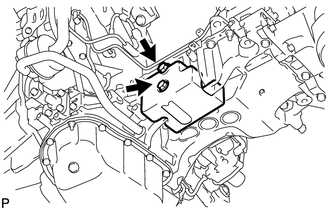
Remove the 2 bolts and stiffener insulator RH.
15777
11.DISCONNECT NO. 1 OIL COOLER HOSE
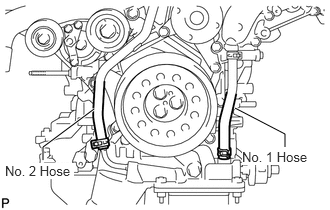
15778
12.DISCONNECT NO. 2 OIL COOLER HOSE
16620D
13.REMOVE V-RIBBED BELT TENSIONER ASSEMBLY
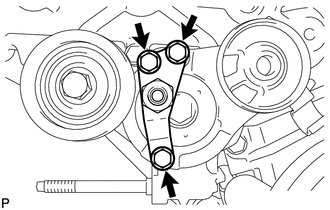
Remove the 3 bolts and V-ribbed belt tensioner bracket.
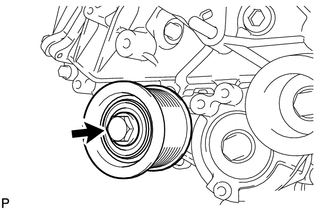
Remove the bolt and No. 1 idler pulley.
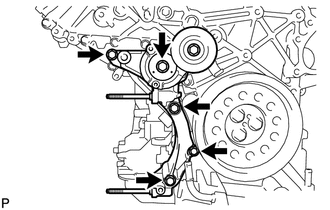
Remove the 5 bolts and V-ribbed belt tensioner.
13471
14.REMOVE CRANKSHAFT PULLEY
11348
15.REMOVE TIMING GEAR COVER SPACER (w/ Intercooler)
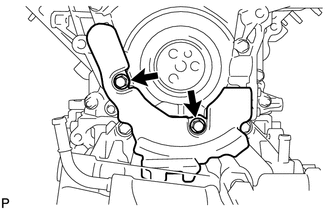
Remove the 2 bolts and timing gear cover spacer.
15650
16.REMOVE OIL FILTER ELEMENT
15609
17.REMOVE OIL FILTER BRACKET SUB-ASSEMBLY
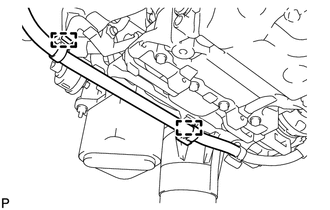
Disconnect the 2 wire harness clamps.
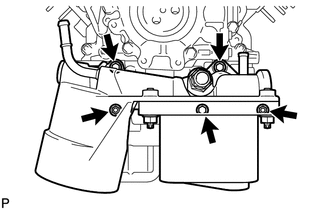
Remove the 3 bolts, 2 nuts and oil filter bracket.
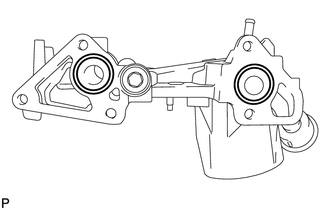
Remove the 2 O-rings.
89491
18.REMOVE ENGINE OIL LEVEL SENSOR
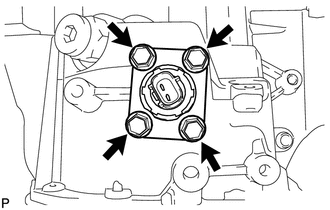
Remove the 4 bolts and engine oil level sensor.
Remove the gasket.
12102A
19.REMOVE NO. 2 OIL PAN SUB-ASSEMBLY
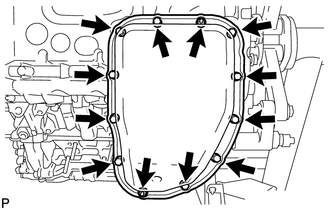
Remove the 10 bolts and 2 nuts.
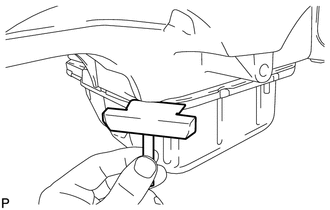
Insert the blade of an oil pan seal cutter between the oil pans. Cut through the applied sealer and remove the No. 2 oil pan.
- NOTICE:
-
Be careful not to damage the contact surfaces of the No. 1 and No. 2 oil pans.
15104
20.REMOVE OIL STRAINER SUB-ASSEMBLY
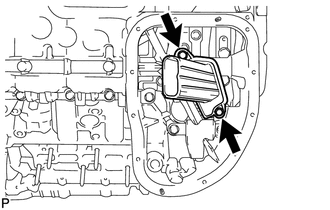
Remove the 2 bolts and oil strainer.
Remove the O-ring from the oil strainer.
12101
21.REMOVE NO. 1 OIL PAN SUB-ASSEMBLY
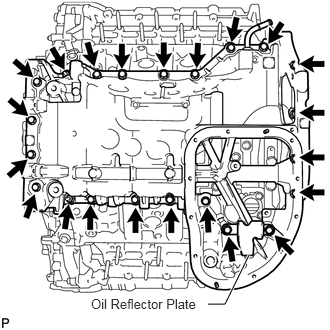
Remove the 20 bolts, 2 nuts and oil reflector plate.
- NOTICE:
-
If the oil reflector plate is deformed, replace it.
- HINT:
-
Be sure to clean the bolts and stud bolts, and check the threads for cracks or other damage.
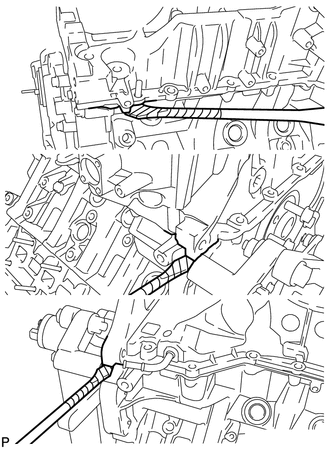
Remove the No. 1 oil pan by prying between the No. 1 oil pan and cylinder block with a screwdriver.
- NOTICE:
-
Be careful not to damage the contact surfaces of the cylinder block and oil pan.
- HINT:
-
Tape the screwdriver tip before use.
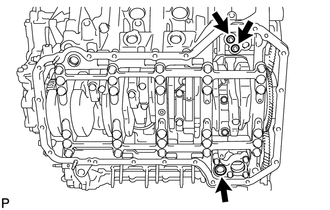
Remove the 3 O-rings.
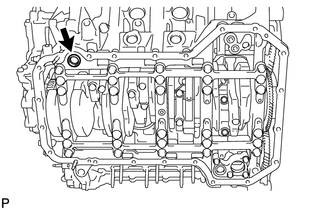
Remove the cylinder block oil hole gasket.
15310H
22.REMOVE OIL REGULATOR ASSEMBLY
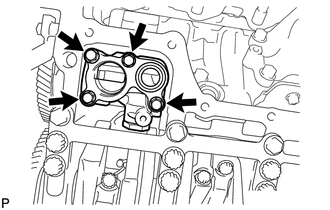
Remove the 4 bolts and oil regulator.
11381
23.REMOVE REAR ENGINE OIL SEAL RETAINER
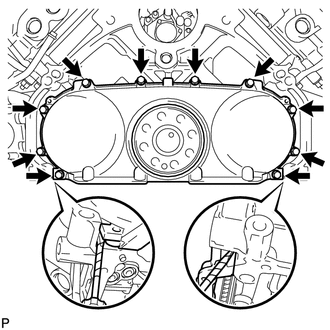
Remove the 10 bolts.
Remove the oil seal retainer by prying between the oil seal retainer and cylinder block with a screwdriver.
- HINT:
-
Tape the screwdriver tip before use.
11381A
24.REMOVE REAR CRANKSHAFT OIL SEAL
15100
25.REMOVE OIL PUMP ASSEMBLY
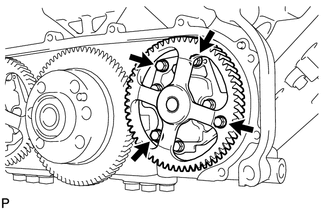
Remove the 4 bolts and oil pump.