1VD-FTV ENGINE MECHANICAL ENGINE ASSEMBLY REMOVAL
CAUTION / NOTICE / HINT
- NOTICE:
-
w/ DPF:
-
When fuel lines are disconnected, air may enter the fuel lines, leading to engine starting trouble. Therefore, perform forced regeneration and bleed the air from the fuel lines.
PROCEDURE

 1.RECOVER REFRIGERANT FROM REFRIGERATION SYSTEM
2. PRECAUTION
- NOTICE:
-
After turning the ignition switch off, waiting time may be required before disconnecting the cable from the battery terminal. Therefore, make sure to read the disconnecting the cable from the battery terminal notice before proceeding with work (See page General>INTRODUCTION>REPAIR INSTRUCTION>PRECAUTION).
3.DISCONNECT CABLE FROM NEGATIVE BATTERY TERMINAL
- NOTICE:
-
When disconnecting the cable some systems need to be initialized after the cable is reconnected (See page General>INTRODUCTION>REPAIR INSTRUCTION>INITIALIZATION).
55781E
4.REMOVE COWL TOP VENTILATOR LOUVER SUB-ASSEMBLY
12601E
5.REMOVE NO. 1 ENGINE COVER SUB-ASSEMBLY (w/ Intercooler)
53292A
6.REMOVE UPPER RADIATOR SUPPORT SEAL
28800
7.REMOVE MAIN BATTERY
8.REMOVE SUB-BATTERY
9.REMOVE FRONT WHEEL
53301
10.REMOVE HOOD SUB-ASSEMBLY
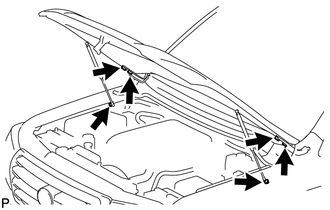
Remove the 2 hood stay bolts. Then disconnect the 2 hood supports.
- NOTICE:
- ·
Avoid touching the stroke portions of the rod as much as possible to prevent foreign matter from attaching to it. Be sure to hold the cylinders while servicing.
·Do not wear cotton gloves or other similar materials when handling the rod. Fibers may attach to the rod and result in gas leaks.
·Do not apply any load to the cylinders in the horizontal direction in order to prevent the rod from being deformed.
·Remove the hood support while supporting the hood by hand.
Remove the 4 bolts and hood.
53806
11.REMOVE FRONT FENDER SPLASH SHIELD SUB-ASSEMBLY LH
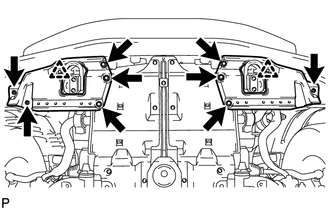
Remove the 3 bolts and screw.
Loosen the clip and remove the front fender splash shield LH.
53805
12.REMOVE FRONT FENDER SPLASH SHIELD SUB-ASSEMBLY RH
Remove the 3 bolts and 2 screws.
Loosen the clip and remove the front fender splash shield RH.
51405A
13.REMOVE NO. 1 ENGINE UNDER COVER SUB-ASSEMBLY
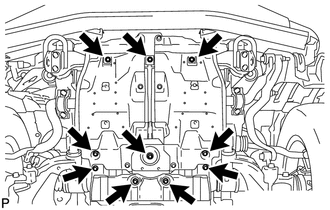
Remove the 10 bolts and No. 1 engine under cover.
51442
14.REMOVE NO. 2 ENGINE UNDER COVER
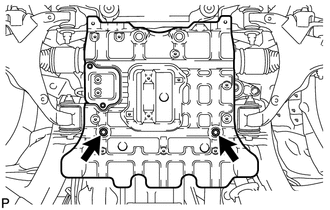
Remove the 2 bolts and No. 2 engine under cover.
51440
15.REMOVE OIL PAN PROTECTOR ASSEMBLY (for 1-piece Type)
51440
16.REMOVE OIL PAN PROTECTOR ASSEMBLY LH (for 2-piece Type)
51440
17.REMOVE OIL PAN PROTECTOR ASSEMBLY RH (for 2-piece Type)
18.DRAIN ENGINE COOLANT
19.DRAIN ENGINE OIL
Remove the oil filler cap.
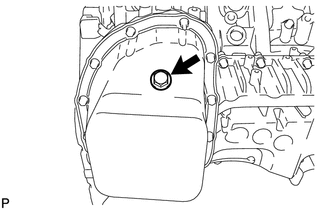
Remove the oil pan drain plug and gasket, and then drain the engine oil into a container.
Install a new gasket and the oil pan drain plug.
- Torque:
- 38 N*m (387 kgf*cm, 28 ft.*lbf)
17940D
20.REMOVE INTERCOOLER ASSEMBLY (w/ Intercooler)
82113
21.REMOVE NO. 3 ENGINE ROOM WIRE
17705
22.REMOVE AIR CLEANER CAP SUB-ASSEMBLY
17801
23.REMOVE AIR CLEANER FILTER ELEMENT
24.REMOVE AIR CLEANER CASE
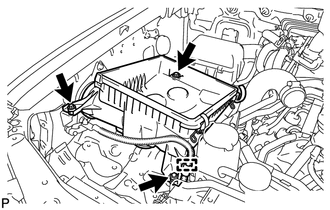
Using a clip remover, detach the wire harness clamp.
Remove the 3 bolts and air cleaner case.
17881
25.REMOVE NO. 1 AIR CLEANER HOSE
17861
26.REMOVE INTAKE AIR CONNECTOR
44360
27.REMOVE VANE PUMP OIL RESERVOIR ASSEMBLY
44369A
28.REMOVE NO. 1 OIL RESERVOIR BRACKET
16470
29.REMOVE RADIATOR RESERVOIR ASSEMBLY
44310
30.REMOVE VANE PUMP ASSEMBLY
16571C
31.DISCONNECT NO. 1 RADIATOR HOSE
16572D
32.DISCONNECT NO. 2 RADIATOR HOSE
33.REMOVE V-RIBBED BELT (w/ Viscous Heater)
34.REMOVE NO. 1 IDLER PULLEY (w/ Viscous Heater)
35.REMOVE NO. 3 IDLER PULLEY (w/ Viscous Heater)
16361A
36.REMOVE V-RIBBED BELT
53782
37.REMOVE FRONT FENDER APRON SEAL FRONT RH
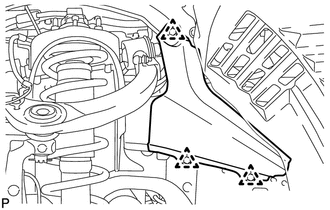
Remove the 3 clips and front fender apron seal front RH.
53784
38.REMOVE FRONT FENDER APRON SEAL REAR RH
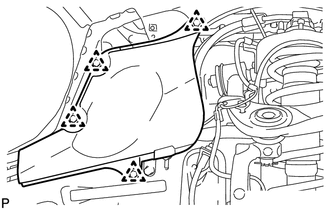
Remove the 4 clips and front fender apron seal rear RH.
53783
39.REMOVE FRONT FENDER APRON SEAL FRONT LH
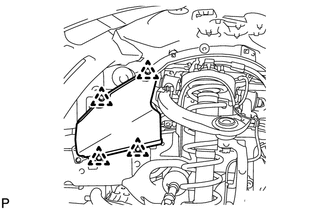
w/o KDSS:
Remove the 4 clips and front fender apron seal front LH.
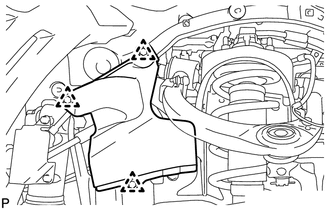
w/ KDSS:
Remove the 3 clips and front fender apron seal front LH.
53785B
40.REMOVE FRONT FENDER APRON SEAL REAR LH
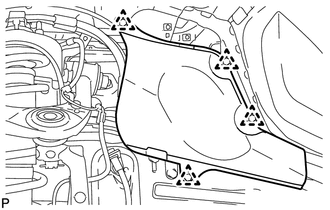
Remove the 4 clips and front fender apron seal rear LH.
32942
41.REMOVE OIL COOLER TUBE (for Automatic Transmission)
16711
42.REMOVE FAN SHROUD WITH FAN
16371
43.REMOVE FAN PULLEY
52049
44.REMOVE FRONT BUMPER WINCH COVER (w/ Winch)
53111
45.REMOVE RADIATOR GRILLE
52119A
46.REMOVE FRONT BUMPER COVER
32917
47.REMOVE TRANSMISSION OIL COOLER AIR DUCT (for Automatic Transmission)
53293C
48.DISCONNECT RADIATOR SIDE DEFLECTOR RH (for Manual Transmission)
53294C
49.DISCONNECT RADIATOR SIDE DEFLECTOR LH
16400
50.REMOVE RADIATOR ASSEMBLY
41533
51.DISCONNECT FRONT DIFFERENTIAL BREATHER TUBE
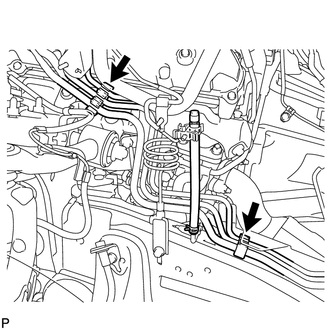
77251B
52.DISCONNECT FUEL TUBE
w/ DPF:
Disconnect the 2 fuel tubes from the No. 1 and No. 3 fuel tube clamps.
w/o DPF:
Disconnect the 3 fuel tubes from the No. 1 and No. 3 fuel tube clamps.
17973
53.REMOVE NO. 1 COOL AIR INLET (w/o Intercooler)
17973
54.REMOVE NO. 2 COOL AIR INLET (w/o Intercooler)
87209
55.DISCONNECT WATER HOSE SUB-ASSEMBLY
56.REMOVE NO. 2 ENGINE OIL LEVEL DIPSTICK GUIDE
17971
57.REMOVE AIR TUBE SUB-ASSEMBLY RH
58.REMOVE DIESEL THROTTLE BODY ASSEMBLY RH
59.DRAIN CLUTCH FLUID (for Manual Transmission)
31418
60.REMOVE CLUTCH HOSE (for Manual Transmission)
17972
61.REMOVE AIR TUBE SUB-ASSEMBLY LH
31489
62.REMOVE TUBE CONNECTOR TO FLEXIBLE HOSE TUBE (for Manual Transmission)
23265
63.REMOVE NO. 1 GAS FILTER
17947B
64.REMOVE NO. 3 INTERCOOLER SUPPORT BRACKET
26100G
65.REMOVE DIESEL THROTTLE BODY ASSEMBLY LH
17341F
66.REMOVE NO. 1 AIR HOSE
17363K
67.REMOVE NO. 3 AIR TUBE
17360E
68.REMOVE NO. 1 AIR TUBE ASSEMBLY
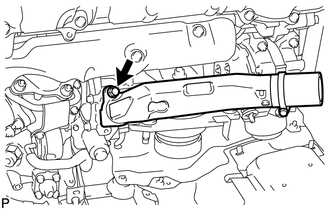
Remove the bolt and No. 1 air tube.
Remove the O-ring.
17342D
69.REMOVE NO. 2 AIR HOSE
17364
70.REMOVE NO. 4 AIR TUBE
71.REMOVE NO. 2 AIR TUBE ASSEMBLY
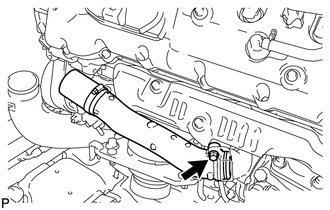
Remove the bolt and No. 2 air tube.
Remove the O-ring.
17806
72.REMOVE NO. 2 AIR CLEANER PIPE SUB-ASSEMBLY
88711
73.REMOVE NO. 1 COOLER REFRIGERANT DISCHARGE HOSE
88704
74.REMOVE SUCTION HOSE SUB-ASSEMBLY
88320
75.REMOVE COOLER COMPRESSOR ASSEMBLY
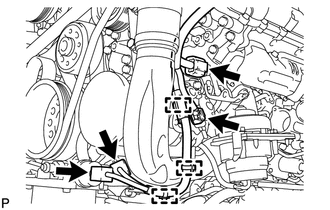
Disconnect the 4 connectors.
Using a clip remover, detach the 3 wire harness clamps.
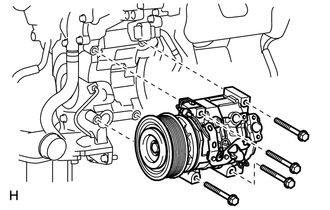
Remove the 4 bolts and cooler compressor.
17877
76.REMOVE NO. 2 INTAKE AIR CONNECTOR PIPE
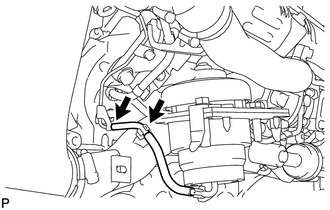
w/ Intercooler:
Disconnect the vacuum hose.
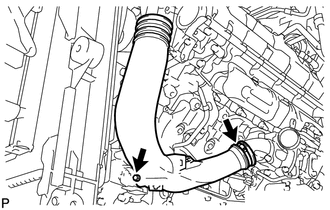
Loosen the hose clamp, and remove the bolt and No. 2 intake air connector pipe.
87208
77.REMOVE HEATER WATER PIPE SUB-ASSEMBLY (w/ Viscous Heater)
17885
78.REMOVE NO. 1 AIR CLEANER PIPE SUB-ASSEMBLY
23274D
79.DISCONNECT FUEL HOSE
16268M
80.REMOVE NO. 3 WATER BY-PASS PIPE (w/o Viscous Heater)
16288
81.REMOVE NO. 4 WATER BY-PASS PIPE
82.DISCONNECT ENGINE WIRE
LH Side:
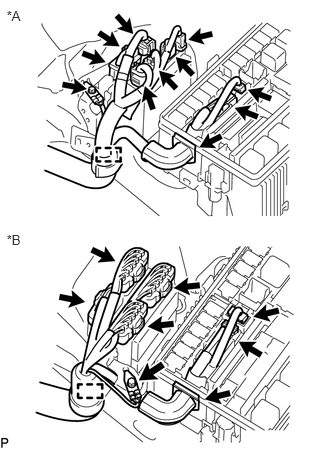
w/ DPF:
Disconnect the 7 connectors from the injector driver.
| *A | w/ DPF |
| *B | w/o DPF |
w/o DPF:
Disconnect the 4 connectors from the injector driver.
Disconnect the 2 connectors and detach the wire harness holder from the relay block.
Remove the bolt and disconnect the ground wire.
Disconnect the wire harness from the wire harness clamp holder.
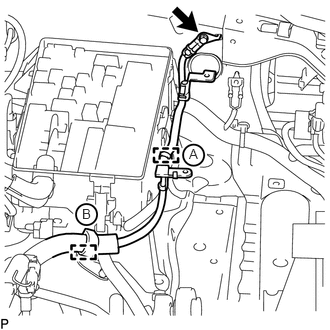
Remove the bolt and disconnect the ground wire from the body panel.
Using a clip remover, detach the ground wire clamp labeled A from the relay block side.
Disconnect the wire harness from the wire harness clamp holder labeled B.
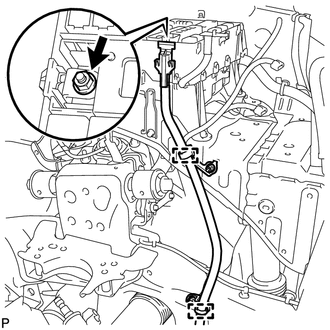
Remove the nut and detach the generator positive (+) cable holder from the relay block.
Disconnect the generator positive (+) cable from the 2 clamps.
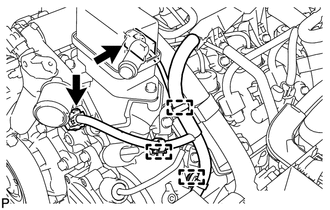
Disconnect the 2 connectors.
Using a clip remover, detach the 3 wire harness clamps.
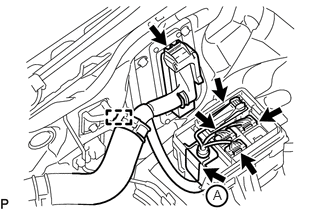
for RHD:
Disconnect the 4 connectors and detach the wire harness tab labeled A from the relay block.
for RHD:
Disconnect the ECM connector.
for RHD:
Disconnect the wire harness from the wire harness clamp holder.
Disconnect the 8 connectors.
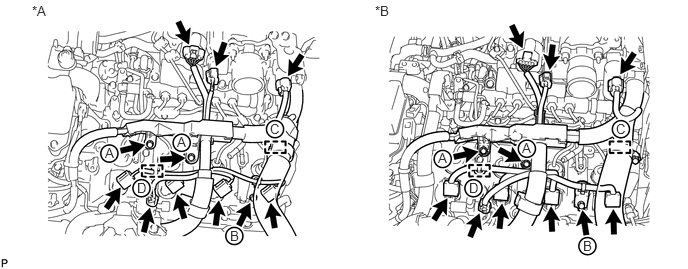
| *A | w/ DPF | *B | w/o DPF |
Remove the bolt and the engine wire harness bracket labeled B.
Using a clip remover, detach the wire harness clamp labeled D.
Remove the 2 bolts and disconnect the engine wire protector labeled A.
for RHD:
Disconnect the wire harness from the wire harness clamp holder labeled C.
RH Side:
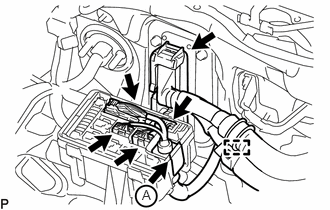
for LHD:
Disconnect the 4 connectors, and detach the wire harness holder from the relay block labeled A.
for LHD:
Disconnect the ECM connector.
for LHD:
Disconnect the wire harness from the wire harness clamp holder.
Disconnect the 7 connectors.
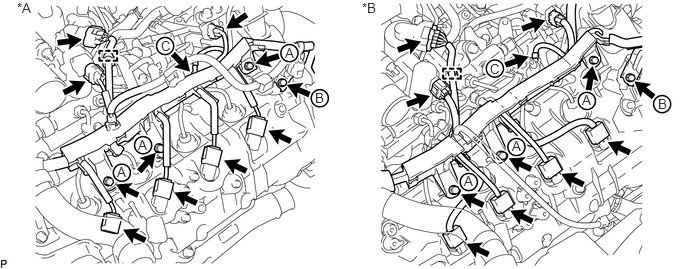
| *A | w/ DPF | *B | w/o DPF |
Using a clip remover, detach the wire harness clamp.
Remove the 3 bolts and disconnect the engine wire protector labeled A.
Remove the bolt and the wire harness bracket labeled B.
Remove the screw grommet, nut and the glow plug wire harness labeled C.
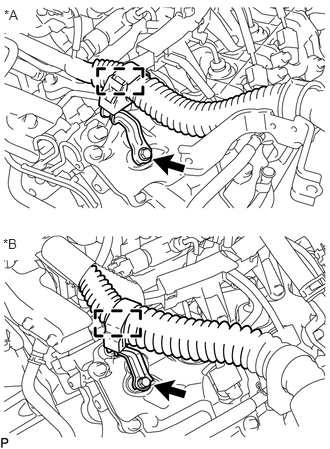
for RHD:
Disconnect the wire harness from the wire harness clamp holder.
| *A | w/ DPF |
| *B | w/o DPF |
for RHD:
Remove the bolt and wire harness clamp holder.
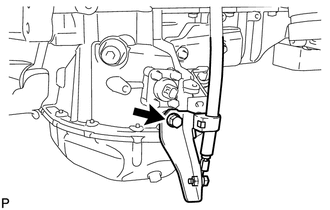
w/ Winch:
Remove the bolt and disconnect the ground wire.
Rear Side:
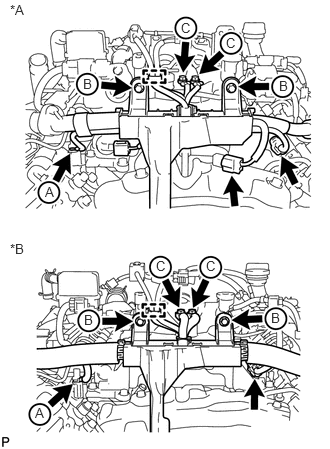
Using a clip remover, detach the wire harness clamp.
| *A | w/ DPF |
| *B | w/o DPF |
Remove the 2 bolts and 2 ground wires labeled C.
Remove the 2 bolts and disconnect the engine wire harness protector labeled B.
w/ DPF:
Disconnect the 3 connectors.
w/o DPF:
Disconnect the connector.
Remove the screw grommet, nut and disconnect the glow plug wire harness labeled A.
23802E
83.REMOVE NO. 2 FUEL PIPE SUB-ASSEMBLY (w/o DPF)
23706
84.REMOVE NO. 6 INJECTION PIPE SUB-ASSEMBLY
25860
85.REMOVE NO. 1 VACUUM SWITCHING VALVE ASSEMBLY (w/ DPF)
25706
86.REMOVE NO. 1 VACUUM TRANSMITTING PIPE SUB-ASSEMBLY (w/ DPF)
11225
87.REMOVE CYLINDER HEAD COVER SILENCER LH (w/ DPF)
23764A
88.REMOVE NO. 4 NOZZLE LEAKAGE PIPE (w/ DPF)
23701
89.REMOVE INJECTION PIPE LH
23812D
90.REMOVE NO. 2 FUEL PIPE (w/ DPF)
23765
91.REMOVE NO. 5 NOZZLE LEAKAGE PIPE (w/ DPF)
23820A
92.REMOVE COMMON RAIL ASSEMBLY LH
23801L
93.REMOVE FUEL FILTER TO INJECTION PUMP FUEL PIPE SUB-ASSEMBLY
23243C
94.DISCONNECT FUEL PUMP MOTOR WIRE
23705
95.REMOVE NO. 5 INJECTION PIPE SUB-ASSEMBLY
11224
96.REMOVE CYLINDER HEAD COVER SILENCER RH (w/ DPF)
23702
97.REMOVE INJECTION PIPE RH
23810A
98.REMOVE COMMON RAIL ASSEMBLY RH
17135A
99.REMOVE NO. 1 INTAKE MANIFOLD INSULATOR (w/ Intercooler)
17136
100.REMOVE NO. 2 INTAKE MANIFOLD INSULATOR (w/ Intercooler)
27148B
101.REMOVE CONNECTING WIRE (w/ DPF)
23763
102.REMOVE NO. 3 NOZZLE LEAKAGE PIPE (w/ DPF)
17113
103.REMOVE INTAKE PIPE
104.DISCONNECT NO. 2 ENGINE WIRE
17114D
105.REMOVE NO. 3 INTAKE MANIFOLD
17853B
106.REMOVE INTAKE MANIFOLD INSULATOR (w/ EGR System)
25615A
107.REMOVE EGR PIPE INSULATOR (w/ EGR System)
25620
108.REMOVE EGR VALVE ASSEMBLY WITH EGR COOLER (w/ EGR System)
25689
109.REMOVE EGR COOLER INSULATOR (w/ EGR System)
23763
110.REMOVE NO. 3 NOZZLE LEAKAGE PIPE (w/o DPF)
23764A
111.REMOVE NO. 4 NOZZLE LEAKAGE PIPE (w/o DPF)
16283
112.DISCONNECT NO. 6 WATER BY-PASS HOSE (w/o DPF)
23920A
113.REMOVE FUEL COOLER ASSEMBLY (w/o DPF)
23712
114.REMOVE NO. 2 FUEL INJECTOR PROTECTOR (w/ DPF)
23711
115.REMOVE NO. 1 FUEL INJECTOR PROTECTOR (w/ DPF)
23901H
116.REMOVE FUEL TUBE SUB-ASSEMBLY (w/ DPF)
16268
117.REMOVE NO. 1 WATER BY-PASS PIPE
23762B
118.REMOVE NO. 2 NOZZLE LEAKAGE PIPE (w/ DPF)
23761A
119.REMOVE NO. 1 NOZZLE LEAKAGE PIPE (w/ DPF)
23881D
120.REMOVE FUEL HOSE BRACKET (w/ DPF)
23841C
121.REMOVE NO. 1 FUEL PIPE CLAMP (w/ DPF)
17111
122.REMOVE NO. 1 INTAKE MANIFOLD
17112
123.REMOVE NO. 2 INTAKE MANIFOLD
12281A
124.INSTALL NO. 1 AND NO. 2 ENGINE HANGER
Install the No. 1 and No. 2 engine hangers to the cylinder head RH and LH with the 4 bolts as shown in the illustration.
- Torque:
- 25 N*m (250 kgf*cm, 18 ft.*lbf)
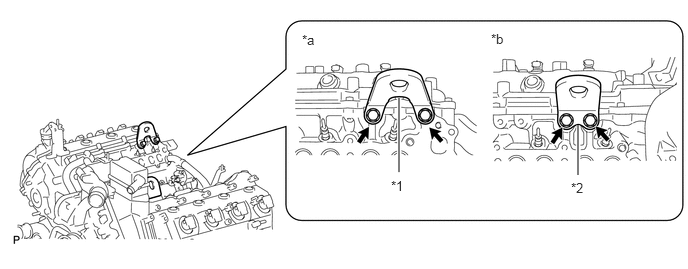
- HINT:
No. 1 engine hanger 12281-51040 No. 2 engine hanger 12282-51040 Bolt 91671-80825
| *1 | No. 1 Engine Hanger |
| *2 | No. 2 Engine Hanger |
| *a | RH |
| *b | LH |
35000
125.REMOVE AUTOMATIC TRANSMISSION ASSEMBLY
33030
126.REMOVE MANUAL TRANSMISSION UNIT ASSEMBLY
31482
127.REMOVE CLUTCH RELEASE CYLINDER TO FLEXIBLE HOSE TUBE (for Manual Transmission)
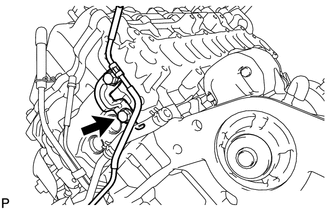
Remove the bolt and clutch release cylinder to flexible hose tube.
128.REMOVE ENGINE ASSEMBLY
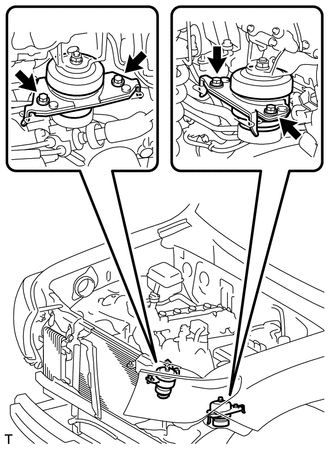
Attach an engine sling device and hang the engine with a chain block.
Remove the 4 bolts from the engine mounting RH and LH side.
Lift the engine out of the vehicle carefully.
- NOTICE:
- ·
Make sure the engine is clear of all wiring and hoses.
·With the exception of installing the engine assembly to an engine stand or removing the engine assembly from an engine stand, do not perform any work on the engine while it is suspended, as doing so is dangerous.
·Pay attention to the angle of the sling device as the engine assembly or engine hangers may be damaged or deformed if the angle is incorrect.
Place the engine onto a work bench.
31210
129.REMOVE CLUTCH COVER ASSEMBLY (for Manual Transmission)
31250
130.REMOVE CLUTCH DISC ASSEMBLY (for Manual Transmission)
32101
131.REMOVE DRIVE PLATE AND RING GEAR SUB-ASSEMBLY (for Automatic Transmission)
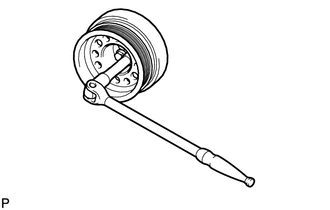
Using a wrench, hold the crankshaft.
- NOTICE:
-
Do not turn the crankshaft counterclockwise.
-
If it is turned counterclockwise, check that the crankshaft pulley set bolt is not loose. If loose, tighten the bolt (See page Engine / Hybrid System>1VD-FTV (ENGINE MECHANICAL)>ENGINE UNIT>REASSEMBLY).
- Torque:
- 108 N*m (1101 kgf*cm, 80 ft.*lbf)
or more
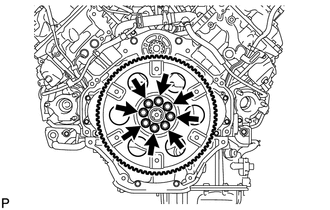
Remove the 8 bolts.
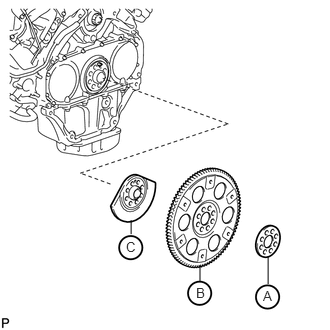
Remove the rear drive plate spacer labeled A, drive plate and ring gear labeled B and rear crankshaft balancer weight labeled C.
13405
132.REMOVE FLYWHEEL SUB-ASSEMBLY (for Manual Transmission)
Using a wrench, hold the crankshaft.
- NOTICE:
-
Do not turn the crankshaft counterclockwise.
-
If it is turned counterclockwise, check that the crankshaft pulley set bolt is not loose. If loose, tighten the bolt (See page Engine / Hybrid System>1VD-FTV (ENGINE MECHANICAL)>ENGINE UNIT>REASSEMBLY).
- Torque:
- 108 N*m (1101 kgf*cm, 80 ft.*lbf)
or more
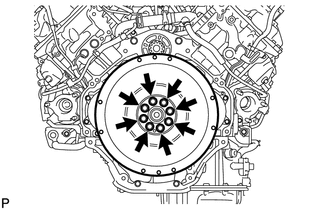
Remove the 8 bolts and flywheel.
133.INSTALL ENGINE STAND
Install the engine onto an engine stand with bolts.
Remove the 4 bolts and No. 1 and No. 2 engine hangers.
12361
134.REMOVE FRONT ENGINE MOUNTING INSULATOR RH
12362A
135.REMOVE FRONT ENGINE MOUNTING INSULATOR LH