AE80F AUTOMATIC TRANSMISSION / TRANSAXLE AUTOMATIC TRANSMISSION SYSTEM Pattern Select Switch 2nd Start Mode Circuit
DESCRIPTION
When 2nd start mode is selected with the ECT 2nd switch (integration control and panel assembly), the ECM controls the shift solenoid valves and the transmission starts from 2nd gear.
WIRING DIAGRAM
Refer to Pattern Select Switch Power Mode Circuit (See page Drivetrain>AE80F (AUTOMATIC TRANSMISSION / TRANSAXLE)>AUTOMATIC TRANSMISSION SYSTEM>Pattern Select Switch Power Mode Circuit).
PROCEDURE
- HINT:
-
The driving test should be performed on a paved road (nonskid road).
Start the engine.
Turn the ECT 2nd switch off (normal drive mode).
Confirm vehicle response by driving from a parked position to fully depressing the accelerator pedal.
Turn the ECT 2nd switch on (2nd start mode) and perform the same check as above.
When driving the vehicle with the 2nd start mode on and off, check that there is a difference in acceleration.
- OK:
There is a difference in acceleration.
OK
NG
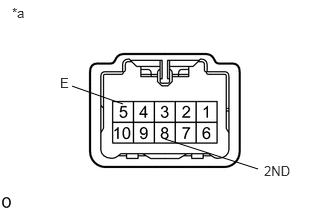
Remove the integration control and panel assembly (See page Drivetrain>AE80F (AUTOMATIC TRANSMISSION / TRANSAXLE)>COMBINATION SWITCH>REMOVAL).
Measure the resistance according to the value(s) in the table below.
- Standard Resistance:
Tester Connection Switch Condition Specified Condition 8 (2ND) - 5 (E) ECT 2nd switch on Below 1 Ω 8 (2ND) - 5 (E) ECT 2nd switch off 10 kΩ or higher
| *a | Component without harness connected
(Integration Control and Panel Assembly) |
OK
NG
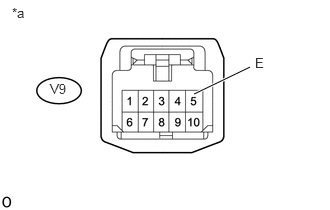
Disconnect the integration control and panel assembly connector.
Measure the resistance according to the value(s) in the table below.
- Standard Resistance:
Tester Connection Condition Specified Condition V9-5 (E) - Body ground Always Below 1 Ω
| *a | Front view of wire harness connector
(to Integration Control and Panel Assembly) |
OK
NG
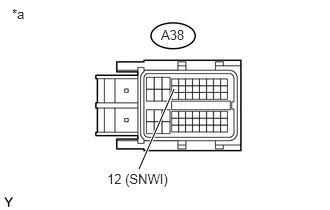
Disconnect the ECM connector.
Measure the resistance according to the value(s) in the table below.
- Standard Resistance:
Tester Connection Switch Condition Specified Condition A38-12 (SNWI) - Body ground ECT 2nd switch on Below 1 Ω A38-12 (SNWI) - Body ground ECT 2nd switch off 10 kΩ or higher
| *a | Front view of wire harness connector
(to ECM) |
OK
NG