THEFT DETERRENT / KEYLESS ENTRY ENTRY AND START SYSTEM(for Start Function) Power Source Mode does not Change
DESCRIPTION
When the certification ECU (smart key ECU assembly) has detected the key inside the cabin before the brake pedal (for A/T) or clutch pedal (for M/T) is depressed, the power source mode can be changed in the following order sequentially by pressing the engine switch: off → on (ACC) → on (IG) → off.
When one of the DTCs shown in the illustration below is detected, troubleshoot the DTC(s) by following the troubleshooting procedure relevant to the DTC(s). If the power source mode still cannot be changed normally, despite troubleshooting, one of the following may have occurred:
The LIN communication line is malfunctioning.
The certification ECU (smart key ECU assembly) has determined that no key is inside the cabin.
The engine switch is malfunctioning.
The main body ECU is malfunctioning.
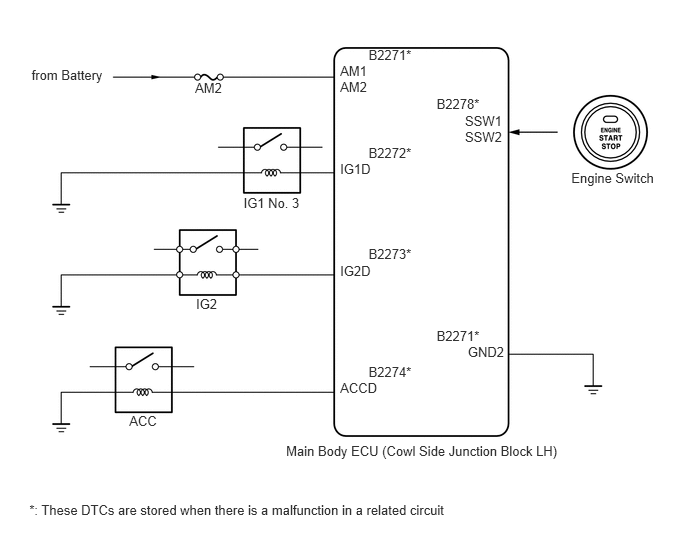
WIRING DIAGRAM
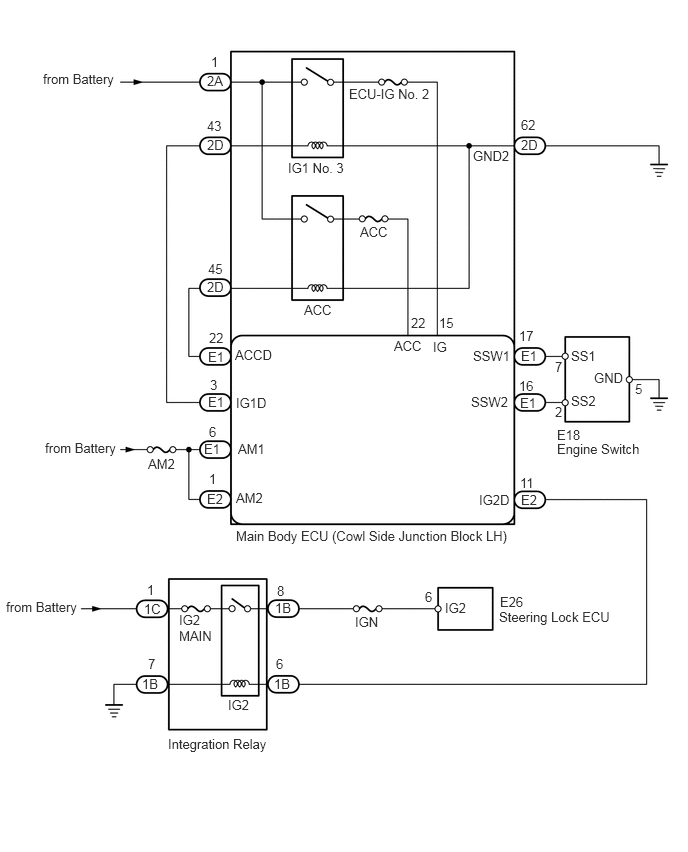
CAUTION / NOTICE / HINT
- HINT:
-
If the vehicle is in key cancel mode, change to normal mode (See page Vehicle Interior>DOOR LOCK>POWER DOOR LOCK CONTROL SYSTEM>CUSTOMIZE PARAMETERS).
PROCEDURE
Check whether a DTC is output (See page Vehicle Interior>THEFT DETERRENT / KEYLESS ENTRY>ENTRY AND START SYSTEM(for Start Function)>DTC CHECK / CLEAR).
| Result | Proceed to |
|---|---|
| No DTC output | A |
| DTC output | B |
A
B
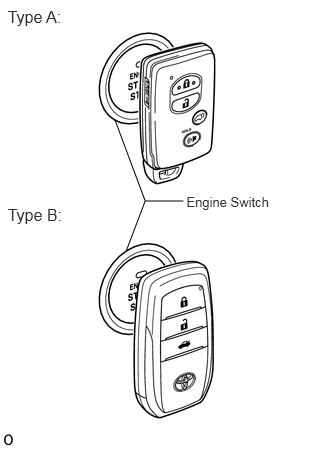
Remove the battery of the electrical key transmitter (See page Vehicle Interior>DOOR LOCK>TRANSMITTER BATTERY(w/ Entry and Start System)>REPLACEMENT).
With the brake pedal (for A/T) or clutch pedal (for M/T) depressed, touch the key to the engine switch, as shown in the illustration.
When operating the engine switch, check whether the engine switch changes to on (ACC) or on (IG).
- HINT:
- ·
When the electrical key transmitter cannot be verified even when it is in the operational area, the engine start check can be performed by removing the transmitter battery from the electrical key transmitter and holding the transmitter against the engine switch.
·When performing the check, if the engine switch turns on (ACC) or on (IG), there is a problem with key certification inside the cabin.
| Result | Proceed to |
|---|---|
| Does not change to on (ACC) | A |
| Does not change to on (IG) | B |
| Does not change to on (ACC) and on (IG) | C |
| Changes to on (ACC) and on (IG) | D |
A
B
C
D
Remove the AM2 fuse from the engine room relay block.
Measure the resistance according to the value(s) in the table below.
- Standard Resistance:
Tester Connection Condition Specified Condition AM2 fuse Always Below 1 Ω
OK
NG
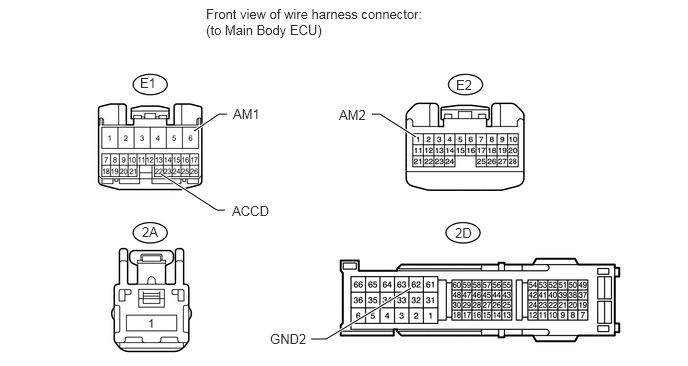
Disconnect the E1, E2, 2A and 2D main body ECU connectors.
Measure the voltage and resistance according to the value(s) in the table below.
- Standard Voltage:
Tester Connection Condition Specified Condition E1-6 (AM1) - Body ground Always 11 to 14 V E2-1 (AM2) - Body ground Always 11 to 14 V 2A-1 - Body ground Always 11 to 14 V
- Standard Resistance:
Tester Connection Condition Specified Condition E1-22 (ACCD) - 2D-45 Always Below 1 Ω 2D-62 (GND2) - Body ground Always Below 1 Ω E1-22 (ACCD) or 2D-45 - Body ground Always 10 kΩ or higher
OK
NG
Remove the AM2 fuse from the engine room relay block.
Measure the resistance according to the value(s) in the table below.
- Standard Resistance:
Tester Connection Condition Specified Condition AM2 fuse Always Below 1 Ω
OK
NG
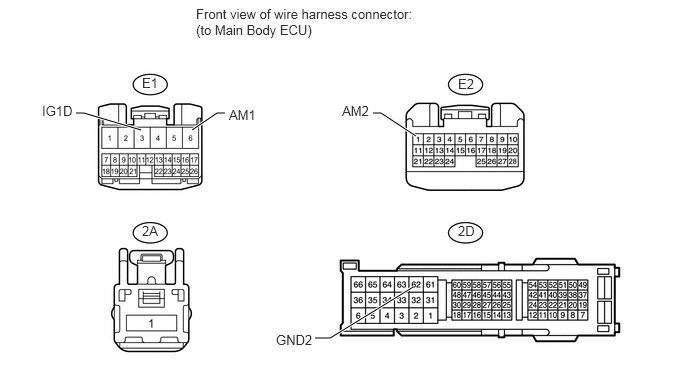
Disconnect the E1, E2, 2A and 2D main body ECU connectors.
Measure the voltage and resistance according to the value(s) in the table below.
- Standard Voltage:
Tester Connection Condition Specified Condition E1-6 (AM1) - Body ground Always 11 to 14 V E2-1 (AM2) - Body ground Always 11 to 14 V 2A-1 - Body ground Always 11 to 14 V
- Standard Resistance:
Tester Connection Condition Specified Condition E1-3 (IG1D) - 2D-43 Always Below 1 Ω 2D-62 (GND2) - Body ground Always Below 1 Ω E1-3 (IG1D) or 2D-43 - Body ground Always 10 kΩ or higher
OK
NG
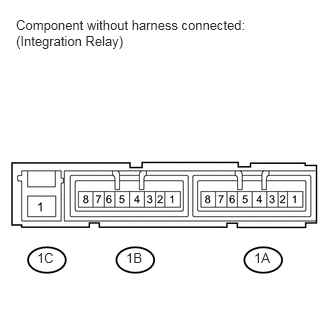
Remove the integration relay from the engine room relay block.
Measure the resistance according to the value(s) in the table below.
- Standard Resistance:
Tester Connection Condition Specified Condition 1B-8 - 1C-1 Battery voltage applied to terminals 1B-6 and 1B-7 Below 1 Ω 1B-8 - 1C-1 Battery voltage not applied to terminals 1B-6 and 1B-7 10 kΩ or higher
OK
NG
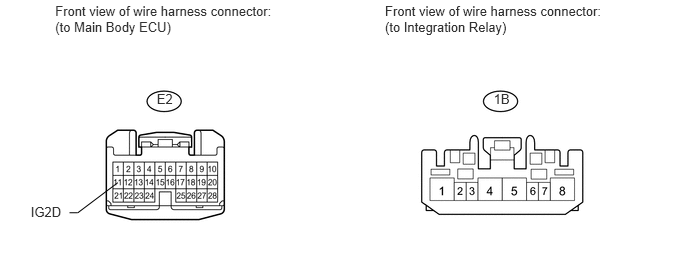
Disconnect the E2 main body ECU connector.
Disconnect the 1B integration relay connector.
Measure the resistance according to the value(s) in the table below.
- Standard Resistance:
Tester Connection Condition Specified Condition E2-11 (IG2D) - 1B-6 Always Below 1 Ω 1B-7 - Body ground Always Below 1 Ω E2-11 (IG2D) or 1B-6 - Body ground Always 10 kΩ or higher
OK
NG
Remove the IGN fuse and IG2 MAIN fuse from the engine room relay block.
Measure the resistance according to the value(s) in the table below.
- Standard Resistance:
Tester Connection Condition Specified Condition IGN fuse Always Below 1 Ω IG2 MAIN fuse Always Below 1 Ω
OK
NG
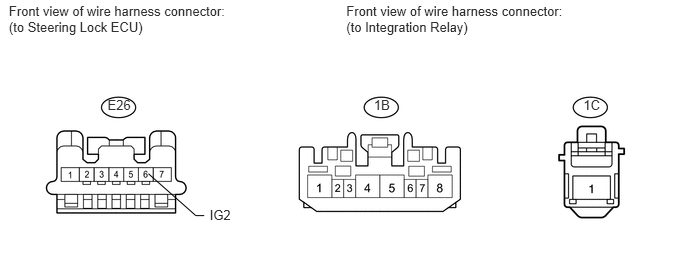
Disconnect the E26 steering lock ECU connector.
Disconnect the 1B and 1C integration relay connectors.
Measure the voltage and resistance according to the value(s) in the table below.
- Standard Voltage:
Tester Connection Condition Specified Condition 1C-1 - Body ground Always 11 to 14 V
- Standard Resistance:
Tester Connection Condition Specified Condition E26-6 (IG2) - 1B-8 Always Below 1 Ω E26-6 (IG2) or 1B-8 - Body ground Always 10 kΩ or higher
OK
NG
Remove the AM2 fuse from the engine room relay block.
Measure the resistance according to the value(s) in the table below.
- Standard Resistance:
Tester Connection Condition Specified Condition AM2 fuse Always Below 1 Ω
OK
NG
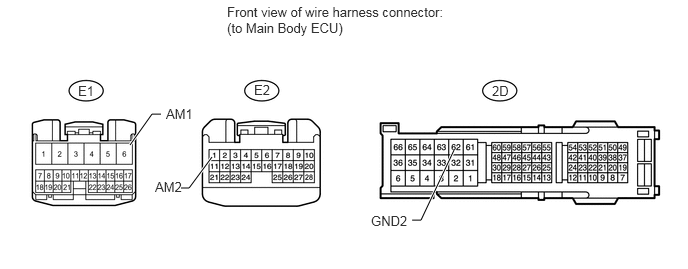
Disconnect the E1, E2 and 2D main body ECU connectors.
Measure the voltage and resistance according to the value(s) in the table below.
- Standard Voltage:
Tester Connection Condition Specified Condition E1-6 (AM1) - Body ground Always 11 to 14 V E2-1 (AM2) - Body ground Always 11 to 14 V
- Standard Resistance:
Tester Connection Condition Specified Condition 2D-62 (GND2) - Body ground Always Below 1 Ω
OK
NG
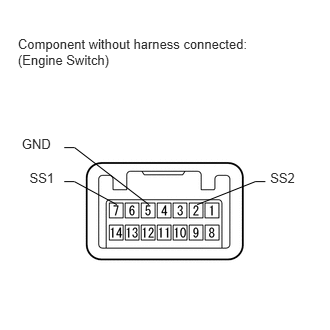
Disconnect the E18 engine switch connector.
Measure the resistance according to the value(s) in the table below.
- Standard Resistance:
Tester Connection Switch Condition Specified Condition 7 (SS1) - 5 (GND) Pushed Below 1 Ω 2 (SS2) - 5 (GND) Pushed Below 1 Ω 7 (SS1) - 5 (GND) Not pushed 10 kΩ or higher 2 (SS2) - 5 (GND) Not pushed 10 kΩ or higher
| Result | Proceed to |
|---|---|
| Within specified range | A |
| Outside specified range (for 1GR-FE) | B |
| Outside specified range (for 1UR-FE) | C |
| Outside specified range (for 3UR-FE) | D |
| Outside specified range (for 1VD-FTV) | E |
A
B
C
D
E
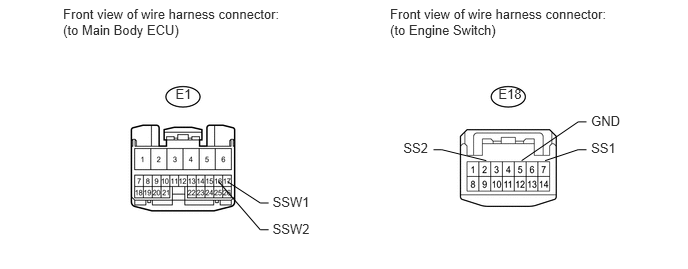
Disconnect the E1 main body ECU connector.
Disconnect the E18 engine switch connector.
Measure the resistance according to the value(s) in the table below.
- Standard Resistance:
Tester Connection Condition Specified Condition E1-17 (SSW1) - E18-7 (SS1) Always Below 1 Ω E1-16 (SSW2) - E18-2 (SS2) Always Below 1 Ω E18-5 (GND) - Body ground Always Below 1 Ω E1-17 (SSW1) or E18-7 (SS1) - Body ground Always 10 kΩ or higher E1-16 (SSW2) or E18-2 (SS2) - Body ground Always 10 kΩ or higher
OK
NG