THEFT DETERRENT / KEYLESS ENTRY ENTRY AND START SYSTEM(for Entry Function) Driver Side Door Entry Lock and Unlock Functions do not Operate
DESCRIPTION
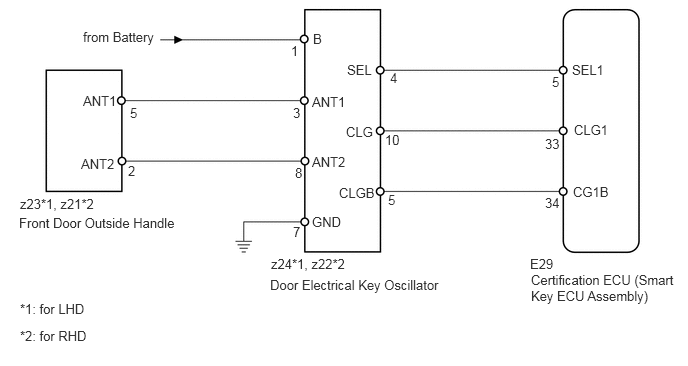
When the driver side door entry lock and unlock functions do not operate, one of the following may be malfunctioning: 1) power door lock system, 2) driver side door electrical key oscillator, or 3) certification ECU (smart key ECU assembly).
WIRING DIAGRAM
PROCEDURE
When the master switch assembly door control switch is operated, check that the locked doors unlock.
- OK:
Door locks operate normally.
OK
NG
Connect the intelligent tester to the DLC3.
Turn the engine switch on (IG).
Turn the intelligent tester on.
Enter the following menus: Body / Main Body / Data List.
Read the Data List according to the display on the intelligent tester.
| Tester Display | Measurement Item/Range | Normal Condition | Diagnostic Note |
|---|---|---|---|
| D Door Lock Position SW | Driver side door lock position switch signal / ON or OFF | ON: Driver side door unlocked
OFF: Driver side door locked |
- |
- OK:
On the intelligent tester screen, the display changes between ON and OFF as shown in the chart above.
OK
NG
Using the intelligent tester, read the Data List.
| Tester Display | Measurement Item/Range | Normal Condition | Diagnostic Note |
|---|---|---|---|
| D-Door Touch Sensor | Driver side door touch sensor / ON or OFF | ON: Touch sensor touched
OFF: Touch sensor not touched |
- |
| D-Door Trigger Switch | Driver side door outside handle lock switch / ON or OFF | ON: Entry lock switch pushed
OFF: Entry lock switch not pushed |
- |
| Result | Proceed to |
|---|---|
| Display changes according to manual operation | A |
| Display does not change according to manual operation | B |
A
B
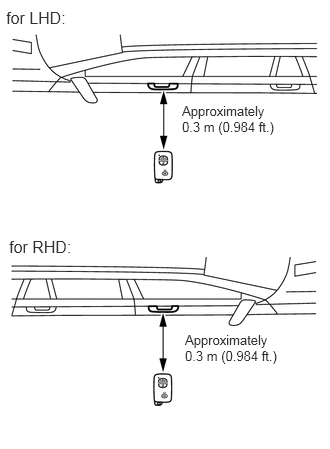
Bring the electrical key transmitter near the driver side door outside handle, and perform a driver side door entry lock and unlock operation check.
- NOTICE:
-
If the key is brought within 0.2 m (0.656 ft.) of the door handle, communication is not possible.
- HINT:
- ·
When the electrical key transmitter is brought near the driver side door outside handle, the possibility of wave interference decreases, and it can be determined if wave interference is causing the problem symptom.
·If the operation check is normal, the possibility of wave interference is high. Also, added vehicle components may cause wave interference. If installed, remove them and perform the operation check.
| Result | Proceed to |
|---|---|
| Operation check fails | A |
| Operation check is normal | B |
A
B
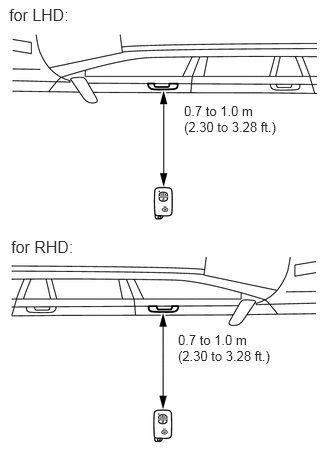
Diagnostic mode inspection (driver side door electrical key oscillator).
Connect the intelligent tester to the DLC3.
Turn the engine switch on (IG).
Turn the intelligent tester on.
Enter the following menus: Body / Entry & Start / Key Communication Check / Overhead + Driver Side.
When the electrical key transmitter is in the position shown in the illustration, check that the wireless door lock buzzer sounds.
- HINT:
-
If the buzzer sounds, it can be determined that the driver seat outside transmitter is operating normally.
- OK:
Wireless door lock buzzer sounds.
OK
NG
Disconnect the E29 ECU connector.
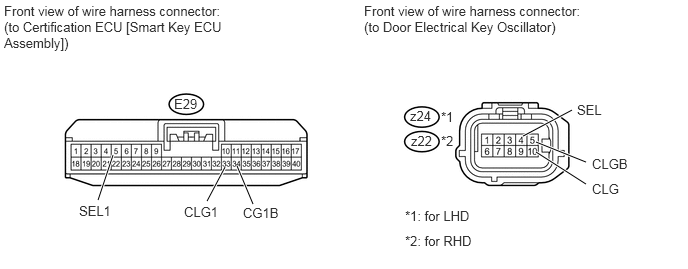
Disconnect the z24 or z22 oscillator connector.
Measure the resistance according to the value(s) in the table below.
- Standard Resistance:
- for LHD:
Tester Connection Condition Specified Condition E29-5 (SEL1) - z24-4 (SEL) Always Below 1 Ω E29-33 (CLG1) - z24-10 (CLG) Always Below 1 Ω E29-34 (CG1B) - z24-5 (CLGB) Always Below 1 Ω E29-5 (SEL1) - Body ground Always 10 kΩ or higher E29-33 (CLG1) - Body ground Always 10 kΩ or higher E29-34 (CG1B) - Body ground Always 10 kΩ or higher
- for RHD:
Tester Connection Condition Specified Condition E29-5 (SEL1) - z22-4 (SEL) Always Below 1 Ω E29-33 (CLG1) - z22-10 (CLG) Always Below 1 Ω E29-34 (CG1B) - z22-5 (CLGB) Always Below 1 Ω E29-5 (SEL1) - Body ground Always 10 kΩ or higher E29-33 (CLG1) - Body ground Always 10 kΩ or higher E29-34 (CG1B) - Body ground Always 10 kΩ or higher
OK
NG
Disconnect the z23 or z21 handle connector.
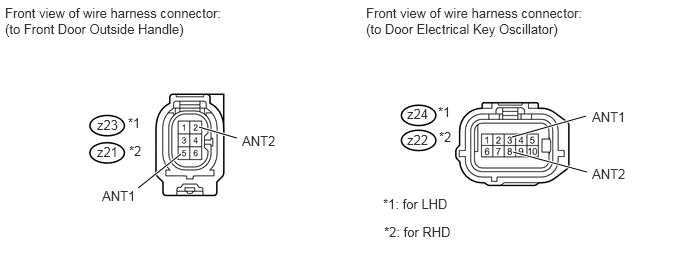
Disconnect the z24 or z22 oscillator connector.
Measure the resistance according to the value(s) in the table below.
- Standard Resistance:
- for LHD:
Tester Connection Condition Specified Condition z23-2 (ANT2) - z24-8 (ANT2) Always Below 1 Ω z23-5 (ANT1) - z24-3 (ANT1) Always Below 1 Ω z23-2 (ANT2) - Body ground Always 10 kΩ or higher z23-5 (ANT1) - Body ground Always 10 kΩ or higher
- for RHD:
Tester Connection Condition Specified Condition z21-2 (ANT2) - z22-8 (ANT2) Always Below 1 Ω z21-5 (ANT1) - z22-3 (ANT1) Always Below 1 Ω z21-2 (ANT2) - Body ground Always 10 kΩ or higher z21-5 (ANT1) - Body ground Always 10 kΩ or higher
OK
NG
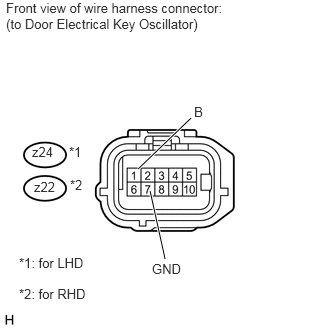
Disconnect the z24 or z22 oscillator connector.
Measure the voltage according to the value(s) in the table below.
- Standard Voltage:
- for LHD:
Tester Connection Condition Specified Condition z24-1 (B) - z24-7 (GND) Always 11 to 14 V
- for RHD:
Tester Connection Condition Specified Condition z22-1 (B) - z22-7 (GND) Always 11 to 14 V
OK
NG
Replace the door electrical key oscillator (See page Vehicle Exterior>DOOR / HATCH>FRONT DOOR>DISASSEMBLY).
NEXT
Check that the entry function operates normally.
- OK:
Operates normally.
OK
NG
Replace the front door outside handle (See page Vehicle Exterior>DOOR / HATCH>FRONT DOOR>DISASSEMBLY).
NEXT
Check that the entry function operates normally.
- OK:
Operates normally.
OK
NG