METER / GAUGE / DISPLAY METER / GAUGE SYSTEM Meter Illumination does not Dim at Night
DESCRIPTION
w/ Multi-information Display:
If the dimmer switch is turned to TAIL, HEAD or AUTO, the main body ECU sends a TAIL relay signal, panel light illumination signal, panel relay signal, and TAIL cancel switch off signal to the combination meter. Then the meter and accessory meter become dim.
- HINT:
-
TAIL cancel switch: When the headlights are illuminated and the TAIL cancel switch is turned on, the meter does not dim.
WIRING DIAGRAM
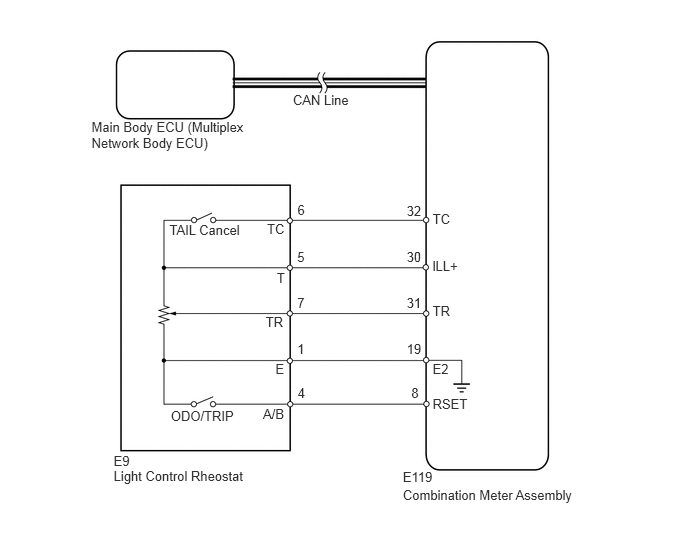
PROCEDURE
Check for DTCs (See page Vehicle Interior>METER / GAUGE / DISPLAY>METER / GAUGE SYSTEM>DTC CHECK / CLEAR).
| Result | Proceed to |
|---|---|
| CAN communication system DTC is not output | A |
| CAN communication system (for LHD with Central Gateway ECU) DTC is output | B |
| CAN communication system (for LHD without Central Gateway ECU) DTC is output | C |
| CAN communication system (for RHD with Central Gateway ECU) DTC is output | D |
| CAN communication system (for RHD without Central Gateway ECU) DTC is output | D |
A
B
C
D
E
Operate the GTS according to the display and select Data List (See page Vehicle Interior>METER / GAUGE / DISPLAY>METER / GAUGE SYSTEM>DATA LIST / ACTIVE TEST).
| Tester Display | Measurement Item/Range | Normal Condition | Diagnostic Note |
|---|---|---|---|
| Tail Cancel SW* | TAIL cancel switch condition/ON or OFF | ON: TAIL cancel switch ON
OFF: TAIL cancel switch OFF |
- |
| Rheostat value | Light control rheostat switch input/Min.: 0, Max.: 100 | Light control rheostat switch is fully turned right (0) → fully turned left (100) | Unit: % |
- HINT:
-
*: w/ TAIL Cancel Switch
- OK:
Light brightness can be changed within specified range by manual operation.
OK
NG
Inspect the light control rheostat.
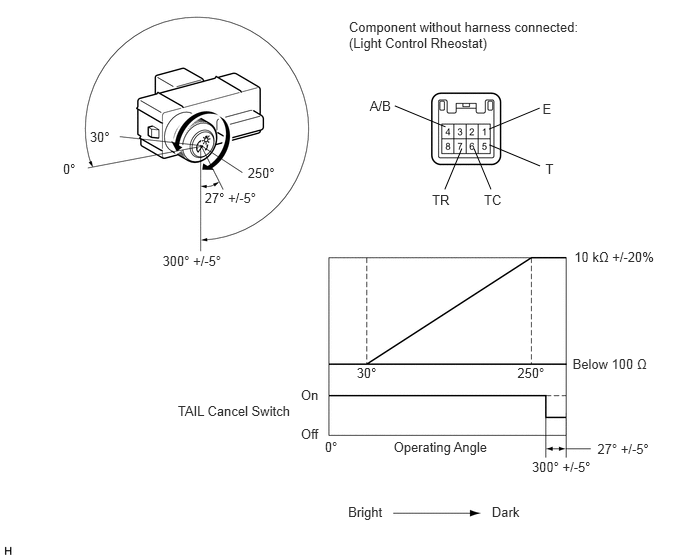
Remove the light control rheostat (See page Vehicle Interior>METER / GAUGE / DISPLAY>LIGHT CONTROL RHEOSTAT>REMOVAL).
Measure the resistance according to the value(s) in the table below.
- Standard Resistance:
Tester Connection Switch Condition Specified Condition 6 (TC) - 1 (E) TAIL cancel switch off → on 10 kΩ or higher → Below 1 Ω 5 (T) - 1 (E) Always 10 kΩ or higher 7 (TR) - 1 (E) Light control rheostat fully turned right → fully turned left 10 kΩ or higher → Below 100 Ω
Inspect the trip switch.
Measure the resistance according to the value(s) in the table below.
- Standard Resistance:
Tester Connection Switch Condition Specified Condition 4 (A/B) - 1 (E) TRIP switch on (Pushed) Below 200 Ω TRIP switch off (Not Pushed) 1 MΩ or higher
OK
NG
Disconnect the E119 meter connector.
Disconnect the E9 rheostat connector.
Measure the resistance according to the value(s) in the table below.
- Standard Resistance:
Tester Connection Condition Specified Condition E119-30 (ILL+) - E9-5 (T) Always Below 1 Ω E119-31 (TR) - E9-7 (TR) E119-19 (E2) - E9-1 (E) E119-32 (TC) - E9-6 (TC)
OK
NG