Home › Vehicle Interior › INTERIOR PANELS / TRIM › ROOF HEADLINING (w/o Sliding Roof) › 2014.08–2015.08
RM2660E _58 Vehicle Interior _052849 INTERIOR PANELS / TRIM _0255719 ROOF HEADLINING(w/o Sliding Roof) A

INTERIOR PANELS / TRIM  ROOF HEADLINING(w/o Sliding Roof)  REASSEMBLY  


PROCEDURE

Hide 82171 2.INSTALL NO. 1 ROOF WIRE

a.

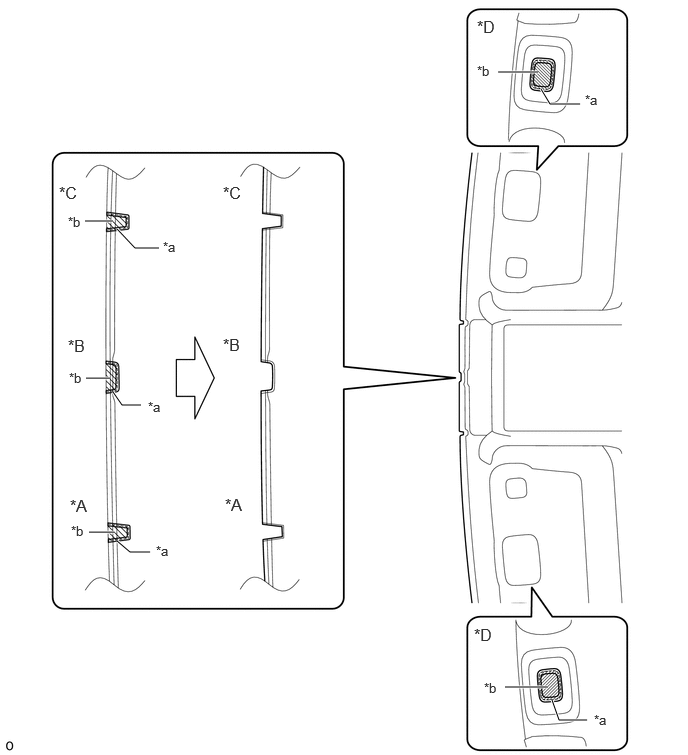
When using a new roof headlining:

i.

Using a knife, cut the roof headlining at the markings as shown in the illustration.

HINT:

Make sure to cut the roof headlining at the same positions as the removed roof headlining.

B605455N01
0.885,2.302 1.177,2.302 true 5.188,0.75 5.604,0.75 true 6.042,1.083 5.729,1.083 5.729,1.083 5.635,0.927 true 1.563,5.75 1.354,5.75 1.354,5.75 1.219,5.635 true 1.219,2.385 1.406,2.583 1.406,2.583 1.656,2.583 true 1.177,4.083 1.271,4.219 1.271,4.219 1.469,4.219 true 0.927,5.542 1.188,5.542 true 0.896,3.938 1.146,3.938 true 5.26,7.156 5.708,7.156 true 5.75,7.292 5.823,7.5 5.823,7.5 6.115,7.5 true 0.729,5.167 1.104,5.406 0.375,0.24 12 false *A 2.323,3.49 2.698,3.729 0.375,0.24 12 false *B 2.323,1.906 2.698,2.146 0.375,0.24 12 false *C 4.969,0.177 5.344,0.417 0.375,0.24 12 false *D 1.698,2.49 2.042,2.719 0.344,0.229 10 false *a 0.708,2.229 1.021,2.427 0.313,0.198 10 false *b 5.042,7.083 5.354,7.281 0.313,0.198 10 false *b 0.719,3.854 1.063,4.083 0.344,0.229 10 false *b 1.542,4.156 1.854,4.354 0.313,0.198 10 false *a 1.625,5.656 1.938,5.854 0.313,0.198 10 false *a 0.708,3.5 1.083,3.74 0.375,0.24 12 false *B 0.615,1.906 0.99,2.146 0.375,0.24 12 false *C 2.344,5.156 2.719,5.396 0.375,0.24 12 false *A 4.938,6.51 5.313,6.75 0.375,0.24 12 false *D 4.969,0.656 5.281,0.854 0.313,0.198 10 false *b 6.094,0.958 6.438,1.188 0.344,0.229 10 false *a 6.188,7.417 6.5,7.615 0.313,0.198 10 false *a 0.74,5.448 1.083,5.677 0.344,0.229 10 false *b

Text in Illustration
*A for RHD with Rain Sensor *B w/ EC Mirror
*C for LHD with Rain Sensor *D w/ Sub Visor
*a Marking *b Cut Area


b.

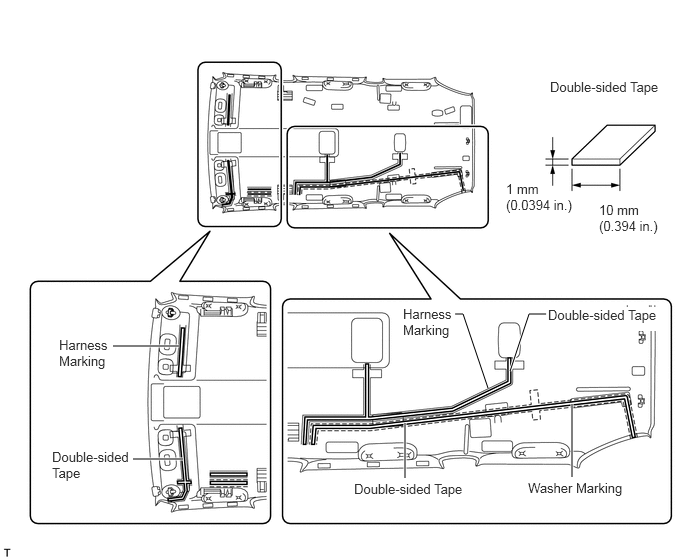
Place double-sided tape along the center of the harness marking and washer marking.

HINT:

Make sure that the double-sided tape is not peeling off or misaligned.

B185352E03
4.74,3.271 4.823,3.271 false 4.823,3.271 5.083,4.042 false 4.219,4.406 4.219,4.979 true 5.958,4.208 5.958,4.969 true 5.313,3.865 5.51,3.271 true 5.51,3.271 5.688,3.271 false 1.385,4.781 1.906,4.781 true 1.177,3.604 1.865,3.604 true 5.729,0.823 6.99,1.177 1.26,0.354 10 false Double-sided Tape 5.271,1.885 6.01,2.271 0.74,0.385 10 false 1 mm (0.0394 in.) 6.24,2.104 6.958,2.51 0.719,0.406 10 false 10 mm (0.394 in.) 5.708,3.198 6.917,3.448 1.208,0.25 10 true Double-sided Tape 5.5,5 6.688,5.302 1.188,0.302 10 false Washer Marking 3.688,5.01 4.896,5.26 1.208,0.25 10 false Double-sided Tape 4.198,3.188 4.813,3.802 0.615,0.615 10 false Harness Marking 0.542,4.677 1.427,5.094 0.885,0.417 10 false Double-sided Tape 0.615,3.51 1.229,4.125 0.615,0.615 10 false Harness Marking


c.

Remove the peeling paper from the double-sided tape while not touching the adhesive side.


d.

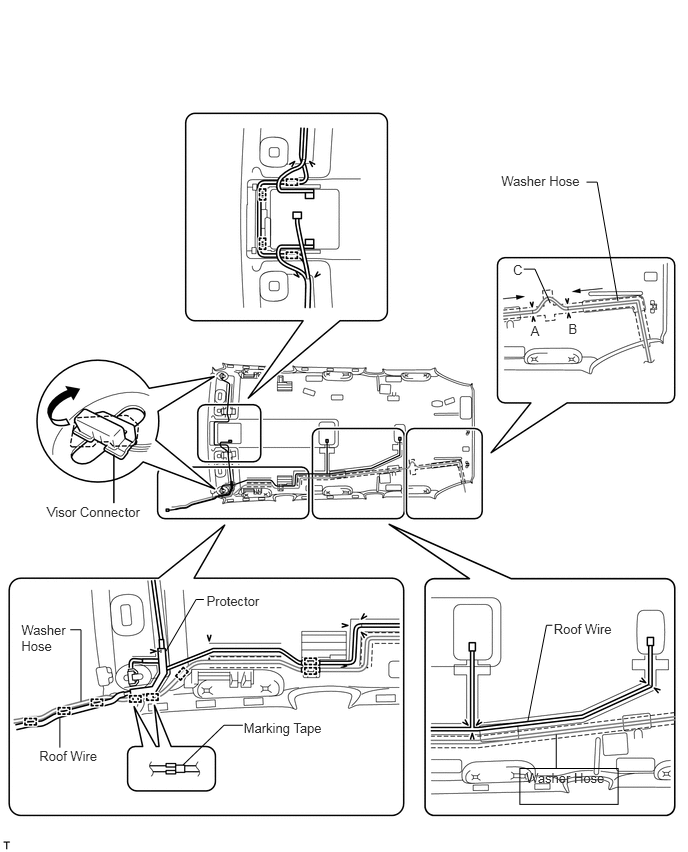
Align the triangle mark of the roof wire protector with the V mark of the headlining as shown in the illustration, and then attach the roof wire protector.


e.

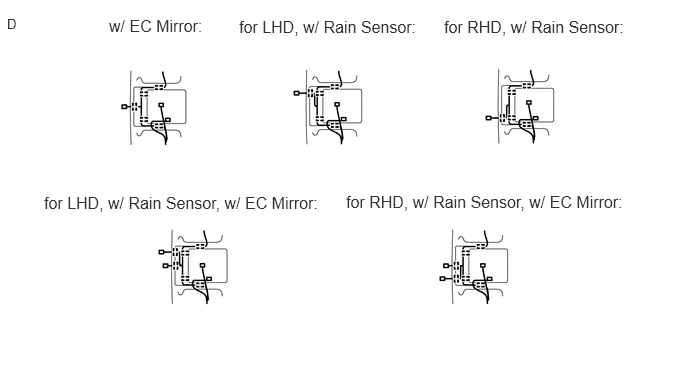
Attach each clamp as shown in the illustration.

HINT:

The positions of the clamps at the front of the roof headlining are shown in illustration D.

B188448E03
1.135,0.167 2.177,0.563 1.042,0.396 12 false w/ EC Mirror: 2.49,0.177 4.448,0.646 1.958,0.469 12 false for LHD, w/ Rain Sensor: 3.604,2 6.521,2.354 2.917,0.354 12 false for RHD, w/ Rain Sensor, w/ EC Mirror: 0.458,2.01 3.375,2.365 2.917,0.354 12 false for LHD, w/ Rain Sensor, w/ EC Mirror: 4.625,0.177 6.583,0.646 1.958,0.469 12 false for RHD, w/ Rain Sensor: 0.073,0.167 0.313,0.615 0.24,0.448 10 false D


f.

Align the roof wire and washer hose with the V marks of the headlining as shown in the illustration, and attach them to the headlining.

HINT:
·

Attach the washer hose from the front to the point labeled A, and attach the washer hose from the rear to the point labeled B as shown in the illustration.

·

Attach the extra length of the washer hose to the part labeled C in the illustration.


g.

Turn the visor connectors approximately 90° clockwise to install them to the roof headlining.
B188732E01
5.415,8.005 6.438,8.378 1.023,0.374 0.409,7.788 1.139,8.203 0.730,0.415 10 Roof Wire 5.768,6.464 6.498,6.879 0.730,0.415 10 Roof Wire 0.222,6.481 0.785,6.868 0.563,0.387 10 Washer Hose 5.221,1.803 6.228,2.190 1.008,0.387 10 Washer Hose 5.479,8.019 6.486,8.406 1.008,0.387 10 Washer Hose 2.538,7.495 3.495,7.836 0.957,0.341 10 Marking Tape 2.151,6.182 2.788,6.495 0.637,0.313 10 Protector 0.488,5.248 1.635,5.626 1.147,0.378 10 Visor Connector 5.345,2.73 5.640,2.951 0.295,0.221 10 C 5.527,3.366 5.757,3.535 0.230,0.170 10 A 5.92,3.347 6.159,3.540 0.239,0.193 10 B 5.455,2.803 5.572,2.803 false 5.572,2.803 5.732,3.158 false 6.109,1.897 6.22,1.897 false 6.22,1.897 6.436,3.135 false 5.497,7.516 5.692,6.513 false 5.692,6.513 5.754,6.513 false 5.794,7.649 5.794,8.005 false 1.728,6.782 2.042,6.244 false 2.042,6.244 2.123,6.244 false 0.624,7.788 0.624,7.48 false 0.731,6.56 0.843,6.56 false 0.843,6.56 0.843,7.307 false 1.906,7.968 2.333,7.554 false 2.333,7.554 2.529,7.554 false 1.186,4.735 1.186,5.241 false 1.186,4.735 1.186,5.241 false


h.

Place tape at the wire harness marking and washer marking locations as shown in the illustration to fix the roof wire and washer hose in place.

HINT:

Apply sufficient pressure when placing tape.
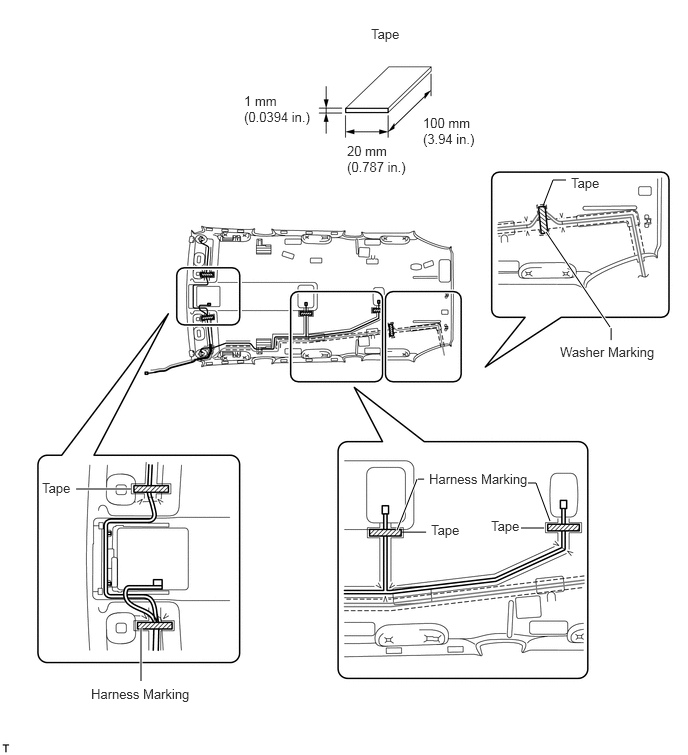

B185354E03
5.688,2.417 6.354,3.406 true 6.365,3.417 6.365,3.542 false 5.656,2.146 5.76,1.875 false 5.76,1.875 5.896,1.875 false 5.729,5.427 5.583,5.031 false 5.583,5.031 5.5,5.031 false 4.135,5.521 4.344,4.99 true 4.354,4.99 4.417,4.99 false 4.188,5.542 4.438,5.542 false 5.667,5.5 5.427,5.5 false 1.469,6.542 1.469,7.094 true 1.365,5.094 0.792,5.094 true 3.865,0.271 4.313,0.615 0.448,0.344 10 false Tape 2.542,0.969 3.292,1.365 0.75,0.396 10 false 1 mm (0.0394 in.) 3.615,1.49 4.333,1.833 0.719,0.344 10 false 20 mm (0.787 in.) 4.406,1.198 5.063,1.563 0.656,0.365 10 false 100 mm (3.94 in.) 5.948,1.823 6.313,2.115 0.365,0.292 10 false Tape 4.49,5.438 4.938,5.781 0.448,0.344 10 false Tape 5.115,5.396 5.563,5.74 0.448,0.344 10 false Tape 0.438,5 0.885,5.344 0.448,0.344 10 false Tape 0.948,7.146 2.094,7.479 1.146,0.333 10 false Harness Marking 4.469,4.906 5.615,5.24 1.146,0.333 10 false Harness Marking 5.833,3.583 6.917,3.927 1.083,0.344 10 false Washer Marking


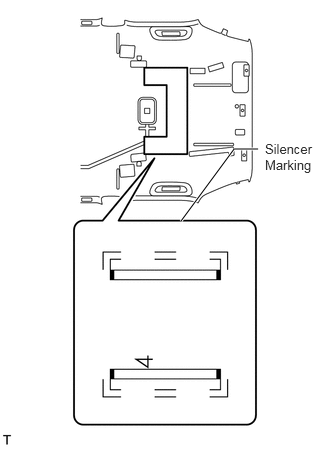
Hide 63344 3.INSTALL NO. 4 ROOF SILENCER PAD
B182434E05
2.688,1.552 2.438,1.552 2.438,1.552 1.885,2.302 true 2.76,1.469 3.333,1.875 0.573,0.406 10 false Silencer Marking

a.

Align the silencer marking on the roof headlining with the roof silencer pad and install the pad using double-sided tape as shown in the illustration.


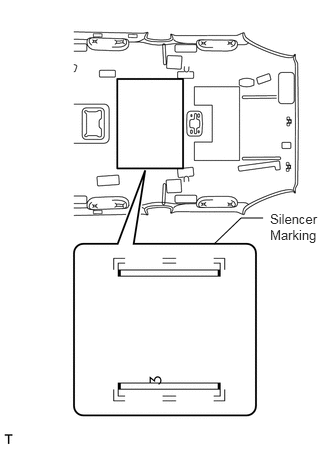
Hide 63343 4.INSTALL NO. 3 ROOF SILENCER PAD
B185347E03
2.74,2.271 2.51,2.271 2.51,2.271 2.229,2.542 false 2.813,2.198 3.354,2.76 0.542,0.563 10 false Silencer Marking

a.

Align the silencer marking on the roof headlining with the roof silencer pad and install the pad using double-sided tape as shown in the illustration.


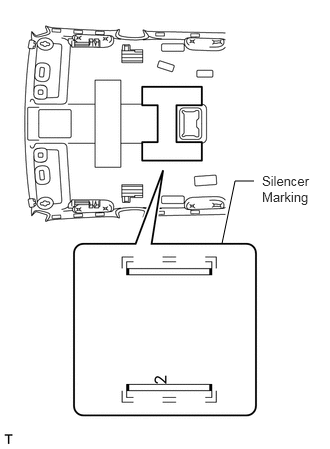
Hide 63342 5.INSTALL NO. 2 ROOF SILENCER PAD
B185346E03
2.646,1.885 2.448,1.885 2.448,1.885 2.313,2.531 false 2.729,1.802 3.354,2.396 0.625,0.594 10 false Silencer Marking

a.

Align the silencer marking on the roof headlining with the roof silencer pad and install the pad using double-sided tape as shown in the illustration.


Hide 63341 6.INSTALL NO. 1 ROOF SILENCER PAD
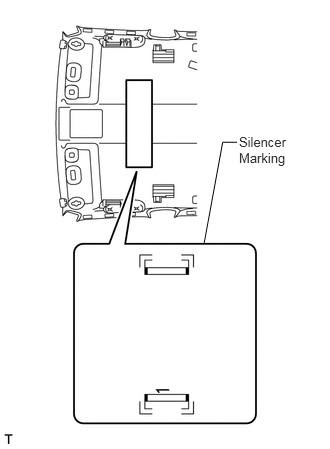
B185345E01
2.489,1.391 3.066,2.002 0.577,0.611 10 Silencer Marking 2.124,2.543 2.319,1.482 false 2.319,1.482 2.468,1.482 false

a.

Align the silencer marking on the roof headlining with the roof silencer pad and install the pad using double-sided tape as shown in the illustration.


Hide 88570D 7.INSTALL NO. 2 AIR OUTLET GRILLE ASSEMBLY (w/ Rear Air Conditioning System)
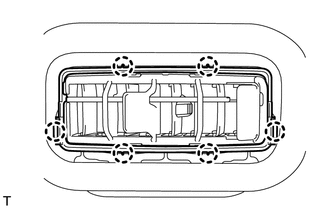
B182435

HINT:

Use the same procedures to install the air outlet grille on the other side.


a.

Attach the 6 claws to install the air outlet grille.


Hide 88570B 8.INSTALL NO. 1 AIR OUTLET GRILLE ASSEMBLY (w/ Rear Air Conditioning System)

HINT:

Use the same procedures described for the No. 2 air outlet grille.