INTERIOR PANELS / TRIM FRONT CONSOLE BOX(w/ Cool Box) INSTALLATION
CAUTION / NOTICE / HINT
- HINT:
-
A bolt without a torque specification is shown in the standard bolt chart (See page General>SPECIFICATIONS>STANDARD BOLT>SPECIFIED TORQUE FOR STANDARD BOLTS).
PROCEDURE

 88520
1.INSTALL COOLING BOX ASSEMBLY
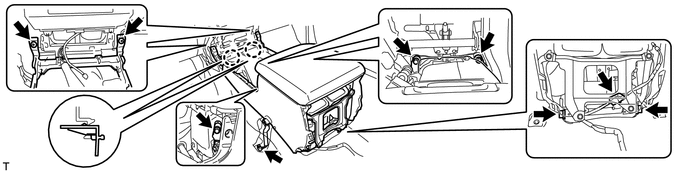
Attach the 2 claws.
Connect the connector.
Sufficiently apply compressor oil to 2 new O-rings.
- Compressor oil:
ND-OIL 8 or equivalent
Install the 2 O-rings on the 2 cooler pipes.
Connect the 2 cooler pipes with the 2 bolts.
- Torque:
- 9.8 N*m (100 kgf*cm, 87 in.*lbf)
Install the cooling box with the 4 bolts and 2 screws.
58903A
2.INSTALL REAR CONSOLE END PANEL SUB-ASSEMBLY
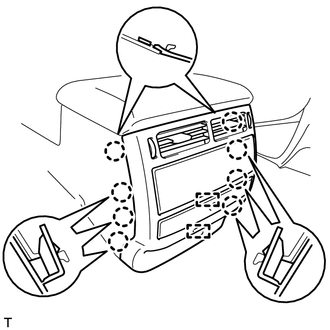
Connect the connectors and 2 clamps.
Attach the 8 claws to install the end panel.
88891H
3.INSTALL NO. 1 COOLER COVER
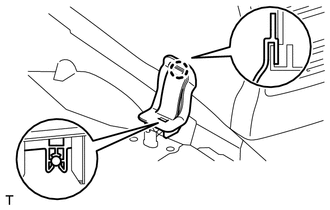
Attach the claw on the upper part of the cooler cover, and then attach the clamp on the lower part of the cooler cover to install it.
58804A
4.INSTALL UPPER CONSOLE PANEL SUB-ASSEMBLY
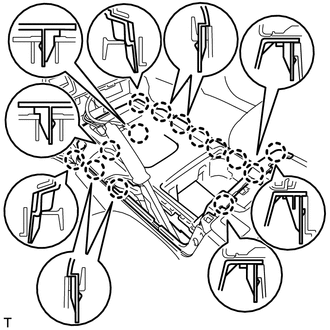
Connect the connectors.
Attach the 14 claws to install the console panel.
58803C
5.INSTALL CONSOLE CUP HOLDER BOX SUB-ASSEMBLY
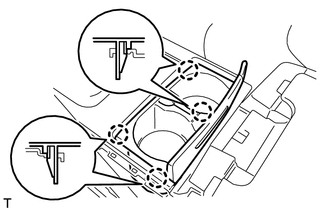
Attach the 4 claws to install the box.
58805C
6.INSTALL REAR UPPER CONSOLE PANEL SUB-ASSEMBLY
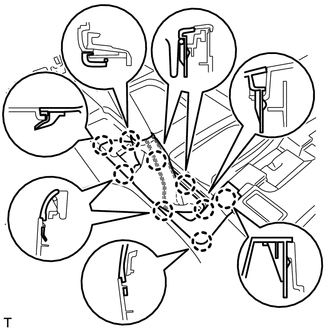
Attach the 9 claws to install the panel.
55406B
7.INSTALL LOWER CENTER INSTRUMENT CLUSTER FINISH PANEL SUB-ASSEMBLY
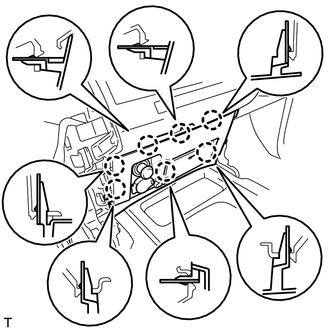
Connect the connectors.
Attach the 7 claws to install the panel.
33504F
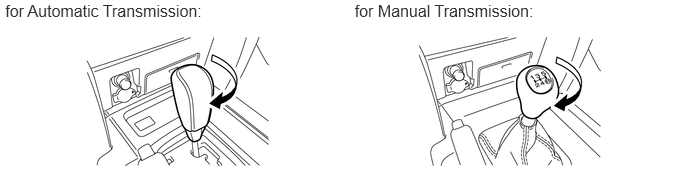
8.INSTALL SHIFT LEVER KNOB SUB-ASSEMBLY
Install the shift lever knob and twist it in the direction indicated by the arrow.
55402C
9.INSTALL LOWER INSTRUMENT PANEL PAD SUB-ASSEMBLY RH
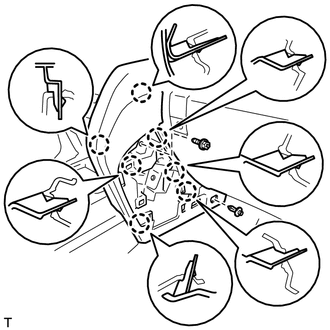
Attach the 7 claws to install the panel pad.
Install the screw.
Install the clip.
55448A
10.INSTALL NO. 1 INSTRUMENT PANEL FINISH CUSHION
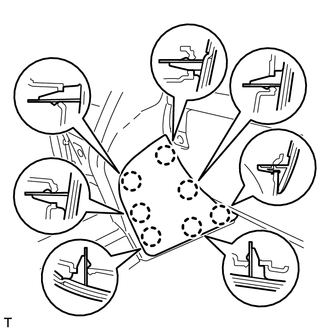
Attach the 7 claws to install the panel cushion.
55403C
11.INSTALL LOWER INSTRUMENT PANEL PAD SUB-ASSEMBLY LH
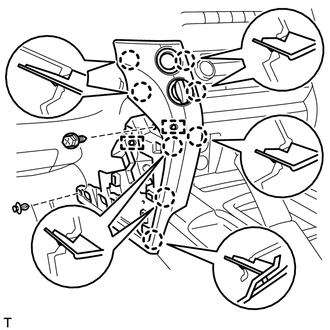
Connect the connectors and 2 clamps.
Attach the 8 claws to install the panel pad.
Install the screw.
Install the clip.
55449C
12.INSTALL NO. 2 INSTRUMENT PANEL FINISH PANEL CUSHION
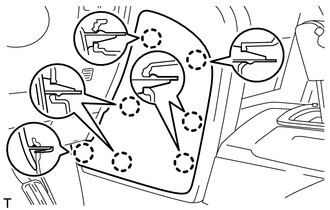
Attach the 7 claws to install the panel cushion.
71200S
13.INSTALL FRONT SEAT ASSEMBLY LH (for Manual Seat)
Install the front seat assembly LH (See page Vehicle Interior>SEAT>FRONT SEAT ASSEMBLY (for Manual Seat)>INSTALLATION).
71200S
14.INSTALL FRONT SEAT ASSEMBLY LH (for Power Seat)
Install the front seat assembly LH (See page Vehicle Interior>SEAT>FRONT SEAT ASSEMBLY (for Power Seat)>INSTALLATION).
15.CHARGE REFRIGERANT
16.WARM UP ENGINE
17. CHECK FOR REFRIGERANT GAS LEAK