WINDOW / GLASS POWER WINDOW CONTROL SYSTEM(for Models with Jam Protection Function on Driver Door Window Only) Driver Side Power Window does not Operate with Power Window Master Switch
DESCRIPTION
If the manual up/down function does not operate, there may be a malfunction in the multiplex network master switch, power window regulator motor, harness or connector.
WIRING DIAGRAM
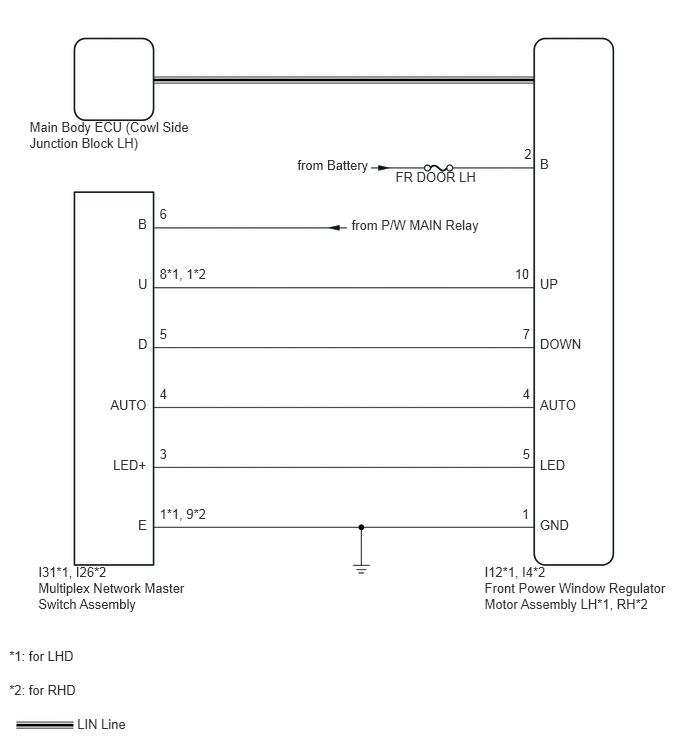
PROCEDURE
Check for LIN communication system DTCs related to the power window control system (See page Power Source / Network>NETWORKING>LIN COMMUNICATION SYSTEM>HOW TO PROCEED WITH TROUBLESHOOTING).
- OK:
LIN communication system DTCs are not output.
OK
NG
(See pagePower Source / Network>NETWORKING>LIN COMMUNICATION SYSTEM>HOW TO PROCEED WITH TROUBLESHOOTING)
Check if DTC B2312 is output (See page Vehicle Exterior>WINDOW / GLASS>POWER WINDOW CONTROL SYSTEM(for Models with Jam Protection Function on Driver Door Window Only)>DTC CHECK / CLEAR).
- OK:
DTC B2312 is not output.
OK
NG
Use the Data List to check if the power window regulator motor is functioning properly (See page Vehicle Exterior>WINDOW / GLASS>POWER WINDOW CONTROL SYSTEM(for Models with Jam Protection Function on Driver Door Window Only)>DATA LIST / ACTIVE TEST).
| Tester Display | Measurement Item/Range | Normal Condition | Diagnostic Note |
|---|---|---|---|
| D Door P/W Up SW | Driver side power window manual up signal / ON or OFF | ON: Driver side power window manual up switch operated
OFF: Driver side power window switch not operated |
- |
| D Door P/W Down SW | Driver side power window manual down signal / ON or OFF | ON: Driver side power window manual down switch operated
OFF: Driver side power window switch not operated |
- |
- OK:
The display changes according to operation of the multiplex network master switch.
| Result | Proceed to |
|---|---|
| OK (for LHD) | A |
| OK (for RHD) | B |
| NG | C |
A
B
C
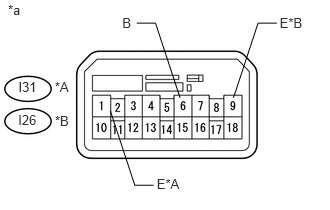
Disconnect the I31*1 or I26*2 multiplex network master switch assembly connector.
*1: for LHD
*2: for RHD
Measure the voltage and resistance according to the value(s) in the table below.
- Standard Voltage:
for LHD Tester Connection Condition Specified Condition I31-6 (B) - Body ground Always 11 to 14 V
for RHD Tester Connection Condition Specified Condition I26-6 (B) - Body ground Always 11 to 14 V
- Standard Resistance:
for LHD Tester Connection Condition Specified Condition I31-1 (E) - Body ground Always Below 1 Ω
for RHD Tester Connection Condition Specified Condition I26-9 (E) - Body ground Always Below 1 Ω
| *A | for LHD |
| *B | for RHD |
| *a | Front view of wire harness connector
(to Multiplex Network Master Switch Assembly) |
OK
NG
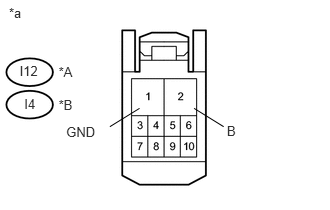
Disconnect the I12*1 or I4*2 front power window regulator motor assembly connector.
*1: for LHD
*2: for RHD
Measure the voltage and resistance according to the value(s) in the table below.
- Standard Voltage:
for LHD Tester Connection Condition Specified Condition I12-2 (B) - Body ground Always 11 to 14 V
for RHD Tester Connection Condition Specified Condition I4-2 (B) - Body ground Always 11 to 14 V
- Standard Resistance:
for LHD Tester Connection Condition Specified Condition I12-1 (GND) - Body ground Always Below 1 Ω
for RHD Tester Connection Condition Specified Condition I4-1 (GND) - Body ground Always Below 1 Ω
| *A | for LHD |
| *B | for RHD |
| *a | Front view of wire harness connector
(to Front Power Window Regulator Motor Assembly) |
OK
NG
*1: for LHD
*2: for RHD
Disconnect the I31*1 or I26*2 multiplex network master switch assembly connector.
Disconnect the I12*1 or I4*2 front power window regulator motor assembly connector.
Measure the resistance according to the value(s) in the table below.
- Standard Resistance:
for LHD Tester Connection Condition Specified Condition I31-8 (U) - I12-10 (UP) Always Below 1 Ω I31-5 (D) - I12-7 (DOWN) Always Below 1 Ω I31-4 (AUTO) - I12-4 (AUTO) Always Below 1 Ω I31-3 (LED+) - I12-5 (LED) Always Below 1 Ω I31-1 (E) - I12-1 (GND) Always Below 1 Ω I31-8 (U) or I12-10 (UP) - Body ground Always 10 kΩ or higher I31-5 (D) or I12-7 (DOWN) - Body ground Always 10 kΩ or higher I31-4 (AUTO) or I12-4 (AUTO) - Body ground Always 10 kΩ or higher I31-3 (LED+) or I12-5 (LED) - Body ground Always 10 kΩ or higher I31-1 (E) or I12-1 (GND) - Body ground Always 10 kΩ or higher
for RHD Tester Connection Condition Specified Condition I26-1 (U) - I4-10 (UP) Always Below 1 Ω I26-5 (D) - I4-7 (DOWN) Always Below 1 Ω I26-4 (AUTO) - I4-4 (AUTO) Always Below 1 Ω I26-3 (LED+) - I4-5 (LED) Always Below 1 Ω I26-9 (E) - I4-1 (GND) Always Below 1 Ω I26-1 (U) or I4-10 (UP) - Body ground Always 10 kΩ or higher I26-5 (D) or I4-7 (DOWN) - Body ground Always 10 kΩ or higher I26-4 (AUTO) or I4-4 (AUTO) - Body ground Always 10 kΩ or higher I26-3 (LED+) or I4-5 (LED) - Body ground Always 10 kΩ or higher I26-9 (E) or I4-1 (GND) - Body ground Always 10 kΩ or higher
| Result | Proceed to |
|---|---|
| OK (for LHD) | A |
| OK (for RHD) | B |
| NG | C |
A
B
C
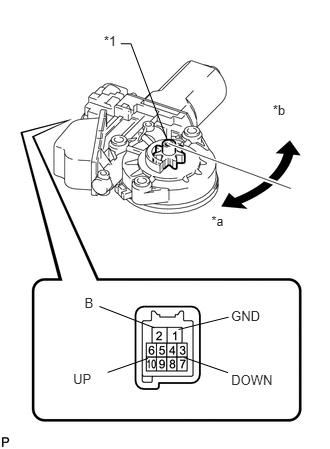
Remove the front power window regulator motor assembly LH (See page Vehicle Exterior>WINDOW / GLASS>POWER WINDOW REGULATOR MOTOR (for Front Door)>REMOVAL).
| *1 | Motor Gear |
| *a | Clockwise |
| *b | Counter clockwise |
Apply positive (+) battery voltage to connector terminal 2 (B).
- NOTICE:
- ·
Do not apply positive (+) battery voltage to any terminals, except terminal 2 (B), to avoid damaging the pulse sensor inside the motor.
- ·
Reset the power window regulator motor (initialize the pulse sensor) after installing the power window regulator motor and regulator assembly onto the door.
Apply negative (-) battery voltage to connector terminals 1 (GND), and 7 (DOWN) or 10 (UP).
Check that the motor gear rotates smoothly as follows.
- OK:
Measurement Condition Specified Condition 1.Connect the positive (+) battery cable to terminal 2 (B), and connect the negative (-) battery cable to terminal 1 (GND), and keep them connected for 3 seconds or more.
2.With terminals 2 (B) and 1 (GND) connected, connect the negative (-) battery cable to terminal 10 (UP).
3.Disconnect and reconnect the negative (-) battery cable to terminal 10 (UP) within 1 second.
Motor gear rotates clockwise (Up) 1.Connect the positive (+) battery cable to terminal 2 (B), and connect the negative (-) battery cable to terminal 1 (GND), and keep them connected for 3 seconds or more.
2.With terminals 2 (B) and 1 (GND) connected, connect the negative (-) battery cable to terminal 7 (DOWN).
3.Disconnect and reconnect the negative (-) battery cable to terminal 7 (DOWN) within 1 second.
Motor gear rotates counterclockwise (Down)
OK
NG
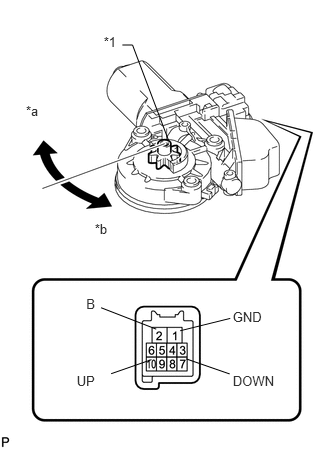
Remove the front power window regulator motor assembly RH (See page Vehicle Exterior>WINDOW / GLASS>POWER WINDOW REGULATOR MOTOR (for Front Door)>REMOVAL).
| *1 | Motor Gear |
| *a | Clockwise |
| *b | Counter clockwise |
Apply positive (+) battery voltage to connector terminal 2 (B).
- NOTICE:
- ·
Do not apply positive (+) battery voltage to any terminals, except terminal 2 (B), to avoid damaging the pulse sensor inside the motor.
- ·
Reset the power window regulator motor (initialize the pulse sensor) after installing the power window regulator motor and regulator assembly onto the door.
Apply negative (-) battery voltage to the connector terminals 1 (GND), and 7 (DOWN) or 10 (UP).
Check that the motor gear rotates smoothly as follows.
- OK:
Measurement Condition Specified Condition 1.Connect the positive (+) battery cable to terminal 2 (B), and connect the negative (-) battery cable to terminal 1 (GND), and keep them connected for 3 seconds or more.
2.With terminals 2 (B) and 1 (GND) connected, connect the negative (-) battery cable to terminal 10 (UP).
3.Disconnect and reconnect the negative (-) battery cable to terminal 10 (UP) within 1 second.
Motor gear rotates counterclockwise (Up) 1.Connect the positive (+) battery cable to terminal 2 (B), and connect the negative (-) battery cable to terminal 1 (GND), and keep them connected for 3 seconds or more.
2.With terminals 2 (B) and 1 (GND) connected, connect the negative (-) battery cable to terminal 7 (DOWN).
3.Disconnect and reconnect the negative (-) battery cable to terminal 7 (DOWN) within 1 second.
Motor gear rotates clockwise (Down)
OK
NG