Home › Engine / Hybrid System › 1GR-FE (ENGINE CONTROL) › SFI SYSTEM › 2016.08–2017.08
RM2660E _51 Engine / Hybrid System _052774 1GR-FE ENGINE CONTROL _0255001 SFI SYSTEM J

1GR-FE ENGINE CONTROL  SFI SYSTEM  Fuel Pump Control Circuit  


DESCRIPTION

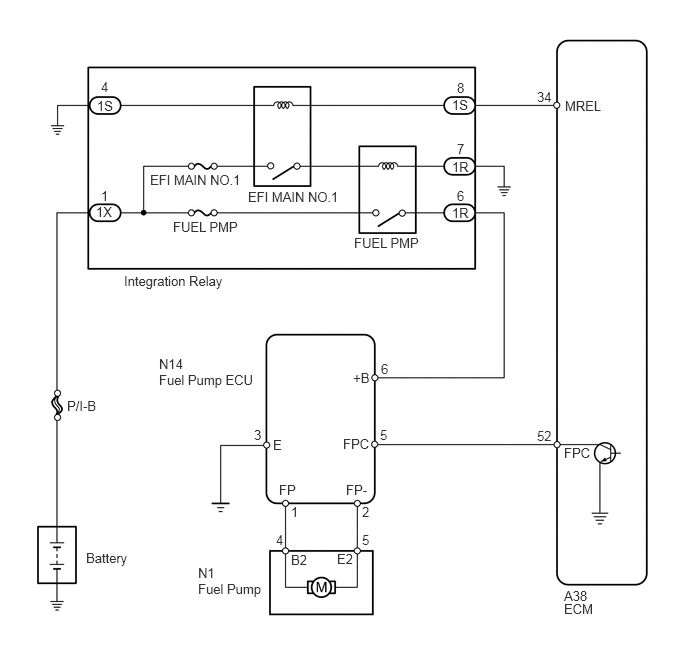
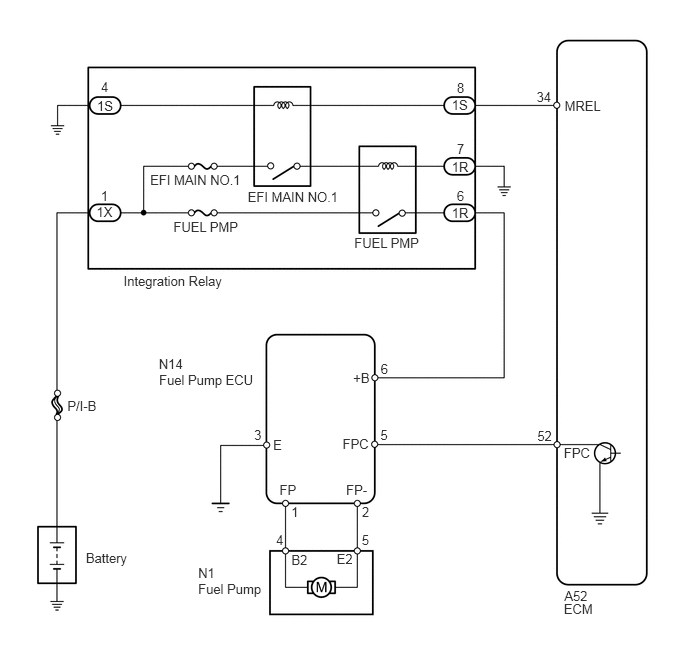
The fuel pump circuit consists of the ECM, fuel pump and fuel pump ECU (which operates the fuel pump). Based on the engine output, the ECM determines the fuel pump speed. The speed is then converted to a duty signal and sent to the fuel pump ECU. Based on the signal sent from the ECM, the fuel pump ECU adjusts the fuel pump operation speed.

WIRING DIAGRAM

for LHD:

A372106E04
1.052,0.823 1.177,1.01 0.125,0.188 10 false 4 1.01,1.021 1.198,1.156 0.188,0.135 10 false 1S 0.698,4.146 1.052,4.323 0.354,0.177 10 false P/I-B 2.583,1.969 3.625,2.125 1.042,0.156 10 false EFI MAIN NO.1 1.563,1.792 2.604,1.948 1.042,0.156 10 false EFI MAIN NO.1 3.688,2.448 4.417,2.625 0.729,0.177 10 false FUEL PMP 1.802,2.281 2.531,2.458 0.729,0.177 10 false FUEL PMP 4.76,0.833 4.854,0.979 0.094,0.146 10 false 8 4.708,1.01 4.896,1.146 0.188,0.135 10 false 1S 4.76,1.469 4.854,1.615 0.094,0.146 10 false 7 4.708,1.656 4.958,1.792 0.25,0.135 10 false 1R 4.76,1.958 4.854,2.104 0.094,0.146 10 false 6 4.708,2.135 4.948,2.271 0.24,0.135 10 false 1R 1.052,1.958 1.167,2.135 0.115,0.177 10 false 1 1,2.125 1.26,2.313 0.26,0.188 10 false 1X 1.292,2.844 2.375,3.021 1.083,0.177 10 false Integration Relay 0.896,5.729 1.365,5.875 0.469,0.146 10 false Battery 2.063,5.885 2.344,6.031 0.281,0.146 10 false N1 2.063,6.052 2.771,6.208 0.708,0.156 10 false Fuel Pump 3.771,5.542 3.865,5.688 0.094,0.146 10 false 5 2.875,5.542 2.979,5.688 0.104,0.146 10 false 4 3.031,5.75 3.229,5.906 0.198,0.156 10 false B2 3.51,5.74 3.708,5.885 0.198,0.146 10 false E2 3.031,5.25 3.146,5.406 0.115,0.156 10 false 1 3.771,5.25 3.865,5.406 0.094,0.156 10 false 2 2.906,5.021 3.115,5.167 0.208,0.146 10 false FP 3.604,5.021 3.854,5.167 0.25,0.146 10 false FP- 2.646,4.448 2.74,4.594 0.094,0.146 10 false 3 2.844,4.552 2.958,4.698 0.115,0.146 10 false E 3.677,3.854 3.875,4 0.198,0.146 10 false +B 3.969,3.76 4.063,3.906 0.094,0.146 10 false 6 3.573,4.542 3.875,4.688 0.302,0.146 10 false FPC 3.958,4.448 4.073,4.604 0.115,0.156 10 false 5 1.656,3.875 2.688,4.031 1.031,0.156 10 false Fuel Pump ECU 5.875,6.125 6.219,6.292 0.344,0.167 10 false A38 5.875,6.26 6.208,6.406 0.333,0.146 10 false ECM 5.594,0.927 5.771,1.073 0.177,0.146 10 false 34 5.885,1.021 6.292,1.167 0.406,0.146 10 false MREL 5.594,4.458 5.823,4.646 0.229,0.188 10 false 52 5.875,4.635 6.167,4.792 0.292,0.156 10 false FPC 1.656,3.708 2.021,3.865 0.365,0.156 10 false N14

for RHD:

A372106E03
1.052,0.826 1.176,1.011 0.124,0.185 10 4 1.011,1.02 1.200,1.158 0.189,0.138 10 1S 0.701,4.148 1.059,4.325 0.357,0.177 10 P/I-B 2.58,1.971 3.625,2.127 1.045,0.156 10 EFI MAIN NO.1 1.564,1.788 2.609,1.944 1.045,0.156 10 EFI MAIN NO.1 3.69,2.452 4.421,2.629 0.731,0.177 10 FUEL PMP 1.806,2.277 2.536,2.454 0.731,0.177 10 FUEL PMP 4.759,0.835 4.857,0.980 0.098,0.145 10 8 4.706,1.015 4.893,1.155 0.187,0.140 10 1S 4.759,1.472 4.857,1.617 0.098,0.145 10 7 4.706,1.653 4.957,1.793 0.250,0.140 10 1R 4.759,1.956 4.857,2.101 0.098,0.145 10 6 4.706,2.136 4.944,2.276 0.238,0.140 10 1R 1.051,1.955 1.161,2.127 0.110,0.173 10 1 1.005,2.128 1.243,2.336 0.237,0.208 10 1X 1.287,2.845 2.367,3.018 1.080,0.173 10 Integration Relay 0.894,5.732 1.359,5.881 0.465,0.149 10 Battery 2.064,5.884 2.345,6.033 0.281,0.149 10 N1 2.064,6.048 2.769,6.199 0.705,0.152 10 Fuel Pump 3.768,5.538 3.865,5.683 0.098,0.145 10 5 2.876,5.54 2.977,5.682 0.102,0.142 10 4 3.035,5.745 3.232,5.898 0.197,0.153 10 B2 3.507,5.743 3.706,5.892 0.199,0.150 10 E2 3.034,5.252 3.147,5.408 0.113,0.156 10 1 3.77,5.249 3.868,5.404 0.098,0.156 10 2 2.911,5.018 3.125,5.167 0.213,0.149 10 FP 3.605,5.018 3.858,5.167 0.253,0.149 10 FP- 2.647,4.449 2.744,4.594 0.098,0.145 10 3 2.845,4.55 2.961,4.697 0.117,0.146 10 E 3.678,3.85 3.880,3.996 0.201,0.146 10 +B 3.966,3.759 4.064,3.904 0.098,0.145 10 6 3.568,4.545 3.870,4.690 0.302,0.145 10 FPC 3.962,4.452 4.074,4.607 0.113,0.156 10 5 1.657,3.876 2.688,4.032 1.030,0.156 10 Fuel Pump ECU 5.878,6.13 6.239,6.305 0.361,0.175 10 A52 5.873,6.265 6.206,6.414 0.333,0.149 10 ECM 5.589,0.927 5.765,1.072 0.177,0.145 10 34 5.881,1.023 6.289,1.168 0.408,0.145 10 MREL 5.597,4.458 5.822,4.642 0.225,0.185 10 52 5.873,4.634 6.167,4.790 0.295,0.156 10 FPC 1.654,3.712 2.021,3.868 0.367,0.155 10 N14

CAUTION / NOTICE / HINT

NOTICE:

Inspect the fuses for circuits related to this system before performing the following inspection procedure.


PROCEDURE

1.PERFORM ACTIVE TEST USING GTS (CONTROL THE FUEL PUMP/SPEED)
a.

Connect the GTS to the DLC3.


b.

Turn the ignition switch to ON.


c.

Turn the GTS on.


d.

Enter the following menus: Powertrain / Engine and ECT / Active Test / Control the Fuel Pump/Speed.


e.

Check whether operating sounds can be heard while operating the fuel pump using the GTS.

OK:

Operating sounds can be heard from fuel pump.


Result
Result Proceed to
NG A
OK B


A

2.INSPECT FUEL PUMP ECU (POWER SOURCE VOLTAGE)

B

11.PERFORM ACTIVE TEST USING GTS (CONTROL THE FUEL PUMP)
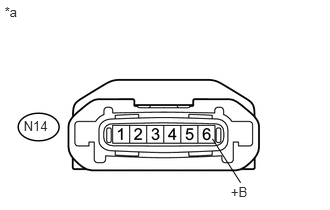
2.INSPECT FUEL PUMP ECU (POWER SOURCE VOLTAGE)
U163417E01
2.404,1.917 2.598,2.070 0.194,0.152 10 +B 2.212,1.446 2.506,1.903 false 0.246,1.232 0.528,1.374 0.282,0.142 10 N14 0.048,0.039 2.400,0.383 2.353,0.344 10 *a

a.

Disconnect the fuel pump ECU connector.


b.

Turn the ignition switch to ON.


c.

Measure the voltage according to the value(s) in the table below.

Standard Voltage:
Tester Connection Switch Condition Specified Condition
N14-6 (+B) - Body Ground Ignition switch ON 11 to 14 V


Text in Illustration
*a Front view of wire harness connector
(to Fuel Pump ECU)


OK

3.CHECK HARNESS AND CONNECTOR (FUEL PUMP ECU - BODY GROUND)

NG

9.CHECK HARNESS AND CONNECTOR (INTEGRATION RELAY - FUEL PUMP ECU)
3.CHECK HARNESS AND CONNECTOR (FUEL PUMP ECU - BODY GROUND)
a.

Disconnect the fuel pump ECU connector.


b.

Measure the resistance according to the value(s) in the table below.

Standard Resistance:
Tester Connection Condition Specified Condition
N14-3 (E) - Body ground Always Below 1 Ω


OK

4.CHECK HARNESS AND CONNECTOR (FUEL PUMP - FUEL PUMP ECU)

NG

REPAIR OR REPLACE HARNESS OR CONNECTOR

4.CHECK HARNESS AND CONNECTOR (FUEL PUMP - FUEL PUMP ECU)
a.

Disconnect the fuel pump connector.


b.

Disconnect the fuel pump ECU connector.


c.

Measure the resistance according to the value(s) in the table below.

Standard Resistance:
Tester Connection Condition Specified Condition
N1-4 (B2) - N14-1 (FP) Always Below 1 Ω
N1-5 (E2) - N14-2 (FP-) Always Below 1 Ω
N1-4 (B2) or N14-1 (FP) - Body ground Always 10 kΩ or higher
N1-5 (E2) or N14-2 (FP-) - Body ground Always 10 kΩ or higher


OK

5.INSPECT FUEL PUMP

NG

REPAIR OR REPLACE HARNESS OR CONNECTOR

5.INSPECT FUEL PUMP

OK

6.CHECK HARNESS AND CONNECTOR (FUEL PUMP ECU - ECM)

NG

6.CHECK HARNESS AND CONNECTOR (FUEL PUMP ECU - ECM)
a.

Disconnect the fuel pump ECU connector.


b.

Disconnect the ECM connector.


c.

Measure the resistance according to the value(s) in the table below.

Standard Resistance:
for LHD
Tester Connection Condition Specified Condition
N14-5 (FPC) - A38-52 (FPC) Always Below 1 Ω
N14-5 (FPC) or A38-52 (FPC) - Body ground Always 10 kΩ or higher

for RHD
Tester Connection Condition Specified Condition
N14-5 (FPC) - A52-52 (FPC) Always Below 1 Ω
N14-5 (FPC) or A52-52 (FPC) - Body ground Always 10 kΩ or higher


OK

7.REPLACE FUEL PUMP ECU

NG

REPAIR OR REPLACE HARNESS OR CONNECTOR

7.REPLACE FUEL PUMP ECU
a.

Replace the fuel pump ECU (See page Engine / Hybrid System>1GR-FE (FUEL)>FUEL PUMP ECU>REMOVAL).


NEXT

8.CONFIRM WHETHER MALFUNCTION HAS BEEN SUCCESSFULLY REPAIRED
a.

Check the fuel pump operation.

OK:

Malfunction has been repaired successfully.


OK

END

NG

9.CHECK HARNESS AND CONNECTOR (INTEGRATION RELAY - FUEL PUMP ECU)
a.

Remove the integration relay from the engine room relay block.


b.

Disconnect the fuel pump ECU connector.


c.

Measure the resistance according to the value(s) in the table below.

Standard Resistance:
Tester Connection Condition Specified Condition
1R-6 - N14-6 (+B) Always Below 1 Ω
1R-6 or N14-6 (+B) - Body ground Always 10 kΩ or higher


OK

10.INSPECT INTEGRATION RELAY (FUEL PMP)

NG

REPAIR OR REPLACE HARNESS OR CONNECTOR

10.INSPECT INTEGRATION RELAY (FUEL PMP)
a.

Inspect the integration relay (FUEL PMP) (See page Engine / Hybrid System>1GR-FE (ENGINE CONTROL)>RELAY>ON-VEHICLE INSPECTION).


OK

NG
REPLACE INTEGRATION RELAY

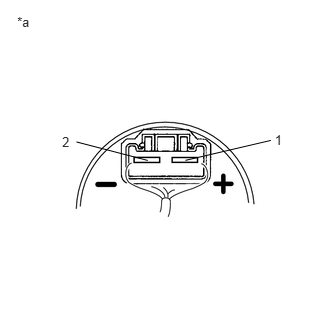
11.PERFORM ACTIVE TEST USING GTS (CONTROL THE FUEL PUMP)
A243665E02
2.862,1.37 2.973,1.519 0.111,0.149 10 1 0.647,1.391 0.755,1.544 0.107,0.152 10 2 1.931,1.67 2.821,1.462 false 1.539,1.671 0.796,1.478 false 0.178,0.144 2.543,0.541 2.365,0.397 10 *a

a.

Remove the fuel tank assembly (See page Engine / Hybrid System>1GR-FE (FUEL)>FUEL TANK>REMOVAL).


b.

Remove the fuel pump from the fuel tank assembly.


c.

Clean the fuel pump to completely remove any remaining fuel.


d.

Connect the fuel pump connector.

CAUTION:

Make sure that there is no fuel remaining inside or on the outside of the fuel pump.


e.

Connect the GTS to the DLC3.


f.

Turn the ignition switch to ON.


g.

Turn the GTS on.


h.

Enter the following menus: Powertrain / Engine and ECT / Active Test / Control the Fuel Pump Duty.


i.

Operate the fuel pump using the Active Test function and measure the voltage according to the value(s) in the table below.

Standard Voltage:
Tester Connection GTS Operation Specified Condition
1 - 2 FPC Duty: 25% 3.2 to 4.05 V
FPC Duty: 80% 8.8 to 12.5 V


j.

Enter the following menus: Powertrain / Engine and ECT / Active Test / Control the Fuel Pump/Speed.


k.

Operate the fuel pump using the Active Test function and measure the voltage according to the value(s) in the table below.

Standard Voltage:
Tester Connection GTS Operation Specified Condition
1 - 2 ON (FPC Duty: 90%) 9.0 to 14.0 V


HINT:
·

Be sure to measure the voltage with all the connectors connected.

·

Before performing this inspection, check that the battery voltage is between 11 and 14 V (not depleted).


Text in Illustration
*a Component with harness connected
(Fuel Pump)


OK

12.CHECK HARNESS AND CONNECTOR (FUEL PUMP ECU - ECM)

NG

14.REPLACE FUEL PUMP ECU
12.CHECK HARNESS AND CONNECTOR (FUEL PUMP ECU - ECM)
a.

Disconnect the fuel pump ECU connector.


b.

Disconnect the ECM connector.


c.

Measure the resistance according to the value(s) in the table below.

Standard Resistance:
for LHD
Tester Connection Condition Specified Condition
N14-5 (FPC) - A38-52 (FPC) Always Below 1 Ω
N14-5 (FPC) or A38-52 (FPC) - Body ground Always 10 kΩ or higher

for RHD
Tester Connection Condition Specified Condition
N14-5 (FPC) - A52-52 (FPC) Always Below 1 Ω
N14-5 (FPC) or A52-52 (FPC) - Body ground Always 10 kΩ or higher


OK

13.REPLACE FUEL PUMP

NG

REPAIR OR REPLACE HARNESS OR CONNECTOR

13.REPLACE FUEL PUMP

NEXT

15.CONFIRM WHETHER MALFUNCTION HAS BEEN SUCCESSFULLY REPAIRED
14.REPLACE FUEL PUMP ECU
a.

Replace the fuel pump ECU (See page Engine / Hybrid System>1GR-FE (FUEL)>FUEL PUMP ECU>REMOVAL).


NEXT

15.CONFIRM WHETHER MALFUNCTION HAS BEEN SUCCESSFULLY REPAIRED
a.

Check the fuel pump operation.

OK:

Malfunction has been repaired successfully.


OK

END

NG