AC60F AUTOMATIC TRANSMISSION / TRANSAXLE AUTOMATIC TRANSMISSION UNIT REASSEMBLY
PROCEDURE

 1. BEARING POSITION
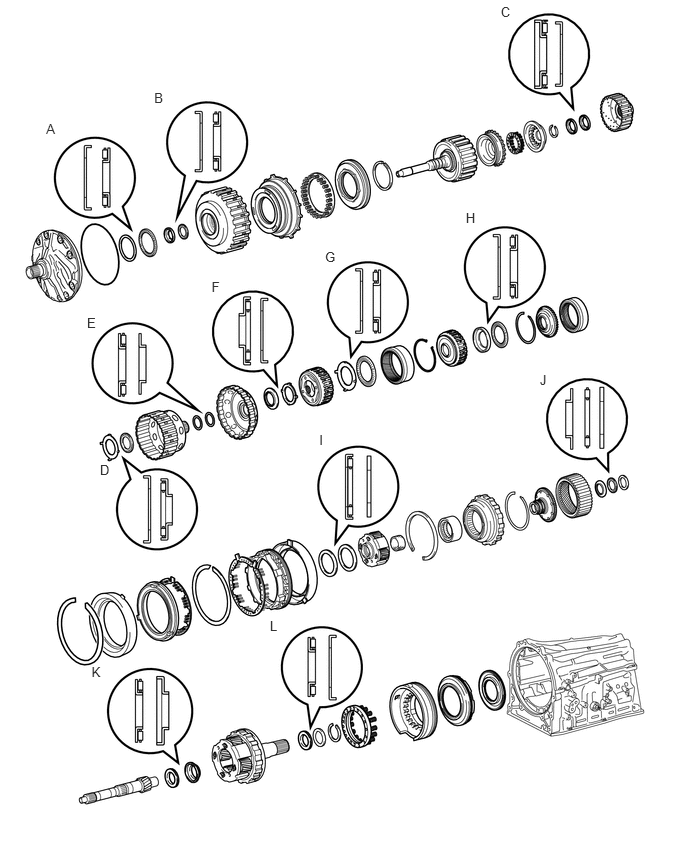
| Mark | Front Race Diameter
Inside / Outside (mm (in.)) |
Thrust Bearing Diameter
Inside / Outside (mm (in.)) |
Rear Race Diameter
Inside / Outside (mm (in.)) |
|---|---|---|---|
| A | 74.2 (2.921) / 87.74 (3.454) | 71.9 (2.831) / 85.6 (3.370) | - |
| B | 40.0 (1.575) / 52.8 (2.079) | 34.6 (1.362) / 52.0 (2.047) | - |
| C | 22.0 (0.866) / 44.8 (1.764) | 21.3 (0.839) / 41.1 (1.618) | - |
| D | 38.4 (1.512) / 56.5 (2.224) | 33.3 (1.311) / 56.6 (2.228) | - |
| E | - | 40.83 (1.607) / 52.8 (2.079) | 39.6 (1.559) / 52.8 (2.079) |
| F | - | 37.1 (1.461) / 61.2 (2.409) | 44.0 (1.732) / 62.8 (2.472) |
| G | 65.8 (2.591) / 86.3 (3.398) | 63.3 (2.492) / 78.8 (3.102) | - |
| H | 66.3 (2.610) / 78.9 (3.106) | 63.3 (2.492) / 78.8 (3.102) | - |
| I | - | 55.7 (2.193) / 76.4 (3.008) | 53.7 (2.114) / 74.0 (2.913) |
| J | 33.4 (1.315) / 49.0 (1.929) | 32.1 (1.264) / 49.35 (1.943) | 32.1 (1.264) / 49.0 (1.929) |
| K | - | 21.0 (0.827) / 41.5 (1.634) | 23.13 (0.911) / 41.5 (1.634) |
| L | - | 43.55 (1.715) / 61.0 (2.402) | 47.1 (1.854) / 67.1 (2.642) |
35639B
2.INSTALL BRAKE PLATE STOPPER SPRING
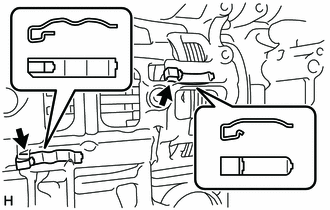
Install the 2 brake plate stopper springs to the automatic transmission case sub-assembly.
- NOTICE:
-
The shapes of the parts are different. Refer to the illustration when installing the parts.
35629A
3.INSTALL NO. 4 BRAKE PISTON
Coat 2 new O-rings with ATF, and install them to the brake reaction sleeve.
Coat 2 new O-rings with ATF, and install them to the No. 4 brake piston.
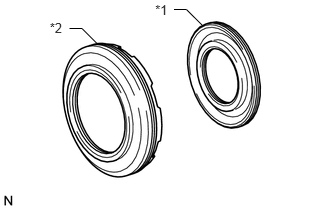
Install the No. 4 brake piston to the brake reaction sleeve.
| *1 | No. 4 Brake Piston |
| *2 | Brake Reaction Sleeve |
- NOTICE:
-
Be careful not to damage the O-rings.
35626
4.INSTALL BRAKE REACTION SLEEVE
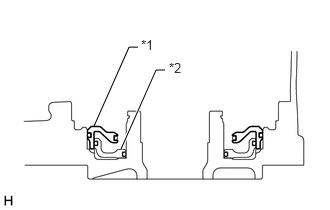
With the No. 4 brake piston underneath (the rear side), install the brake reaction sleeve and No. 4 brake piston to the automatic transmission case sub-assembly.
| *1 | Brake Reaction Sleeve |
| *2 | No. 4 Brake Piston |
- NOTICE:
-
Be careful not to damage the O-rings.
35623H
5.INSTALL 1ST AND REVERSE BRAKE PISTON
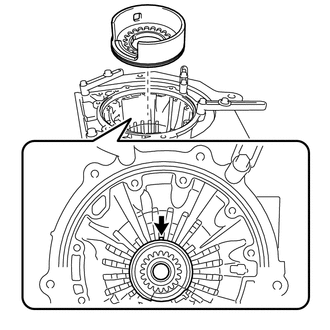
Coat a new O-ring with ATF, and install it to the 1st and reverse brake piston.
Install the 1st and reverse brake piston to the automatic transmission case sub-assembly while making sure that the protrusion of the 1st and reverse brake piston is positioned as shown in the illustration.
- NOTICE:
-
Be careful not to damage the O-ring.
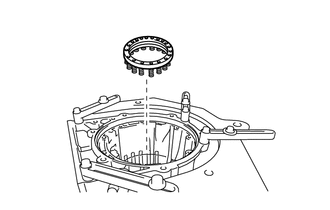
Install the 1st and reverse brake return spring sub-assembly to the automatic transmission case sub-assembly.
Place the 1st and reverse brake return spring sub-assembly onto the 1st and reverse brake piston.
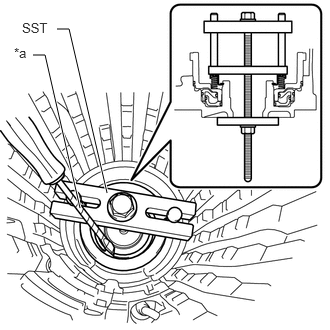
Place SST on the 1st and reverse brake return spring sub-assembly, and compress the 1st and reverse brake return spring sub-assembly.
- SST
- 09380-60011 (09381-06030, 09381-06040, 09381-06080, 09381-06120, 09381-06130, 09381-05040, 09381-05050)
| *a | Protective Tape |
Using a screwdriver, install the snap ring to the automatic transmission case sub-assembly.
- NOTICE:
-
Be careful not to damage the 1st and reverse brake return spring sub-assembly and automatic transmission case sub-assembly.
- HINT:
-
Tape the screwdriver tip before use.
35760
6.INSTALL REAR PLANETARY GEAR ASSEMBLY
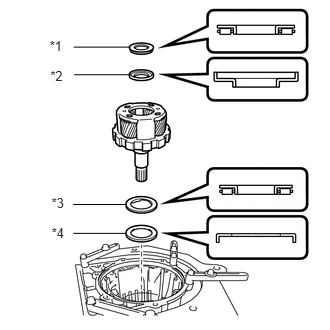
Coat the thrust bearing race with ATF and install it to the automatic transmission case sub-assembly.
- Thrust Needle Roller Bearing and Thrust Bearing Race Diameter:
Item Inside (mm (in.)) Outside (mm (in.)) Thrust Needle Roller Bearing K 21.0 (0.827) 41.5 (1.634) Thrust Bearing Race K 23.13 (0.911) 41.5 (1.634) Thrust Needle Roller Bearing L 43.55 (1.715) 61.0 (2.402) Thrust Bearing Race L 47.1 (1.854) 67.1 (2.642)
| *1 | Thrust Needle Roller Bearing K |
| *2 | Thrust Bearing Race K |
| *3 | Thrust Needle Roller Bearing L |
| *4 | Thrust Bearing Race L |
- NOTICE:
-
Be sure to install the thrust needle roller bearing and thrust bearing race in the correct direction.
Coat the 2 thrust needle roller bearings and thrust bearing race with ATF and install them to the rear planetary gear assembly.
Install the rear planetary gear assembly to the automatic transmission case sub-assembly.
35684
7.INSTALL NO. 4 BRAKE DISC
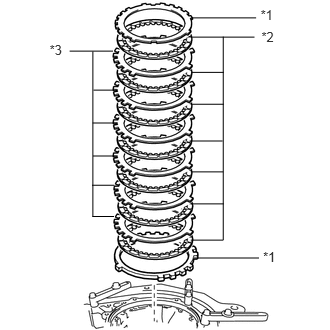
Install the 2 No. 4 brake flanges, 7 No. 4 brake discs and 6 No. 4 brake plates to the automatic transmission case sub-assembly.
| *1 | No. 4 Brake Flange |
| *2 | No. 4 Brake Disc |
| *3 | No. 4 Brake Plate |
- NOTICE:
- ·
Make sure that the No. 4 brake discs, No. 4 brake plates and No. 4 brake flanges are installed in the correct order.
·Install the thicker No. 4 brake flange first, and then install the thinner one.
35713
8.INSTALL INTERMEDIATE SHAFT
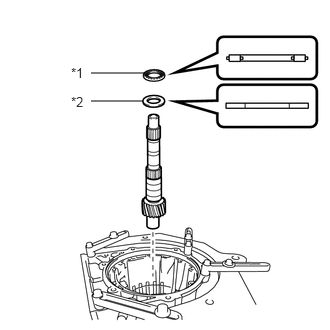
Coat the thrust needle roller bearing and thrust bearing race with ATF and install them to the intermediate shaft.
- Thrust Needle Roller Bearing and Thrust Bearing Race Diameter:
Item Inside (mm (in.)) Outside (mm (in.)) Thrust Needle Roller Bearing J 32.1 (1.264) 49.35 (1.943) Thrust Bearing Race J
(Rear Race)32.1 (1.264) 49.0 (1.929)
| *1 | Thrust Needle Roller Bearing J |
| *2 | Thrust Bearing Race J (Rear Race) |
Install the intermediate shaft to the automatic transmission case sub-assembly.
35761
9.INSTALL REAR PLANETARY RING GEAR
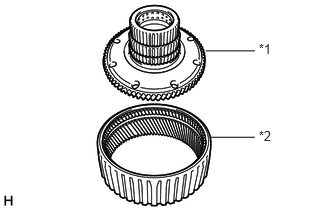
Install the rear planetary ring gear to the rear planetary ring gear flange sub-assembly.
| *1 | Rear Planetary Ring Gear Flange Sub-assembly |
| *2 | Rear Planetary Ring Gear |
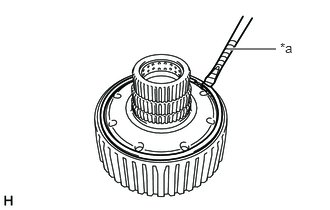
Using a screwdriver, install the snap ring to the rear planetary ring gear flange sub-assembly with rear planetary ring gear.
| *a | Protective Tape |
- NOTICE:
-
Be careful not to damage the rear planetary ring gear flange sub-assembly with rear planetary ring gear.
- HINT:
-
Tape the screwdriver tip before use.
35077D
10.INSTALL REAR PLANETARY RING GEAR FLANGE SUB-ASSEMBLY WITH REAR PLANETARY RING GEAR
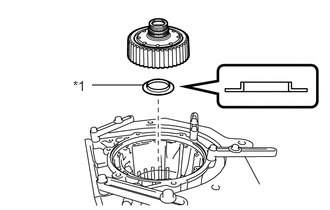
Coat the thrust bearing race with ATF and install it to the rear planetary ring gear flange sub-assembly with rear planetary ring gear.
- Thrust Bearing Race Diameter:
Item Inside (mm (in.)) Outside (mm (in.)) Thrust Bearing Race J
(Front Race)33.4 (1.315.) 49.0 (1.929)
| *1 | Thrust Bearing Race J (Front Race) |
- NOTICE:
-
Be sure to install the thrust bearing race in the correct direction.
Install the rear planetary ring gear flange sub-assembly with rear planetary ring gear to the automatic transmission case sub-assembly.
35797B
11.INSTALL ONE-WAY CLUTCH INNER RACE
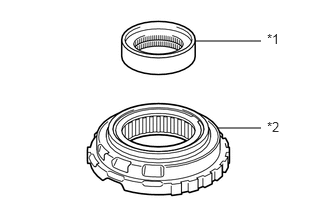
Install the one-way clutch inner race to the No. 3 one-way clutch assembly.
| *1 | One-way Clutch Inner Race |
| *2 | No. 3 One-way Clutch Assembly |
- HINT:
-
Rotate the one-way clutch inner race clockwise to install it.
35770C
12.INSTALL NO. 3 ONE-WAY CLUTCH ASSEMBLY WITH ONE-WAY CLUTCH INNER RACE
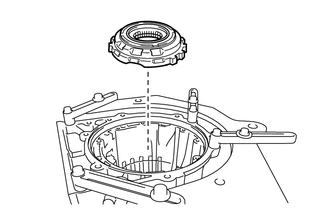
Install the No. 3 one-way clutch assembly with one-way clutch inner race to the automatic transmission case sub-assembly.
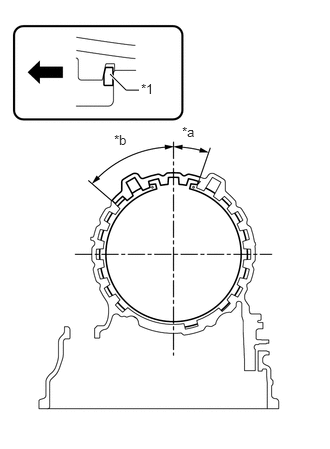
Using SST, install the snap ring to the automatic transmission case sub-assembly.
- SST
- 09350-30020 (09350-07060)
| *1 | Snap Ring |
| *a | 19° |
| *b | 49° |

|
Front Side |
- NOTICE:
- ·
Install the snap ring so that the tapered side is facing out.
·Be sure to install the snap ring so that the ends of the snap ring are within the area shown in the illustration.
35689
13.INSPECT CLEARANCE OF NO. 4 BRAKE
35621V
14.INSTALL NO. 1 BRAKE PISTON
Coat 2 new O-rings with ATF and install them to the No. 1 brake piston.
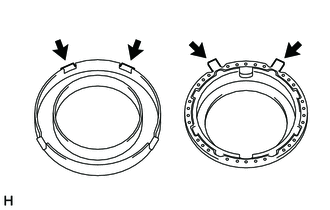
With the No. 1 brake piston return spring sub-assembly installed to the No. 1 brake piston, align the 2 claws of the No. 1 brake piston return spring sub-assembly with the 2 claws of the No. 1 brake cylinder, and then install the No. 1 brake piston to the No. 1 brake cylinder.
35698
15.INSTALL NO. 1 BRAKE CYLINDER WITH NO. 1 BRAKE PISTON
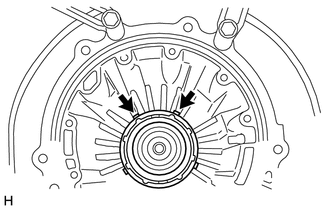
Install the No. 1 brake cylinder with No. 1 brake piston to the automatic transmission case sub-assembly while making sure that the 2 claws of the No. 1 brake cylinder with No. 1 brake piston are positioned as shown in the illustration.
35608J
16.INSTALL NO. 1 BRAKE PISTON RETURN SPRING SUB-ASSEMBLY
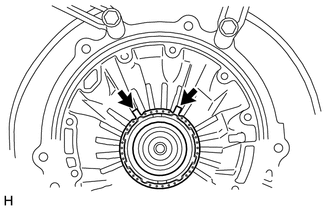
Align the 2 claws of the No. 1 brake piston return spring sub-assembly with the 2 claws of the No. 1 brake cylinder, and then install the No. 1 brake piston return spring sub-assembly to the No. 1 brake piston.
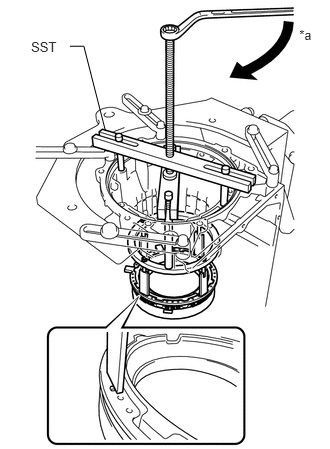
Place SST on the No. 1 brake piston return spring sub-assembly, and compress the No. 1 brake piston return spring sub-assembly with a press.
- SST
- 09380-60011 (09381-06010, 09381-06040, 09381-06050, 09381-06070, 09381-06090, 09381-06100, 09381-06110, 09381-06120)
| *a | Turn |
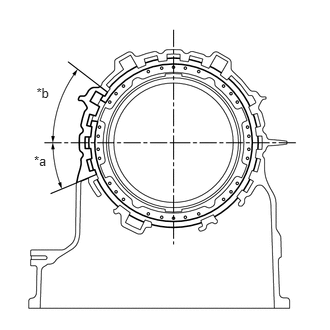
Using a screwdriver, install the snap ring to the automatic transmission case sub-assembly.
| *a | 22.5° |
| *b | 37.5° |
- NOTICE:
- ·
Be sure to install the snap ring so that the ends of the snap ring are within the area shown in the illustration.
·Be careful not to damage the automatic transmission case sub-assembly.
- HINT:
-
Tape the screwdriver tip before use.
35681A
17.INSTALL NO. 1 BRAKE DISC
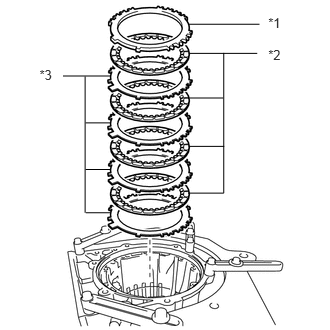
Install the No. 1 brake flange, 4 No. 1 brake discs and 4 No. 1 brake plates to the automatic transmission case sub-assembly.
| *1 | No. 1 Brake Flange |
| *2 | No. 1 Brake Disc |
| *3 | No. 1 Brake Plate |
- NOTICE:
-
Make sure that the No. 1 brake discs, No. 1 brake plates and No. 1 brake flange are installed in the correct order.
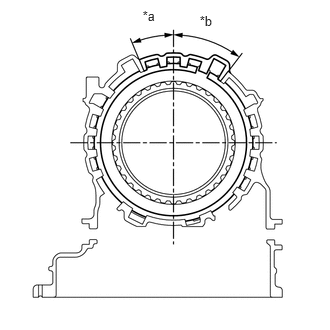
Using a screwdriver, install the snap ring to the automatic transmission case sub-assembly.
| *a | 22.5° |
| *b | 37.5° |
- NOTICE:
- ·
Be sure to install the snap ring so that the ends of the snap ring are within the area shown in the illustration.
·Be careful not to damage the automatic transmission case sub-assembly.
- HINT:
-
Tape the screwdriver tip before use.
35676B
18.INSPECT CLEARANCE OF NO. 1 BRAKE
35719B
19.INSTALL PLANETARY SUN GEAR
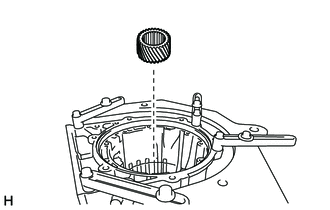
Install the planetary sun gear to the automatic transmission case sub-assembly.
35750
20.INSTALL CENTER PLANETARY GEAR ASSEMBLY
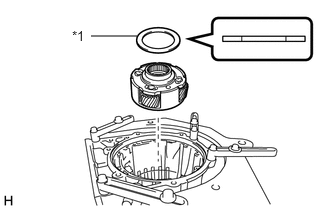
Coat the thrust bearing race with ATF and install it to the center planetary gear assembly.
- Thrust Bearing Race Diameter:
Item Inside (mm (in.)) Outside (mm (in.)) Thrust Bearing Race I 53.7 (2.114) 74.0 (2.913)
| *1 | Thrust Bearing Race I |
Install the center planetary gear assembly to the automatic transmission case sub-assembly.
35763
21.INSTALL CENTER PLANETARY RING GEAR
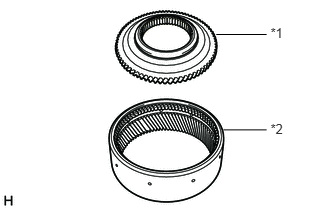
Install the center planetary ring gear to the center planetary ring gear flange
| *1 | Center Planetary Ring Gear Flange |
| *2 | Center Planetary Ring Gear |
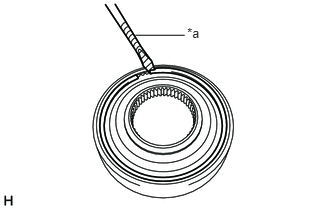
Using a screwdriver, install the snap ring to the center planetary ring gear flange with center planetary ring gear.
| *a | Protective Tape |
- NOTICE:
-
Be careful not to damage the center planetary ring gear flange with center planetary ring gear.
- HINT:
-
Tape the screwdriver tip before use.
35769
22.INSTALL CENTER PLANETARY RING GEAR FLANGE WITH CENTER PLANETARY RING GEAR
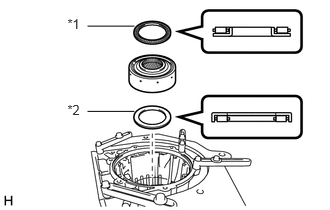
Coat the 2 thrust needle roller bearings with ATF and install them to the center planetary ring gear flange with center planetary ring gear.
- Thrust Needle Roller Bearing Diameter:
Item Inside (mm (in.)) Outside (mm (in.)) Thrust Needle Roller Bearing H 63.3 (2.492) 78.8 (3.102) Thrust Needle Roller Bearing I 55.7 (2.193) 76.4 (3.008)
| *1 | Thrust Needle Roller Bearing H |
| *2 | Thrust Needle Roller Bearing I |
- NOTICE:
-
Be sure to install the thrust needle roller bearing in the correct direction.
Install the center planetary ring gear flange with center planetary ring gear to the automatic transmission case sub-assembly.
35682A
23.INSTALL NO. 2 BRAKE DISC
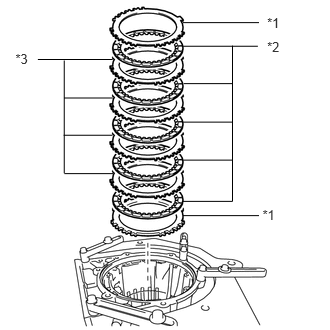
Install the 2 No. 2 brake flanges, 5 No. 2 brake discs and 4 No. 2 brake plates to the automatic transmission case sub-assembly.
| *1 | No. 2 Brake Flange |
| *2 | No. 2 Brake Disc |
| *3 | No. 2 Brake Plate |
- NOTICE:
- ·
Make sure that the No. 2 brake discs, No. 2 brake plates and No. 2 brake flanges are installed in the correct order.
·Install the thicker No. 2 brake flange first, and then install the thinner one.
35622G
24.INSTALL NO. 2 BRAKE PISTON
Coat 2 new O-rings with ATF and install them to the No. 2 brake piston.
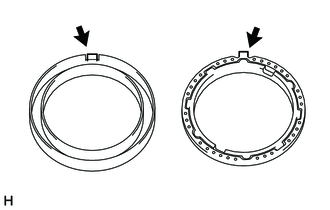
With the No. 2 brake piston return spring sub-assembly installed to the No. 2 brake piston, align the claw of the No. 2 brake piston return spring sub-assembly with the claw of the No. 2 brake cylinder, and then install the No. 2 brake piston to the No. 2 brake cylinder.
- NOTICE:
-
Be careful not to damage the O-rings.
35699
25.INSTALL NO. 2 BRAKE CYLINDER WITH NO. 2 BRAKE PISTON
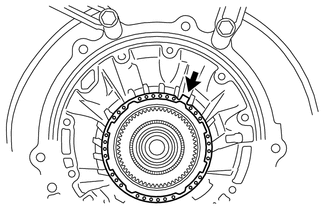
Install the No. 2 brake piston return spring sub-assembly to the automatic transmission case sub-assembly while making sure that the claw of the No. 2 brake piston return spring sub-assembly is positioned as shown in the illustration.
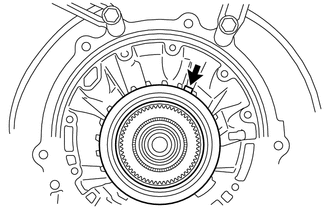
Install the No. 2 brake cylinder with No. 2 brake piston to the automatic transmission case sub-assembly while making sure that the claw of the No. 1 brake cylinder with No. 1 brake piston is positioned as shown in the illustration.
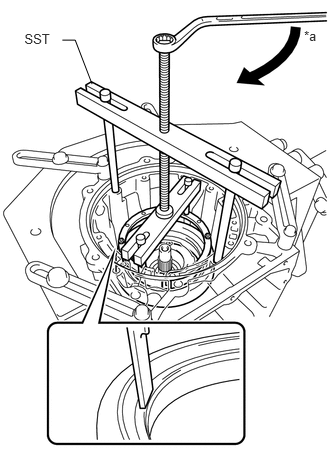
Place SST on the No. 2 brake cylinder, and compress the No. 2 brake piston return spring sub-assembly with a press.
- SST
- 09380-60011 (09381-06010, 09381-06020, 09381-06040, 09381-06050, 09381-06060, 09381-06090, 09381-06100, 09381-06110, 09381-06120)
| *a | Turn |
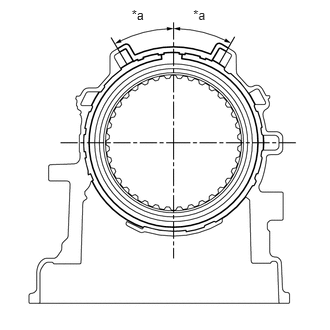
Using a screwdriver, install the snap ring to the automatic transmission case sub-assembly.
| *a | 30° |
- NOTICE:
- ·
Be sure to install the snap ring so that the ends of the snap ring are within the area shown in the illustration.
·Be careful not to damage the automatic transmission case sub-assembly.
- HINT:
-
Tape the screwdriver tip before use.
35678B
26.INSPECT CLEARANCE OF NO. 2 BRAKE
35076C
27.INSTALL FRONT PLANETARY RING GEAR FLANGE SUB-ASSEMBLY
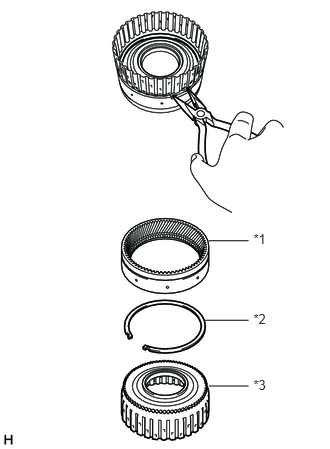
Set the snap ring onto the front planetary ring gear flange sub-assembly. Using needle-nose pliers, insert the snap ring into the front planetary ring gear while squeezing it, and then expand the snap ring to install it.
| *1 | Front Planetary Ring Gear |
| *2 | Snap Ring |
| *3 | Front Planetary Ring Gear Flange Sub-assembly |
- NOTICE:
-
Make sure the snap ring is securely inserted into the groove of the front planetary ring gear.
35743
28.INSTALL FRONT PLANETARY RING GEAR WITH FRONT PLANETARY RING GEAR FLANGE SUB-ASSEMBLY
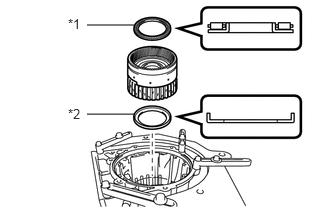
Coat the thrust needle roller bearing and thrust bearing race with ATF and install them to the front planetary ring gear with front planetary ring gear flange sub-assembly.
- Thrust Needle Roller Bearing and Thrust Bearing Race Diameter:
Item Inside (mm (in.)) Outside (mm (in.)) Thrust Needle Roller Bearing G 63.3 (2.492) 78.8 (3.102) Thrust Bearing Race H 66.3 (2.610) 78.9 (3.106)
| *1 | Thrust Needle Roller Bearing G |
| *2 | Thrust Bearing Race H |
- NOTICE:
-
Be sure to install the thrust needle roller bearing and thrust bearing race in the correct direction.
Install the front planetary ring gear with front planetary ring gear flange sub-assembly to the automatic transmission case sub-assembly.
35720
29.INSTALL FRONT PLANETARY GEAR ASSEMBLY
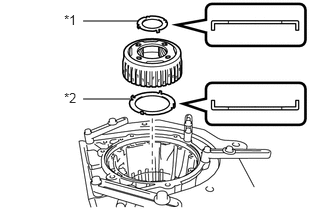
Coat the 2 thrust bearing races with ATF and install them to the front planetary gear assembly.
- Thrust Bearing Race Diameter:
Item Inside (mm (in.)) Outside (mm (in.)) Thrust Bearing Race F 44.0 (1.732) 62.8 (2.472) Thrust Bearing Race G 65.8 (2.591) 86.3 (3.398)
| *1 | Thrust Bearing Race F |
| *2 | Thrust Bearing Race G |
- NOTICE:
-
Be sure to install the thrust bearing race in the correct direction.
Install the front planetary gear assembly to the automatic transmission case sub-assembly.
35709J
30.INSTALL SUN GEAR INPUT DRUM SUB-ASSEMBLY
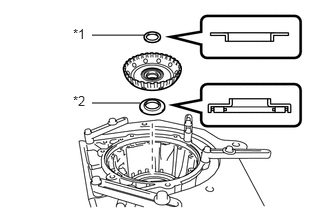
Coat the thrust needle roller bearing and thrust bearing race with ATF and install them to the sun gear input drum sub-assembly.
- Thrust Needle Roller Bearing and Thrust Bearing Race Diameter:
Item Inside (mm (in.)) Outside (mm (in.)) Thrust Bearing Race E 40.83 (1.607) 52.8 (2.079) Thrust Needle Roller Bearing F 37.1 (1.461) 61.2 (2.409)
| *1 | Thrust Bearing Race E |
| *2 | Thrust Needle Roller Bearing F |
- NOTICE:
-
Be sure to install the thrust needle roller bearing and thrust bearing race in the correct direction.
Install the sun gear input drum sub-assembly to the automatic transmission case sub-assembly.
35061
31.INSTALL FORWARD CLUTCH HUB SUB-ASSEMBLY
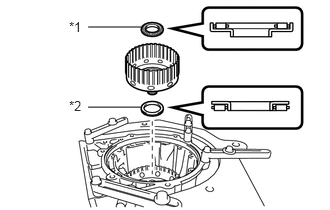
Coat the 2 thrust needle roller bearings with ATF and install them to the forward clutch hub sub-assembly.
- Thrust Needle Roller Bearing Diameter:
Item Inside (mm (in.)) Outside (mm (in.)) Thrust Needle Roller Bearing D 33.3 (1.311) 56.6 (2.228) Thrust Needle Roller Bearing E 39.6 (1.559) 52.8 (2.079)
| *1 | Thrust Needle Roller Bearing D |
| *2 | Thrust Needle Roller Bearing E |
- NOTICE:
-
Be sure to install the thrust needle roller bearing in the correct direction.
Install the forward clutch hub sub-assembly to the automatic transmission case sub-assembly.
35631
32.INSTALL MULTIPLE DISC CLUTCH HUB
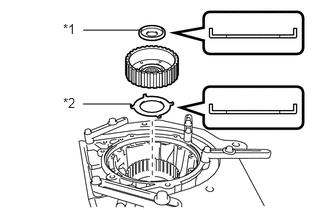
Coat the 2 thrust bearing races with ATF and install them to the multiple disc clutch hub.
- Thrust Bearing Race Diameter:
Item Inside (mm (in.)) Outside (mm (in.)) Thrust bearing race C 22.0 (0.866) 44.8 (1.764) Thrust bearing race D 38.4 (1.512) 56.5 (2.224)
| *1 | Thrust bearing race C |
| *2 | Thrust bearing race D |
- NOTICE:
-
Be sure to install the thrust bearing race in the correct direction.
Install the multiple disc clutch hub to the automatic transmission case sub-assembly.
35606A
33.INSTALL DIRECT CLUTCH PISTON
Coat 2 new O-rings with ATF, and install them to the direct clutch piston.
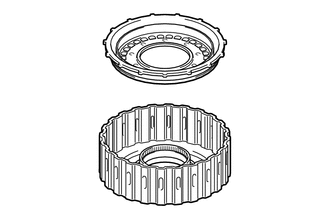
Install the direct clutch piston to the direct clutch drum sub-assembly.
- NOTICE:
-
Be careful not to damage the O-rings.
35669
34.INSTALL NO. 2 CLUTCH BALANCER
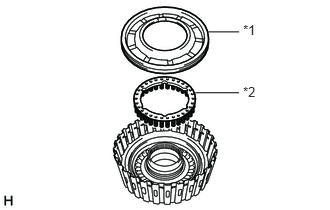
Install the direct clutch return spring sub-assembly to the direct clutch piston.
| *1 | No. 2 Clutch Balancer |
| *2 | Direct Clutch Return Spring Sub-assembly |
Coat a new O-ring with ATF, and install it to the No. 2 clutch balancer.
Install the No. 2 clutch balancer to the direct clutch drum sub-assembly.
- NOTICE:
-
Be careful not to damage the O-ring.
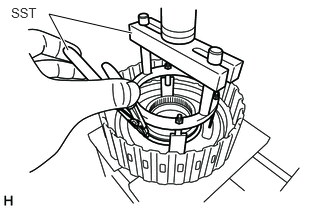
Place SST on the No. 2 clutch balancer, and compress the direct clutch return spring sub-assembly with a press.
- SST
- 09380-60011 (09381-06030, 09381-06040, 09381-06080, 09381-06100, 09381-06110)
- NOTICE:
-
Stop pressing when the spring sheet is lowered to the place 1 to 2 mm (0.0394 to 0.0787 in.) from the snap ring groove to prevent the spring sheet from being deformed.
Using SST, install the snap ring.
- SST
- 09350-30020 (09350-07070)
- NOTICE:
-
Do not expand the snap ring excessively.
35667A
35.INSTALL NO. 2 CLUTCH DISC (DIRECT CLUTCH DISC)
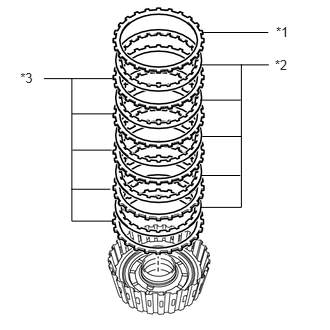
Install the 5 No. 2 clutch plates, 5 No. 2 clutch discs and direct clutch flange to the direct clutch drum sub-assembly.
| *1 | Direct Clutch Flange |
| *2 | No. 2 Clutch Disc |
| *3 | No. 2 Clutch Plate |
- NOTICE:
-
Make sure that the No. 2 clutch discs, No. 2 clutch plates and direct clutch flange are installed in the correct order.
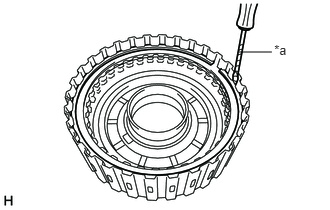
Using a screwdriver, install the snap ring to the direct clutch drum sub-assembly.
| *a | Protective Tape |
- NOTICE:
-
Be careful not to damage the direct clutch drum sub-assembly.
- HINT:
-
Tape the screwdriver tip before use.
35675C
36.INSPECT CLEARANCE OF NO. 2 CLUTCH (DIRECT CLUTCH)
35612B
37.INSTALL FORWARD CLUTCH PISTON
Coat a new O-ring with ATF, and install it to the input shaft sub-assembly.
Coat a new O-ring with ATF, and install it to the forward clutch piston.
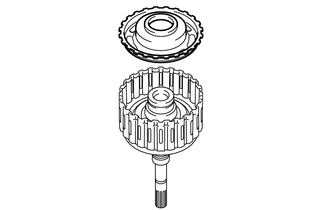
Install the forward clutch piston to the input shaft sub-assembly.
- NOTICE:
-
Be careful not to damage the O-rings.
35668
38.INSTALL NO. 1 CLUTCH BALANCER
Coat a new O-ring with ATF, and install it to the No. 1 clutch balancer.
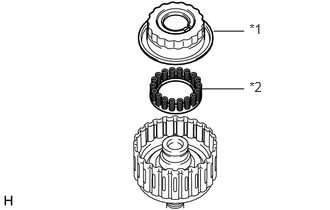
Install the forward clutch return spring sub-assembly and No. 1 clutch balancer to the input shaft sub-assembly.
| *1 | No. 1 Clutch Balancer |
| *2 | Forward Clutch Return Spring Sub-assembly |
- NOTICE:
-
Be careful not to damage the O-ring.
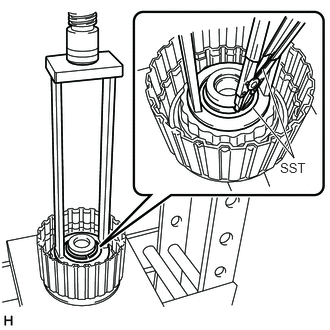
Place SST on the No. 1 clutch balancer, and compress the forward clutch return spring sub-assembly with a press.
- SST
- 09387-00110
- NOTICE:
-
Stop pressing when the spring sheet is lowered to the place 1 to 2 mm (0.0394 to 0.0787 in.) from the snap ring groove to prevent the spring sheet from being deformed.
Using SST, install the snap ring.
- SST
- 09350-30020 (09350-07070)
- NOTICE:
-
Do not expand the snap ring excessively.
35633B
39.INSTALL NO. 1 CLUTCH DISC (FORWARD CLUTCH DISC)
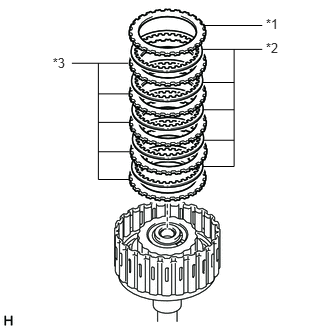
Install the 5 No. 1 clutch plates, 5 No. 1 clutch discs and forward clutch flange to the input shaft sub-assembly.
| *1 | Forward Clutch Flange |
| *2 | No. 1 Clutch Disc |
| *3 | No. 1 Clutch Plate |
- NOTICE:
-
Make sure that the No. 1 clutch discs, No. 1 clutch plates and forward clutch flange are installed in the correct order.
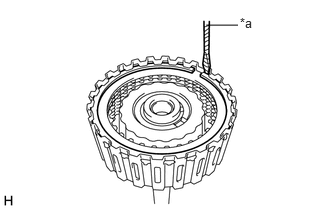
Using a screwdriver, install the snap ring.
| *a | Protective Tape |
- NOTICE:
-
Be careful not to damage the input shaft sub-assembly.
- HINT:
-
Tape the screwdriver tip before use.
35635
40.INSPECT CLEARANCE OF NO. 1 CLUTCH (FORWARD CLUTCH DISC)
35617
41.INSTALL CLUTCH DRUM OIL SEAL RING
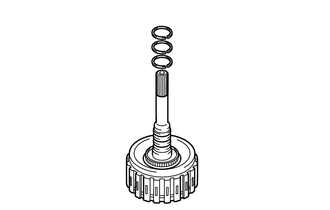
Coat 3 new clutch drum oil seal rings with ATF and install them to the input shaft sub-assembly.
- NOTICE:
-
Do not expand the clutch drum oil seal ring ends excessively.
- HINT:
-
After installing the clutch drum oil seal rings, check that they rotate smoothly.
35605A
42.INSTALL DIRECT CLUTCH DRUM SUB-ASSEMBLY
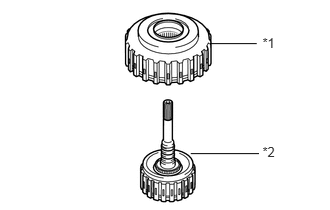
Install the direct clutch drum sub-assembly to the input shaft sub-assembly.
| *1 | Direct Clutch Drum Sub-assembly |
| *2 | Input Shaft Sub-assembly |
43.INSTALL DIRECT CLUTCH DRUM SUB-ASSEMBLY AND INPUT SHAFT ASSEMBLY
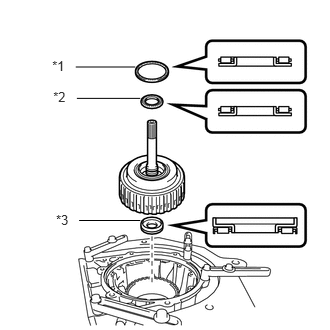
Coat the 3 thrust needle roller bearings with ATF and install them to the direct clutch drum sub-assembly and input shaft assembly.
- Thrust Needle Roller Bearing Diameter:
Item Inside (mm (in.)) Outside (mm (in.)) Thrust Needle Roller Bearing A 71.9 (2.831) 85.6 (3.370) Thrust Needle Roller Bearing B 34.6 (1.362) 52.0 (2.047) Thrust Needle Roller Bearing C 21.3 (0.839) 41.1 (1.618)
| *1 | Thrust Needle Roller Bearing A |
| *2 | Thrust Needle Roller Bearing B |
| *3 | Thrust Needle Roller Bearing C |
- NOTICE:
-
Be sure to install the thrust needle roller bearing in the correct direction.
Install the direct clutch drum sub-assembly and input shaft assembly to the automatic transmission case sub-assembly.
44.INSTALL OIL PUMP ASSEMBLY
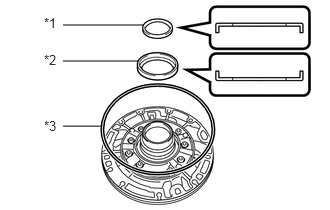
Coat the 2 thrust bearing races with ATF and install them to the oil pump assembly.
- Race Diameter:
Item Inside (mm (in.)) Outside (mm (in.)) Thrust Bearing Race B 40.0 (1.575) 52.8 (2.079) Thrust Bearing Race A 74.2 (2.921) 87.74 (3.454)
| *1 | Thrust Bearing Race B |
| *2 | Thrust Bearing Race A |
| *3 | Oil Pump O-ring |
- NOTICE:
-
Be sure to install the thrust bearing race in the correct direction.
Coat a new oil pump O-ring with ATF, and install it to the oil pump assembly.
Set the oil pump assembly on the input shaft, and align the bolt holes of the oil pump assembly with the automatic transmission case sub-assembly.
- NOTICE:
-
Be careful not to damage the oil pump O-ring.
Temporarily install the oil pump assembly to the automatic transmission case sub-assembly.
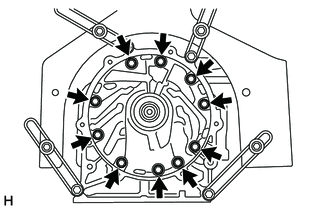
Install the oil pump assembly with the 10 bolts.
- Torque:
- 21 N*m (215 kgf*cm, 16 ft.*lbf)
35506F
45.INSTALL MANUAL VALVE LEVER SHAFT OIL SEAL
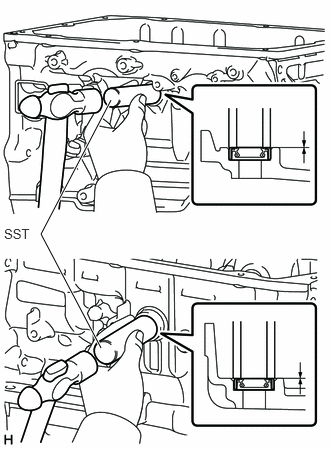
Using SST and a hammer, drive in 2 new manual valve lever shaft oil seals to the automatic transmission case sub-assembly.
- SST
- 09350-30020 (09350-07110)
- Standard Depth:
-0.5 to 0.5 mm (-0.0196 to 0.0196 in.)
Coat the lip of the manual valve lever shaft oil seal with MP grease.
35505
46.INSTALL MANUAL VALVE LEVER SUB-ASSEMBLY
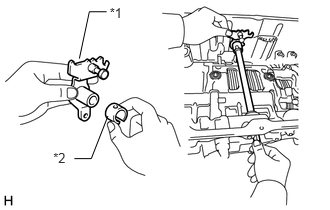
Install a new spacer to the manual valve lever sub-assembly.
| *1 | Manual Valve Lever Sub-assembly |
| *2 | Spacer |
Install the manual valve lever shaft to the automatic transmission case sub-assembly through the manual valve lever sub-assembly.
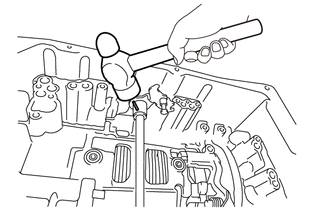
Using a hammer, drive in a new spring pin.
Turn the spacer and manual valve lever shaft to align the smaller hole on the spacer with the indent on the manual valve lever sub-assembly.
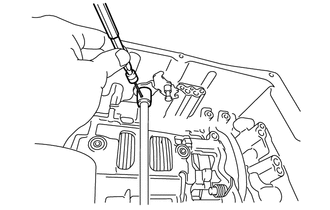
Using a 3 mm pin punch and a hammer, stake the spacer.
Check that the spacer does not turn.
Make sure that the shaft rotates smoothly.
35556
47.INSTALL PARKING LOCK PAWL SHAFT
Install the E-ring to the parking lock pawl shaft.
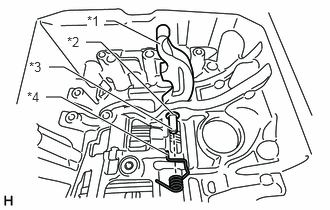
Install the parking lock pawl, parking lock pawl shaft and spring to the automatic transmission case sub-assembly.
| *1 | Parking Lock Pawl |
| *2 | E-ring |
| *3 | Parking Lock Pawl Shaft |
| *4 | Spring |
35501
48.INSTALL PARKING LOCK ROD SUB-ASSEMBLY
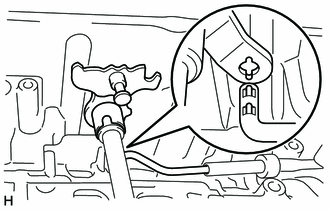
Install the parking lock rod sub-assembly to the manual valve lever sub-assembly.
35595
49.INSTALL PARKING LOCK PAWL BRACKET
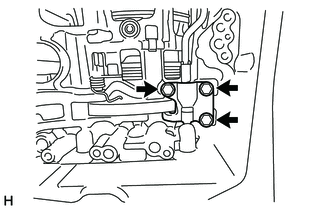
Install the parking lock pawl bracket to the automatic transmission case sub-assembly with the 3 bolts.
- Torque:
- 18 N*m (184 kgf*cm, 13 ft.*lbf)
Move the manual valve lever sub-assembly to P, and check the output shaft is locked by the parking lock pawl.
35159
50.INSTALL BRAKE DRUM GASKET
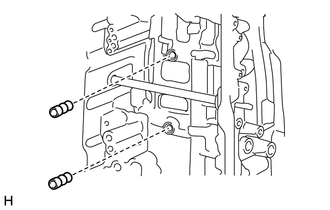
Coat 2 new brake drum gaskets with ATF and install them to the automatic transmission case sub-assembly.
35145C
51.INSTALL TRANSMISSION CASE GASKET
35410
52.INSTALL TRANSMISSION VALVE BODY ASSEMBLY
35330
53.INSTALL VALVE BODY OIL STRAINER ASSEMBLY
82125J
54.INSTALL TRANSMISSION WIRE
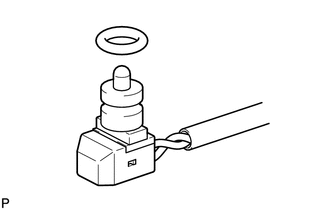
Coat 2 new O-rings with ATF, and install them to the 2 temperature sensors.
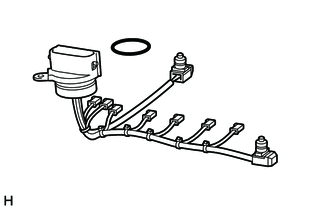
Coat a new O-ring with ATF, and install it to the transmission wire.
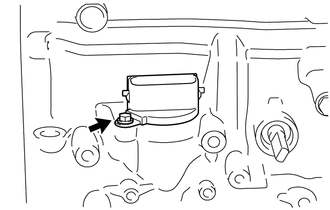
Install the transmission wire to the automatic transmission case sub-assembly with the bolt.
- Torque:
- 5.4 N*m (55 kgf*cm, 48 in.*lbf)
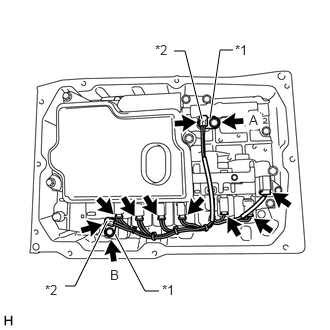
Connect the 7 solenoid valve connectors.
| *1 | Temperature Sensor Clamp |
| *2 | Temperature Sensor |
Install the 2 temperature sensors and 2 temperature sensor clamps to the transmission valve body assembly with the bolt.
- Torque:
- for bolt A : 10 N*m (102 kgf*cm, 7 ft.*lbf)
- for bolt B : 11 N*m (112 kgf*cm, 8 ft.*lbf)
35106
55.INSTALL AUTOMATIC TRANSMISSION OIL PAN SUB-ASSEMBLY
56.INSTALL DRAIN PLUG
Install the drain plug and a new gasket to the automatic transmission oil pan sub-assembly.
- Torque:
- 20 N*m (204 kgf*cm, 15 ft.*lbf)
57.INSTALL OVERFLOW PLUG
Using a 5 mm hexagon socket wrench, install the gasket and overflow plug to the automatic transmission oil pan sub-assembly.
- Torque:
- 20 N*m (204 kgf*cm, 15 ft.*lbf)
- HINT:
-
After adjusting the automatic transmission oil level, replace the gasket with a new one.
35111
58.INSTALL AUTOMATIC TRANSMISSION HOUSING
Clean and degrease the bolts and bolt holes with non-residue solvent.
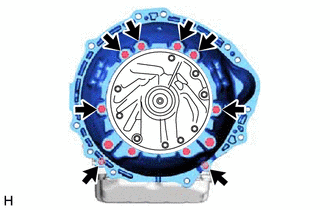
Install the automatic transmission housing to the automatic transmission case sub-assembly with the 8 bolts.
- Torque:
- 34 N*m (346 kgf*cm, 25 ft.*lbf)
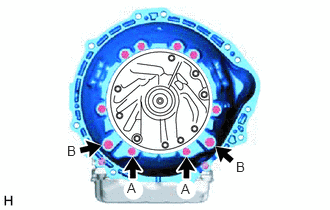
Apply adhesive to 2 or 3 threads on the end of the 4 bolts.
- Adhesive:
Toyota Genuine Adhesive 1344, Three Bond 1344 or equivalent
Install 4 bolts to the automatic transmission housing.
- Torque:
- for bolt A (M10 bolt) : 34 N*m (346 kgf*cm, 25 ft.*lbf)
- for bolt B (M12 bolt) : 57 N*m (579 kgf*cm, 42 ft.*lbf)
35157B
59.INSTALL REAR TRANSFER CASE ADAPTER OIL RECEIVER
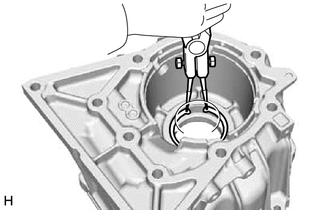
Install the rear transfer case adapter oil receiver to the transfer adapter sub-assembly.
Using snap ring pliers, install the snap ring to the transfer adapter sub-assembly.
36117A
60.INSTALL TRANSFER ADAPTER OIL SEAL
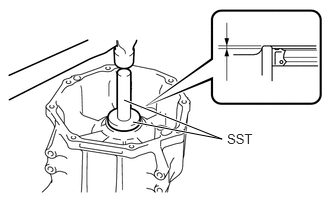
Using SST and a hammer, drive in a new transfer adapter oil seal to the transfer adapter sub-assembly.
- SST
- 09950-60010 (09951-00650)
09950-70010 (09951-07150)
- Standard Depth:
0 to 0.5 mm (0 to 0.0196 in.)
Coat the lip of the transfer adapter oil seal with MP grease.
35015G
61.INSTALL TRANSFER ADAPTER SUB-ASSEMBLY
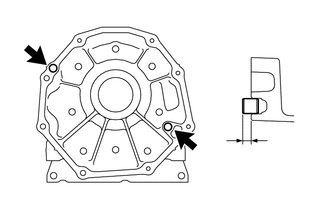
Using a plastic-faced hammer, tap 2 new straight pins into the transfer adapter sub-assembly.
- Standard Protrusion Height:
5.7 to 6.3 mm (0.225 to 0.248 in.)
- HINT:
-
It is not necessary to remove the straight pins they are being replaced.
Clean and degrease the threads of the 10 bolts, bolt holes and the contact surfaces of the automatic transmission case sub-assembly and transfer adapter sub-assembly with non-residue solvent.
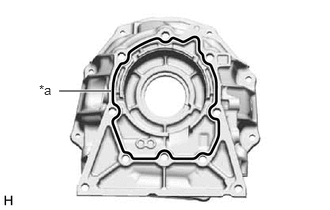
Apply seal packing to the transfer adapter sub-assembly as shown in the illustration.
- Seal Packing:
Toyota Genuine Seal Packing 1281, Three Bond 1281 or equivalent
| *a | Seal Packing |
- NOTICE:
- ·
Apply seal packing in a continuous line (width 1.2 mm (0.0472 in.)) along the sealing surface.
·After applying seal packing, install the transfer adapter sub-assembly to the automatic transmission case sub-assembly within 3 minutes and tighten the bolts within 10 minutes.
Apply adhesive to 2 or 3 threads on the end of the 10 bolts.
- Adhesive:
Toyota Genuine Adhesive 1344, Three Bond 1344 or equivalent
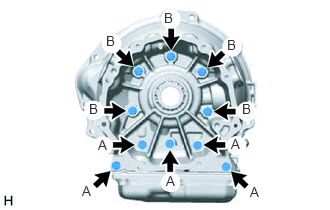
Install the transfer adapter sub-assembly to the automatic transmission case sub-assembly with the 10 bolts.
- Torque:
- 34 N*m (346 kgf*cm, 26 ft.*lbf)
- HINT:
-
Each bolt length is indicated below.
- Bolt Length:
- for bolt A:
40 mm (1.57 in.)
- for bolt B:
50 mm (1.97 in.)
62.INSTALL OIL COOLER TUBE UNION
Coat 2 new O-rings with ATF and install them to the 2 oil cooler tube unions.
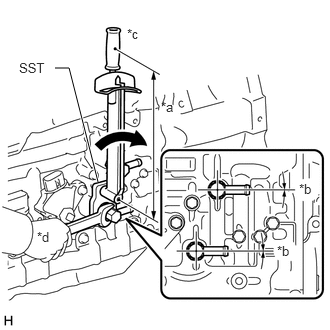
Using SST, install the 2 oil cooler tube unions to the automatic transmission case sub-assembly.
- SST
- 09268-78010
- Torque:
- 31 N*m (317 kgf*cm, 23 ft.*lbf)
| *a | Torque Wrench Fulcrum Length |
| *b | -2° to 2° |
| *c | Turn |
| *d | Hold |
- HINT:
- ·
Calculate the torque wrench reading when changing the fulcrum length of the torque wrench.
Click hereGeneral>INTRODUCTION>REPAIR INSTRUCTION>PRECAUTION
·When using SST (fulcrum length of 34.5 mm (1.3583 in.)) + torque wrench (fulcrum length of 180 mm (7.0866 in.)): 26 N*m (266 kgf*cm, 19 ft.*lbf)
35104A
63.INSTALL AUTOMATIC TRANSMISSION CASE PLUG
Coat 6 new O-rings with ATF, and install them to the 6 automatic transmission case plugs.
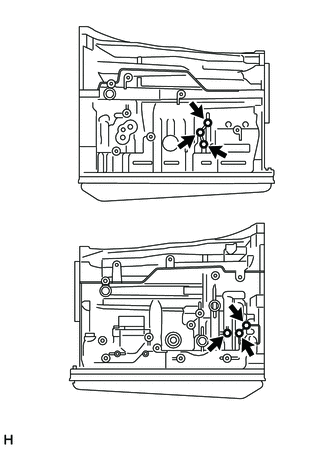
Install the 6 automatic transmission case plugs to the automatic transmission case sub-assembly.
- Torque:
- 7.4 N*m (75 kgf*cm, 65 in.*lbf)
Coat a new O-ring with ATF, and install it to the automatic transmission case plug.
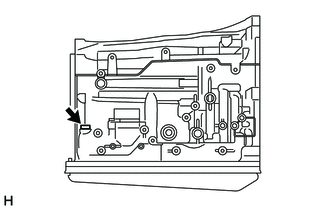
Using a T55 "TORX" socket wrench, install the automatic transmission case plug to the automatic transmission case sub-assembly.
- Torque:
- 39 N*m (400 kgf*cm, 29 ft.*lbf)
35104A
64.INSTALL REFILL PLUG
Install the O-ring and refill plug to the transfer adapter sub-assembly.
- Torque:
- 39 N*m (400 kgf*cm, 29 ft.*lbf)
- HINT:
-
After adjusting the automatic transmission oil level, replace the O-ring with a new one.
84540
65.INSTALL PARK/NEUTRAL POSITION SWITCH ASSEMBLY
- HINT:
-
Make sure that the manual valve lever shaft has not been rotated prior to installing the park/neutral position switch assembly as the detent spring may become detached from the manual valve lever shaft.
Clean the bolt and bolt hole.
Apply adhesive to 2 or 3 threads on the end of the bolt.
- Adhesive:
Toyota Genuine Adhesive 1344, Three Bond 1344 or equivalent
- NOTICE:
-
Install the bolt within 3 minutes of applying adhesive.
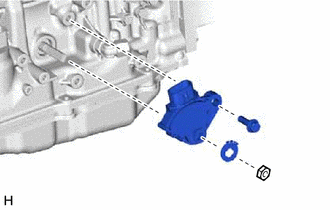
Temporarily install the park/neutral position switch assembly to the automatic transmission case sub-assembly with the bolt.
- HINT:
-
Tighten the bolt to the specified torque when adjusting the park/neutral position switch assembly.
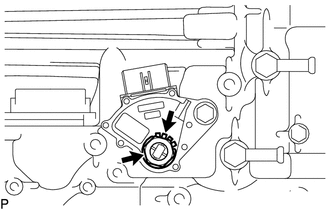
Install the lock washer and the lock nut to the park/ neutral position switch assembly.
- Torque:
- 6.9 N*m (70 kgf*cm, 61 in.*lbf)
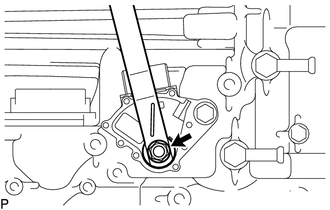
Temporarily install the transmission control shaft lever RH to the manual valve lever shaft with the spring washer and nut.
- HINT:
-
Tighten the nut to the specified torque when adjusting the park/neutral position switch assembly.
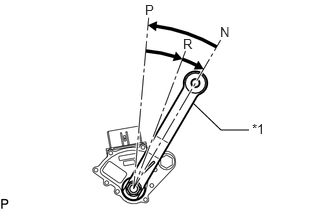
| *1 | Transmission Control Shaft Lever RH |
Turn the transmission control shaft lever RH counterclockwise until it stops, and then turn it clockwise 2 notches to set it to the N position.
Remove the nut, spring washer and transmission control shaft lever RH from the manual valve lever shaft.
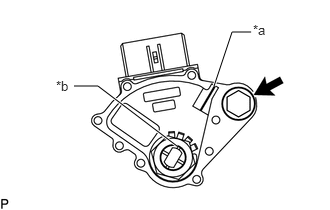
| *a | Neutral Basic Line |
| *b | Groove |
Align the groove with the neutral basic line.
Hold the park/neutral position switch assembly in the position described above and tighten the bolt.
- Torque:
- 13 N*m (133 kgf*cm, 10 ft.*lbf)
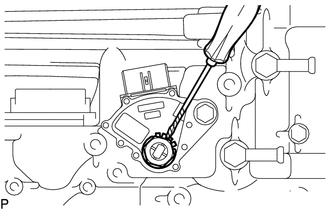
Using a screwdriver, bend the tabs of the lock washer.
- NOTICE:
- ·
Be careful not to damage the park/neutral position switch assembly.
·Bend at least 2 of the lock washer tabs.
- HINT:
-
Tape the screwdriver tip before use.
89413R
66.INSTALL TRANSMISSION REVOLUTION SENSOR (SP2)
89413N
67.INSTALL TRANSMISSION REVOLUTION SENSOR (NT)
35104V
68.INSTALL BREATHER PLUG HOSE
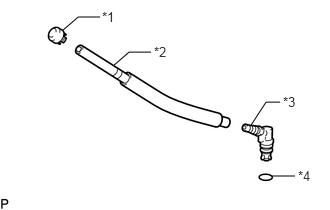
| *1 | Breather Plug Sub-assembly |
| *2 | Breather Plug Hose |
| *3 | Breather Plug |
| *4 | O-ring |
Install the breather plug sub-assembly and breather plug to the breather plug hose.
Coat a new O-ring with ATF, and install it to the breather plug.
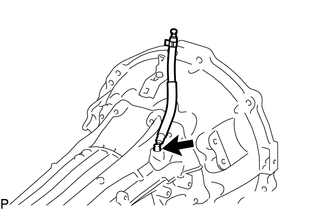
Install the breather plug hose to the automatic transmission case sub-assembly.
- NOTICE:
-
Be careful not to damage the O-rings.