Home › Vehicle Interior › HEATING / AIR CONDITIONING › AIR CONDITIONING SYSTEM (for Automatic Air Conditioning System) › from 2017.08
RM2660E _58 Vehicle Interior _052847 HEATING / AIR CONDITIONING _0255699 AIR CONDITIONING SYSTEM(for Automatic Air Conditioning System) J

HEATING / AIR CONDITIONING  AIR CONDITIONING SYSTEM(for Automatic Air Conditioning System)  Rear Air Conditioning Relay Circuit  


DESCRIPTION

When the No. 2 air conditioning control assembly (rear blower switch) is set to position LO or higher, the contact of the CLR RR relay is closed, current flows to the rear blower motor, and the rear blower motor operates. The rear blower motor speed can be changed by exchanging the ground and the rear blower motor control circuit with the No. 2 air conditioning control assembly (rear blower switch).

WIRING DIAGRAM
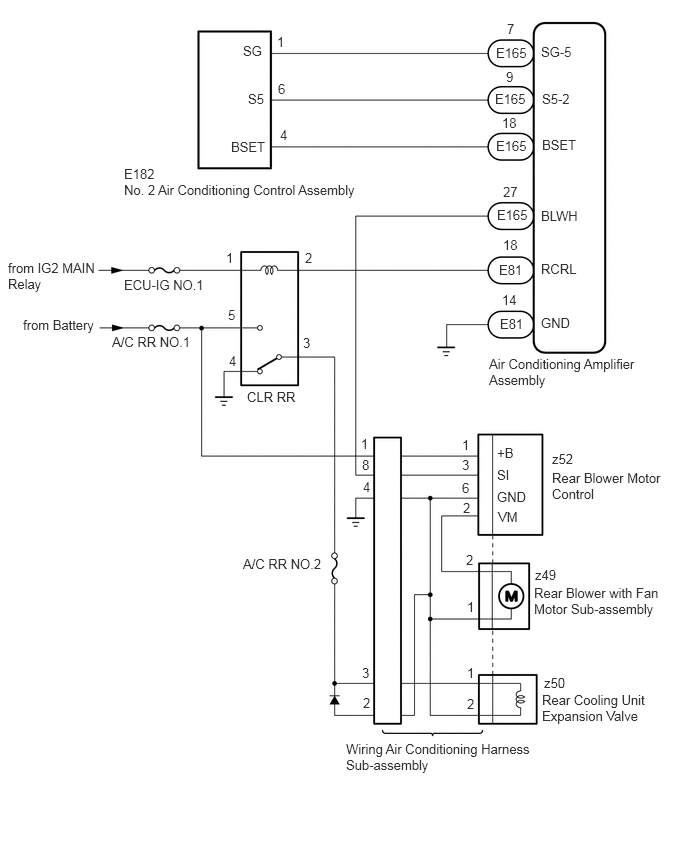
E378406E01
5.167,0.469 5.781,0.667 0.615,0.198 10 false E165 5.281,0.219 5.896,0.417 0.615,0.198 10 false 7 5.635,0.458 6.25,0.656 0.615,0.198 10 false SG-5 5.646,0.948 6.26,1.146 0.615,0.198 10 false S5-2 5.156,0.948 5.771,1.146 0.615,0.198 10 false E165 5.271,0.719 5.885,0.917 0.615,0.198 10 false 9 5.646,1.427 6.26,1.625 0.615,0.198 10 false BSET 5.167,1.438 5.781,1.635 0.615,0.198 10 false E165 5.229,1.198 5.844,1.396 0.615,0.198 10 false 18 2.531,0.448 3.146,0.646 0.615,0.198 10 false SG 2.583,0.948 3.198,1.146 0.615,0.198 10 false S5 2.406,1.448 3.021,1.646 0.615,0.198 10 false BSET 2.885,0.354 3.5,0.552 0.615,0.198 10 false 1 2.896,0.844 3.51,1.042 0.615,0.198 10 false 6 2.917,1.323 3.531,1.521 0.615,0.198 10 false 4 1.292,1.729 1.906,1.927 0.615,0.198 10 false E182 1.292,1.896 3.99,2.135 2.698,0.24 10 false No. 2 Air Conditioning Control Assembly 5.198,2.729 5.813,2.927 0.615,0.198 10 false E81 5.24,2.469 5.854,2.667 0.615,0.198 10 false 18 5.208,3.292 5.823,3.49 0.615,0.198 10 false E81 5.229,3.042 5.844,3.24 0.615,0.198 10 false 14 5.635,2.719 6.25,2.917 0.615,0.198 10 false RCRL 5.635,3.281 6.25,3.479 0.615,0.198 10 false GND 2.573,4.052 3.188,4.25 0.615,0.198 10 false CLR RR 1.167,3.479 2.094,3.698 0.927,0.219 10 false A/C RR NO.1 1.292,2.885 2.219,3.104 0.927,0.219 10 false ECU-IG NO.1 0.083,2.708 1.021,3.083 0.938,0.375 10 false from IG2 MAIN Relay 0.24,3.302 1.177,3.677 0.938,0.375 10 false from Battery 2.531,5.792 3.458,6.01 0.927,0.219 10 false A/C RR NO.2 5.573,5.906 6.5,6.125 0.927,0.219 10 false z49 5.094,3.708 6.667,4.156 1.573,0.448 10 false Air Conditioning Amplifier Assembly 5.563,6.094 6.969,6.479 1.406,0.385 10 false Rear Blower with Fan Motor Sub-assembly 5.667,7.031 6.594,7.25 0.927,0.219 10 false z50 5.646,7.208 6.771,7.594 1.125,0.385 10 false Rear Cooling Unit Expansion Valve 5.75,4.698 6.677,4.917 0.927,0.219 10 false z52 5.75,4.896 6.938,5.292 1.188,0.396 10 false Rear Blower Motor Control 3.604,7.719 5.615,8.198 2.01,0.479 10 false Wiring Air Conditioning Harness Sub-assembly 4.865,7.25 5.479,7.448 0.615,0.198 10 false 2 4.865,6.24 5.479,6.438 0.615,0.198 10 false 1 4.865,6.927 5.479,7.125 0.615,0.198 10 false 1 4.854,5.75 5.469,5.948 0.615,0.198 10 false 2 4.813,4.552 5.427,4.75 0.615,0.198 10 false 1 4.813,4.76 5.427,4.958 0.615,0.198 10 false 3 2.354,2.604 2.969,2.802 0.615,0.198 10 false 1 3.177,2.604 3.792,2.802 0.615,0.198 10 false 2 2.375,3.198 2.99,3.396 0.615,0.198 10 false 5 2.385,3.677 3,3.875 0.615,0.198 10 false 4 3.156,3.49 3.771,3.688 0.615,0.198 10 false 3 4.813,5 5.427,5.198 0.615,0.198 10 false 6 4.823,5.208 5.438,5.406 0.615,0.198 10 false 2 5.177,4.635 5.792,4.833 0.615,0.198 10 false +B 5.177,4.865 5.792,5.063 0.615,0.198 10 false SI 5.177,5.094 5.792,5.292 0.615,0.198 10 false GND 5.188,5.302 5.802,5.5 0.615,0.198 10 false VM 3.76,4.542 4.375,4.74 0.615,0.198 10 false 1 3.771,4.76 4.385,4.958 0.615,0.198 10 false 8 3.781,4.99 4.396,5.188 0.615,0.198 10 false 4 3.771,6.927 4.385,7.125 0.615,0.198 10 false 3 5.24,1.917 5.854,2.115 0.615,0.198 10 false 27 5.635,2.167 6.25,2.365 0.615,0.198 10 false BLWH 5.177,2.156 5.792,2.354 0.615,0.198 10 false E165 3.781,7.24 4.396,7.438 0.615,0.198 10 false 2

CAUTION / NOTICE / HINT

NOTICE:

Inspect the fuses for circuits related to this system before performing the following inspection procedure.


PROCEDURE

1.INSPECT CLR RR RELAY
a.

Remove the CLR RR relay from the No.1 engine room relay block.


OK

2.INSPECT REAR BLOWER WITH FAN MOTOR SUB-ASSEMBLY

NG

REPLACE CLR RR RELAY

2.INSPECT REAR BLOWER WITH FAN MOTOR SUB-ASSEMBLY
a.

Remove the rear blower with fan motor sub-assembly (See page Vehicle Interior>HEATING / AIR CONDITIONING>REAR BLOWER MOTOR>REMOVAL).


b.

Measure the rear blower with fan motor sub-assembly (See page Vehicle Interior>HEATING / AIR CONDITIONING>REAR BLOWER MOTOR>INSPECTION).


OK

3.CHECK HARNESS AND CONNECTOR (AIR CONDITIONING AMPLIFIER ASSEMBLY - BATTERY AND BODY GROUND)

NG

REPLACE REAR BLOWER WITH FAN MOTOR SUB-ASSEMBLY

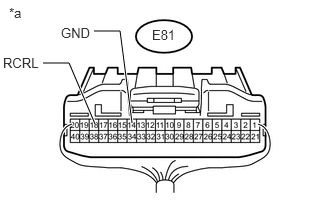
3.CHECK HARNESS AND CONNECTOR (AIR CONDITIONING AMPLIFIER ASSEMBLY - BATTERY AND BODY GROUND)
a.
U166421E03
0.448,0.656 0.719,0.656 0.719,0.656 0.99,1.292 true 0.979,0.323 1.25,0.323 1.25,0.323 1.375,1.281 true 1.583,0.281 2.01,0.531 0.427,0.25 10 false E81 0.094,0.052 0.521,0.302 0.427,0.25 10 false *a 0.635,0.26 1.094,0.479 0.458,0.219 10 false GND 0.031,0.573 0.458,0.75 0.427,0.177 10 false RCRL

Disconnect the air conditioning amplifier connector.


b.

Measure the resistance according to the value(s) in the table below.

Standard Resistance:
Tester Connection Condition Specified Condition
E81-14 (GND) - Body ground Always Below 1 Ω


c.

Measure the voltage according to the value(s) in the table below.

Standard Voltage:
Tester Connection Switch Condition Specified Condition
E81-18 (RCRL) - Body ground
·

Ignition switch ON

·

Heater control (blower switch): OFF


Below 1 V
E81-18 (RCRL) - Body ground
·

Ignition switch ON

·

Heater control (blower switch): LO


11 to 14 V


Text in Illustration
*a Rear view of wire harness connector
(to Air Conditioning Amplifier Assembly)


OK

4.CHECK HARNESS AND CONNECTOR (AIR CONDITIONING AMPLIFIER ASSEMBLY - WIRING AIR CONDITIONING HARNESS SUB-ASSEMBLY)

NG

REPAIR OR REPLACE HARNESS OR CONNECTOR

4.CHECK HARNESS AND CONNECTOR (AIR CONDITIONING AMPLIFIER ASSEMBLY - WIRING AIR CONDITIONING HARNESS SUB-ASSEMBLY)
a.

Disconnect the E165 air conditioning amplifier assembly connector.


b.

Disconnect the wiring air conditioning harness sub-assembly connector.


c.

Measure the resistance according to the value(s) in the table below.

Standard Resistance:
Tester Connection Condition Specified Condition
E165-27 (BLWH) - 8 Always Below 1 Ω
E165-27 (BLWH) or 8 - Body ground Always 10 kΩ or higher


OK

5.CHECK HARNESS AND CONNECTOR (NO. 2 AIR CONDITIONING CONTROL ASSEMBLY - AIR CONDITIONING AMPLIFIER ASSEMBLY)

NG

REPAIR OR REPLACE HARNESS OR CONNECTOR

5.CHECK HARNESS AND CONNECTOR (NO. 2 AIR CONDITIONING CONTROL ASSEMBLY - AIR CONDITIONING AMPLIFIER ASSEMBLY)
a.

Disconnect the E182 No. 2 air conditioning control assembly connector.


b.

Disconnect the E165 air conditioning amplifier assembly connector.


c.

Measure the resistance according to the value(s) in the table below.

Standard Resistance:
Tester Connection Condition Specified Condition
E182-1 (SG) - E165-7 (SG-5) Always Below 1 Ω
E182-6 (S5) - E165-9 (S5-2) Always Below 1 Ω
E182-4 (BSET) - E165-18 (BSET) Always Below 1 Ω
E182-1 (SG) or E165-7 (SG-5) - Body ground Always 10 kΩ or higher
E182-6 (S5) or E165-9 (S5-2) - Body ground Always 10 kΩ or higher
E182-4 (BSET) or E165-18 (BSET) - Body ground Always 10 kΩ or higher


OK

6.CHECK WIRING AIR CONDITIONING HARNESS SUB-ASSEMBLY

NG

REPAIR OR REPLACE HARNESS OR CONNECTOR

6.CHECK WIRING AIR CONDITIONING HARNESS SUB-ASSEMBLY
a.

Disconnect the wiring air conditioning harness sub-assembly connector.


b.

Disconnect the z52 rear blower motor control connector.


c.

Disconnect the z49 rear blower with fan motor sub-assembly connector.


d.

Disconnect the z50 rear cooling unit expansion valve connector.


e.

Measure the resistance according to the value(s) in the table below.

Standard Resistance:
Tester Connection Condition Specified Condition
1 - z52-1 (+B) Always Below 1 Ω
3 - z50-1 Always Below 1 Ω
4 - z52-6 (GND) Always Below 1 Ω
4 - z49-1 Always Below 1 Ω
4 - z50-2 Always Below 1 Ω
8 - z52-3 (SI) Always Below 1 Ω
z49-2 - z52-2 (VM) Always Below 1 Ω
1 or z52-1 (+B) - Body ground Always 10 kΩ or higher
3 or z50-1 - Body ground Always 10 kΩ or higher
8 or z52-3 (SI) - Body ground Always 10 kΩ or higher
z49-2 or z52-2 (VM) - Body ground Always 10 kΩ or higher


OK

7.CHECK HARNESS AND CONNECTOR (WIRING AIR CONDITIONING HARNESS SUB-ASSEMBLY - CLR RR RELAY AND BATTERY)

NG

REPAIR OR REPLACE HARNESS OR CONNECTOR

7.CHECK HARNESS AND CONNECTOR (WIRING AIR CONDITIONING HARNESS SUB-ASSEMBLY - CLR RR RELAY AND BATTERY)
a.

Disconnect the wiring air conditioning harness sub-assembly connector.


b.

Remove the CLR RR relay from the No. 1 engine room relay.


c.

Measure the resistance according to the value(s) in the table below.

Standard Resistance:
Tester Connection Condition Specified Condition
3 - Relay terminal-3 Always Below 1 Ω
2 - Relay terminal-3 Always Below 1 Ω
3 - or Relay terminal-3 - Body ground Always 10 kΩ or higher
2 - or Relay terminal-3 - Body ground Always 10 kΩ or higher


d.

Measure the voltage according to the value(s) in the table below.

Standard Resistance:
Tester Connection Condition Specified Condition
1 - Body ground Always 11 to 14 V


OK

8.CHECK REAR BLOWER MOTOR CONTROL

NG

REPAIR OR REPLACE HARNESS OR CONNECTOR

8.CHECK REAR BLOWER MOTOR CONTROL
a.

Replace the rear blower motor control with a new or known good one (See page Vehicle Interior>HEATING / AIR CONDITIONING>BLOWER MOTOR CONTROLLER>REMOVAL).

OK:

Same problem does not occur.


OK

END (REAR BLOWER MOTOR CONTROL IS DEFECTIVE)

(See page)


NG

9.CHECK NO. 2 AIR CONDITIONING CONTROL ASSEMBLY
a.

Replace the No. 2 air conditioning control assembly with a new or known good one (See page Vehicle Interior>HEATING / AIR CONDITIONING>REAR AIR CONDITIONING PANEL>DISASSEMBLY).

OK:

Same problem does not occur.


OK

END (NO.2 AIR CONDITIONING CONTROL ASSEMBLY IS DEFECTIVE)

NG

10.CHECK REAR COOLING UNIT EXPANSION VALVE
a.

Replace the rear cooling unit expansion valve (See page Vehicle Interior>HEATING / AIR CONDITIONING>REAR AIR CONDITIONING UNIT (w/o Heater)>DISASSEMBLY).

HINT:

Since the rear cooling unit expansion valve cannot be inspected while it is removed from the vehicle, replace the rear cooling unit expansion valve with a normal one and check that the condition returns to normal.


OK:

Same problem does not occur.


OK

END (REAR COOLING UNIT EXPANSION VALUVE IS DEFECTIVE)

NG