DRIVE SHAFT / PROPELLER SHAFT FRONT DRIVE SHAFT ASSEMBLY REASSEMBLY
CAUTION / NOTICE / HINT
- HINT:
- ·
Use the same procedure for the RH and LH sides.
·The procedure listed below is for the LH side.
- NOTICE:
- ·
When using a vise, place aluminum plates between the part and vise.
·When using a vise, do not overtighten it.
·Do not allow brake fluid, front differential oil, gasoline, or battery fluid to contact the front axle inboard joint boot and front axle outboard joint boot, as the front axle inboard joint boot and front axle outboard joint boot may be damaged.
PROCEDURE

 41336E
1.INSTALL FRONT DRIVE SHAFT DUST COVER LH
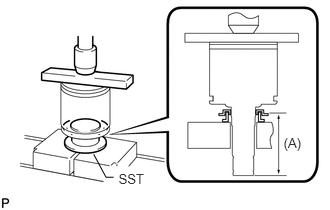
Using SST, a steel plate and press, press in a new front drive shaft dust cover LH.
- SST
- 09316-20011
- Standard Distance (A):
108.4 to 109.0 mm (4.27 to 4.29 in.)
- NOTICE:
-
Do not damage the front drive shaft dust cover LH.
2.INSTALL DUST SEAL
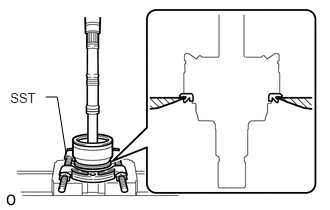
Using SST and a press, press in a new dust seal until it reaches the end of the outboard joint shaft.
- SST
- 09950-00020
- NOTICE:
-
Do not damage the dust seal.
- HINT:
-
Place SST on a level surface.
3.INSTALL FRONT AXLE OUTBOARD JOINT BOOT
Before installing the front axle outboard joint boot, wrap protective tape around the spline of the outboard joint shaft to prevent damaging the front axle outboard joint boot.
Install new parts to the outboard joint shaft in the following order.
Front No. 1 axle outboard joint boot setting clamp
Front axle outboard joint boot
Front No. 2 axle outboard joint boot setting clamp
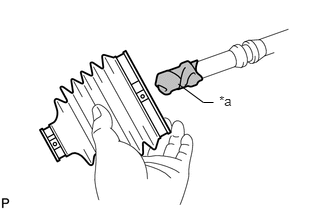
Slide the front axle outboard joint boot onto the outboard joint shaft.
| *a | Protective Tape |
Pack the outboard joint shaft and front axle outboard joint boot with grease from the boot kit.
- Standard grease capacity:
202 to 212 g (7.13 to 7.47 oz.)
Install the front axle outboard joint boot to the outboard joint shaft groove.
- NOTICE:
- ·
Do not allow grease to adhere to the front No. 1 axle outboard joint boot setting clamp and front No. 2 axle outboard joint boot setting clamp track of the front axle outboard joint boot.
·Keep the inside of the front axle outboard joint boot free of foreign matter.
43447A
4.INSTALL FRONT NO.1 AXLE OUTBOARD JOINT BOOT SETTING CLAMP
Secure the front No. 1 axle outboard joint boot setting clamp to the front axle outboard joint boot.
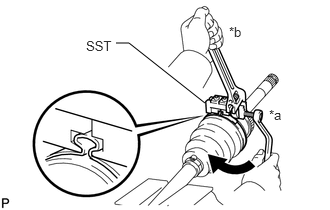
Place SST onto the front No. 1 axle outboard joint boot setting clamp.
- SST
- 09521-24010
Tighten SST so that the front No. 1 axle outboard joint boot setting clamp is pinched.
| *a | Turn |
| *b | Hold |
- NOTICE:
-
Do not overtighten SST.
Remove SST.
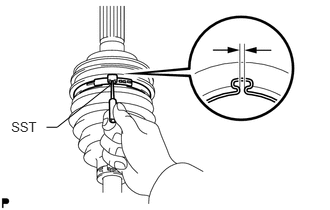
Using SST, adjust the clearance of the front No. 1 axle outboard joint boot setting clamp.
- SST
- 09240-00020
- Standard clearance:
1.5 mm (0.0590 in.) or less
If the clearance is more than the standard, retighten the front No. 1 axle outboard joint boot setting clamp.
43447B
5.INSTALL FRONT NO.2 AXLE OUTBOARD JOINT BOOT SETTING CLAMP
Use the same procedure described for the front No. 1 axle outboard joint boot setting clamp.
43404
6.INSTALL FRONT AXLE INBOARD JOINT SET LH
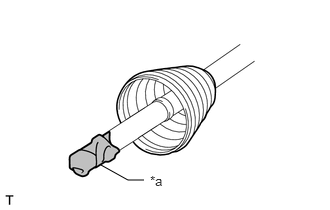
Slide a new front axle inboard joint boot onto the outboard joint shaft.
| *a | Protective Tape |
- HINT:
-
Before installing the front axle inboard joint boot, wrap protective tape around the spline of the outboard joint shaft to prevent damaging the front axle inboard joint boot.
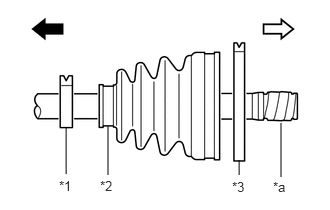
Install new parts to the outboard joint shaft in the following order.
| *1 | Front No. 1 Axle Inboard Joint Boot Setting Clamp |
| *2 | Front Axle Inboard Joint Boot |
| *3 | Front No. 2 Axle Inboard Joint Boot Setting Clamp |
| *a | Protective Tape |

|
Outboard Joint Side |

|
Inboard Joint Side |
Front No. 1 axle inboard joint boot setting clamp
Front axle inboard joint boot
Front No. 2 axle inboard joint boot setting clamp
Remove the protective tape from the outboard joint shaft.
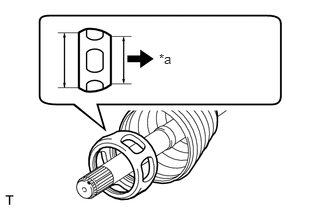
Install the cage to the outboard joint shaft.
| *a | Outboard Joint Side |
- NOTICE:
-
Insert the cage with its smaller inner diameter side facing the outboard joint.
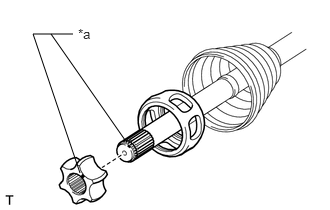
Align the matchmarks and install the inner race to the outboard joint shaft.
| *a | Matchmark |
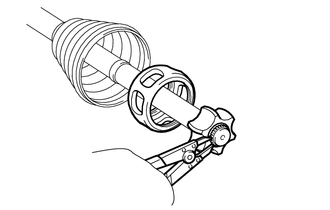
Using a snap ring expander, install a new snap ring.
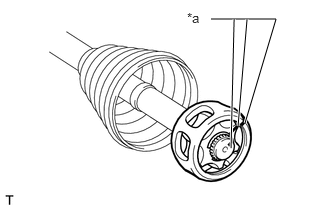
Align the matchmarks placed before removal, and install the cage to the inner race.
| *a | Matchmark |
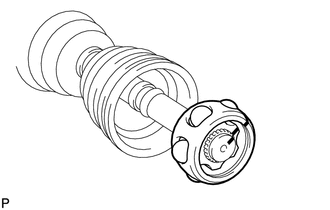
Install the 6 balls.
- HINT:
-
Apply grease onto the balls to keep them from falling out.
Pack the front axle inboard joint set LH and front axle inboard joint boot with grease from a boot kit.
- Standard grease capacity:
263 to 273 g (9.28 to 9.62 oz.)
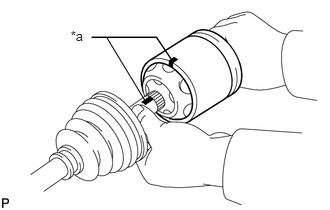
Align the matchmarks placed before removal, and install the front axle inboard joint set LH to the outboard joint shaft.
| *a | Matchmark |
7.INSTALL FRONT AXLE INBOARD JOINT BOOT
Install the front axle inboard joint boot to the front drive inboard joint set LH.
- HINT:
-
Make sure that the front axle inboard joint boot is on the outboard joint shaft groove.
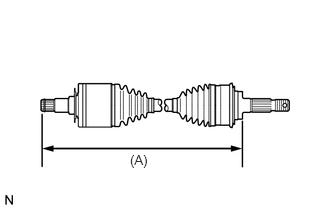
Check that the 2 joint boots are not stretched or contracted when the front drive shaft assembly is at the standard length.
- Length (A):
582.67 mm (1.91 ft.)
If the front axle inboard joint boot and front axle outboard joint boot are stretched or contracted, correct them.
43448B
8.INSTALL FRONT AXLE INBOARD JOINT BOOT SETTING NO.2 CLAMP
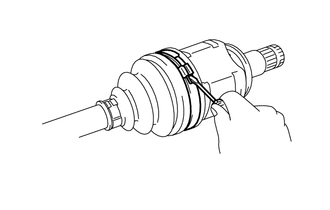
Using a screwdriver, install the front No. 2 axle inboard joint boot setting clamp as shown in the illustration.
- NOTICE:
- ·
Be sure to install the front No. 2 axle inboard joint boot setting clamp in the correct position.
·Do not damage the front axle inboard joint boot.
43448A
9.INSTALL FRONT NO.1 AXLE INBOARD JOINT BOOT SETTING CLAMP
Secure the front No. 1 axle inboard joint boot setting clamp to the front axle inboard joint boot.
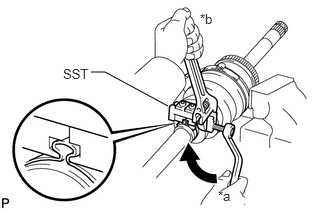
Place SST onto the front No. 1 axle inboard joint boot setting clamp.
- SST
- 09521-24010
Tighten SST so that the front No. 1 axle inboard joint boot setting clamp is pinched.
| *a | Turn |
| *b | Hold |
- NOTICE:
-
Do not overtighten SST.
Remove SST.
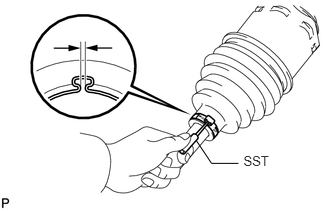
Using SST, adjust the clearance of the front No. 1 axle inboard joint boot setting clamp.
- SST
- 09240-00020
- Standard clearance:
1.5 mm (0.0590 in.) or less
If the clearance is more than the standard, retighten the front No. 1 axle inboard joint boot setting clamp.
43403A
10.INSTALL FRONT AXLE INBOARD JOINT SET SETTING SHAFT SNAP RING
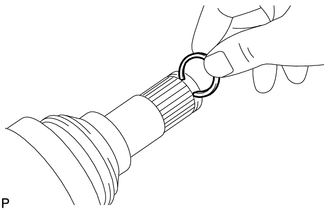
Install a new front axle inboard joint set setting shaft snap ring to the front axle inboard joint set LH.
- CAUTION:
-
Do not damage the spline of the front axle inboard joint set LH.
43420
11.INSPECT FRONT DRIVE SHAFT ASSEMBLY