WIPER / WASHER HEADLIGHT CLEANER ACTUATOR INSTALLATION
CAUTION / NOTICE / HINT
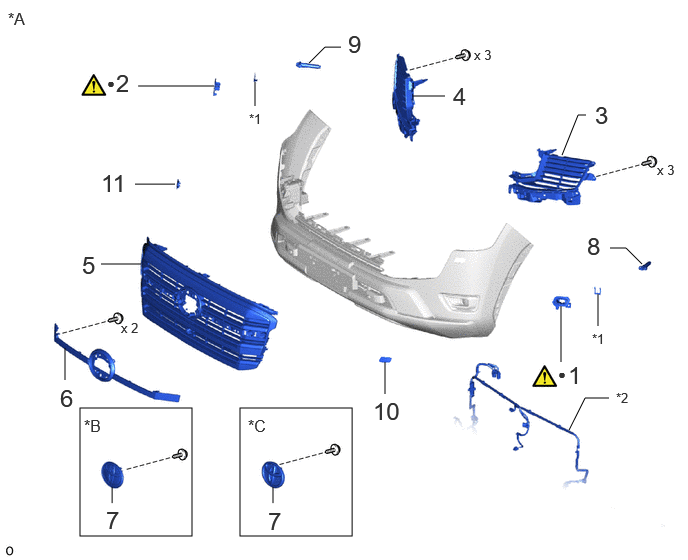
| Procedure | Part Name Code |

|

|

|
|
|---|---|---|---|---|---|
| 1 | NO. 2 WASHER BRACKET | 85362 | ( ) |
- | - |
| 2 | WASHER BRACKET | 85361C | () |
- | - |
| 3 | RADIATOR SIDE GRILLE LH | 53113B | - | - | - |
| 4 | RADIATOR SIDE GRILLE RH | 53112B | - | - | - |
| 5 | RADIATOR GRILLE SUB-ASSEMBLY | 53101 | - | - | - |
| 6 | NO. 7 RADIATOR GRILLE MOULDING | - | - | - | - |
| 7 | RADIATOR GRILLE EMBLEM ASSEMBLY | 75310A | - | - | - |
| 8 | HEADLIGHT WASHER ACTUATOR SUB-ASSEMBLY LH | 85208A | - | - | - |
| 9 | HEADLIGHT WASHER ACTUATOR SUB-ASSEMBLY RH | 85207A | - | - | - |
| 10 | HEADLIGHT WASHER COVER LH | 85354 | - | - | - |
| 11 | HEADLIGHT WASHER COVER RH | 85353 | - | - | - |
| *A | for Standard | *B | w/ Dynamic Radar Cruise Control System |
| *C | w/o Dynamic Radar Cruise Control System | - | - |
| *1 | NO. 1 HEADLIGHT CLEANER CLAMP | *2 | NO. 4 ENGINE ROOM WIRE |
| ● | Non-reusable part | - | - |
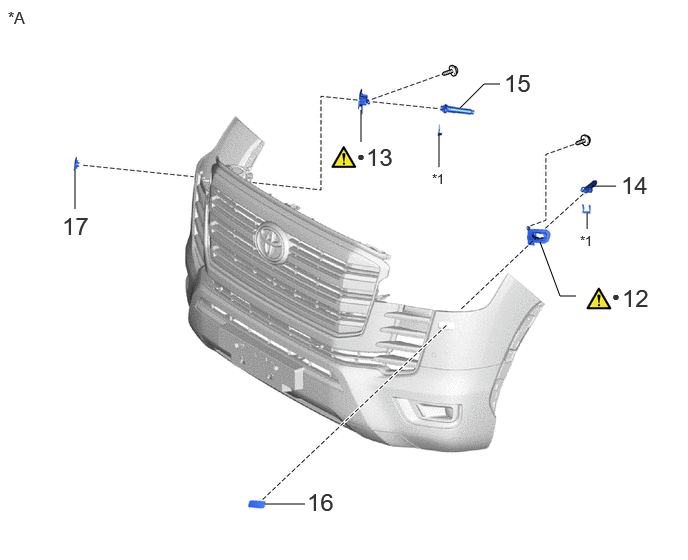
| Procedure | Part Name Code |
|
|
|
|
|---|---|---|---|---|---|
| 12 | NO. 2 WASHER BRACKET | 85361U | () |
- | - |
| 13 | WASHER BRACKET | 85361C | () |
- | - |
| 14 | HEADLIGHT WASHER ACTUATOR SUB-ASSEMBLY LH | 85208A | - | - | - |
| 15 | HEADLIGHT WASHER ACTUATOR SUB-ASSEMBLY RH | 85207A | - | - | - |
| 16 | HEADLIGHT WASHER COVER LH | 85354 | - | - | - |
| 17 | HEADLIGHT WASHER COVER RH | 85353 | - | - | - |
| *A | for Aero Type | - | - |
| *1 | NO. 1 HEADLIGHT CLEANER CLAMP | - | - |
| ● | Non-reusable part | - | - |
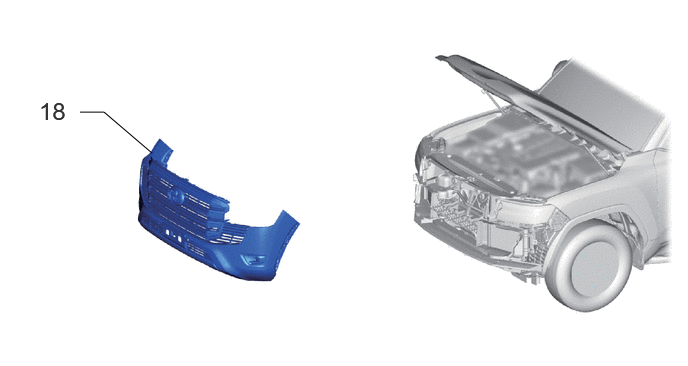
| Procedure | Part Name Code |
|
|
|
|
|---|---|---|---|---|---|
| 18 | FRONT BUMPER ASSEMBLY | - | - | - | - |
PROCEDURE

 85362 1.INSTALL NO. 2 WASHER BRACKET (for Standard)
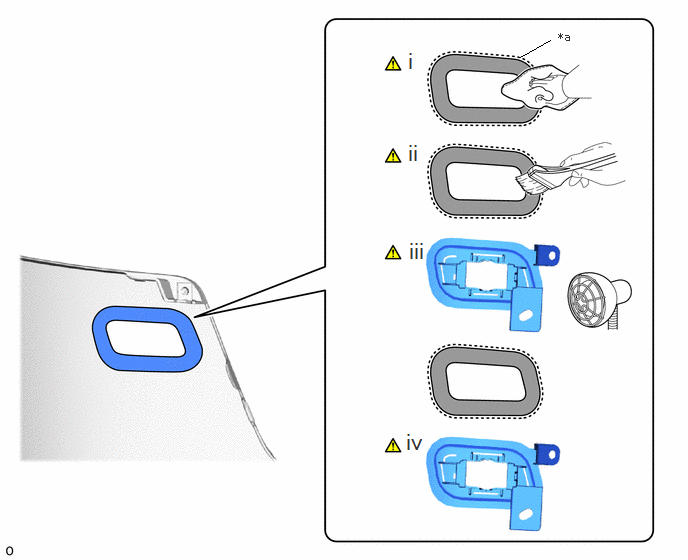
| *a | Mark-off Line | - | - |

|
Installation area | - | - |
Clean the front bumper assembly surface:
1. When reusing the front bumper assembly, remove remaining double-sided tape from the front bumper assembly.
2. Using a heat light, heat the front bumper assembly surface.
- Standard Value:
-
Part Temperature Front Bumper Assembly 20 to 30°C (68 to 86°F) No. 2 Washer Bracket 20 to 30°C (68 to 86°F)
- CAUTION:
-
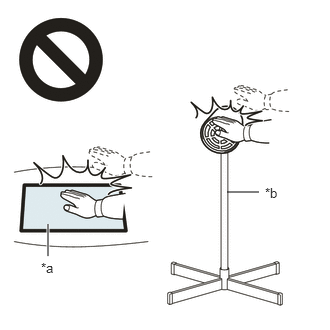 2.365,2 2.698,2 false 0.5,2.333 0.5,2.667 true 0.427,2.708 0.74,2.865 0.313,0.156 10 false *a 2.76,1.927 3.073,2.083 0.313,0.156 10 false *b
*a Heated Part *b Heat Light
-
·
Do not touch the heat light and heated parts.
·Touching the heat light may result in burns.
·Touching heated parts for a long time may result in burns.
- NOTICE:
-
Do not heat the front bumper assembly excessively.
3. Remove any remaining double-sided tape from the front bumper assembly and wipe off any tape adhesive residue with cleaner.
4. Clean the installation area surface.
- NOTICE:
-
·
Installing the No. 2 washer bracket with some double-sided tape remaining may cause poor adhesion. Perform this procedure until the tape is sufficiently removed.
·Make sure to use a cloth when removing. Using a screwdriver, etc., may cause damage and poor adhesion.
·Also, clean a new front bumper assembly surface.
Primer application:
1. Apply primer to the front bumper assembly on the installation area of the No. 2 washer bracket using a brush or felt.
- NOTICE:
-
·
Replace the brush or felt if it is dirty or has become hardened.
·Keep any painted surface free from primer.
·If the primer contacts a painted surface, it may leave light primer marks. Therefore, use protective tape when using liquid primer.
·Do not touch surfaces to which primer has been applied until the No. 2 washer bracket has been attached.
2. Let the primer dry sufficiently.
- NOTICE:
-
Do not touch applied surfaces until the primer is dry.
- Recommended drying time:
-
10 minutes or more (at 23°C (73°F))
Using a heat light, heat the front bumper assembly and a new No. 2 washer bracket.
- NOTICE:
-
Do not heat the No. 2 washer bracket and front bumper assembly excessively.
Install the No. 2 washer bracket in the position shown in the illustration.
- NOTICE:
-
The application strength of the No. 2 washer bracket will weaken if reapplied. If reapplication is necessary, be sure to replace it with a new one.
- HINT:
-
Apply pressure so that it does not lift up from the front bumper assembly.
85361C 2.INSTALL WASHER BRACKET (for Standard)
Use the same procedure as for the No. 2 washer bracket.
53113B 3.INSTALL RADIATOR SIDE GRILLE LH (for Standard)
53112B 4.INSTALL RADIATOR SIDE GRILLE RH (for Standard)
53101 5.INSTALL RADIATOR GRILLE SUB-ASSEMBLY (for Standard)
6.INSTALL NO. 7 RADIATOR GRILLE MOULDING (for Standard)
75310A 7.INSTALL RADIATOR GRILLE EMBLEM ASSEMBLY (for Standard)
85208A 8.INSTALL HEADLIGHT WASHER ACTUATOR SUB-ASSEMBLY LH (for Standard)
85207A 9.INSTALL HEADLIGHT WASHER ACTUATOR SUB-ASSEMBLY RH (for Standard)
85354 10.INSTALL HEADLIGHT WASHER COVER LH (for Standard)
85353 11.INSTALL HEADLIGHT WASHER COVER RH (for Standard)
85362 12.INSTALL NO. 2 WASHER BRACKET (for Aero Type)
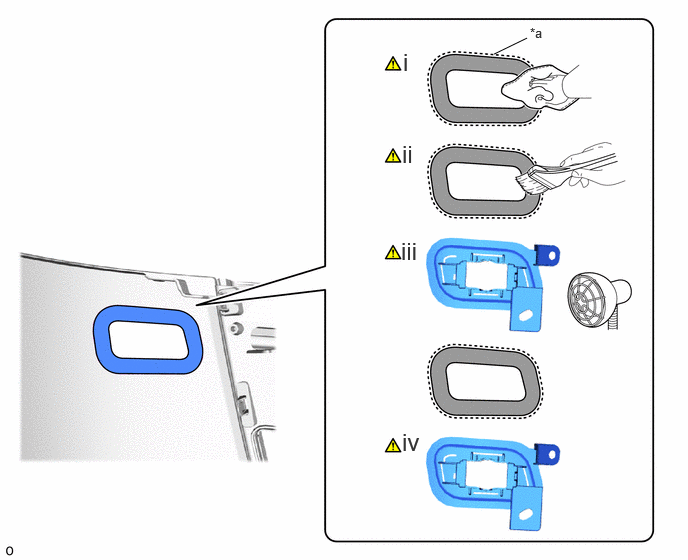
| *a | Mark-off Line | - | - |
|
|
Installation area | - | - |
Clean the front bumper assembly surface:
1. When reusing the front bumper assembly, remove remaining double-sided tape from the front bumper assembly.
2. Using a heat light, heat the front bumper assembly surface.
- Standard Value:
-
Part Temperature Front Bumper Assembly 20 to 30°C (68 to 86°F) No. 2 Washer Bracket 20 to 30°C (68 to 86°F)
- CAUTION:
-
2.365,2 2.698,2 false 0.5,2.333 0.5,2.667 true 0.427,2.708 0.74,2.865 0.313,0.156 10 false *a 2.76,1.927 3.073,2.083 0.313,0.156 10 false *b
*a Heated Part *b Heat Light
-
·
Do not touch the heat light and heated parts.
·Touching the heat light may result in burns.
·Touching heated parts for a long time may result in burns.
- NOTICE:
-
Do not heat the front bumper assembly excessively.
3. Remove any remaining double-sided tape from the front bumper assembly and wipe off any tape adhesive residue with cleaner.
4. Clean the installation area surface.
- NOTICE:
-
·
Installing the No. 2 washer bracket with some double-sided tape remaining may cause poor adhesion. Perform this procedure until the tape is sufficiently removed.
·Make sure to use a cloth when removing. Using a screwdriver, etc., may cause damage and poor adhesion.
·Also, clean a new front bumper assembly surface.
Primer application:
1. Apply primer to the front bumper assembly on the installation area of the No. 2 washer bracket using a brush or felt.
- NOTICE:
-
·
Replace the brush or felt if it is dirty or has become hardened.
·Keep any painted surface free from primer.
·If the primer contacts a painted surface, it may leave light primer marks. Therefore, use protective tape when using liquid primer.
·Do not touch surfaces to which primer has been applied until the No. 2 washer bracket has been attached.
2. Let the primer dry sufficiently.
- NOTICE:
-
Do not touch applied surfaces until the primer is dry.
- Recommended drying time:
-
10 minutes or more (at 23°C (73°F))
Using a heat light, heat the front bumper assembly and a new No. 2 washer bracket.
- NOTICE:
-
Do not heat the No. 2 washer bracket and front bumper assembly excessively.
Install the No. 2 washer bracket in the position shown in the illustration.
- NOTICE:
-
The application strength of the No. 2 washer bracket will weaken if reapplied. If reapplication is necessary, be sure to replace it with a new one.
- HINT:
-
Apply pressure so that it does not lift up from the front bumper assembly .

Attach the clamp.
Install the screw.
85361C 13.INSTALL WASHER BRACKET (for Aero Type)
Use the same procedure as for the No. 2 washer bracket.
85208A 14.INSTALL HEADLIGHT WASHER ACTUATOR SUB-ASSEMBLY LH (for Aero Type)
85207A 15.INSTALL HEADLIGHT WASHER ACTUATOR SUB-ASSEMBLY RH (for Aero Type)
85354 16.INSTALL HEADLIGHT WASHER COVER LH (for Aero Type)
85353 17.INSTALL HEADLIGHT WASHER COVER RH (for Aero Type)
18.INSTALL FRONT BUMPER ASSEMBLY
for Standard:
Click hereVehicle Exterior>EXTERIOR PANELS / TRIM>FRONT BUMPER (for Standard)>INSTALLATION
for Aero Type:
Click hereVehicle Exterior>EXTERIOR PANELS / TRIM>FRONT BUMPER (for Aero Type)>INSTALLATION