V35A-FTS ENGINE MECHANICAL CYLINDER HEAD DISASSEMBLY
CAUTION / NOTICE / HINT
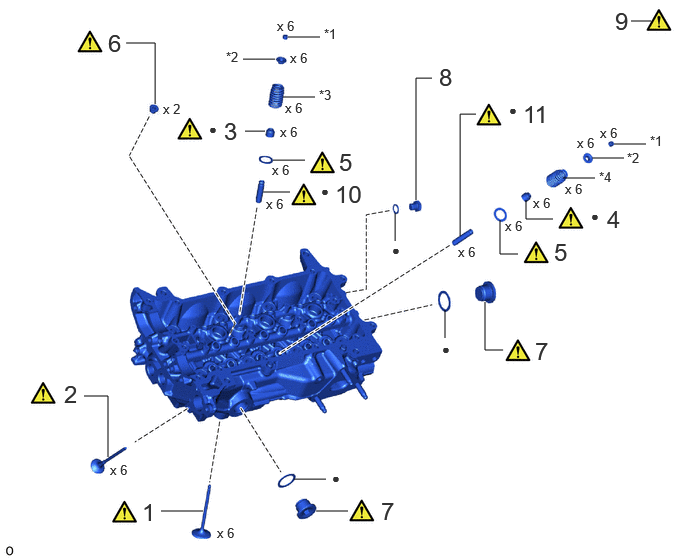
| Procedure | Part Name Code |

|

|

|
|
|---|---|---|---|---|---|
| 1 | CYLINDER HEAD INTAKE VALVE LH | 13711G | ( ) |
- | - |
| 2 | CYLINDER HEAD EXHAUST VALVE LH | 13715C | () |
- | - |
| 3 | CYLINDER HEAD INTAKE VALVE STEM OIL SEAL LH | 13711L | () |
- | - |
| 4 | CYLINDER HEAD EXHAUST VALVE STEM OIL SEAL LH | 13715G | () |
- | - |
| 5 | CYLINDER HEAD VALVE SPRING SEAT LH | 13734D | () |
- | - |
| 6 | NO. 1 STRAIGHT SCREW PLUG LH WITH HEAD | 11117K | () |
- | - |
| 7 | NO. 2 STRAIGHT SCREW PLUG LH WITH HEAD | 11117L | () |
- | - |
| 8 | NO. 1 STRAIGHT SCREW PLUG WITH HEAD | 11117E | - | - | - |
| 9 | DISPOSE OF EXHAUST VALVE | - | () |
- | - |
| 10 | INTAKE VALVE GUIDE BUSH LH | 11122D | () |
- | - |
| 11 | EXHAUST VALVE GUIDE BUSH LH | 11126D | () |
- | - |
| *1 | CYLINDER HEAD VALVE SPRING RETAINER LOCK LH | *2 | CYLINDER HEAD VALVE SPRING RETAINER LH |
| *3 | CYLINDER HEAD INTAKE COMPRESSION SPRING LH | *4 | CYLINDER HEAD EXHAUST COMPRESSION SPRING LH |
| ● | Non-reusable part | - | - |
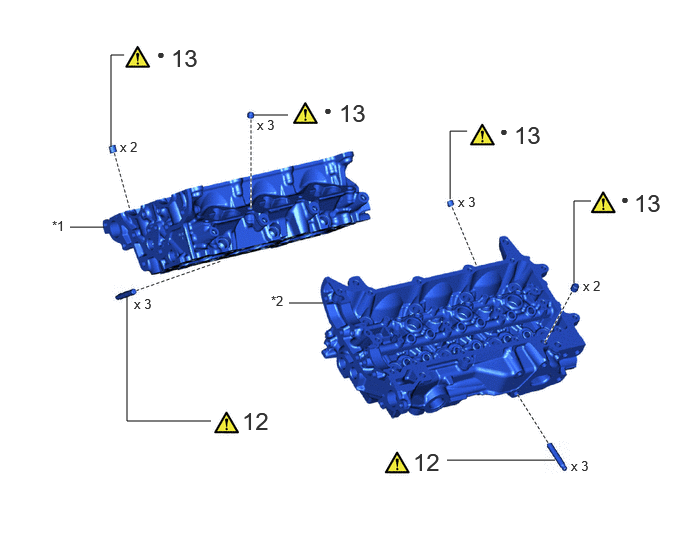
| Procedure | Part Name Code |
|
|
|
|
|---|---|---|---|---|---|
| 12 | STUD BOLT | - | () |
- | - |
| 13 | RING PIN | - | () |
- | - |
| *1 | CYLINDER HEAD SUB-ASSEMBLY RH | *2 | CYLINDER HEAD SUB-ASSEMBLY LH |
| ● | Non-reusable part | - | - |
CAUTION / NOTICE / HINT
The necessary procedures (adjustment, calibration, initialization, or registration) that must be performed after parts are removed, installed, or replaced during the cylinder head removal/installation are shown below.
| Replaced Part or Performed Procedure | Necessary Procedure | Effect/Inoperative Function when Necessary Procedure not Performed | Link |
|---|---|---|---|
| Battery terminal is disconnected/reconnected | Memorize steering angle neutral point | Parking assist monitor system | () |
| Multi-terrain monitor system | () |
||
| Panoramic view monitor system | () |
||
|
·
Throttle body with motor assembly
·
Cleaning the deposits from the throttle body with motor assembly
·
Cylinder head sub-assembly
·
Camshaft (for intake or exhaust camshaft)
·
Camshaft timing intake gear assembly
·
Camshaft timing exhaust gear assembly
·
Port fuel injector assembly
·
Direct fuel injector assembly
·
Fuel pump assembly (for high pressure side)
·
Spark plug
·
Ignition coil assembly
·
Air leaks from intake system
·
Gas leaks from exhaust system
·
Turbocharger sub-assembly |
Inspection after repairs |
·
Poor idle, etc.
·
Engine start function, etc. |
() |
| Engine assembly | Inspection after repair |
·
Poor idle, etc.
·
Engine start function, etc. |
() |
| Perform road test to allow TCM to learn |
·
Large shift shock
·
Engine overruns |
() |
|
| Automatic transmission assembly | ECU configuration | - | () |
| Update ECU security key | Vehicle control history (RoB) are stored | () |
|
| Automatic transmission fluid | ATF thermal degradation estimate reset | The value of the Data List item "ATF Thermal Degradation Estimate" is not estimated correctly. | () |
| Front bumper assembly (Including removal and installation) | Front television camera view adjustment | Panoramic view monitor system | () |
- HINT:
-
When the cable is disconnected/reconnected to the battery terminal, systems temporarily stop operating. However, each system has a function that completes learning the first time the system is used.
-
·
Learning completes when vehicle is driven
Effect/Inoperative Function When Necessary Procedures are not Performed Necessary Procedures Link Stop and start system Drive the vehicle until stop and start control is permitted (approximately 5 to 60 minutes). ( )Lighting system (EXT) Cornering lights Drive the vehicle straight ahead at 35 km/h (22 mph) or more for 5 seconds or more. ( )Pre-collision system Lane tracing assist system Lane departure alert system Adaptive high beam system
·Learning completes when vehicle is operated normally
Effect/Inoperative Function When Necessary Procedures are not Performed Necessary Procedures Link Power back door system Fully close the back door by hand.
- HINT:
-
Initialization is not necessary if the above procedures are performed while the back door is closed.
( )Air conditioning system After the ignition switch is turned to ON, the servo motor and expansion valve standard position is recognized. -
- HINT:
-
·
Use the same procedure for the Bank 1 side and Bank 2 side.
·The following procedure is for the Bank 2 side.
PROCEDURE

 13711G 1.REMOVE CYLINDER HEAD INTAKE VALVE LH
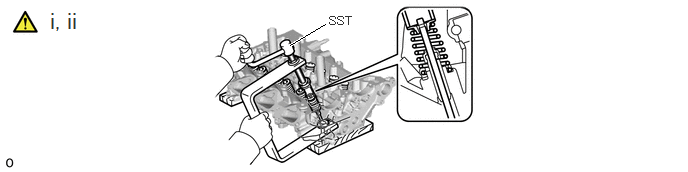
Using SST, compress each compression spring and remove the 6 cylinder head valve spring retainer locks.
- SST
-
09202-70020 (09202-01010, 09202-01020)
09202-00021
Remove the 6 cylinder head valve spring retainers, 6 cylinder head intake valve compression springs and 6 cylinder head intake valves from the cylinder head sub-assembly LH.
- HINT:
-
Arrange the removed parts in the correct order.
13715C 2.REMOVE CYLINDER HEAD EXHAUST VALVE LH
|
|
|
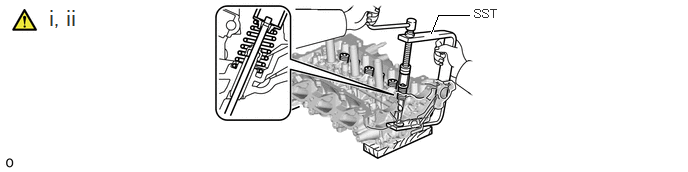
Using SST, compress each compression spring and remove the 6 cylinder head valve spring retainer locks.
- SST
-
09202-70020 (09202-01010, 09202-01020)
09202-00021
Remove the 6 cylinder head valve spring retainers, 6 cylinder head exhaust valve compression springs and 6 cylinder head exhaust valves from the cylinder head sub-assembly LH.
- HINT:
-
Arrange the removed parts in the correct order.
13711L 3.REMOVE CYLINDER HEAD INTAKE VALVE STEM OIL SEAL LH
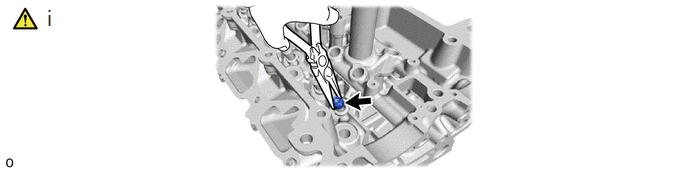
Using needle-nose pliers, remove the 6 cylinder head intake valve stem oil seals.
13715G 4.REMOVE CYLINDER HEAD EXHAUST VALVE STEM OIL SEAL LH
Use the same procedure as for the intake side.
13734D 5.REMOVE CYLINDER HEAD VALVE SPRING SEAT LH
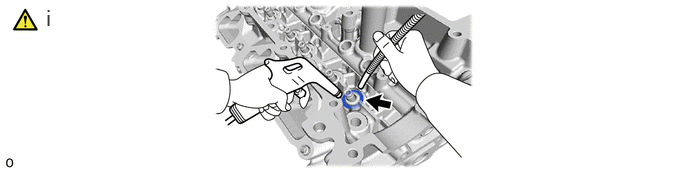
Using compressed air and a magnet hand, remove the 12 cylinder head valve spring seats by blowing air onto them.
11117K 6.REMOVE NO. 1 STRAIGHT SCREW PLUG LH WITH HEAD
|
|
|
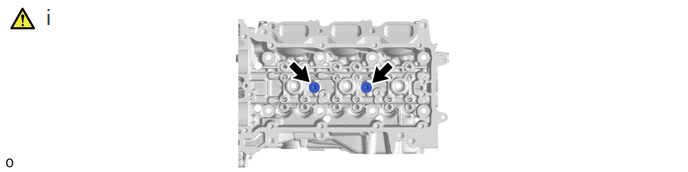
Using a 6 mm hexagon wrench, remove the No. 1 straight screw plugs LH with head.
11117L 7.REMOVE NO. 2 STRAIGHT SCREW PLUG LH WITH HEAD
|
|
|
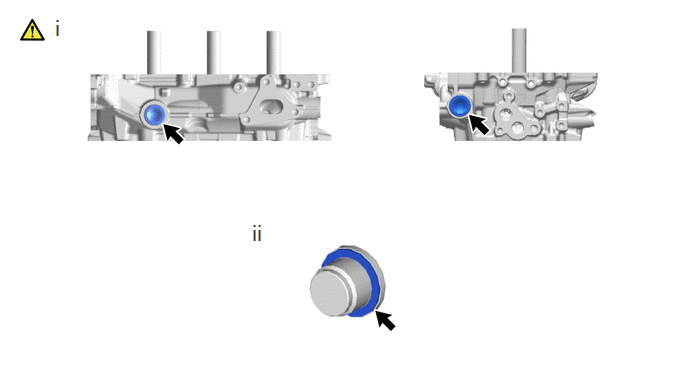
Using a 14 mm hexagon wrench, remove the No. 2 straight screw plugs LH with head.
Remove the gaskets from the No. 2 straight screw plugs LH with head.
11117E 8.REMOVE NO. 1 STRAIGHT SCREW PLUG WITH HEAD
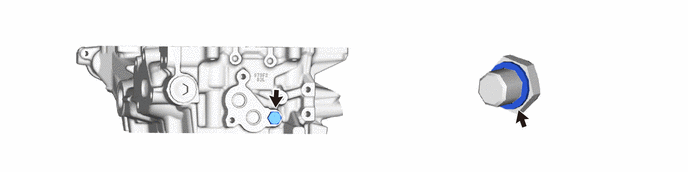
13715C 9.DISPOSE OF EXHAUST VALVE
- CAUTION:
-
·
The exhaust valve is filled with sodium. Sodium is a strong alkali which may produce a dangerous chemical reaction. Therefore, be very careful when handling and disposing of it.
·Do not disassemble the exhaust valve for the following reasons: 1) If sodium enters your eyes, vision loss may occur. 2) If sodium contacts your skin, burns may occur. 3) If sodium is exposed to a flame and starts a fire due to the chemical reaction that takes place, burns may occur.
·If the exhaust valve is damaged, remove the valve and perform the proper procedures to dispose of the sodium. (disposal preparation and actual disposal)
·When removing a damaged exhaust valve, always wear rubber gloves and safety glasses.
·Do not cut the exhaust valve to take out the sodium.
- NOTICE:
-
If it is clearly stated that the industrial waste disposal method is dissolution, carry out the process below.
- HINT:
-
·
The sodium inside the exhaust valve is safe as long as the sodium is not exposed to air.
·Exhaust valves filled with sodium can be identified by confirming the "NA" identification mark.
Waste disposal preparation
- CAUTION:
-
Always carry out the following when performing the disposal procedure.
Have a fire extinguisher close by.
Wear safety glasses.
Wear rubber gloves.
Waste disposal
Put on rubber gloves and remove the damaged exhaust valve from the cylinder head sub-assembly.
Add 10 L of water or more to a large receptacle (a bucket, oil can, etc.) in a well ventilated area.
Hold the damaged exhaust valve upright with pliers or large pair of tweezers and submerge it into the water.
- CAUTION:
-
·
Fully submerge the damaged exhaust valve in water.
·Do not allow any sparks or other flames near the receptacle as hydrogen gas is generated by the chemical reaction.
·Stay 2 m (6.56 ft.) or 3 m (9.84 ft.) or more away from the receptacle as a strong chemical reaction occurs.
11122D 10.REMOVE INTAKE VALVE GUIDE BUSH LH
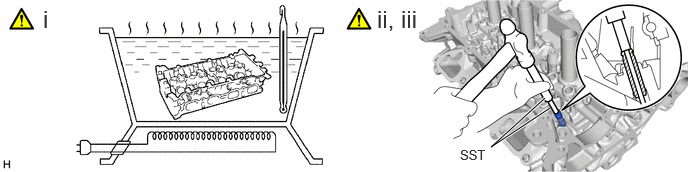
Heat the cylinder head sub-assembly to 80 to 100°C (176 to 212°F).
- CAUTION:
-
·
Do not touch the cylinder head sub-assembly without wearing protective gloves, as it may get very hot during operation.
·Be sure to wear protective gloves to avoid burns.
Place the cylinder head sub-assembly on wooden blocks.
- CAUTION:
-
Be sure to wear protective gloves.
Using SST and a hammer, tap out the intake valve guide bushes.
- SST
-
09201-10000 (09201-01050)
09950-70010 (09951-07100)
11126D 11.REMOVE EXHAUST VALVE GUIDE BUSH LH
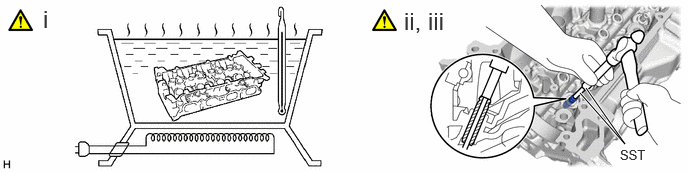
Heat the cylinder head sub-assembly to 80 to 100°C (176 to 212°F).
- CAUTION:
-
·
Do not touch the cylinder head sub-assembly without wearing protective gloves, as it may get very hot during operation.
·Be sure to wear protective gloves to avoid burns.
Place the cylinder head sub-assembly on wooden blocks.
- CAUTION:
-
Be sure to wear protective gloves.
Using SST and a hammer, tap out the exhaust valve guide bushes.
- SST
-
09201-10000 (09201-01050)
09950-70010 (09951-07100)
12.REMOVE STUD BOLT
|
|
|
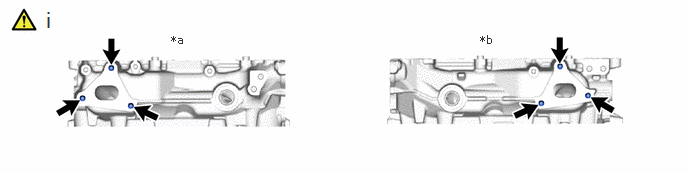
| *a | for Bank 1 | *b | for Bank 2 |
Using an E10 "TORX" socket wrench, remove the stud bolts.
13.REMOVE RING PIN
|
|
|
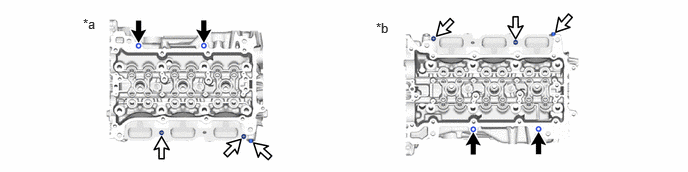
| *a | for Bank 1 | *b | for Bank 2 |

|
Ring Pin A |

|
Ring Pin B |