V35A-FTS ENGINE MECHANICAL CYLINDER BLOCK REASSEMBLY
CAUTION / NOTICE / HINT
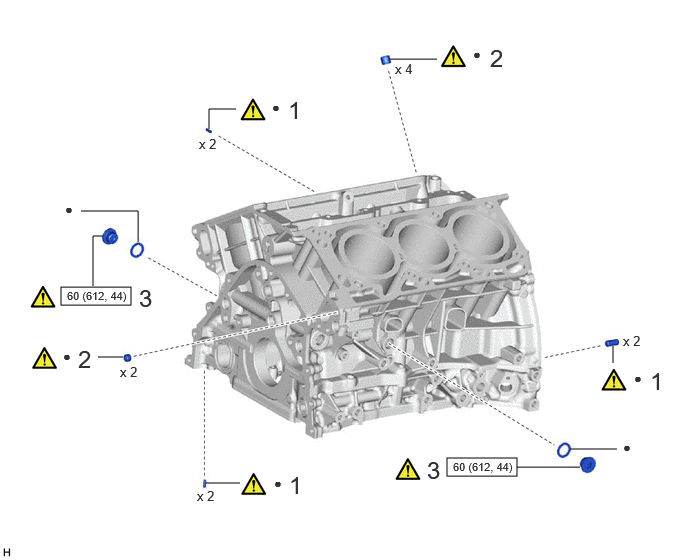
| Procedure | Part Name Code |

|

|

|
|
|---|---|---|---|---|---|
| 1 | STRAIGHT PIN | - | ( ) |
- | - |
| 2 | RING PIN | - | () |
- | - |
| 3 | CYLINDER BLOCK PLUG WITH HEAD STRAIGHT SCREW | 11432R | () |
- | - |

|
N*m (kgf*cm, ft.*lbf): Specified torque | ● | Non-reusable part |
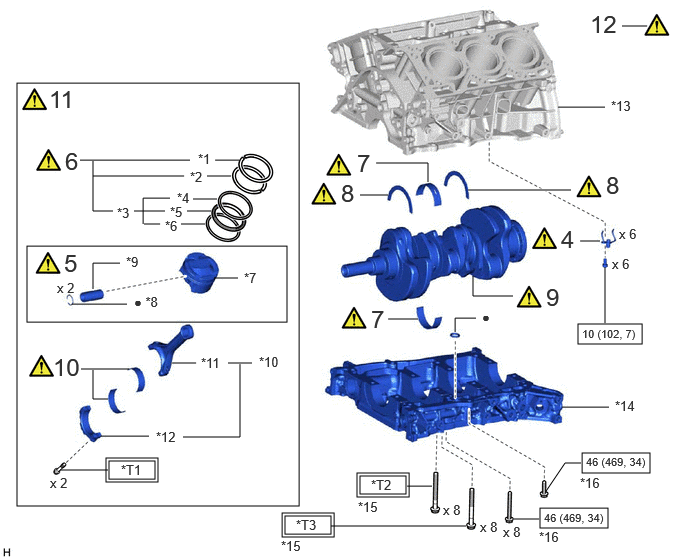
| Procedure | Part Name Code |
|
|
|
|
|---|---|---|---|---|---|
| 4 | NO. 1 OIL NOZZLE SUB-ASSEMBLY | 15708 | () |
- | - |
| 5 | PISTON SUB-ASSEMBLY WITH PIN | - | () |
- | - |
| 6 | PISTON RING SET | 13011 | () |
- | - |
| 7 | CRANKSHAFT BEARING | 11711 | () |
- | - |
| 8 | CRANKSHAFT THRUST WASHER SET | 11011 | () |
- | - |
| 9 | CRANKSHAFT | 13411 | () |
- | - |
| 10 | CONNECTING ROD BEARING | 13041 | () |
- | - |
| 11 | PISTON SUB-ASSEMBLY WITH CONNECTING ROD | - | () |
- | - |
| 12 | INSPECT CONNECTING ROD THRUST CLEARANCE | - | () |
- | - |
| *1 | NO. 1 COMPRESSION RING | *2 | NO. 2 COMPRESSION RING |
| *3 | OIL RING | *4 | UPPER SIDE RAIL |
| *5 | OIL RING EXPANDER | *6 | LOWER SIDE RAIL |
| *7 | PISTON | *8 | PISTON PIN HOLE SNAP RING |
| *9 | PISTON PIN | *10 | CONNECTING ROD SUB-ASSEMBLY |
| *11 | CONNECTING ROD | *12 | CONNECTING ROD CAP |
| *13 | CYLINDER BLOCK SUB-ASSEMBLY | *14 | CRANKSHAFT BEARING CAP SUB-ASSEMBLY |
| *15 | CRANKSHAFT BEARING CAP SET BOLT | *16 | CRANKSHAFT BEARING CAP BOLT |

|
Tightening torque for "Major areas involving basic vehicle performance such as moving/turning/stopping": N*m (kgf*cm, ft.*lbf) |
|
N*m (kgf*cm, ft.*lbf): Specified torque |
| ● | Non-reusable part | - | - |
| *T1 | 1st: 40 (408, 30) 2nd: Turn 90° |
*T2 | 1st: 30 (306, 22) 2nd: 61 (622, 45) 3rd: Turn 90° 4th: Turn 45° |
| *T3 | 1st: 30 (306, 22) 2nd: 90 (918, 66) 3rd: Turn 90° |
- | - |
CAUTION / NOTICE / HINT
- NOTICE:
-
This procedure includes the installation of small-head bolts. Refer to Small-Head Bolts of Basic Repair Hint to identify the small-head bolts.
-
Click hereGeneral>INTRODUCTION>REPAIR INSTRUCTION>PRECAUTION
- HINT:
-
Perform "Inspection After Repairs" after replacing the piston or piston ring.
-
Click hereEngine / Hybrid System>V35A-FTS (ENGINE CONTROL)>SFI SYSTEM>INITIALIZATION
PROCEDURE

 1.INSTALL STRAIGHT PIN
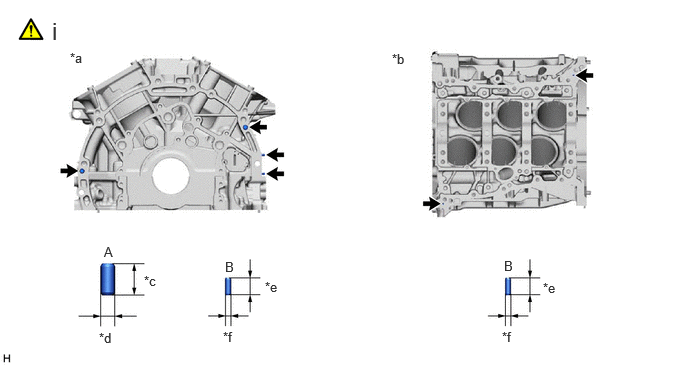
| *a | Rear Side | *b | Cylinder Block Sub-assembly Lower Side |
| *c | 22 mm (0.867 in.) | *d | 10 mm (0.394 in.) |
| *e | 12 mm (0.472 in.) | *f | 4 mm (0.157 in.) |
Using a plastic-faced hammer, tap in new straight pins to the cylinder block sub-assembly.
- Standard Protrusion Height:
-
Item Specified Condition A 10.0 to 12.0 mm (0.393 to 0.472 in.) B 5.0 to 7.0 mm (0.196 to 0.275 in.)
2.INSTALL RING PIN
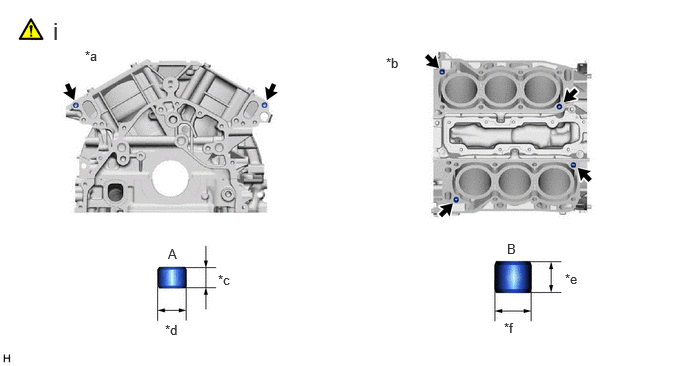
| *a | Front Side | *b | Cylinder Block Sub-assembly Upper Side |
| *c | 8 mm (0.315 in.) | *d | 11 mm (0.433 in.) |
| *e | 12 mm (0.472 in.) | *f | 14 mm (0.551 in.) |
Using a plastic-faced hammer, tap in new ring pins to the cylinder block sub-assembly.
- Standard Protrusion Height:
-
Item Specified Condition A 3.0 to 5.0 mm (0.118 to 0.196 in.) B 5.0 to 7.0 mm (0.196 to 0.275 in.)
11432R 3.INSTALL CYLINDER BLOCK PLUG WITH HEAD STRAIGHT SCREW
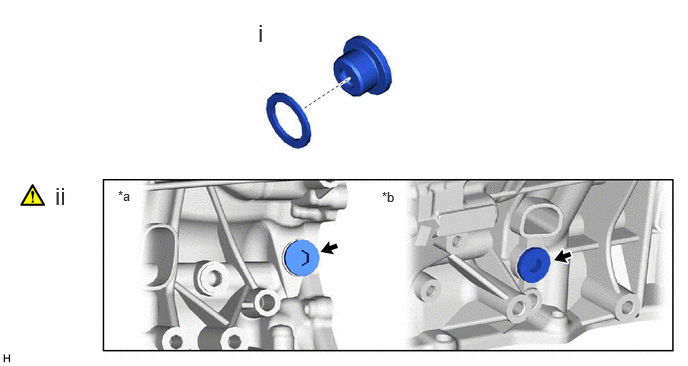
| *a | for Bank 1 | *b | for Bank 2 |
Install new gaskets to the cylinder block plug with head straight screw.
Install the cylinder block plug with head straight screw to the cylinder block sub-assembly.
- Torque:
- 60 N*m (612 kgf*cm, 44 ft.*lbf)
15708 4.INSTALL NO. 1 OIL NOZZLE SUB-ASSEMBLY
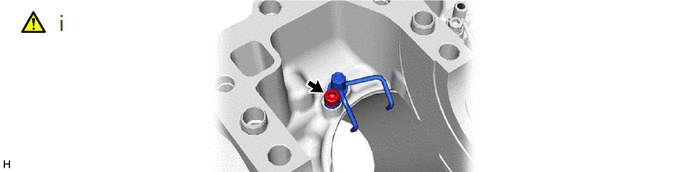
Using a 5 mm hexagon wrench, install the No. 1 oil nozzle sub-assemblies with the 6 bolts.
- Torque:
- 10 N*m (102 kgf*cm, 7 ft.*lbf)
5.INSTALL PISTON SUB-ASSEMBLY WITH PIN
|
|
|
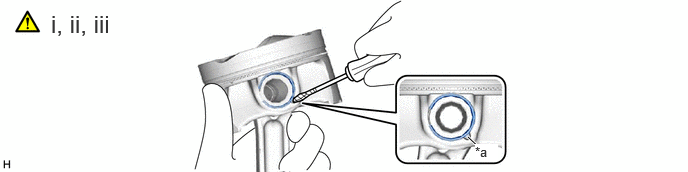
| *a | Cutout Portion | - | - |
Using a screwdriver, install a new piston pin hole snap ring at one end of the piston pin hole.
- HINT:
-
Confirm that the end gap of the snap ring is not aligned with the pin hole cutout portion of the piston.
- HINT:
-
·
The piston and piston pin are a matched set.
·Confirm that the end gap of the snap ring is not aligned with the pin hole cutout portion of the piston.
Gradually heat the piston to approximately 80°C (176°F).
Coat the piston pin with engine oil.
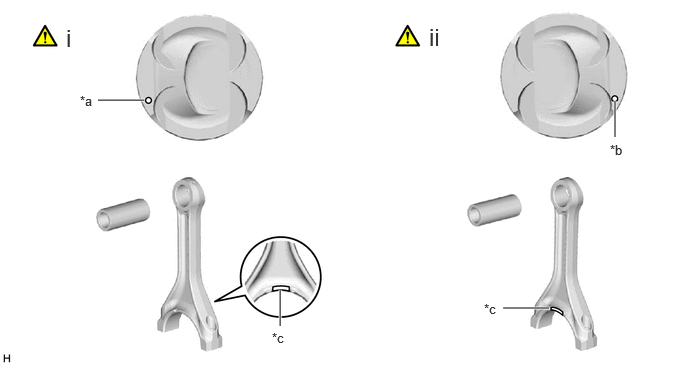
| *a | Piston RH | *b | Piston LH |
| *c | Piston Matchmark (Protrusion) | - | - |
for Bank 1:
Align the piston matchmark (protrusion) of the piston and connecting rod, and push in the piston pin with your thumb.
- HINT:
-
·
The piston and pin are a matched set.
·Take care as the piston matchmark (protrusion) on the piston RH connecting rod is reversed for the piston LH.
·Check the fitting condition between the piston and piston pin by trying to move the piston back and forth on the piston pin.
for Bank 2:
Align the piston matchmark (protrusion) of the piston and connecting rod, and push in the piston pin with your thumb.
- HINT:
-
·
The piston and pin are a matched set.
·Take care as the piston matchmark (protrusion) on the piston LH connecting rod is reversed for the piston RH.
·Check the fitting condition between the piston and piston pin by trying to move the piston back and forth on the piston pin.
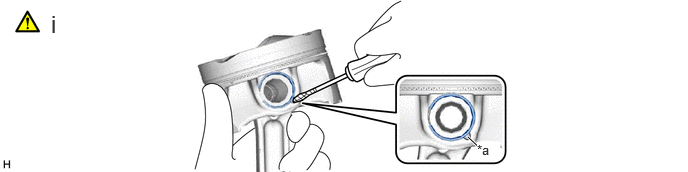
| *a | Cutout Portion | - | - |
Using a screwdriver, install a new piston pin hole snap ring at the other end of the piston pin hole.
- HINT:
-
Confirm that the end gap of the snap ring is not aligned with the pin hole cutout portion of the piston.
13011 6.INSTALL PISTON RING SET
|
|
|
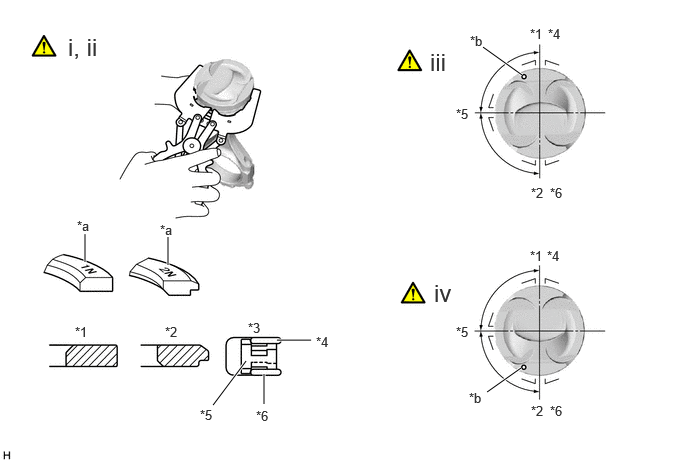
| *1 | No. 1 Compression Ring | *2 | No. 2 Compression Ring |
| *3 | Oil Ring | *4 | Upper Side Rail |
| *5 | Oil Ring Expander | *6 | Lower Side Rail |
| *a | Code Mark | *b | Piston Matchmark (Arrow) |
Install the oil ring expander and 2 side rails by hand.
Using a piston ring expander, install the 2 compression rings so that the code marks are positioned as shown in the illustration.
- HINT:
-
·
Install the No. 1 compression ring with the code mark (1N) facing upward.
·Install the No. 2 compression ring with the code mark (2N) facing upward.
Position the piston rings so that the ring ends are as shown in the illustration. (Piston RH)
- NOTICE:
-
Do not align the ring ends.
Position the piston rings so that the ring ends are as shown in the illustration. (Piston LH)
- NOTICE:
-
Do not align the ring ends.
11711 7.INSTALL CRANKSHAFT BEARING
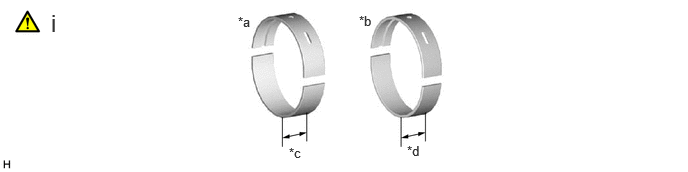
| *a | No. 1 and No. 4 Journal Bearing | *b | No. 2 and No. 3 Journal Bearing |
| *c | 21.0 mm (0.827 in.) | *d | 19.0 mm (0.748 in.) |
Clean the main journal and both surfaces of the bearings.
- NOTICE:
-
Main bearings come in widths between 19.0 mm (0.748 in.) and 21.0 mm (0.827 in.). Install the 21.0 mm (0.827 in.) bearings in the No. 1 and No. 4 cylinder block journal positions with the main bearing cap. Install the 19.0 mm (0.748 in.) bearings in the No. 2 and No. 3 positions.
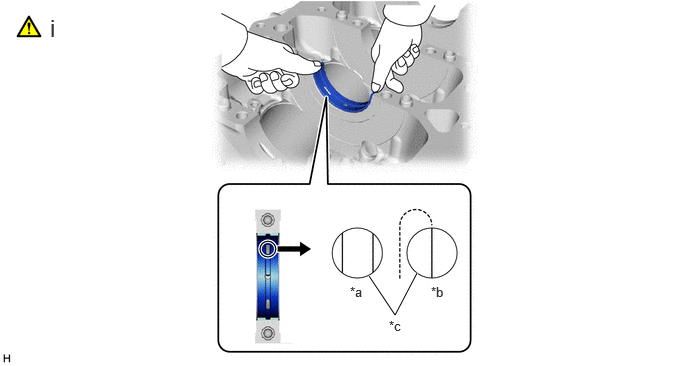
| *a | Correct | *b | Incorrect |
| *c | Upper Crankshaft Bearing | - | - |
Install the upper crankshaft bearings to the cylinder block sub-assembly as shown in the illustration.
- NOTICE:
-
·
Do not apply engine oil to the bearings and the contact surfaces.
·Both sides of the oil groove in the cylinder block sub-assembly should be visible through the oil feed holes in the bearing. The amount visible on each side of the holes should be equal.
·Do not allow coolant to come into contact with the bearing inner surface.
·If any coolant comes into contact with the bearing inner surface, replace the bearing with a new one.
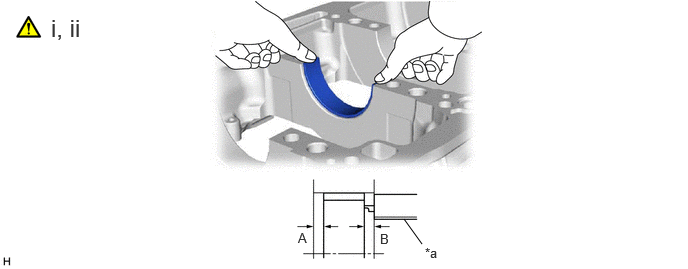
| *a | Vernier Caliper | - | - |
Install the lower crankshaft bearings to the crankshaft bearing caps.
Using a vernier caliper, measure the distance between the crankshaft bearing cap edge and the lower crankshaft bearing edge.
- Standard dimension (A - B or B - A):
-
0.7 mm (0.0276 in.) or less
- NOTICE:
-
·
Do not apply engine oil to the crankshaft bearings and the contact surfaces.
·Do not allow coolant to come into contact with the bearing inner surface.
·If any coolant comes into contact with the bearing inner surface, replace the bearing with a new one.
11011 8.INSTALL CRANKSHAFT THRUST WASHER SET
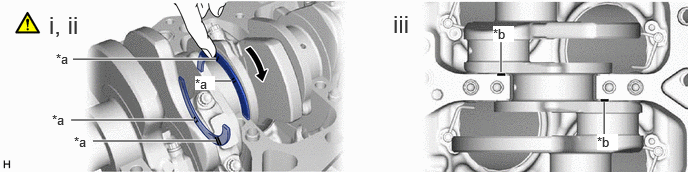
| *a | Oil Grooves | *b | Identification Paint Mark |
Apply engine oil to the crankshaft thrust washer.
Install the 2 upper crankshaft thrust washers under the No. 2 journal position of the cylinder block sub-assembly with the oil grooves facing outward.
- NOTICE:
-
Make sure to correctly install the crankshaft thrust washer set.
After installation, check for the identification paint mark on the crankshaft thrust washer set at the position shown in the illustration.
13411 9.INSTALL CRANKSHAFT
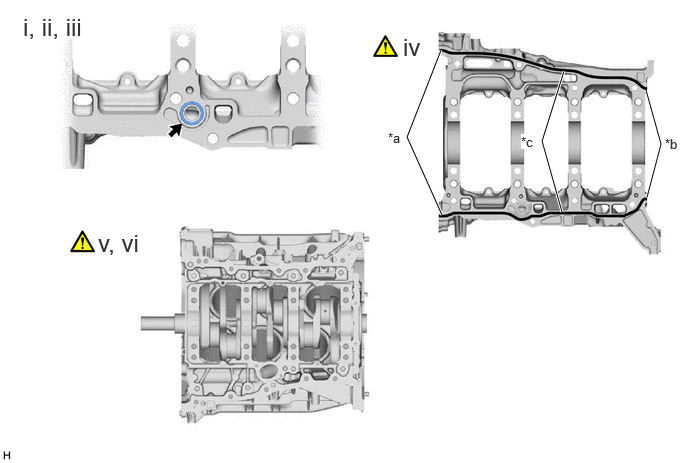
| *a | 4.5 to 5.5 mm (0.177 to 0.216 in.) | *b | 2.5 to 6.5 mm (0.098 to 0.255 in.) |
| *c | 2.5 to 3.5 mm (0.098 to 0.137 in.) | - | - |

|
Seal Packing | - | - |
Apply engine oil to the crankshaft bearing (upper), and then place the crankshaft on the cylinder block sub-assembly.
Install a new gasket to the crankshaft bearing cap sub-assembly.
Apply engine oil to the crankshaft bearing (lower).
Apply seal packing black to the crankshaft bearing cap sub-assembly at the points shown in the illustration.
- NOTICE:
-
·
Clean and degrease the installation surface using non-residue solvent and brake cleaner.
·Check, clean and degrease the bolt and bolt hole.
·Install the part within 3 minutes and tighten the bolts within 15 minutes after applying seal packing.
·Do not pour engine oil within 2 hours of the installation.
·Do not start the engine within 2 hours of the installation.
Check the protrusion of the crankshaft bearing cap sub-assembly and journal number, and then temporarily place the crankshaft bearing cap sub-assembly on the cylinder block sub-assembly.
- NOTICE:
-
·
Check the protrusion of the crankshaft bearing cap and journal number.
·Install the crankshaft bearing cap sub-assembly as shown in the illustration.
Using a plastic-faced hammer, lightly tap the crankshaft bearing cap sub-assembly to securely insert it.
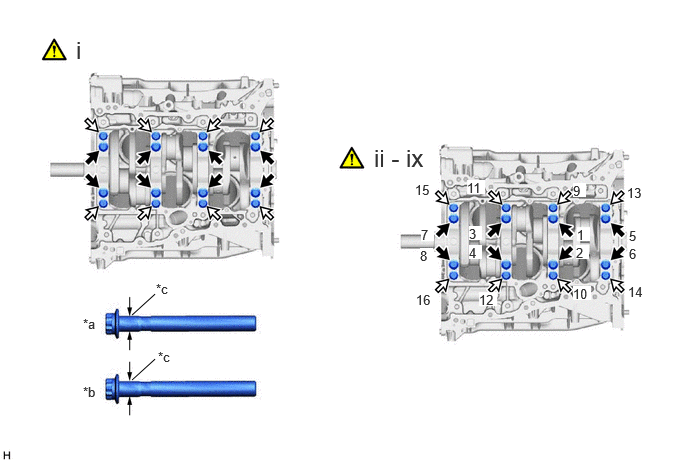
| *a | Bolt A (Bolt Diameter 12 mm (0.472 in.)) | *b | Bolt B (Bolt Diameter 11 mm (0.433 in.)) |
| *c | Measurement Area | - | - |

|
Bolt A |

|
Bolt B |
Apply engine oil to the threads and beneath the head of the crankshaft bearing cap set bolts, and install the 16 crankshaft bearing cap set bolts at the positions shown in the illustration.
- NOTICE:
-
·
The diameter of the crankshaft bearing cap set bolt differs. Therefore, check this at installation.
·Tighten the crankshaft bearing cap set bolts by the plastic region tightening method.
Temporarily install in 2 or 3 steps in the order shown in the illustration and tighten to the specified torque (1st Time).
- Torque:
- 30 N*m (306 kgf*cm, 22 ft.*lbf)
- NOTICE:
-
·
The tightening procedure is different for bolt A and bolt B.
·Tighten the bolts while checking that the crankshaft rotates smoothly.
Tighten to the specified torque in the order shown in the illustration (2nd Time).
- Torque:
- for bolt A : 61 N*m (622 kgf*cm, 45 ft.*lbf)
- for bolt B. : 90 N*m (918 kgf*cm, 66 ft.*lbf)
- NOTICE:
-
Tighten the bolts while checking that the crankshaft rotates smoothly.
Place paint marks on the front side of the crankshaft bearing cap set bolt heads.
Retighten the crankshaft bearing cap set bolts 90° in the tightening order, using the paint marks on bolt A as the indicator.
- NOTICE:
-
Tighten the bolts while checking that the crankshaft rotates smoothly.
Retighten the crankshaft bearing cap set bolts 45° in the tightening order, using the paint marks on bolt A as the indicator.
- NOTICE:
-
Tighten the bolts while checking that the crankshaft rotates smoothly.
Retighten the crankshaft bearing cap set bolts 90° in the tightening order, using the paint marks on bolt B as the indicator.
- NOTICE:
-
Tighten the bolts while checking that the crankshaft rotates smoothly.
Check that the paint marks on bolt B are now at a 90° angle from their original position.
Check that the paint marks on bolt A are now at a 135° angle from their original position.
|
|
Bolt A (Length Beneath Head 80 mm (3.149 in.)) |
|
Bolt B (Length Beneath Head 35 mm (1.377 in.)) |
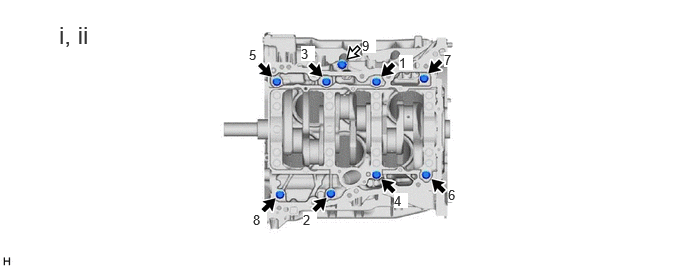
Install the 9 crankshaft bearing cap bolts.
Tighten to the specified torque in the order shown in the illustration.
- Torque:
- 46 N*m (469 kgf*cm, 34 ft.*lbf)
13041 10.INSTALL CONNECTING ROD BEARING
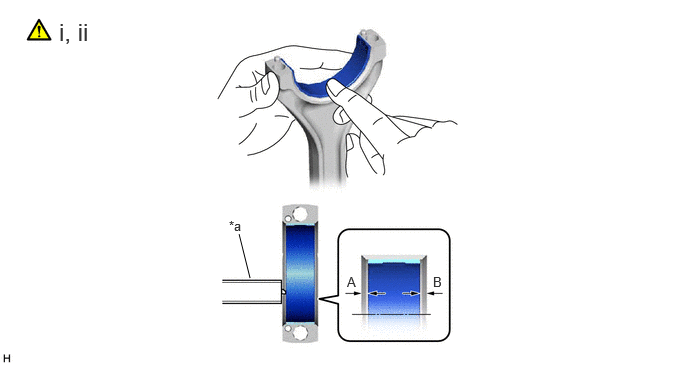
| *a | Vernier Caliper | - | - |
Install the connecting rod bearings to the connecting rod and connecting rod cap.
Using a vernier caliper, measure the distance between each connecting rod bearing edge and the connecting rod edges, and the connecting rod cap edges respectively.
- Standard dimension (A - B or B - A):
-
0.7 mm (0.0276 in.) or less
- NOTICE:
-
Do not apply engine oil to the bearings and the contact surfaces.
11.INSTALL PISTON SUB-ASSEMBLY WITH CONNECTING ROD
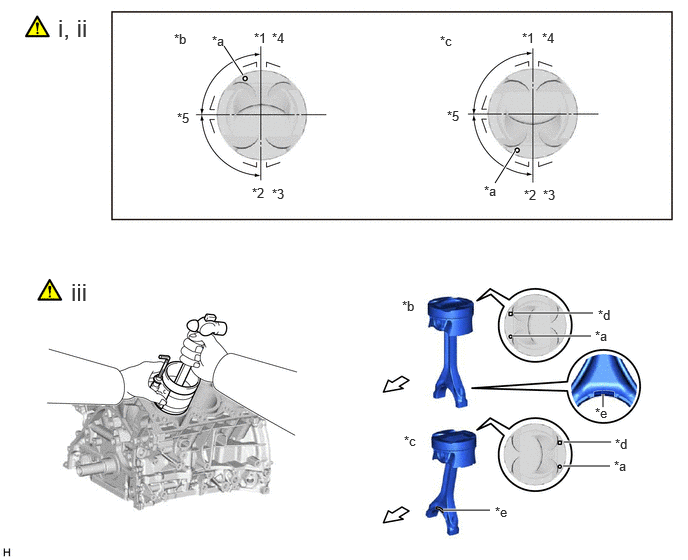
| *1 | No. 1 Compression Ring | *2 | No. 2 Compression Ring |
| *3 | Lower Side Rail | *4 | Upper Side Rail |
| *5 | Oil Ring Expander | - | - |
| *a | Piston Matchmark (Arrow) | *b | Piston RH |
| *c | Piston LH | *d | Piston Pin Size Identification Mark |
| *e | Piston Matchmark (Protrusion) | - | - |
|
|
Engine Front | - | - |
Apply engine oil to the cylinder walls, the pistons, and the surfaces of the connecting rod bearings.
Position the piston rings so that the ring ends are as shown in the illustration.
- NOTICE:
-
Do not align the ring ends.
Using a piston ring compressor, push the correctly numbered piston and connecting rod sub-assembly into the cylinder with the piston matchmark of the piston facing forward.
- NOTICE:
-
·
Take care as the piston matchmark (protrusion) on the piston RH connecting rod is reversed for the piston LH.
·When inserting the piston sub-assembly with connecting rod, install it so that the connecting rod does not damage the wall of the cylinder and crank pin.
·Do not change piston and piston pin combinations.
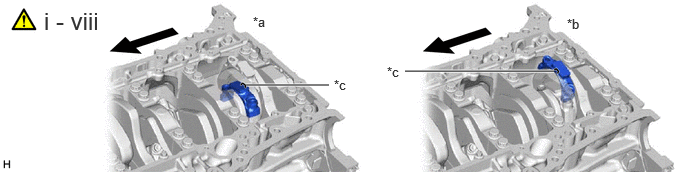
| *a | for Bank 1 (Piston RH) | *b | for Bank 2 (Piston LH) |
| *c | Piston Matchmark (Protrusion) | - | - |
|
|
Engine Front | - | - |
Check the combinations of connecting rods and connecting rod caps and piston matchmark (protrusion) on connecting rod caps, and install the connecting rod caps to the connecting rods.
- NOTICE:
-
·
Take care as the piston matchmark (protrusion) on the piston RH connecting rod is reversed for the piston LH.
·The matchmarks on the connecting rod sub-assembly and connecting rod cap are guides for correct reassembly.
Apply a light coat of engine oil to the threads and under the heads of the connecting rod bolts.
Using a socket wrench (12 mm, 12-point), temporarily install the connecting rod bolts in 2 or 3 steps, and tighten them to the specified torque.
- Torque:
- 40 N*m (408 kgf*cm, 30 ft.*lbf)
- NOTICE:
-
Tighten the bolts while checking that the crankshaft rotates smoothly.
Place paint marks on the front side of the heads of the connecting rod bolts.
Tighten the connecting rod bolts 90°.
Check that the paint marks are now at a 90° angle to the front.
Check that the crankshaft turns smoothly.
Check that the piston matchmark (protrusion) on the piston RH connecting rod is the rear side and piston matchmark (protrusion) on the piston LH connecting rod is the front side.
12.INSPECT CONNECTING ROD THRUST CLEARANCE