WIPER / WASHER WIPER AND WASHER SYSTEM Rear Wiper Motor Circuit
DESCRIPTION
This circuit is the power source circuit for the rear wiper motor assembly.
WIRING DIAGRAM
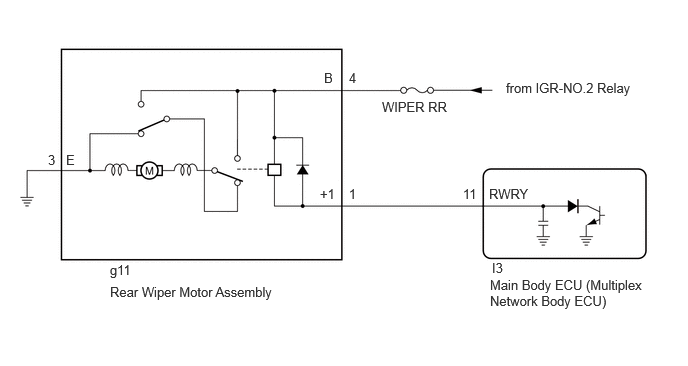
CAUTION / NOTICE / HINT
- NOTICE:
-
·
Inspect the fuse of circuits related to this system before performing the following procedure.
·If the main body ECU (multiplex network body ECU) is replaced, refer to Service Bulletin.
PROCEDURE
Perform the Active Test according to the display on the GTS.
- Body Electrical > Main Body > Active Test
-
Tester Display Measurement Item Control Range Diagnostic Note Rear Wiper Operation Function to operate the rear wiper motor assembly OFF or ON -
- Body Electrical > Main Body > Active Test
-
Tester Display Rear Wiper Operation - 50004 449 77
- OK:
-
Rear wiper motor assembly operates normally.
- Result:
-
Proceed to OK NG
OK
NG
OK
NG
Disconnect the g11 rear wiper motor assembly connector.
Measure the resistance according to the value(s) in the table below.
- Standard Resistance:
-
Tester Connection Condition Specified Condition Click Location & Routing(g11)Location & Routingewd_type=routing;type=c;code=g11
Click Connector(g11)Body>No. 1 Rear Window Wire / No. 2 Back Door Wire>Rear Wiper Motor Assemblyewd_type=component;type=c;code=g11;pinno=3
g11-3 (E) - Body Ground Always Below 1 Ω
Measure the voltage according to the value(s) in the table below.
- Standard Voltage:
-
Tester Connection Condition Specified Condition Click Location & Routing(g11)Location & Routingewd_type=routing;type=c;code=g11
Click Connector(g11)Body>No. 1 Rear Window Wire / No. 2 Back Door Wire>Rear Wiper Motor Assemblyewd_type=component;type=c;code=g11;pinno=4
g11-4 (B) - Body ground Always 11 to 14 V
- Result:
-
Proceed to OK NG
OK
NG
Disconnect the g11 rear wiper motor assembly connector.
Disconnect the I3 main body ECU (multiplex network body ECU) connector.
Measure the resistance according to the value(s) in the table below.
- Standard Resistance:
-
Tester Connection Condition Specified Condition Click Location & Routing(g11,I3)Location & Routingewd_type=routing;type=c,c;code=g11,I3
Click Connector(g11)Body>No. 1 Rear Window Wire / No. 2 Back Door Wire>Rear Wiper Motor Assemblyewd_type=component;type=c;code=g11;pinno=1
g11-1 (+1) - I3-11 (RWRY) Always Below 1 Ω g11-1 (+1) or I3-11 (RWRY) - Body ground Always 10 kΩ or higher
- Result:
-
Proceed to OK NG
OK
for LHD:
Click herePower Source / Network>POWER DISTRIBUTION>MAIN BODY ECU (for LHD)>REMOVAL
for RHD:
Click herePower Source / Network>POWER DISTRIBUTION>MAIN BODY ECU (for RHD)>REMOVAL
NG