POWER DISTRIBUTION MAIN BODY ECU(for LHD) REMOVAL
CAUTION / NOTICE / HINT
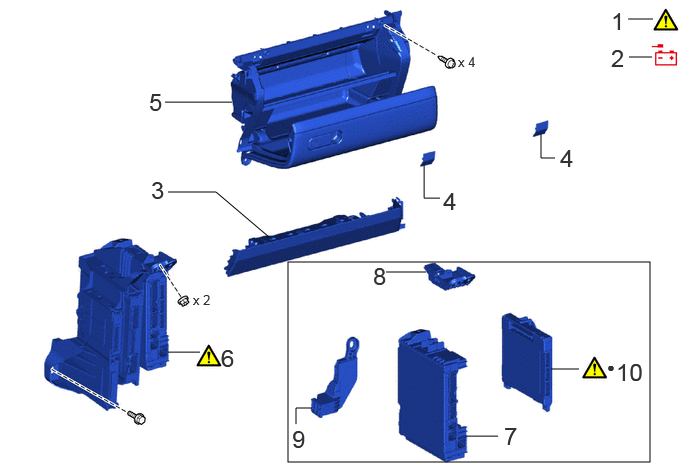
| Procedure | Part Name Code |

|

|

|
|
|---|---|---|---|---|---|
| 1 | PRECAUTION | - | ( ) |
- | - |
| 2 | DISCHARGE DOOR CONTROL BATTERY AND DISCONNECT CABLE FROM NEGATIVE BATTERY TERMINAL | - | () |
- | - |
| 3 | LOWER NO. 2 INSTRUMENT PANEL AIRBAG ASSEMBLY | 73990 | - | - | - |
| 4 | INSTRUMENT PANEL BOX DOOR COVER | 55443A | () |
- | - |
| 5 | LOWER NO. 2 INSTRUMENT PANEL ASSEMBLY | 55320 | - | - | - |
| 6 | ECU INTEGRATION BOX RH | 82877 | () |
- | - |
| 7 | POWER DISTRIBUTION BOX ASSEMBLY | 82730G | - | - | - |
| 8 | JUNCTION BLOCK BRACKET | 82673A | - | - | - |
| 9 | JUNCTION BLOCK BRACKET | 82673B | - | - | - |
| 10 | MAIN BODY ECU (MULTIPLEX NETWORK BODY ECU) | 89221 | () |
- | - |
| *A | w/ Door Control Battery | - | - |
| ● | Non-reusable part | - | - |
CAUTION / NOTICE / HINT
The necessary procedures (adjustment, calibration, initialization, or registration) that must be performed after parts are removed, installed, or replaced during the main body ECU (multiplex network body ECU) removal/installation are shown below.
| Replaced Part or Performed Procedures | Necessary procedures | Effect/Inoperative Function when Necessary Procedures are not Performed | Link |
|---|---|---|---|
| Disconnect cable from negative (-) battery terminal | Memorize steering angle neutral point | Parking assist monitor system | () |
| Multi-terrain monitor system | () |
||
| Panoramic view monitor system | () |
||
| Main body ECU (multiplex network body ECU) | ECU configuration | - | () |
| Perform code registration |
·
Wireless door lock control system
·
Entry and start system
·
Engine start |
See Service Bulletin for the registration method. |
- HINT:
-
·
When the cable is disconnected/reconnected to the battery terminal, systems temporarily stop operating. However, each system has a function that completes learning the first time the system is used.
-Learning completes when vehicle is driven
Effect/Inoperative Function When Necessary Procedures are not Performed Necessary Procedures Link Stop and start system Drive the vehicle until stop and start control is permitted (approximately 5 to 60 minutes) ( )Lighting system (EXT) Cornering lights Drive the vehicle straight ahead at 35 km/h (22 mph) or more for 5 seconds or more. ( )Pre-collision system Lane tracing assist system Lane departure alert system Adaptive high beam system
-Learning completes when vehicle is operated normally
Effect/Inoperative Function When Necessary Procedures are not Performed Necessary Procedures Link Power back door system Fully close the back door by hand.
- HINT:
-
Initialization is not necessary if the above procedures are performed while the back door is closed.
( )Air conditioning system After the ignition switch is turned to ON, the servo motor and expansion valve standard position is recognized. -
PROCEDURE

 1. PRECAUTION
|
|
|
2. DISCHARGE DOOR CONTROL BATTERY AND DISCONNECT CABLE FROM NEGATIVE BATTERY TERMINAL (w/ Door Control Battery)
|
|
|
Turn the ignition switch off.
- Body Electrical > Main Body > Active Test
-
Tester Display Control Range Collision Door Lock Release OFF/ON
- NOTICE:
-
Do not perform the Active Test at this time.
Disconnect the cable from the negative (-) battery terminal.
for 1GR-FE:
Click hereGeneral>MAINTENANCE>1GR-FE BATTERY>REMOVAL
for V35A-FTS:
Perform the "Shock Detection Unlock" Active Test repeatedly until the multiplex network body ECU (main body ECU) communication lost error message "Lost communication with vehicle" is displayed on the GTS.
- Body Electrical > Main Body > Active Test
-
Tester Display Collision Door Lock Release - 50004 449 13
- HINT:
-
·
When the cable is disconnected from the negative (-) battery terminal and the door control battery becomes completely discharged, the multiplex network body ECU (main body ECU) communication lost message "Lost communication with vehicle" is displayed on the GTS.
·The number of times the Active Test can be performed depends on the charge condition of the door control battery.
73990 3.REMOVE LOWER NO. 2 INSTRUMENT PANEL AIRBAG ASSEMBLY
55443A 4.REMOVE INSTRUMENT PANEL BOX DOOR COVER
|
|
Click here() |
55320 5.REMOVE LOWER NO. 2 INSTRUMENT PANEL ASSEMBLY
82877 6.REMOVE ECU INTEGRATION BOX RH
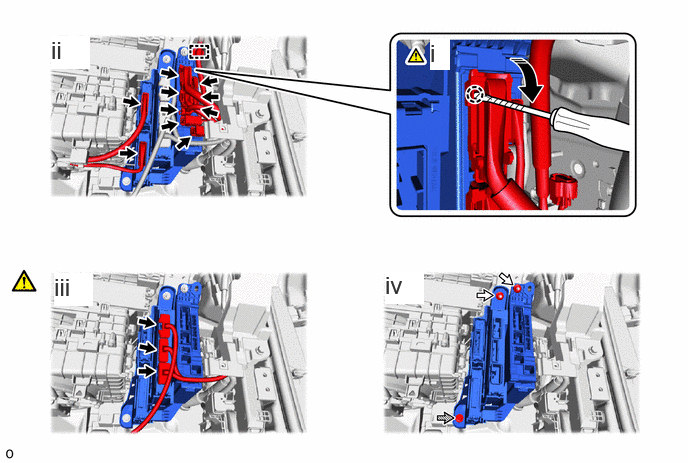

|
Remove in this Direction |

|
Connector |

|
Nut |

|
Bolt |
Using a thin-bladed screwdriver with its tip wrapped with protective tape, detach the claw and disconnect the lever connector.
Disconnect the 9 connectors and detach the clamp.
w/ Stop and Start System:
Disconnect the 3 connectors.
Remove the 2 nuts and bolt.
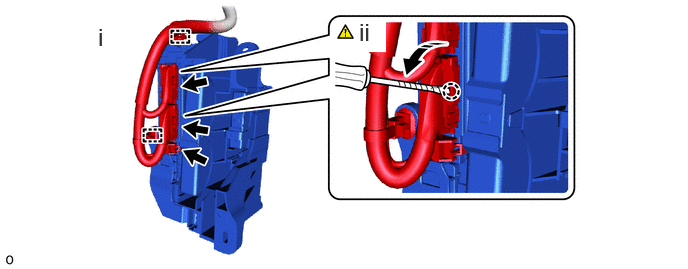
|
|
Remove in this Direction | - | - |
Detach the clamp and disconnect the connector.
Using a thin-bladed screwdriver with its tip wrapped with protective tape, detach the claw, disconnect the 2 lever connectors and remove the ECU integration box RH.
82730G 7.REMOVE POWER DISTRIBUTION BOX ASSEMBLY
|
|
Remove in this Direction | - | - |
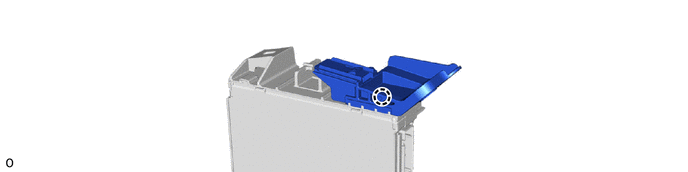
82673A 8.REMOVE JUNCTION BLOCK BRACKET
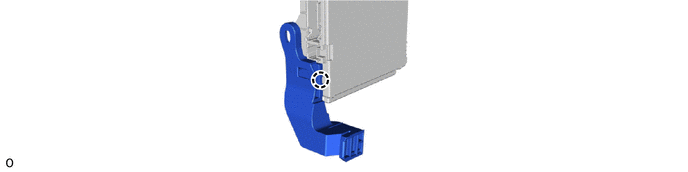
82673B 9.REMOVE JUNCTION BLOCK BRACKET
89221 10.REMOVE MAIN BODY ECU (MULTIPLEX NETWORK BODY ECU)
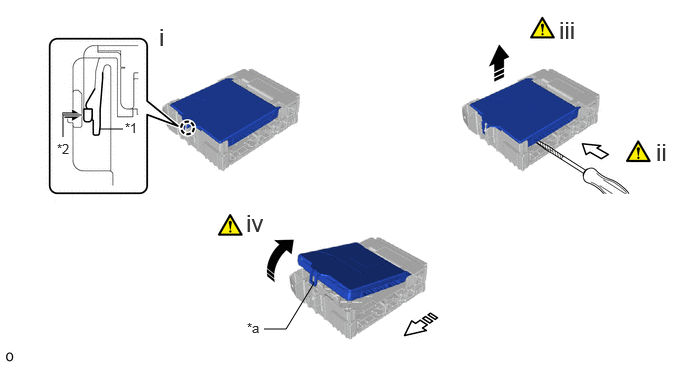
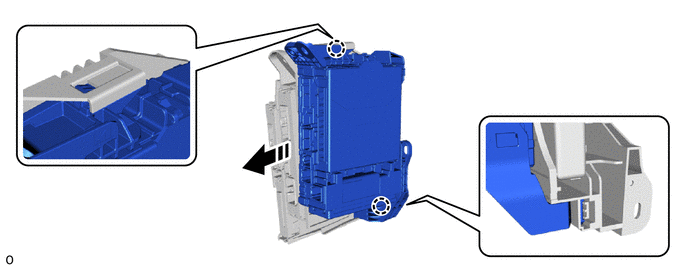
| *1 | Power Distribution Box Assembly | *2 | Main Body ECU (Multiplex Network Body ECU) |
| *a | Rib | - | - |
|
|
Remove in this Direction (1) |

|
Remove in this Direction (2) |
|
|
Push in this Direction |
|
Horizontally Insert a Thin-bladed Screwdriver |
Press the claw of the power distribution box assembly as shown in the illustration and release the lock of the main body ECU (multiplex network body ECU).
With the lock released, insert a screwdriver with its tip wrapped with protective tape horizontally in between the main body ECU (multiplex network body ECU) and the power distribution box assembly.
- NOTICE:
-
Use a screwdriver with a diameter between 5.0 mm (0.197 in.) and 6.3 mm (0.248 in.) and a length of approximately 90 mm (3.54 in.).
Using the screwdriver, carefully raise the main body ECU (multiplex network body ECU) to the position where the connector becomes disconnected.
- NOTICE:
-
·
Do not pry and lift with the screwdriver.
·Replace the power distribution box assembly or the main body ECU (multiplex network body ECU) when the connector terminal, locking section or case is damaged or deformed.
Lift up the rib of the main body ECU (multiplex network body ECU) and slide the main body ECU (multiplex network body ECU) to remove it as shown in the illustration.
- NOTICE:
-
Do not touch the ECU connector terminal with your fingers.