PARK ASSIST / MONITORING ULTRASONIC SENSOR(for Rear) INSTALLATION
CAUTION / NOTICE / HINT
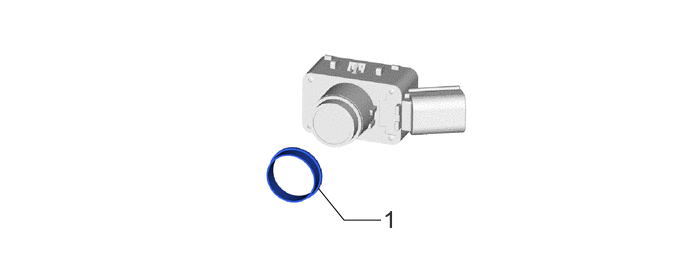
| Procedure | Part Name Code |

|

|

|
|
|---|---|---|---|---|---|
| 1 | ULTRASONIC SENSOR CUSHION SET | 89305 | - | - | - |
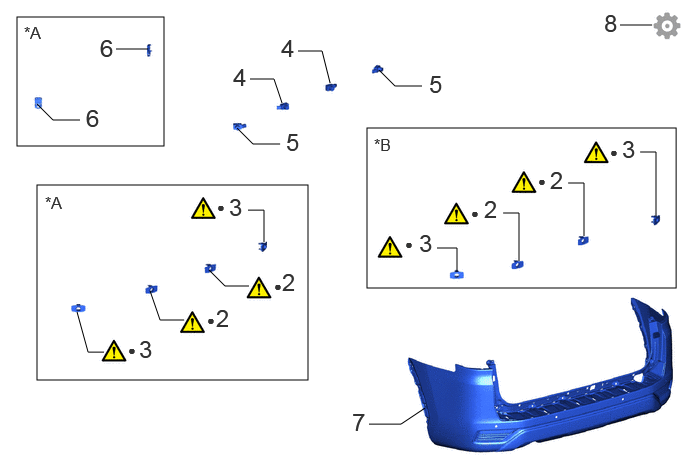
| Procedure | Part Name Code |
|
|
|
|
|---|---|---|---|---|---|
| 2 | REAR CENTER ULTRASONIC SENSOR RETAINER | 89C48B | ( ) |
- | - |
| 3 | REAR CORNER ULTRASONIC SENSOR RETAINER | 89C48A | () |
- | - |
| 4 | REAR CENTER ULTRASONIC SENSOR | 89342A | - | - | - |
| 5 | REAR CORNER ULTRASONIC SENSOR | 89342 | - | - | - |
| 6 | ULTRASONIC SENSOR CLIP | 89348D | - | - | - |
| 7 | REAR BUMPER ASSEMBLY | - | - | - | - |
| 8 | PERFORM CALIBRATION | - | - | - | () |
| *A | for Standard | *B | for Aero Type |
| ● | Non-reusable part | - | - |
PROCEDURE

 89305 1.INSTALL ULTRASONIC SENSOR CUSHION SET
89C48B 2.INSTALL REAR CENTER ULTRASONIC SENSOR RETAINER
|
|
|
- Standard Value:
-
Part Temperature Rear Bumper Assembly 20 to 30°C (68 to 86°F) Rear Center Ultrasonic Sensor Retainer 20 to 30°C (68 to 86°F)
- CAUTION:
-
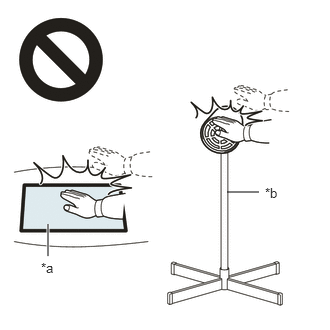 2.365,2 2.698,2 false 0.5,2.333 0.5,2.667 true 0.427,2.708 0.74,2.865 0.313,0.156 10 false *a 2.76,1.927 3.073,2.083 0.313,0.156 10 false *b
*a Heated Part *b Heat Light
-
·
Do not touch the heat light and heated parts.
·Touching the heat light may result in burns.
·Touching heated parts for a long time may result in burns.
- NOTICE:
-
Do not heat the rear center ultrasonic sensor retainer and rear bumper assembly excessively.
for Standard:
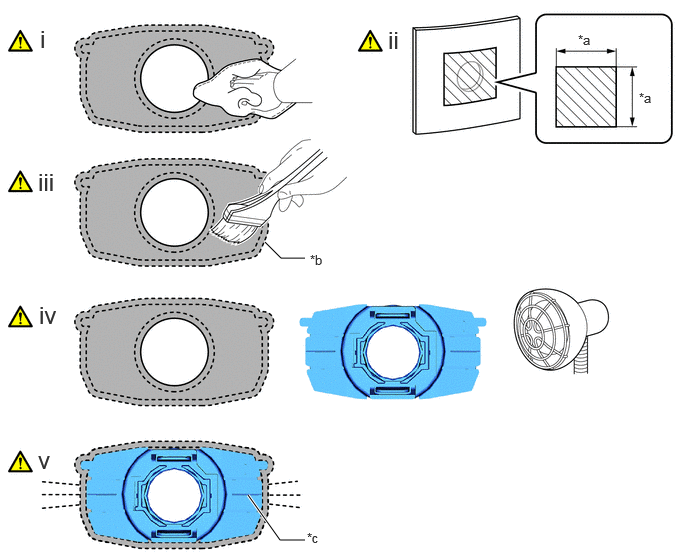
| *a | 30 mm (1.18 in.) | *b | Mark-off Line |
| *c | Rib | - | - |

|
Installation area | - | - |
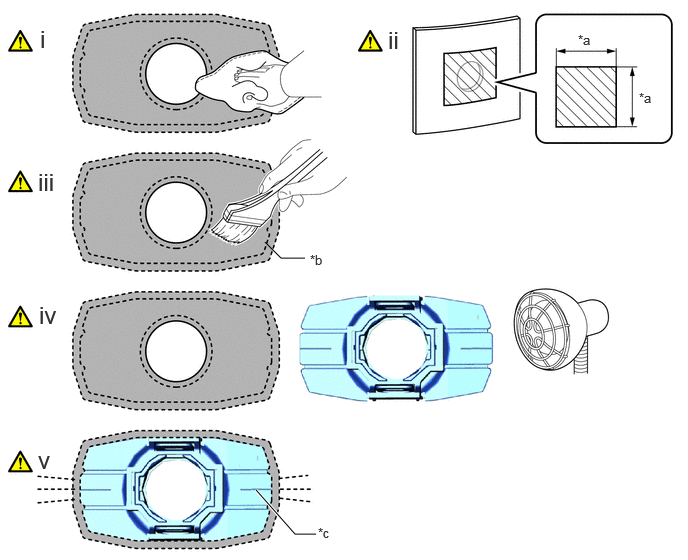
Clean the rear bumper assembly surface:
1. When reusing the rear bumper assembly, remove remaining double-sided tape from the rear bumper assembly.
2. Using a heat light, heat the rear bumper assembly surface.
3. Remove any remaining double-sided tape from the rear bumper assembly and wipe off any tape adhesive residue with cleaner.
4. Clean the installation area surface.
- NOTICE:
-
·
Installing the rear center ultrasonic sensor retainer with some double-sided tape remaining may cause poor adhesion. Perform this procedure until the tape is sufficiently removed.
·Make sure to use a cloth when removing. Using a screwdriver, etc., may cause damage and poor adhesion.
·Clean a new rear bumper assembly surface.
Cover the sensor installation hole from the outside of the bumper with a 30 mm (1.18 in.) square piece of tape.
Primer application:
1. Apply primer to the rear bumper assembly on the installation area of the rear center ultrasonic sensor retainer using a brush or felt.
- NOTICE:
-
·
Replace the brush or felt if it is dirty or has become hardened.
·Keep any painted surface free from primer.
·If the primer contacts a painted surface, it may leave light primer marks. Therefore, use protective tape when using liquid primer.
·Do not touch surfaces to which primer has been applied until the rear center ultrasonic sensor retainer has been attached.
2. Let the primer dry sufficiently.
- NOTICE:
-
Do not touch applied surfaces until the primer is dry.
- Recommended drying time:
-
10 minutes or more (at 23°C (73°F))
Using a heat light, heat the rear bumper assembly and a new rear center ultrasonic sensor retainer.
Install the rear center ultrasonic sensor retainer in the position shown in the illustration.
- NOTICE:
-
The application strength of the rear center ultrasonic sensor retainer will weaken if reapplied. If reapplication is necessary, be sure to replace it with a new one.
- HINT:
-
Apply pressure so that it does not lift up from the rear bumper assembly.
for Aero Type:
| *a | 30 mm (1.18 in.) | *b | Mark-off Line |
| *c | Rib | - | - |
|
|
Installation area | - | - |
Clean the rear bumper assembly surface:
1. When reusing the rear bumper assembly, remove remaining double-sided tape from the rear bumper assembly.
2. Using a heat light, heat the rear bumper assembly surface.
3. Remove any remaining double-sided tape from the rear bumper assembly and wipe off any tape adhesive residue with cleaner.
4. Clean the installation area surface.
- NOTICE:
-
·
Installing the rear center ultrasonic sensor retainer with some double-sided tape remaining may cause poor adhesion. Perform this procedure until the tape is sufficiently removed.
·Make sure to use a cloth when removing. Using a screwdriver, etc., may cause damage and poor adhesion.
·Clean a new rear bumper assembly surface.
Cover the sensor installation hole from the outside of the bumper with a 30 mm (1.18 in.) square piece of tape.
Primer application:
1. Apply primer to the rear bumper assembly on the installation area of the rear center ultrasonic sensor retainer using a brush or felt.
- NOTICE:
-
·
Replace the brush or felt if it is dirty or has become hardened.
·Keep any painted surface free from primer.
·If the primer contacts a painted surface, it may leave light primer marks. Therefore, use protective tape when using liquid primer.
·Do not touch surfaces to which primer has been applied until the rear center ultrasonic sensor retainer has been attached.
2. Let the primer dry sufficiently.
- NOTICE:
-
Do not touch applied surfaces until the primer is dry.
- Recommended drying time:
-
10 minutes or more (at 23°C (73°F))
Using a heat light, heat the rear bumper assembly and a new rear center ultrasonic sensor retainer.
Install the rear center ultrasonic sensor retainer in the position shown in the illustration.
- NOTICE:
-
The application strength of the rear center ultrasonic sensor retainer will weaken if reapplied. If reapplication is necessary, be sure to replace it with a new one.
- HINT:
-
Apply pressure so that it does not lift up from the rear bumper assembly.
The orientation for the RH side is the opposite of the LH side.
89C48A 3.INSTALL REAR CORNER ULTRASONIC SENSOR RETAINER
|
|
|
- Standard Value:
-
Part Temperature Rear Bumper Assembly 20 to 30°C (68 to 86°F) Rear Corner Ultrasonic Sensor Retainer 20 to 30°C (68 to 86°F)
- CAUTION:
-
2.365,2 2.698,2 false 0.5,2.333 0.5,2.667 true 0.427,2.708 0.74,2.865 0.313,0.156 10 false *a 2.76,1.927 3.073,2.083 0.313,0.156 10 false *b
*a Heated Part *b Heat Light
-
·
Do not touch the heat light and heated parts.
·Touching the heat light may result in burns.
·Touching heated parts for a long time may result in burns.
- NOTICE:
-
Do not heat the rear corner ultrasonic sensor retainer and rear bumper assembly excessively.
for Standard:
| *a | 30 mm (1.18 in.) | *b | Mark-off Line |
| *c | Rib | - | - |
|
|
Installation area | - | - |
Clean the rear bumper assembly surface:
1. When reusing the rear bumper assembly, remove remaining double-sided tape from the rear bumper assembly.
2. Using a heat light, heat the rear bumper assembly surface.
3. Remove any remaining double-sided tape from the rear bumper assembly and wipe off any tape adhesive residue with cleaner.
4. Clean the installation area surface.
- NOTICE:
-
·
Installing the rear corner ultrasonic sensor retainer with some double-sided tape remaining may cause poor adhesion. Perform this procedure until the tape is sufficiently removed.
·Make sure to use a cloth when removing. Using a screwdriver, etc., may cause damage and poor adhesion.
·Clean a new rear bumper assembly surface.
Cover the sensor installation hole from the outside of the bumper with a 30 mm (1.18 in.) square piece of tape.
Primer application:
1. Apply primer to the rear bumper assembly on the installation area of the rear corner ultrasonic sensor retainer using a brush or felt.
- NOTICE:
-
·
Replace the brush or felt if it is dirty or has become hardened.
·Keep any painted surface free from primer.
·If the primer contacts a painted surface, it may leave light primer marks. Therefore, use protective tape when using liquid primer.
·Do not touch surfaces to which primer has been applied until the rear corner ultrasonic sensor retainer has been attached.
2. Let the primer dry sufficiently.
- NOTICE:
-
Do not touch applied surfaces until the primer is dry.
- Recommended drying time:
-
10 minutes or more (at 23°C (73°F))
Using a heat light, heat the rear bumper assembly and a new rear corner ultrasonic sensor retainer.
Install the rear corner ultrasonic sensor retainer in the position shown in the illustration.
- NOTICE:
-
The application strength of the rear corner ultrasonic sensor retainer will weaken if reapplied. If reapplication is necessary, be sure to replace it with a new one.
- HINT:
-
Apply pressure so that it does not lift up from the rear bumper assembly.
for Aero Type:
| *a | 30 mm (1.18 in.) | *b | Mark-off Line |
| *c | Rib | - | - |
|
|
Installation area | - | - |
Clean the rear bumper assembly surface:
1. When reusing the rear bumper assembly, remove remaining double-sided tape from the rear bumper assembly.
2. Using a heat light, heat the rear bumper assembly surface.
3. Remove any remaining double-sided tape from the rear bumper assembly and wipe off any tape adhesive residue with cleaner.
4. Clean the installation area surface.
- NOTICE:
-
·
Installing the rear corner ultrasonic sensor retainer with some double-sided tape remaining may cause poor adhesion. Perform this procedure until the tape is sufficiently removed.
·Make sure to use a cloth when removing. Using a screwdriver, etc., may cause damage and poor adhesion.
·Clean a new rear bumper assembly surface.
Cover the sensor installation hole from the outside of the bumper with a 30 mm (1.18 in.) square piece of tape.
Primer application:
1. Apply primer to the rear bumper assembly on the installation area of the rear corner ultrasonic sensor retainer using a brush or felt.
- NOTICE:
-
·
Replace the brush or felt if it is dirty or has become hardened.
·Keep any painted surface free from primer.
·If the primer contacts a painted surface, it may leave light primer marks. Therefore, use protective tape when using liquid primer.
·Do not touch surfaces to which primer has been applied until the rear corner ultrasonic sensor retainer has been attached.
2. Let the primer dry sufficiently.
- NOTICE:
-
Do not touch applied surfaces until the primer is dry.
- Recommended drying time:
-
10 minutes or more (at 23°C (73°F))
Using a heat light, heat the rear bumper assembly and a new rear corner ultrasonic sensor retainer.
Install the rear corner ultrasonic sensor retainer in the position shown in the illustration.
- NOTICE:
-
The application strength of the rear corner ultrasonic sensor retainer will weaken if reapplied. If reapplication is necessary, be sure to replace it with a new one.
- HINT:
-
Apply pressure so that it does not lift up from the rear bumper assembly.
The orientation for the RH side is the opposite of the LH side.
89342A 4.INSTALL REAR CENTER ULTRASONIC SENSOR
89342 5.INSTALL REAR CORNER ULTRASONIC SENSOR
89348D 6.INSTALL ULTRASONIC SENSOR CLIP (for Standard)
7.INSTALL REAR BUMPER ASSEMBLY
for Standard:
Click hereVehicle Exterior>EXTERIOR PANELS / TRIM>REAR BUMPER (for Standard)>INSTALLATION
for Aero Type:
Click hereVehicle Exterior>EXTERIOR PANELS / TRIM>REAR BUMPER (for Aero Type)>INSTALLATION
8.PERFORM CALIBRATION