Home › Vehicle Interior › SUPPLEMENTAL RESTRAINT SYSTEMS › CURTAIN SHIELD AIRBAG ASSEMBLY
RM38G0E _58 Vehicle Interior _100751 SUPPLEMENTAL RESTRAINT SYSTEMS _0467882 CURTAIN SHIELD AIRBAG ASSEMBLY A

SUPPLEMENTAL RESTRAINT SYSTEMS  CURTAIN SHIELD AIRBAG ASSEMBLY  INSTALLATION  


CAUTION / NOTICE / HINT
COMPONENTS (INSTALLATION)
B608770N02
2.25,0.229 3,0.396 0.75,0.167 1.583,1.917 5.333,3.583 3.75,1.667 2.219,0.198 3.031,0.427 0.813,0.229 2.25,2.063 3.063,2.292 0.813,0.229 2.281,2.094 3.031,2.26 0.75,0.167 1.583,0.083 5.333,1.75 3.75,1.667 3,0.313 3.25,0.313 false 3.479,1.125 3.479,0.844 true 3.521,2.958 3.521,2.677 true 3.031,2.177 3.281,2.177 false 3.417,1.083 3.698,1.438 0.281,0.354 18 false 1 3.458,2.927 3.74,3.281 0.281,0.354 18 false 2 2.313,0.24 3.906,0.396 1.594,0.156 8 false 10.8 (110, 8) 3.167,0.385 3.802,0.583 0.635,0.198 10 false x 14 3.24,2.24 3.854,2.438 0.615,0.198 10 false x 9 2.104,0.208 2.26,0.406 0.156,0.198 10 false ● 2.135,2.083 2.292,2.281 0.156,0.198 10 false ● 2.333,2.104 3.927,2.26 1.594,0.156 8 false 10.8 (110, 8) 1.646,0.115 2.021,0.354 0.375,0.24 12 false *A 1.646,1.958 2.021,2.198 0.375,0.24 12 false *B

Procedure Part Name Code
Z101186

Z101188

Z101187

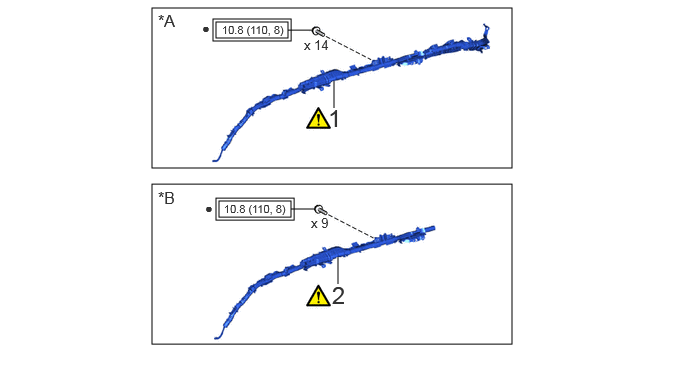
1 CURTAIN SHIELD AIRBAG ASSEMBLY LH 62180A (Click here) - -
2 CURTAIN SHIELD AIRBAG ASSEMBLY LH 62180A (Click here) - -

*A for 7-Passenger *B for 5-Passenger
V111893

Tightening torque for "Major areas involving basic vehicle performance such as moving/turning/stopping": N*m (kgf*cm, ft.*lbf) ● Non-reusable part

B608769N01
4.198,2.24 4.198,2.573 true 6.625,0.188 6.875,0.188 true 6.552,0.583 6.802,0.583 true 4.135,2.531 4.417,2.885 0.281,0.354 18 false 3 6.406,0.427 6.688,0.781 0.281,0.354 18 false 4 6.469,0.031 6.927,0.469 0.458,0.438 18 false 5

Procedure Part Name Code
Z101186

Z101188

Z101187

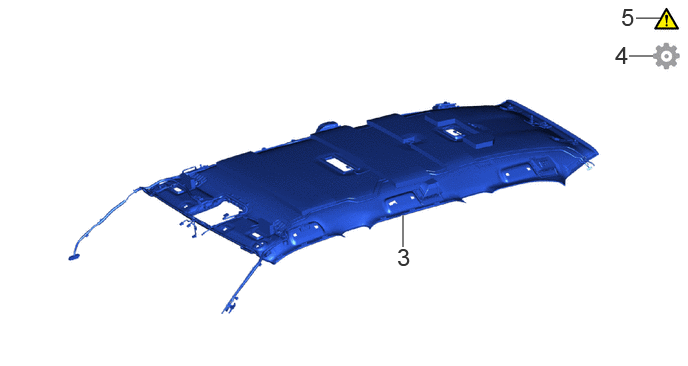
3 ROOF HEADLINING ASSEMBLY - - - -
4 PERFORM DIAGNOSTIC SYSTEM CHECK - - - (Click here)
5 CHECK SRS WARNING LIGHT - (Click here) - -

CAUTION / NOTICE / HINT

HINT:
·

Use the same procedure for the LHD and RHD vehicles.

·

The procedure listed below is for the LHD vehicles.

·

Use the same procedure for the RH and LH sides.

·

The procedure listed below is for the LH side.


PROCEDURE

Hide 62180A 1.INSTALL CURTAIN SHIELD AIRBAG ASSEMBLY LH (for 7-Passenger)

Z101186

CAUTION:
·

Do not install the curtain shield airbag assembly LH partially twisted 360° from the normal condition.

·
B608780N01
1.646,1.646 1.646,1.198 true 0.646,3.167 0.646,2.823 true 2.792,3.156 2.792,2.823 true 1.563,1.635 1.875,1.833 0.313,0.198 10 false *a 0.563,3.156 0.875,3.354 0.313,0.198 10 false *a 2.708,3.156 3.021,3.354 0.313,0.198 10 false *a

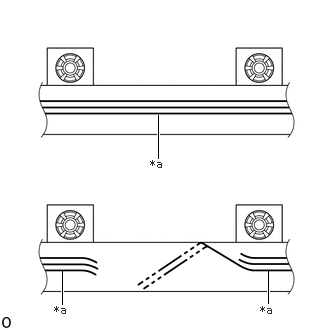
Do not twist the red line (*a) to prevent incorrect installation upward from below or downward from above. In addition, visually check that the red line (*a) is not twisted after installation is complete.


a.
B608600C01
0.583,0.667 1.167,0.667 true 4.208,0.094 4.531,0.417 0.323,0.323 18 false ii 0.438,0.563 0.708,0.771 0.271,0.208 10 false *a 0.625,0.094 0.948,0.417 0.323,0.323 18 false i
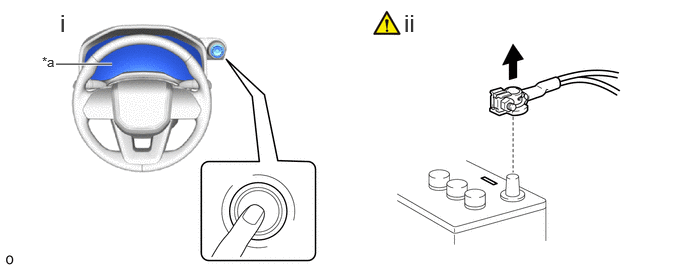
*a Turns off - -


i.

Check that the ignition switch is off.


ii.

Check that the cable is disconnected from the negative (-) battery terminal.

CAUTION:
·

Wait at least 60 seconds after disconnecting the cable from the negative (-) battery terminal to disable the SRS system.

·

If the airbag deploys for any reason, it may cause a serious accident.


b.
B608777N01
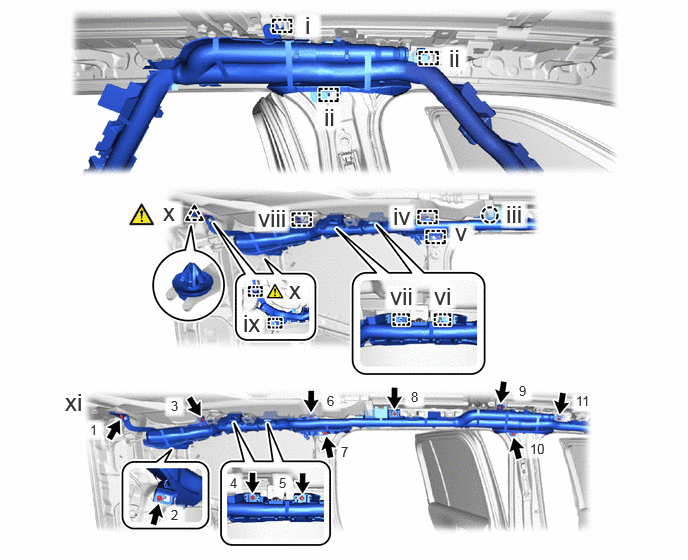
3.177,0.115 3.458,0.469 0.281,0.354 18 false i 4.677,0.458 4.958,0.813 0.281,0.354 18 false ii 3.375,1.073 3.656,1.427 0.281,0.354 18 false ii 5.271,2.083 5.552,2.438 0.281,0.354 18 false iii 4.094,2.104 4.375,2.458 0.281,0.354 18 false iv 4.74,2.271 5.021,2.625 0.281,0.354 18 false v 4.063,2.938 4.344,3.292 0.281,0.354 18 false vii 2.688,2.125 3.042,2.479 0.354,0.354 18 false viii 2.531,3.219 2.813,3.573 0.281,0.354 18 false ix 3.01,2.875 3.198,3.156 0.188,0.281 18 false x 1.698,2.063 1.896,2.365 0.198,0.302 18 false x 0.677,4.042 0.948,4.323 0.271,0.281 18 false xi 0.938,4.396 1.094,4.594 0.156,0.198 10 false 1 1.781,5.281 1.938,5.479 0.156,0.198 10 false 2 1.781,4.146 1.938,4.344 0.156,0.198 10 false 3 2.396,4.948 2.552,5.146 0.156,0.198 10 false 4 2.906,4.948 3.063,5.146 0.156,0.198 10 false 5 3.406,4.094 3.563,4.292 0.156,0.198 10 false 6 3.552,4.625 3.708,4.823 0.156,0.198 10 false 7 4.281,4.052 4.438,4.25 0.156,0.198 10 false 8 5.406,3.99 5.563,4.188 0.156,0.198 10 false 9 5.521,4.594 5.75,4.792 0.229,0.198 10 false 10 6,4.094 6.219,4.292 0.219,0.198 10 false 11 4.521,2.938 4.802,3.292 0.281,0.354 18 false vi

i.

Engage the hook.


ii.

Engage the hook.


iii.

Engage the claw.


iv.

Engage the hook.


v.

Engage the hook.


vi.

Engage the hook.


vii.

Engage the hook.


viii.

Engage the hook.


ix.

Engage the hook.


x.

Engage the hook and clip.

NOTICE:

Do not twist the strap.


HINT:

When the clip cannot be engaged due to deformation or damage, remove the clip from the curtain shield airbag assembly LH.


xi.

Temporarily install 11 new bolts in the order shown in the illustration.


c.
B608778C01
3.104,1.281 2.844,1.281 true 1.74,1.542 1.74,1.323 true 1.229,0.229 1.51,0.583 0.281,0.354 18 false i 2.281,0.5 2.563,0.854 0.281,0.354 18 false ii 2.531,0.76 3.083,1.104 0.552,0.344 18 false iii, vi 1.771,0.073 2.052,0.427 0.281,0.354 18 false v 2.75,1.469 3.031,1.823 0.281,0.354 18 false iv 3.917,0.25 4.198,0.604 0.281,0.354 18 false vii 6.198,0.563 6.542,0.948 0.344,0.385 18 false viii 6.104,1.354 6.385,1.708 0.281,0.354 18 false ix 1.979,1.938 2.26,2.292 0.281,0.354 18 false x 4.469,2.885 4.625,3.083 0.156,0.198 10 false 2 3.51,2.177 3.667,2.375 0.156,0.198 10 false 1 1.667,1.531 1.823,1.698 0.156,0.167 10 true *b 3.104,1.188 3.271,1.354 0.167,0.167 10 true *a
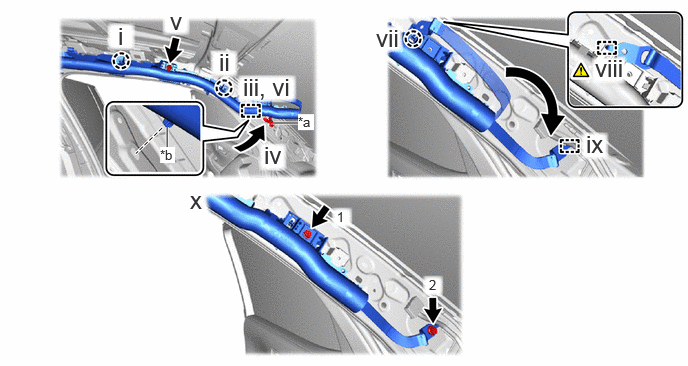
*a Assist Grip Bracket *b Rib of the Case


i.

Engage the claw.


ii.

Engage the claw.


iii.

Insert the rib of the case into body hole.


iv.

Put the curtain shield airbag assembly LH edge on the assist grip bracket.


v.

Temporarily install a new bolt.


vi.

Remove the rib of the case from the body hole and lower the front end of the curtain shield airbag assembly LH.


vii.

Engage the claw.


viii.

When replacing the curtain shield airbag assembly LH with a new part, perform the following procedure.

1. Engage the hook and remove the strap bracket.


ix.

Engage the hook.

NOTICE:

Do not twist the strap.


x.

Temporarily install 2 new bolts in the order shown in the illustration.


d.
B612463N01
0.156,0.448 0.313,0.646 0.156,0.198 10 false 1 0.979,1.313 1.135,1.51 0.156,0.198 10 false 2 0.938,0.219 1.094,0.417 0.156,0.198 10 false 3 1.677,1 1.833,1.198 0.156,0.198 10 false 4 2.188,1.01 2.344,1.208 0.156,0.198 10 false 5 2.521,0.188 2.677,0.385 0.156,0.198 10 false 6 2.646,0.656 2.802,0.854 0.156,0.198 10 false 7 3.354,0.156 3.51,0.354 0.156,0.198 10 false 8 4.417,0.094 4.573,0.292 0.156,0.198 10 false 9 4.531,0.656 4.917,0.938 0.385,0.281 10 false 10 4.969,0.208 5.208,0.427 0.24,0.219 10 false 11 5.688,0.271 5.99,0.5 0.302,0.229 10 false 12 6.521,0.708 6.76,0.948 0.24,0.24 10 false 13 6.865,1.063 7.073,1.271 0.208,0.208 10 false 14 0.448,0.01 0.719,0.365 0.271,0.354 18 false i

i.

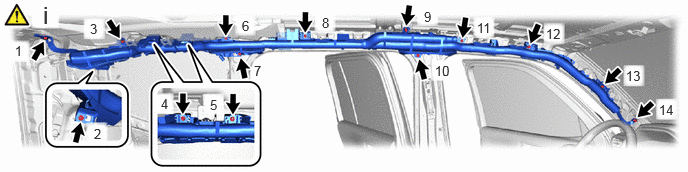
Tighten the 14 bolts in the order shown in the illustration to install the curtain shield airbag assembly LH.

Torque:
10.8 N*m (110 kgf*cm, 8 ft.*lbf)

NOTICE:
·

Perform this procedure within 2 hours after temporarily installing the curtain shield airbag assembly LH to the vehicle.

·

After tightening the bolts, check that the hook has not become detached.
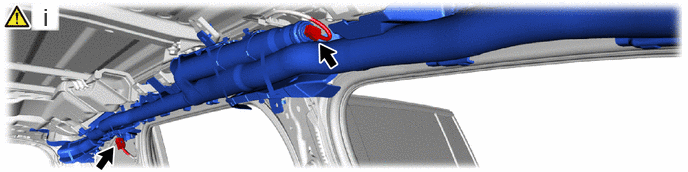


e.
B612464N01
0.448,0.031 0.729,0.385 0.281,0.354 18 false i

i.

Connect the 2 airbag connectors.

NOTICE:

When connecting any airbag connector, take care not to damage the airbag wire harness.


HINT:

Refer to How to Connect or Disconnect Airbag Connector: Click hereVehicle Interior>SUPPLEMENTAL RESTRAINT SYSTEMS>AIRBAG SYSTEM>HOW TO CONNECT OR DISCONNECT AIRBAG CONNECTOR


Hide 62180A 2.INSTALL CURTAIN SHIELD AIRBAG ASSEMBLY LH (for 5-Passenger)

Z101186

CAUTION:
·

Do not install the curtain shield airbag assembly LH partially twisted 360° from the normal condition.

·
B608780N02
1.646,1.646 1.646,1.198 true 0.646,3.167 0.646,2.823 true 2.792,3.156 2.792,2.823 true 1.563,1.635 1.875,1.833 0.313,0.198 10 false *a 0.563,3.156 0.875,3.354 0.313,0.198 10 false *a 2.708,3.156 3.021,3.354 0.313,0.198 10 false *a

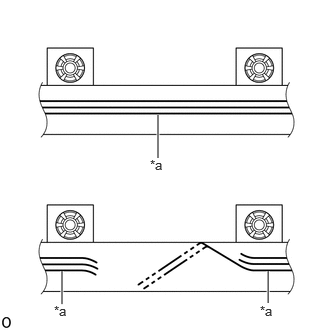
Do not twist the red line (*a) to prevent incorrect installation upward from below or downward from above. In addition, visually check that the red line (*a) is not twisted after installation is complete.


a.
B608600C01
0.583,0.667 1.167,0.667 true 4.208,0.094 4.531,0.417 0.323,0.323 18 false ii 0.438,0.563 0.708,0.771 0.271,0.208 10 false *a 0.625,0.094 0.948,0.417 0.323,0.323 18 false i
*a Turns off - -


i.

Check that the ignition switch is off.


ii.

Check that the cable is disconnected from the negative (-) battery terminal.

CAUTION:
·

Wait at least 60 seconds after disconnecting the cable from the negative (-) battery terminal to disable the SRS system.

·

If the airbag deploys for any reason, it may cause a serious accident.
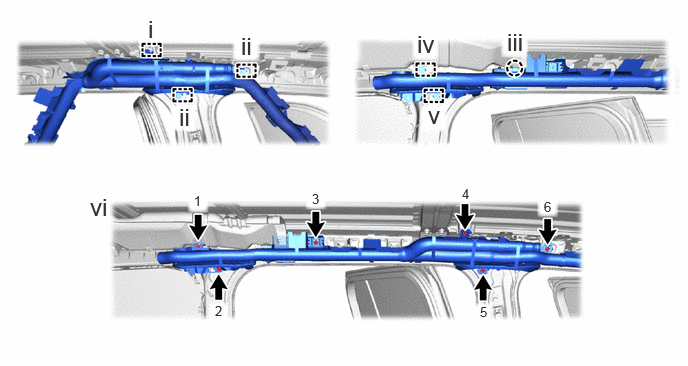


b.
B608779N01
1.542,0.156 1.823,0.51 0.281,0.354 18 false i 1.865,1.073 2.146,1.427 0.281,0.354 18 false ii 2.51,0.333 2.792,0.688 0.281,0.354 18 false ii 5.281,0.292 5.563,0.646 0.281,0.354 18 false iii 4.344,0.313 4.625,0.667 0.281,0.354 18 false iv 0.938,2.01 1.219,2.365 0.281,0.354 18 false vi 4.458,1.052 4.74,1.406 0.281,0.354 18 false v 2.021,2.01 2.177,2.208 0.156,0.198 10 false 1 2.24,3.156 2.396,3.354 0.156,0.198 10 false 2 3.25,1.99 3.406,2.188 0.156,0.198 10 false 3 4.813,1.938 4.969,2.135 0.156,0.198 10 false 4 5,3.167 5.156,3.365 0.156,0.198 10 false 5 5.667,2.073 5.823,2.271 0.156,0.198 10 false 6

i.

Engage the hook.


ii.

Engage the hook.


iii.

Engage the claw.


iv.

Engage the hook.


v.

Engage the hook.


vi.

Temporarily install 6 new bolts in the order shown in the illustration.
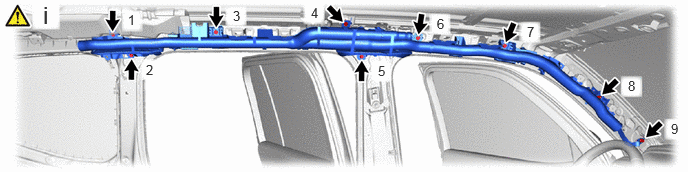


c.
B608778C01
3.104,1.281 2.844,1.281 true 1.74,1.542 1.74,1.323 true 1.229,0.229 1.51,0.583 0.281,0.354 18 false i 2.281,0.5 2.563,0.854 0.281,0.354 18 false ii 2.531,0.76 3.083,1.104 0.552,0.344 18 false iii, vi 1.771,0.073 2.052,0.427 0.281,0.354 18 false v 2.75,1.469 3.031,1.823 0.281,0.354 18 false iv 3.917,0.25 4.198,0.604 0.281,0.354 18 false vii 6.198,0.563 6.542,0.948 0.344,0.385 18 false viii 6.104,1.354 6.385,1.708 0.281,0.354 18 false ix 1.979,1.938 2.26,2.292 0.281,0.354 18 false x 4.469,2.885 4.625,3.083 0.156,0.198 10 false 2 3.51,2.177 3.667,2.375 0.156,0.198 10 false 1 1.667,1.531 1.823,1.698 0.156,0.167 10 true *b 3.104,1.188 3.271,1.354 0.167,0.167 10 true *a
*a Assist Grip Bracket *b Rib of the Case


i.

Engage the claw.


ii.

Engage the claw.


iii.

Insert the rib of the case into body hole.


iv.

Put the curtain shield airbag assembly LH edge on the assist grip bracket.


v.

Temporarily install a new bolt.


vi.

Remove the rib of the case from the body hole and lower the front end of the curtain shield airbag assembly LH.


vii.

Engage the claw.


viii.

When replacing the curtain shield airbag assembly LH with a new part, perform the following procedure.

1. Engage the hook and remove the strap bracket.


ix.

Engage the hook.

NOTICE:

Do not twist the strap.


x.

Temporarily install 2 new bolts in the order shown in the illustration.


d.
B612465N01
0.448,0.01 0.729,0.365 0.281,0.354 18 false i 1.333,0.125 1.49,0.323 0.156,0.198 10 false 1 1.521,0.646 1.677,0.844 0.156,0.198 10 false 2 2.427,0.083 2.583,0.281 0.156,0.198 10 false 3 3.24,0.052 3.396,0.25 0.156,0.198 10 false 4 3.938,0.656 4.094,0.854 0.156,0.198 10 false 5 4.552,0.167 4.708,0.365 0.156,0.198 10 false 6 5.49,0.25 5.646,0.448 0.156,0.198 10 false 7 6.542,0.813 6.698,1.01 0.156,0.198 10 false 8 6.99,1.26 7.115,1.458 0.125,0.198 10 false 9

i.

Tighten the 9 bolts in the order shown in the illustration to install the curtain shield airbag assembly LH.

Torque:
10.8 N*m (110 kgf*cm, 8 ft.*lbf)

NOTICE:
·

Perform this procedure within 2 hours after temporarily installing the curtain shield airbag assembly LH to the vehicle.

·

After tightening the bolts, check that the hook has not become detached.



e.
B612466N01
2.115,0.042 2.396,0.396 0.281,0.354 18 false i

i.

Connect the airbag connector.

NOTICE:

When connecting any airbag connector, take care not to damage the airbag wire harness.


HINT:

Refer to How to Connect or Disconnect Airbag Connector: Click hereVehicle Interior>SUPPLEMENTAL RESTRAINT SYSTEMS>AIRBAG SYSTEM>HOW TO CONNECT OR DISCONNECT AIRBAG CONNECTOR


Hide 3.INSTALL ROOF HEADLINING ASSEMBLY

Hide 4. PERFORM DIAGNOSTIC SYSTEM CHECK