INTERIOR PANELS / TRIM FRONT CONSOLE BOX(w/o Cool Box) INSTALLATION
CAUTION / NOTICE / HINT
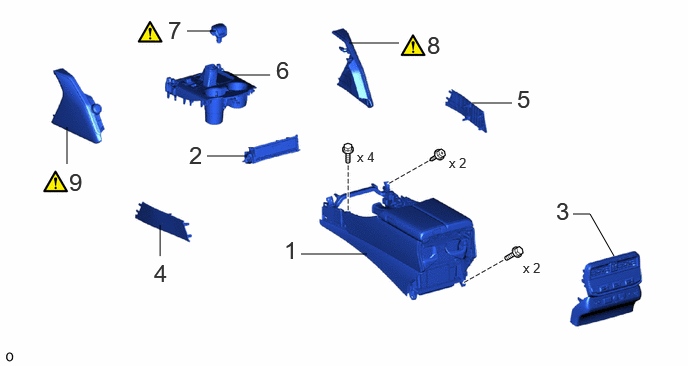
| Procedure | Part Name Code |

|

|

|
|
|---|---|---|---|---|---|
| 1 | REAR CONSOLE BOX SUB-ASSEMBLY | 58901A | - | - | - |
| 2 | CENTER INSTRUMENT CLUSTER FINISH PANEL SUB-ASSEMBLY | 55405B | - | - | - |
| 3 | CONSOLE REAR END PANEL SUB-ASSEMBLY | 58903A | - | - | - |
| 4 | INNER NO. 1 INSTRUMENT PANEL BRACKET COVER LH | 55395C | - | - | - |
| 5 | INNER NO. 1 INSTRUMENT PANEL BRACKET COVER RH | 55394D | - | - | - |
| 6 | UPPER CONSOLE PANEL ASSEMBLY | - | - | - | - |
| 7 | SHIFT LEVER KNOB SUB-ASSEMBLY | 33504F | ( ) |
- | - |
| 8 | LOWER NO. 2 INSTRUMENT PANEL PAD SUB-ASSEMBLY | 55403H | () |
- | - |
| 9 | INTEGRATION CONTROL AND PANEL SUB-ASSEMBLY | 84012 | () |
- | - |
CAUTION / NOTICE / HINT
- HINT:
-
·
Use the same procedure for RHD and LHD vehicles.
·The procedure listed below is for LHD vehicles.
·A bolt without a torque specification is shown in the standard bolt chart.
Click hereGeneral>SPECIFICATIONS>STANDARD BOLT>SPECIFIED TORQUE FOR STANDARD BOLTS
PROCEDURE

 58901A 1.INSTALL REAR CONSOLE BOX SUB-ASSEMBLY
55405B 2.INSTALL CENTER INSTRUMENT CLUSTER FINISH PANEL SUB-ASSEMBLY
58903A 3.INSTALL CONSOLE REAR END PANEL SUB-ASSEMBLY
55395C 4.INSTALL INNER NO. 1 INSTRUMENT PANEL BRACKET COVER LH
55394D 5.INSTALL INNER NO. 1 INSTRUMENT PANEL BRACKET COVER RH
6.INSTALL UPPER CONSOLE PANEL ASSEMBLY
33504F 7.INSTALL SHIFT LEVER KNOB SUB-ASSEMBLY
|
|
·
for AC60F: Click here(
·
for AJA0F: Click here( |
55403H 8.INSTALL LOWER NO. 2 INSTRUMENT PANEL PAD SUB-ASSEMBLY
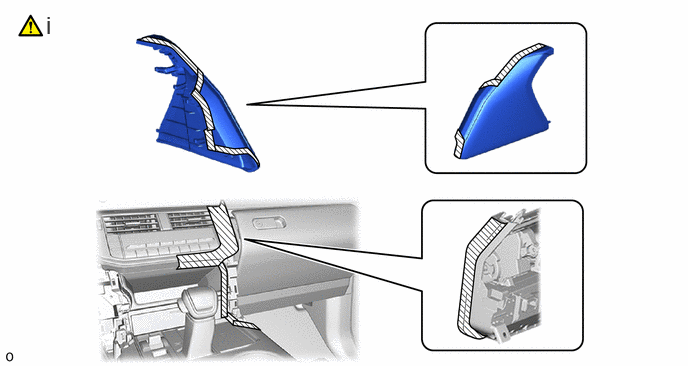
Apply the protective tape as shown in the illustration.
- NOTICE:
-
Use thick protective tape.
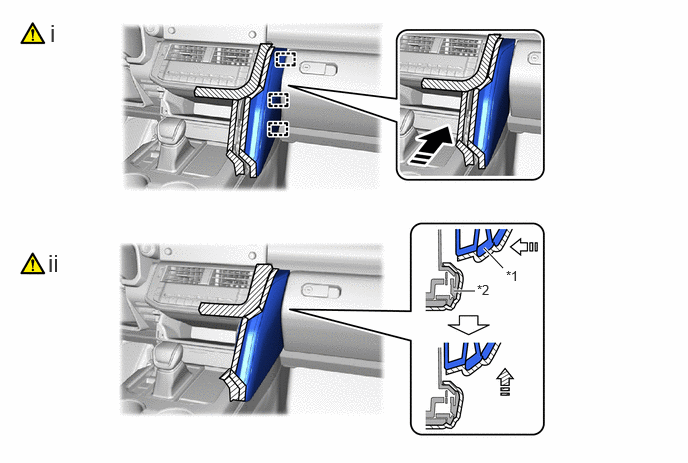
| *1 | Lower No. 2 Instrument Panel Pad Sub-assembly | *2 | Air Conditioning Panel Assembly |

|
Install in this Direction (1) |

|
Install in this Direction (2) |

|
Install in this Direction (3) | - | - |
Attach the guide as shown in the illustration.
- NOTICE:
-
Do not damage the lower No. 2 instrument panel pad sub-assembly or vehicle interior.
Pull the lower No. 2 instrument panel pad sub-assembly to outward while avoiding contact with the air conditioning panel assembly as shown in the illustration.
- NOTICE:
-
Do not damage the lower No. 2 instrument panel pad sub-assembly or air conditioning panel assembly.
|
|
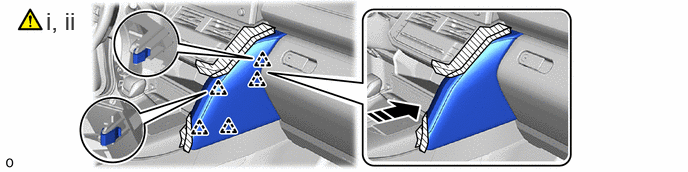
Install in this Direction | - | - |
Set the clip position of the lower No. 2 instrument panel pad sub-assembly to the attached hole position of the instrument panel safety pad assembly.
Attach the clip to install the lower No. 2 instrument panel pad sub-assembly as shown in the illustration.
- NOTICE:
-
Make sure that the lower No. 2 instrument panel pad sub-assembly is securely installed.
84012 9.INSTALL INTEGRATION CONTROL AND PANEL SUB-ASSEMBLY
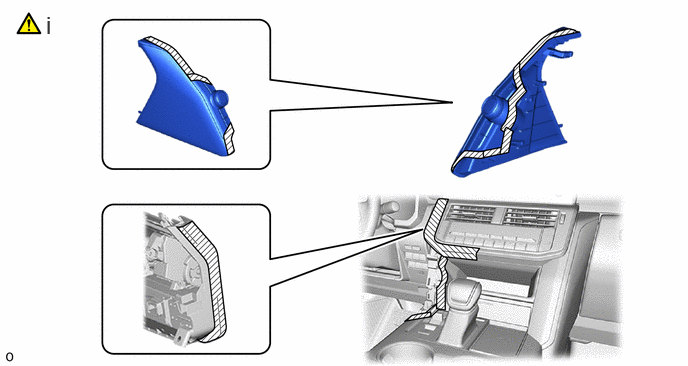
Apply the protective tape as shown in the illustration.
- NOTICE:
-
Use thick protective tape.
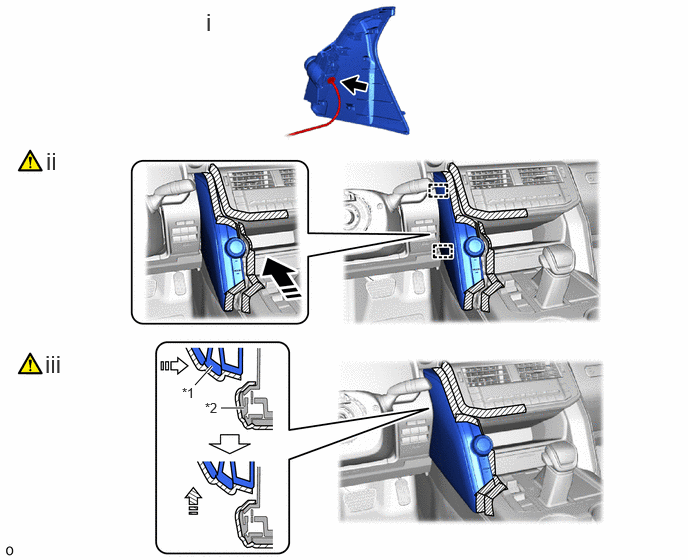
| *1 | Integration Control and Panel Sub-assembly | *2 | Air Conditioning Panel Assembly |
|
|
Install in this Direction (1) |
|
Install in this Direction (2) |
|
|
Install in this Direction (3) | - | - |
Connect the connector.
Attach the guide as shown in the illustration.
- NOTICE:
-
Do not damage the integration control and panel sub-assembly or vehicle interior.
Pull the integration control and panel sub-assembly to outward while avoiding contact with the air conditioning panel assembly as shown in the illustration.
- NOTICE:
-
Do not damage the integration control and panel sub-assembly or air conditioning panel assembly.
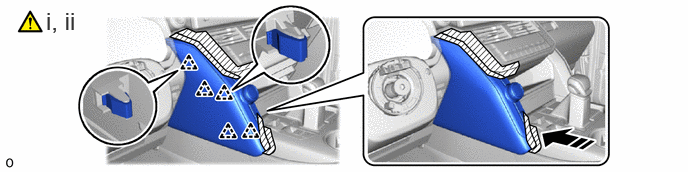
|
|
Install in this Direction | - | - |
Set the clip position of the integration control and panel sub-assembly to the attached hole position of the instrument panel safety pad assembly.
Attach the clip to install the integration control and panel sub-assembly as shown in the illustration.
- NOTICE:
-
Make sure that the integration control and panel sub-assembly is securely installed.