INTERIOR PANELS / TRIM ROOF HEADLINING REASSEMBLY
CAUTION / NOTICE / HINT
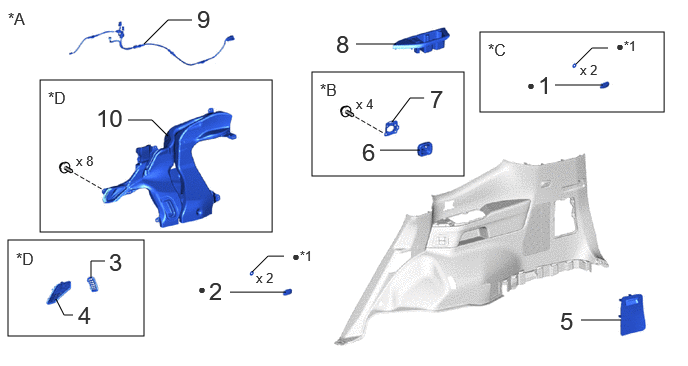
| Procedure | Part Name Code |

|

|

|
|
|---|---|---|---|---|---|
| 1 | REAR NO. 2 SEAT SHOULDER BELT HANGER | 73371H | - | - | - |
| 2 | REAR SEAT SHOULDER BELT HANGER | 73371A | - | - | - |
| 3 | REAR QUARTER TRIM BASE COVER RH | 62635B | - | - | - |
| 4 | FRONT QUARTER TRIM BASE COVER RH | 62633D | - | - | - |
| 5 | QUARTER TRIM COVER HOLE | 62538C | - | - | - |
| 6 | FRONT TONNEAU COVER HOLDER BRACKET RH | 64933E | - | - | - |
| 7 | FRONT QUARTER TRIM BASE RH | 62517B | - | - | - |
| 8 | NO. 1 CUP HOLDER | 66991B | - | - | - |
| 9 | ROOM WIRE | 82235 | - | - | - |
| 10 | REAR NO. 3 SIDE AIR DUCT | 87217F | - | - | - |
| *A | for RH Side | *B | w/ Tonneau Cover |
| *C | w/ Rear No. 2 Seat | *D | w/ Rear Airconditioning System |
| *1 | Spring Nut | - | - |
| ● | Non-reusable part | - | - |
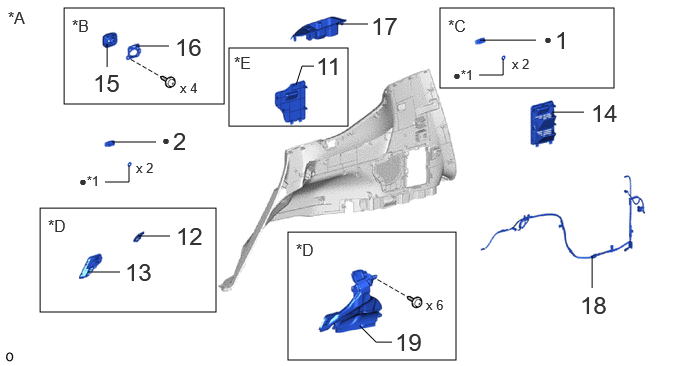
| Procedure | Part Name Code |
|
|
|
|
|---|---|---|---|---|---|
| 1 | REAR NO. 2 SEAT SHOULDER BELT HANGER | 73371H | - | - | - |
| 2 | REAR SEAT SHOULDER BELT HANGER | 73371A | - | - | - |
| 11 | SIDE TRIM BOX COVER | 62598D | - | - | - |
| 12 | REAR QUARTER TRIM BASE COVER LH | 62636B | - | - | - |
| 13 | FRONT QUARTER TRIM BASE COVER LH | 62634D | - | - | - |
| 14 | QUARTER TRIM LID SUB-ASSEMBLY LH | 62606A | - | - | - |
| 15 | FRONT TONNEAU COVER HOLDER BRACKET LH | 64934E | - | - | - |
| 16 | FRONT QUARTER TRIM BASE LH | 62518B | - | - | - |
| 17 | NO. 2 CUP HOLDER | 66992 | - | - | - |
| 18 | NO. 2 ROOM WIRE | 82236 | - | - | - |
| 19 | REAR NO. 5 SIDE AIR DUCT | 87217H | - | - | - |
| *A | for LH Side | *B | w/ Tonneau Cover |
| *C | w/ Rear No. 2 Seat | *D | w/ Rear Airconditioning System |
| *E | w/o Woofer | - | - |
| *1 | Spring Nut | - | - |
| ● | Non-reusable part | - | - |
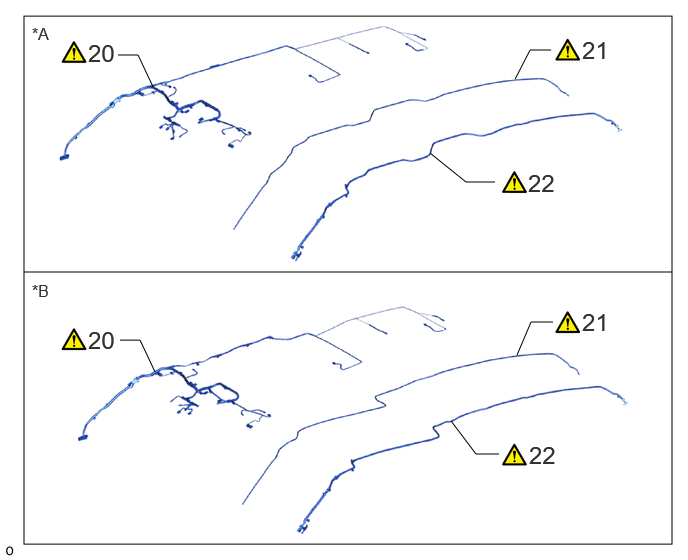
| Procedure | Part Name Code |
|
|
|
|
|---|---|---|---|---|---|
| 20 | NO. 1 ROOF WIRE | 82171 | ( ) |
- | - |
| 21 | WASHER HOSE | - | () |
- | - |
| 22 | NO. 2 ANTENNA CORD SUB-ASSEMBLY | 86101J | () |
- | - |
| *A | for Normal Roof | *B | for Moon Roof |
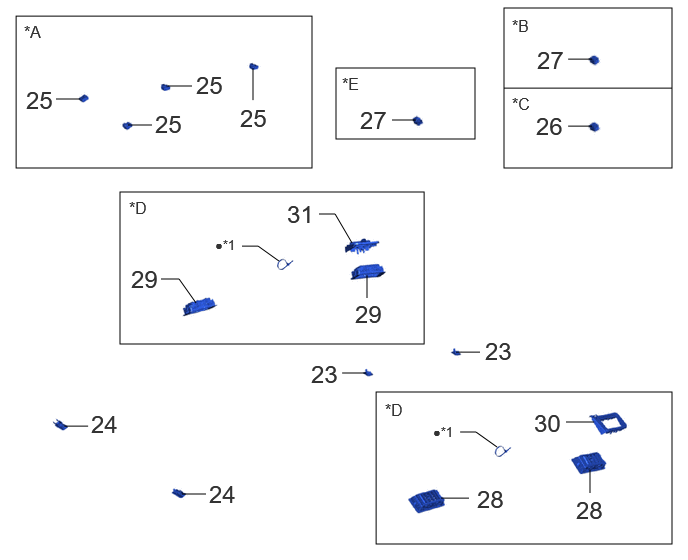
| Procedure | Part Name Code |
|
|
|
|
|---|---|---|---|---|---|
| 23 | NO. 2 ROOF HEADLINING HOLDER COVER | 63388G | - | - | - |
| 24 | ROOF HEADLINING HOLDER COVER | 63388A | - | - | - |
| 25 | ACTIVE NOISE CONTROL MICROPHONE | 86734D | - | - | - |
| 26 | TELEPHONE MICROPHONE ASSEMBLY | 86730A | - | - | - |
| 27 | NO. 30 CONNECTOR HOLDER | 82667S | - | - | - |
| 28 | OUTLET NO. 2 AIR GRILLE ASSEMBLY | 88570D | - | - | - |
| 29 | OUTLET NO. 1 AIR GRILLE ASSEMBLY | 88570B | - | - | - |
| 30 | OUTLET AIR GRILLE LH | 88571B | - | - | - |
| 31 | OUTLET AIR GRILLE RH | 88571A | - | - | - |
| *A | w/ Active Noise Control System | *B | for Driver Side |
| *C | w/ Microphone | *D | w/ Rear Cooler |
| *E | for Front Passenger Side | - | - |
| *1 | Cable Tie | - | - |
| ● | Non-reusable part | - | - |
| Procedure | Part Name Code |
|
|
|
|
|---|---|---|---|---|---|
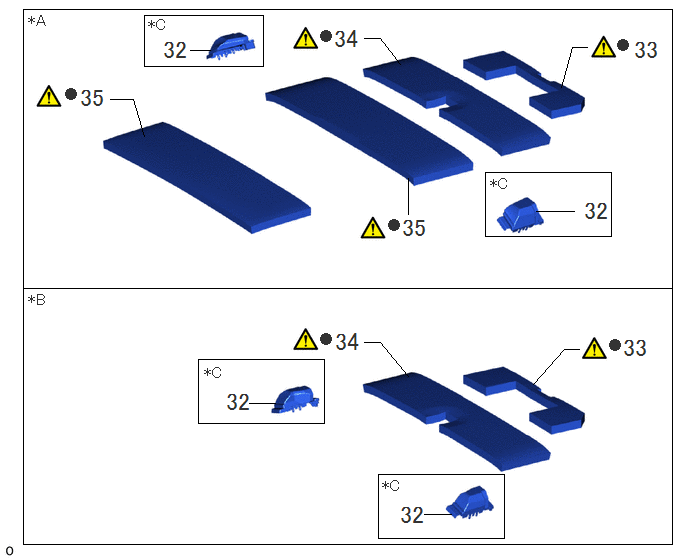
| 32 | OUTLET AIR GRILLE ASSEMBLY | 88570E | - | - | - |
| 33 | NO. 4 ROOF SILENCER PAD | 63344 | () |
- | - |
| 34 | NO. 1 ROOF SILENCER PAD | 63341 | () |
- | - |
| 35 | NO. 2 ROOF SILENCER PAD | 63342 | () |
- | - |
| *A | for Normal Roof | *B | for Moon Roof |
| *C | w/ Rear Cooler | - | - |
| ● | Non-reusable part | - | - |
- HINT:
-
·
Use the same procedure for RHD and LHD vehicles.
·The procedure listed below is for LHD vehicles.
PROCEDURE

 73371H 1.INSTALL REAR NO. 2 SEAT SHOULDER BELT HANGER (w/ Rear No. 2 Seat)
73371A 2.INSTALL REAR SEAT SHOULDER BELT HANGER
62635B 3.INSTALL REAR QUARTER TRIM BASE COVER RH (w/ Rear Air Conditioning System)
62633D 4.INSTALL FRONT QUARTER TRIM BASE COVER RH (w/ Rear Air Conditioning System)
62538C 5.INSTALL QUARTER TRIM COVER HOLE
64933E 6.INSTALL FRONT TONNEAU COVER HOLDER BRACKET RH (w/ Tonneau Cover)
62517B 7.INSTALL FRONT QUARTER TRIM BASE RH (w/ Tonneau Cover)
66991B 8.INSTALL NO. 1 CUP HOLDER
82235 9.INSTALL ROOM WIRE
87217F 10.INSTALL REAR NO. 3 SIDE AIR DUCT (w/ Rear Air Conditioning System)
62598D 11.INSTALL SIDE TRIM BOX COVER (w/o Woofer)
62636B 12.INSTALL REAR QUARTER TRIM BASE COVER LH (w/ Rear Air Conditioning System)
62634D 13.INSTALL FRONT QUARTER TRIM BASE COVER LH (w/ Rear Air Conditioning System)
62606A 14.INSTALL QUARTER TRIM LID SUB-ASSEMBLY LH
64934E 15.INSTALL FRONT TONNEAU COVER HOLDER BRACKET LH (w/ Tonneau Cover)
62518B 16.INSTALL FRONT QUARTER TRIM BASE LH (w/ Tonneau Cover)
66992 17.INSTALL NO. 2 CUP HOLDER
82236 18.INSTALL NO. 2 ROOM WIRE
87217H 19.INSTALL REAR NO. 5 SIDE AIR DUCT (w/ Rear Air Conditioning System)
82171 20.INSTALL NO. 1 ROOF WIRE
- HINT:
-
The illustrations are representative examples, and details may differ.
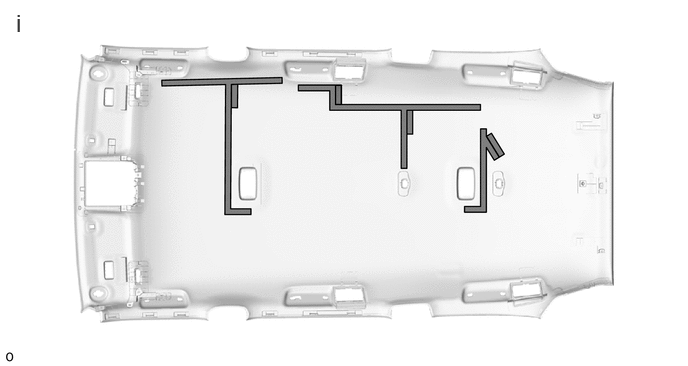
for Normal Roof, Dome Type:

|
Butyl Tape | - | - |
Apply butyl tape to the roof headlining assembly ensuring it does not go over the marking.
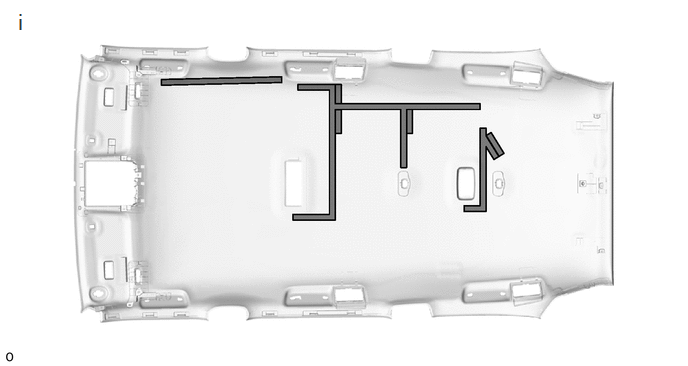
for Normal Roof, Spot Type:
|
|
Butyl Tape | - | - |
Apply butyl tape to the roof headlining assembly ensuring it does not go over the marking.
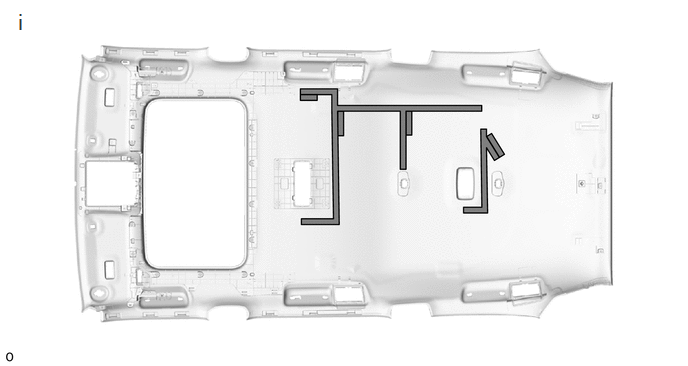
for Moon Roof:
|
|
Butyl Tape | - | - |
Apply butyl tape to the roof headlining assembly ensuring it does not go over the marking.
for Normal Roof, Dome Type:
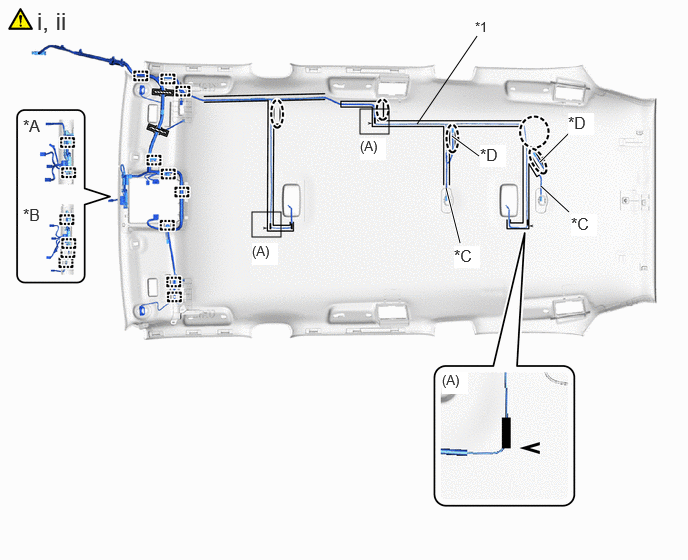
| *A | for LHD | *B | for RHD |
| *C | w/ Active Noise Control System | *D | w/o Active Noise Control System |
| *1 | No. 1 Roof Wire | - | - |

|
Extra Length Absorption Point |

|
Positioning Tape |

|
Fastening Tape | - | - |
Attach the No. 1 roof wire to the butyl tape and secure the No. 1 roof wire with pieces of fastening tape.
- NOTICE:
-
·
Make sure to attach the No. 1 roof wire without leaving any of it loose.
·If any of the No. 1 roof wire is left loose, it will cause an abnormal noise.
- HINT:
-
·
Adjust the extra length of the No. 1 roof wire in the part of the illustration.
·Align the positioning tape of the No. 1 roof wire with the marking on the roof headlining assembly and attach the butyl tape as shown in the part of the illustration labeled (A).
·Apply the No. 1 roof wire so that it is securely attached and not twisted.
Attach the clamp to install the No. 1 roof wire.
for Normal Roof, Spot Type:
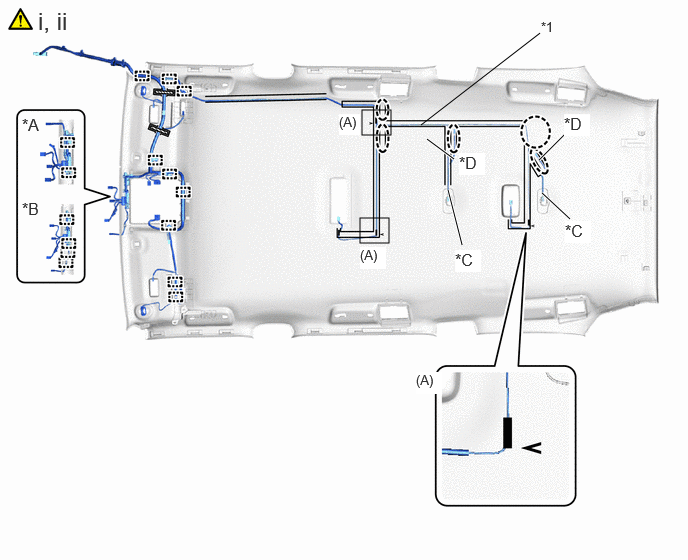
| *A | for LHD | *B | for RHD |
| *C | w/ Active Noise Control System | *D | w/o Active Noise Control System |
| *1 | No. 1 Roof Wire | - | - |
|
|
Extra Length Absorption Point |
|
Positioning Tape |
|
|
Fastening Tape | - | - |
Attach the No. 1 roof wire to the butyl tape and secure the No. 1 roof wire with pieces of fastening tape.
- NOTICE:
-
·
Make sure to attach the No. 1 roof wire without leaving any of it loose.
·If any of the No. 1 roof wire is left loose, it will cause an abnormal noise.
- HINT:
-
·
Adjust the extra length of the No. 1 roof wire in the part of the illustration.
·Align the positioning tape of the No. 1 roof wire with the marking on the roof headlining assembly and attach the butyl tape as shown in the part of the illustration labeled (A).
·Apply the No. 1 roof wire so that it is securely attached and not twisted.
Attach the clamp to install the No. 1 roof wire.
for Moon Roof:
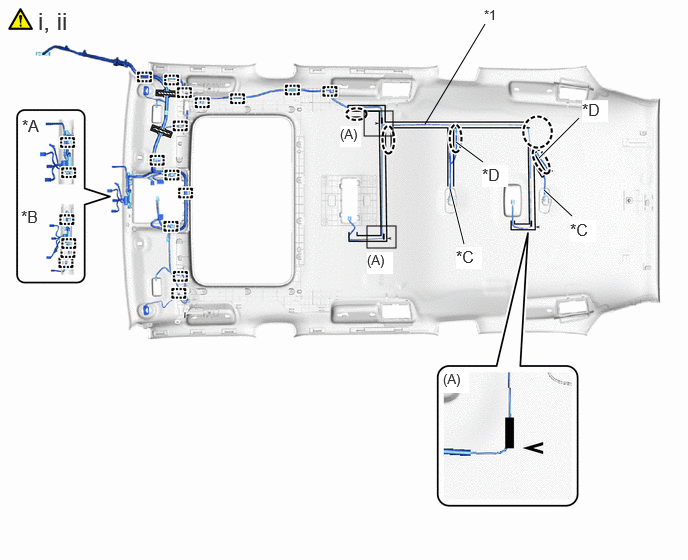
| *A | for LHD | *B | for RHD |
| *C | w/ Active Noise Control System | *D | w/o Active Noise Control System |
| *1 | No. 1 Roof Wire | - | - |
|
|
Extra Length Absorption Point |
|
Positioning Tape |
|
|
Fastening Tape | - | - |
Attach the No. 1 roof wire to the butyl tape and secure the No. 1 roof wire with pieces of fastening tape.
- NOTICE:
-
·
Make sure to attach the No. 1 roof wire without leaving any of it loose.
·If any of the No. 1 roof wire is left loose, it will cause an abnormal noise.
- HINT:
-
·
Adjust the extra length of the No. 1 roof wire in the part of the illustration.
·Align the positioning tape of the No. 1 roof wire with the marking on the roof headlining assembly and attach the butyl tape as shown in the part of the illustration labeled (A).
·Apply the No. 1 roof wire so that it is securely attached and not twisted.
Attach the clamp to install the No. 1 roof wire.

Attach the claw.
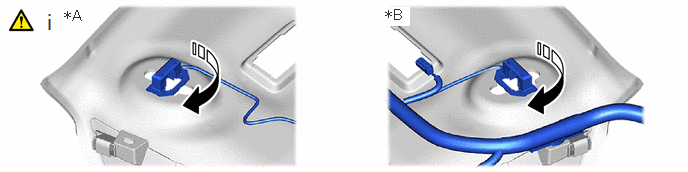
| *A | for Driver Side | *B | for Front Passenger Side |

|
Install in this Direction | - | - |
Turn the visor connectors approximately 90° clockwise and install them to the roof headlining assembly.
21.INSTALL WASHER HOSE
for Normal Roof:
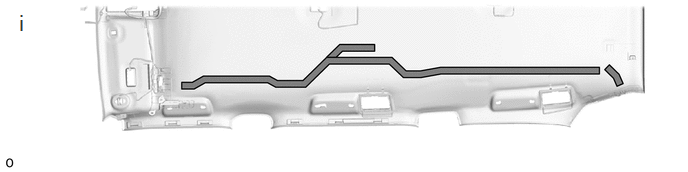
|
|
Butyl Tape | - | - |
Apply butyl tape to the roof headlining assembly ensuring it does not go over the marking.
for Moon Roof:
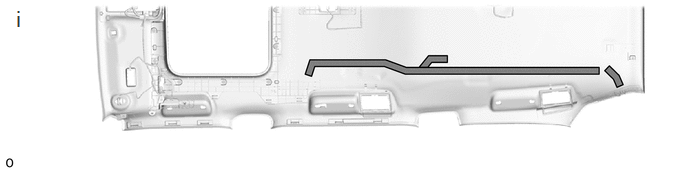
|
|
Butyl Tape | - | - |
Apply butyl tape to the roof headlining assembly ensuring it does not go over the marking.
for Normal Roof:
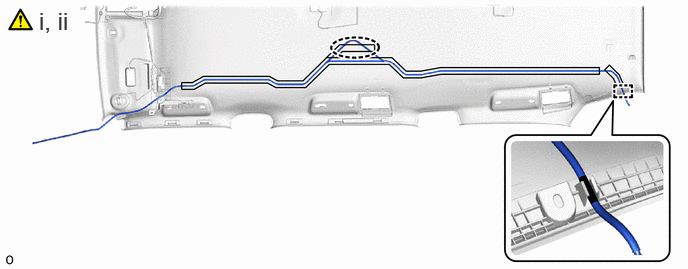
|
|
Extra Length Absorption Point |
|
Positioning Tape |
Attach the washer hose to the butyl tape as shown in the illustration.
- NOTICE:
-
·
Make sure to attach the washer hose without leaving any of it loose.
·If any of the washer hose is left loose, it will cause an abnormal noise.
- HINT:
-
·
Adjust the extra length of the washer hose in the part of the illustration.
·Apply the washer hose so that it is securely attached and not twisted.
Attach the clamp to install the washer hose.
for Moon Roof:
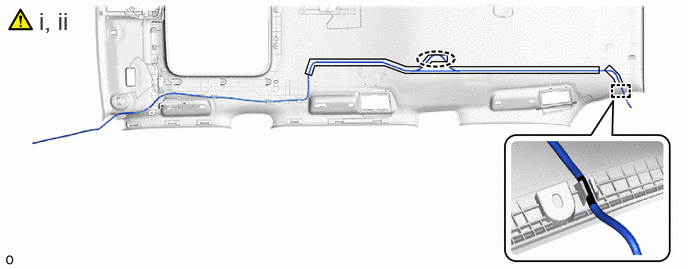
|
|
Extra Length Absorption Point |
|
Positioning Tape |
Attach the washer hose to the butyl tape as shown in the illustration.
- NOTICE:
-
·
Make sure to attach the washer hose without leaving any of it loose.
·If any of the washer hose is left loose, it will cause an abnormal noise.
- HINT:
-
·
Adjust the extra length of the washer hose in the part of the illustration.
·Apply the washer hose so that it is securely attached and not twisted.
Attach the clamp to install the washer hose.
86101J 22.INSTALL NO. 2 ANTENNA CORD SUB-ASSEMBLY
|
|
Click here() |
63388G 23.INSTALL NO. 2 ROOF HEADLINING HOLDER COVER
63388A 24.INSTALL ROOF HEADLINING HOLDER COVER
86734D 25.INSTALL ACTIVE NOISE CONTROL MICROPHONE (w/ Active Noise Control System)
86730A 26.INSTALL TELEPHONE MICROPHONE ASSEMBLY (w/ Microphone)
82667S 27.INSTALL NO. 30 CONNECTOR HOLDER
88570D 28.INSTALL OUTLET NO. 2 AIR GRILLE ASSEMBLY (w/ Rear Cooler)
88570B 29.INSTALL OUTLET NO. 1 AIR GRILLE ASSEMBLY (w/ Rear Cooler)
88571B 30.INSTALL OUTLET AIR GRILLE LH (w/ Rear Cooler)
88571A 31.INSTALL OUTLET AIR GRILLE RH (w/ Rear Cooler)
88570E 32.INSTALL OUTLET AIR GRILLE ASSEMBLY (w/ Rear Cooler)
63344 33.INSTALL NO. 4 ROOF SILENCER PAD
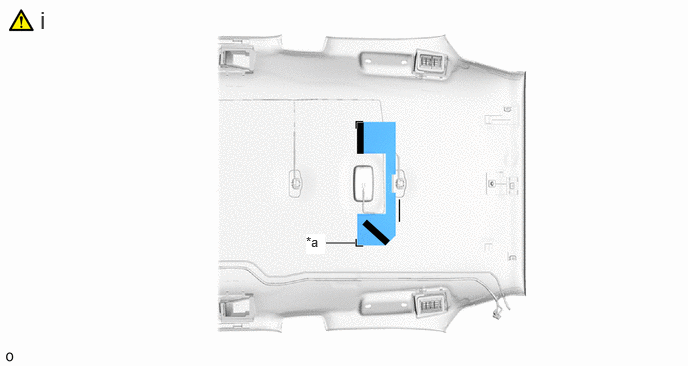
| *a | Marking | - | - |
|
|
Hot-melt Glue | - | - |
Align the markings on the roof headlining assembly with the No. 4 roof silencer pad and install them using hot-melt glue as shown in the illustration.
63341 34.INSTALL NO. 1 ROOF SILENCER PAD
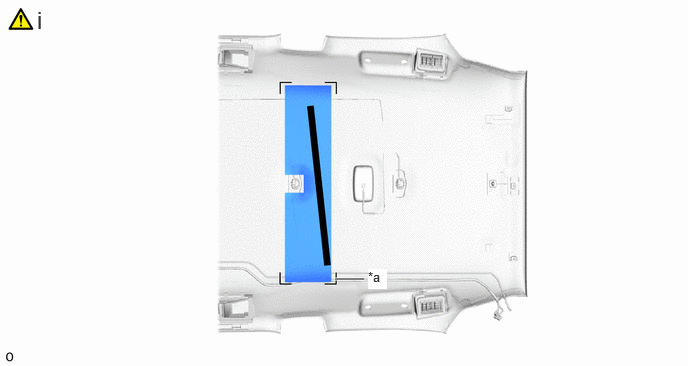
| *a | Marking | - | - |
|
|
Hot-melt Glue | - | - |
Align the markings on the roof headlining assembly with the No. 1 roof silencer pad and install them using hot-melt glue as shown in the illustration.
63342 35.INSTALL NO. 2 ROOF SILENCER PAD (for Normal Roof)
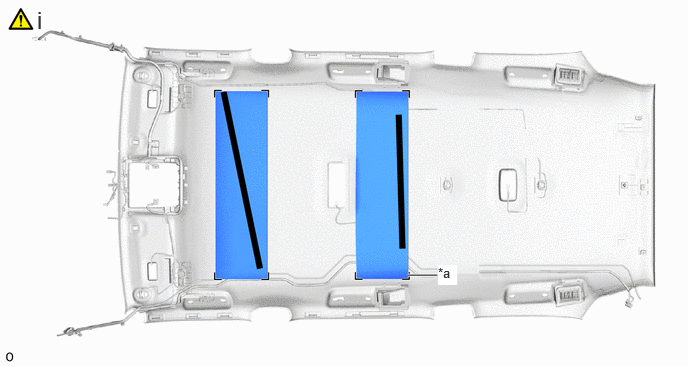
| *a | Marking | - | - |
|
|
Hot-melt Glue | - | - |
Align the markings on the roof headlining assembly with the 2 No. 2 roof silencer pads and install them using hot-melt glue as shown in the illustration.