EXTERIOR PANELS / TRIM ROOF DRIP SIDE FINISH MOULDING REMOVAL
CAUTION / NOTICE / HINT
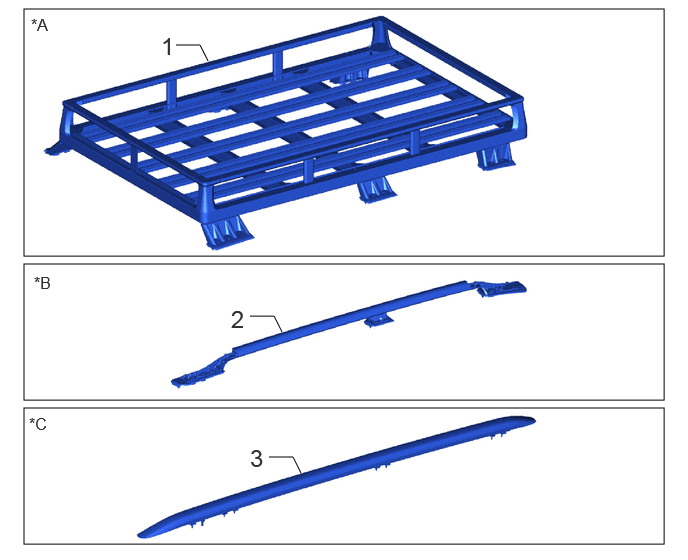
| Procedure | Part Name Code |

|

|

|
|
|---|---|---|---|---|---|
| 1 | ROOF RACK ASSEMBLY | - | - | - | - |
| 2 | ROOF CARRIER SUB-ASSEMBLY LH | 63408C | - | - | - |
| 3 | ROOF RACK ASSEMBLY LH | 63470B | - | - | - |
| *A | w/ Roof Rack | *B | w/ Roof Carrier |
| *C | w/ Roof Rack Assembly LH | - | - |
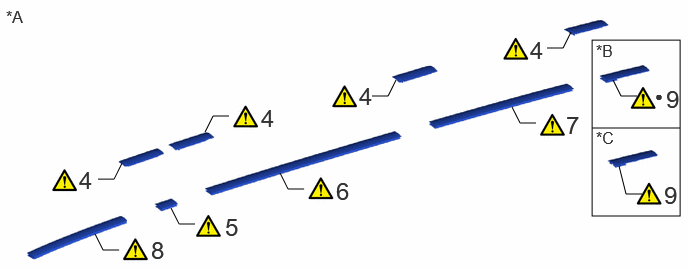
| Procedure | Part Name Code |
|
|
|
|
|---|---|---|---|---|---|
| 4 | ROOF DRIP SIDE FINISH MOULDING JOINT COVER LH | 75597 | ( ) |
- | - |
| 5 | ROOF DRIP SIDE MOULDING LH | 75552H | () |
- | - |
| 6 | CENTER ROOF DRIP SIDE FINISH MOULDING LH | 75556C | () |
- | - |
| 7 | REAR ROOF DRIP SIDE FINISH MOULDING LH | 75556 | () |
- | - |
| 8 | ROOF DRIP SIDE FINISH MOULDING LH | 75552 | () |
- | - |
| 9 | REAR ROOF DRIP SIDE FINISH MOULDING LH | 75554A | () |
- | - |
| *A | for Standard | *B | for Type A |
| *C | for Type B | - | - |
| ● | Non-reusable part | - | - |
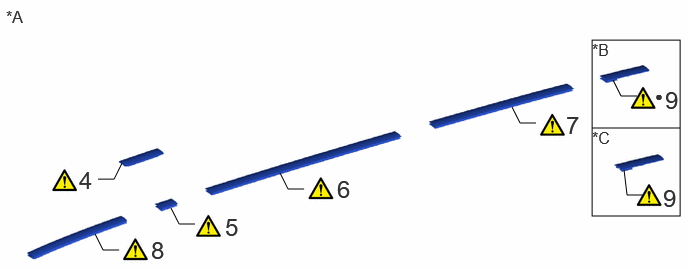
| Procedure | Part Name Code |
|
|
|
|
|---|---|---|---|---|---|
| 4 | ROOF DRIP SIDE FINISH MOULDING JOINT COVER LH | 75597 | () |
- | - |
| 5 | ROOF DRIP SIDE MOULDING LH | 75552H | () |
- | - |
| 6 | CENTER ROOF DRIP SIDE FINISH MOULDING LH | 75556C | () |
- | - |
| 7 | REAR ROOF DRIP SIDE FINISH MOULDING LH | 75556 | () |
- | - |
| 8 | ROOF DRIP SIDE FINISH MOULDING LH | 75552 | () |
- | - |
| 9 | REAR ROOF DRIP SIDE FINISH MOULDING LH | 75554A | () |
- | - |
| *A | w/ Roof Rack | *B | for Type A |
| *C | for Type B | - | - |
| ● | Non-reusable part | - | - |
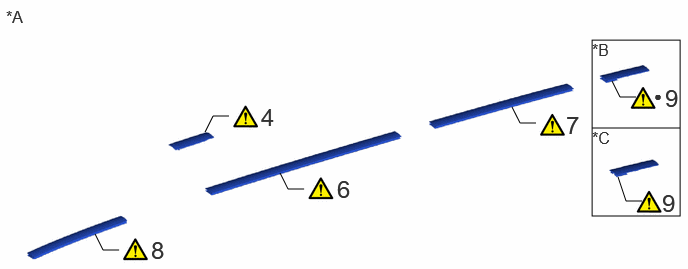
| Procedure | Part Name Code |
|
|
|
|
|---|---|---|---|---|---|
| 4 | ROOF DRIP SIDE FINISH MOULDING JOINT COVER LH | 75597 | () |
- | - |
| 6 | CENTER ROOF DRIP SIDE FINISH MOULDING LH | 75556C | () |
- | - |
| 7 | REAR ROOF DRIP SIDE FINISH MOULDING LH | 75556 | () |
- | - |
| 8 | ROOF DRIP SIDE FINISH MOULDING LH | 75552 | () |
- | - |
| 9 | REAR ROOF DRIP SIDE FINISH MOULDING LH | 75554A | () |
- | - |
| *A | w/ Roof Carrier | *B | for Type A |
| *B | for Type B | - | - |
| ● | Non-reusable part | - | - |
| Procedure | Part Name Code |
|
|
|
|
|---|---|---|---|---|---|
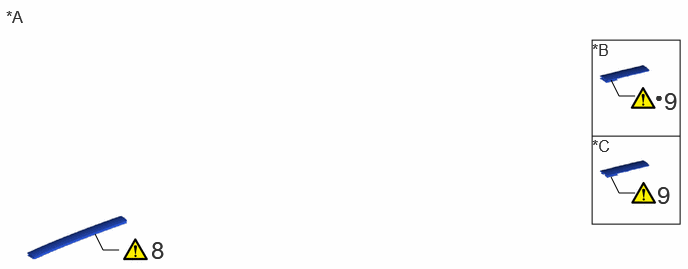
| 8 | ROOF DRIP SIDE FINISH MOULDING LH | 75552 | () |
- | - |
| 9 | REAR ROOF DRIP SIDE FINISH MOULDING LH | 75554A | () |
- | - |
| *A | w/ Roof Rack Assembly LH | *B | for Type A |
| *C | for Type B | - | - |
| ● | Non-reusable part | - | - |
CAUTION / NOTICE / HINT
The necessary procedures (adjustment, calibration, initialization or registration) that must be performed after parts are removed, installed or replaced during the roof drip side finish moulding LH and rear roof drip side finish moulding LH removal/installation are shown below.
| Replaced Part or Performed Procedures | Necessary Procedures | Effect/Inoperative Function when Necessary Procedures are not Performed | Link |
|---|---|---|---|
|
w/ Curtain Shield Airbag
Disconnect cable from negative battery terminal |
Memorize steering angle neutral point | Parking assist monitor system | () |
| Multi-terrain monitor system | () |
||
| Panoramic view monitor system | () |
- HINT:
-
·
When the cable is disconnected/reconnected to the battery terminal, systems temporarily stop operating. However, each system has a function that completes learning the first time the system is used.
-Learning completes when vehicle is driven
Effect/Inoperative Function When Necessary Procedures are not Performed Necessary Procedures Link Stop and start system Drive the vehicle until stop and start control is permitted (approximately 5 to 60 minutes) ( )Lighting system (EXT) Cornering lights Drive the vehicle straight ahead at 35 km/h (22 mph) or more for 5 seconds or more. ( )Pre-collision system Lane tracing assist system Lane departure alert system Adaptive high beam system
-Learning completes when vehicle is operated normally
Effect/Inoperative Function When Necessary Procedures are not Performed Necessary Procedures Link Power back door system Fully close the back door by hand.
- HINT:
-
Initialization is not necessary if the above procedures are performed while the back door is closed.
( )Air conditioning system After the ignition switch is turned to ON, the servo motor and expansion valve standard position is recognized. -
·Use the same procedure for the RH and LH sides.
·The procedure described below is for the LH side.
PROCEDURE

 1.REMOVE ROOF RACK ASSEMBLY (w/ Roof Rack)
63408C 2.REMOVE ROOF CARRIER SUB-ASSEMBLY LH (w/ Roof Carrier)
63470B 3.REMOVE ROOF RACK ASSEMBLY LH (w/ Roof Rack Assembly LH)
75597 4.REMOVE ROOF DRIP SIDE FINISH MOULDING JOINT COVER LH (for Standard or w/Roof Rack or w/ Roof Carrier)
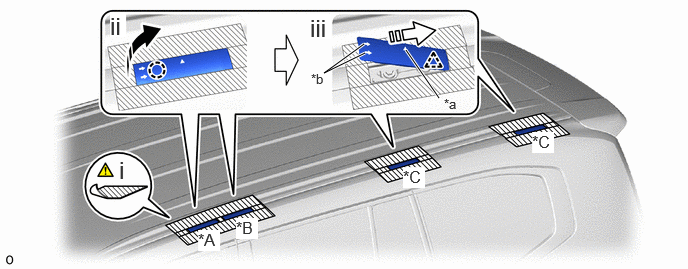
| *A | for Standard or w/ Roof Rack | *B | for Standard or w/ Roof Carrier |
| *C | for Standard | - | - |
| *a | Triangle Mark | *b | Arrow Mark |

|
Remove in this Direction (1) |

|
Remove in this Direction (2) |
Put protective tape around the roof drip side finish moulding joint cover LH.
Lift up the front side of the roof drip side finish moulding joint cover LH and detach the claw as shown in the illustration.
Push the roof drip side finish moulding joint cover LH as shown in the illustration to detach the clip and remove the roof drip side finish moulding joint cover LH.
75552H 5.REMOVE ROOF DRIP SIDE MOULDING LH (for Standard or w/ Roof Rack)
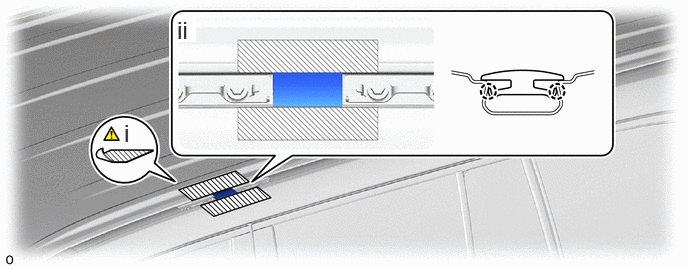
Put protective tape around the roof drip side moulding LH.
Detach the claw and remove the roof drip side moulding LH.
75556C 6.REMOVE CENTER ROOF DRIP SIDE FINISH MOULDING LH (for Standard or w/Roof Rack or w/ Roof Carrier)
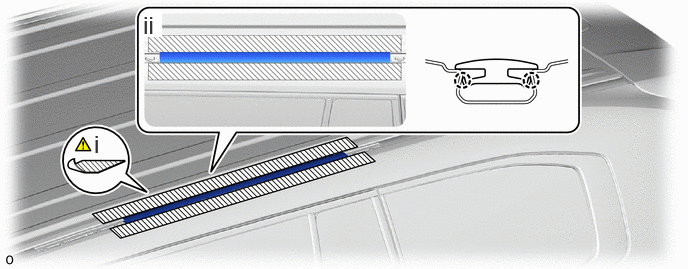
Put protective tape around the center roof drip side finish moulding LH.
Detach the claw and remove the center roof drip side finish moulding LH.
75556 7.REMOVE REAR ROOF DRIP SIDE FINISH MOULDING LH (for Standard or w/Roof Rack or w/ Roof Carrier)
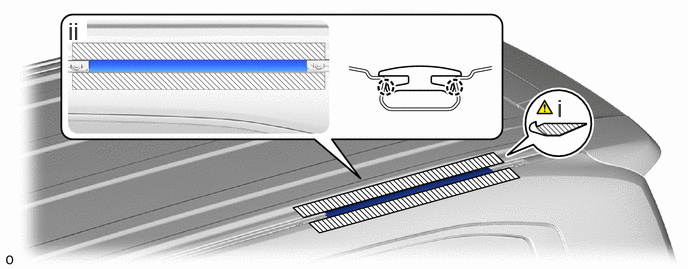
Put protective tape around the rear roof drip side finish moulding LH.
Detach the claw and remove the rear roof drip side finish moulding LH.
75552 8.REMOVE ROOF DRIP SIDE FINISH MOULDING LH
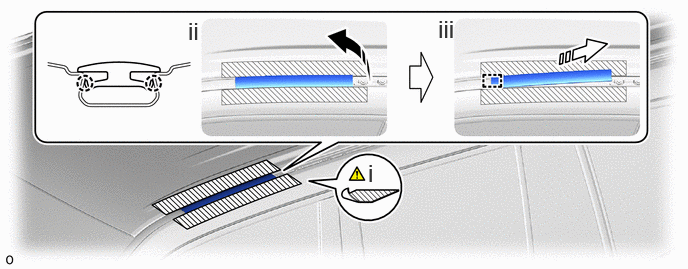
|
|
Remove in this Direction (1) |
|
Remove in this Direction (2) |
Put protective tape around the roof drip side finish moulding LH.
Lift up the rear end of the roof drip side finish moulding LH and detach the claw as shown in the illustration.
Pull the roof drip side finish moulding LH backward and attach the guide and remove the roof drip side finish moulding LH as shown in the illustration.
75554A 9.REMOVE REAR ROOF DRIP SIDE FINISH MOULDING LH
|
|
|
- Standard Value:
-
Part Temperature Vehicle Body 40 to 60°C (104 to 140°F) Rear Roof Drip Side Finish Moulding LH 20 to 30°C (68 to 86°F)
- CAUTION:
-
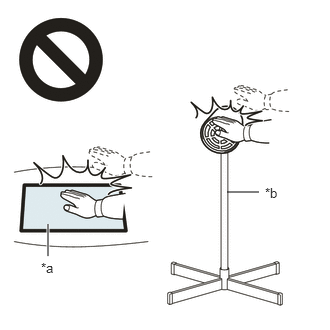 2.365,2 2.698,2 false 0.5,2.333 0.5,2.667 true 0.427,2.708 0.74,2.865 0.313,0.156 10 false *a 2.76,1.927 3.073,2.083 0.313,0.156 10 false *b
*a Heated Part *b Heat Light
-
·
Do not touch the heat light and heated parts.
·Touching the heat light may result in burns.
·Touching heated parts for a long time may result in burns.
- NOTICE:
-
Do not heat the rear roof drip side finish moulding LH and vehicle body excessively.
for Type A:
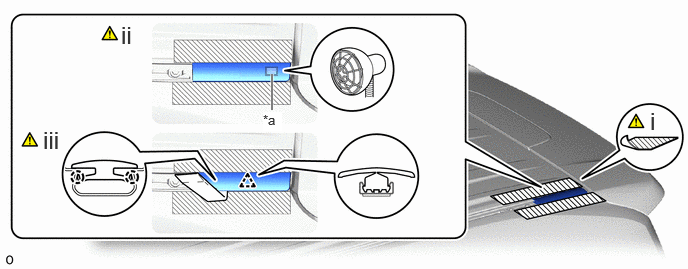
| *a | Double-sided Tape | - | - |
Put protective tape around the rear roof drip side finish moulding LH.
Heat the adhesive of the rear roof drip side finish moulding LH using a heat light.
Using moulding remover D, detach the claw and clip and remove the rear roof drip side finish moulding LH.
- NOTICE:
-
·
Do not remove the roof drip side finish moulding clip.
·If a roof drip side finish moulding clip is damaged or falls off, replace it with a new one.
for Type B:
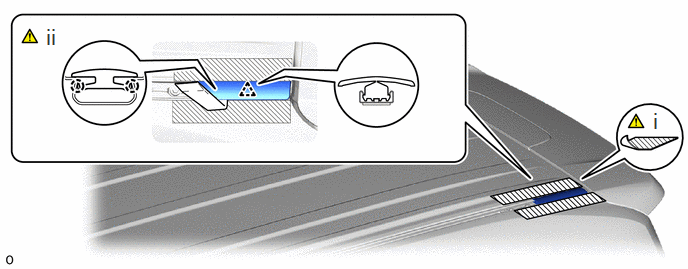
Put protective tape around the rear roof drip side finish moulding LH.
Using moulding remover D, detach the claw and clip and remove the rear roof drip side finish moulding LH.
- NOTICE:
-
·
Do not remove the roof drip side finish moulding clip.
·If a roof drip side finish moulding clip is damaged or falls off, replace it with a new one.