EXTERIOR PANELS / TRIM BACK DOOR OUTSIDE GARNISH REMOVAL
CAUTION / NOTICE / HINT
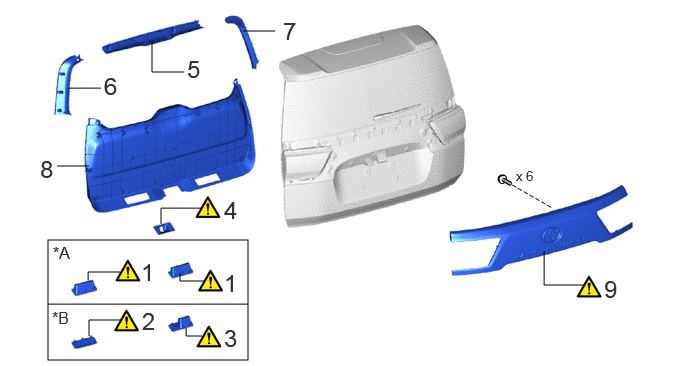
| Procedure | Part Name Code |

|

|

|
|
|---|---|---|---|---|---|
| 1 | DOOR PULL HANDLE | 74811B | ( ) |
- | - |
| 2 | BACK DOOR TRIM BASE | 64785A | () |
- | - |
| 3 | DOOR PULL HANDLE | 74811G | () |
- | - |
| 4 | BACK DOOR LOCK COVER | 69321 | () |
- | - |
| 5 | BACK DOOR CENTER GARNISH | 67939B | - | - | - |
| 6 | BACK DOOR SIDE GARNISH LH | 67938A | - | - | - |
| 7 | BACK DOOR SIDE GARNISH RH | 67937B | - | - | - |
| 8 | BACK DOOR TRIM PANEL ASSEMBLY | 64780A | - | - | - |
| 9 | BACK DOOR OUTSIDE GARNISH SUB-ASSEMBLY | 76801 | () |
- | - |
| *A | w/o Power Back Door | *B | w/ Power Back Door |
PROCEDURE

 74811B 1.REMOVE DOOR PULL HANDLE (w/o Power Back Door)
|
|
Click here() |
64785A 2.REMOVE BACK DOOR TRIM BASE (w/ Power Back Door)
|
|
Click here() |
74811G 3.REMOVE DOOR PULL HANDLE (w/ Power Back Door)
|
|
Click here() |
69321 4.REMOVE BACK DOOR LOCK COVER
|
|
Click here() |
67939B 5.REMOVE BACK DOOR CENTER GARNISH
67938A 6.REMOVE BACK DOOR SIDE GARNISH LH
67937B 7.REMOVE BACK DOOR SIDE GARNISH RH
Use the same procedure described for the LH side.
64780A 8.REMOVE BACK DOOR TRIM PANEL ASSEMBLY
76801 9.REMOVE BACK DOOR OUTSIDE GARNISH SUB-ASSEMBLY
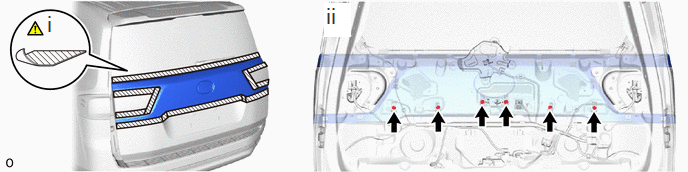
Put protective tape around the back door outside garnish sub-assembly.
Remove the 6 bolts.

|
Place Hand Here |

|
Remove in this Direction |
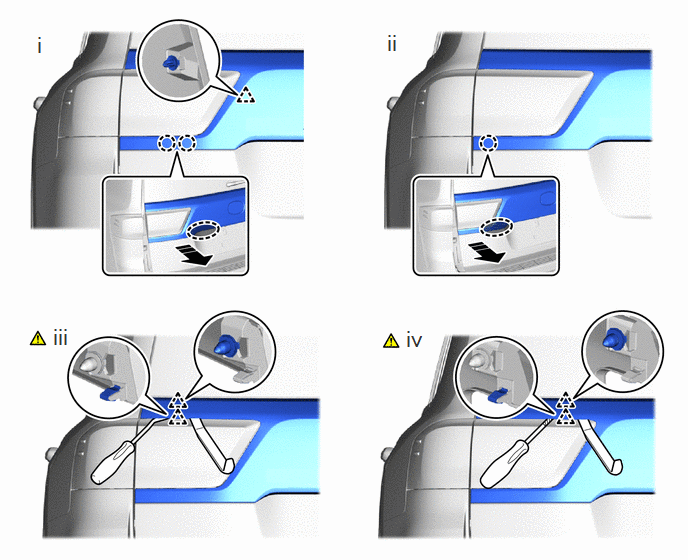
Place your hand at the positions shown in the illustration and detach the clip and claw as shown in the illustration.
Place your hand at the positions shown in the illustration and detach the claw as shown in the illustration.
Using moulding remover A and clip remover with its tip wrapped with protective tape, detach the clip.
Using moulding remover A and screwdriver with its tip wrapped with protective tape, detach the clip.
Use the same procedure for the other side.
|
|
Remove in this Direction | - | - |
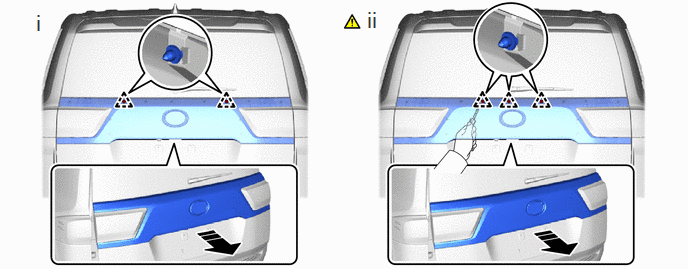
Detach the clip from the backside as shown in the illustration.
Using clip remover with its tip wrapped with protective tape, detach the clip and remove the back door outside garnish sub-assembly as shown in the illustration.