DOOR / HATCH POWER BACK DOOR SYSTEM Jam Protection Function Activates During Power Back Door Operation
DESCRIPTION
When the jam protection function activates during power back door operation, one of the following may be the cause: 1) improper fit of back door, or a foreign object is stuck in the back door, 2) malfunctioning power back door sensor assembly circuit or 3) malfunctioning multiplex network door ECU.
WIRING DIAGRAM
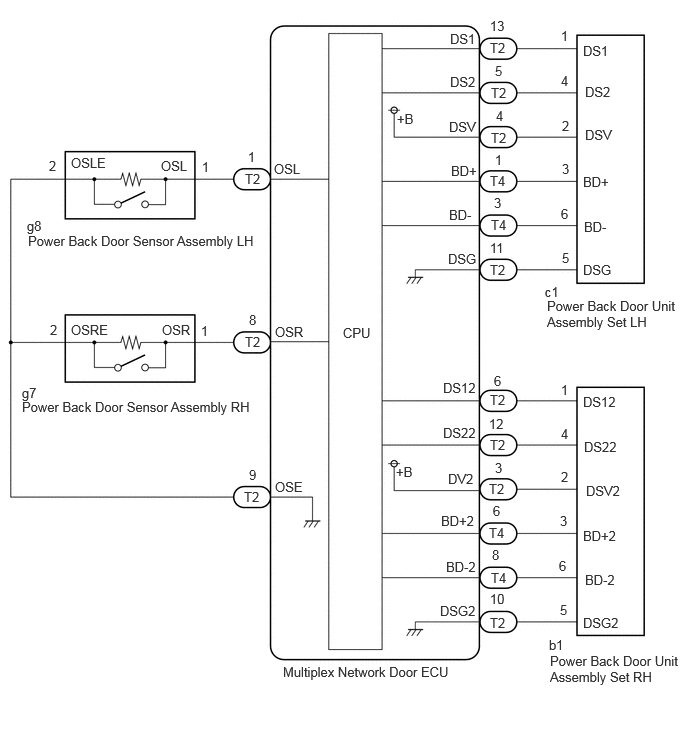
CAUTION / NOTICE / HINT
- NOTICE:
-
If the replacement, removal and installation of the multiplex network door ECU or disconnection of the connectors of the multiplex network door ECU has been performed, initialize the power back door system.
-
Click hereVehicle Exterior>DOOR / HATCH>POWER BACK DOOR SYSTEM>INITIALIZATION
PROCEDURE
Check if there are any foreign objects interfering with back door operation.
- Result:
-
Result Proceed to There are no foreign objects A There are foreign objects B
A
B
Set the power back door system main switch to "On"
Operate the multi-information display in the combination meter assembly and check the customization status.
- HINT:
-
Select the setting tab to check this.
| Display | Description | Default | Setting | Relevant ECU |
|---|---|---|---|---|
| System Settings | Function that enables or disables the power back door operation. | On | On or Off | Multiplex network door ECU |
Open/close the back door by hand.
- Result:
-
Proceed to OK NG
OK
NG
Check the Data List to determine if the power back door sensor assembly functions properly.
- Body Electrical > Back Door > Data List
-
Tester Display Measurement Item Range Normal Condition Diagnostic Note PBD Touch Sensor RH Power back door sensor assembly RH signal ON, OFF or Open ON: Power back door sensor assembly RH pressed
OFF: Power back door sensor assembly RH not pressed
Open: Power back door sensor assembly RH circuit open- PBD Touch Sensor LH Power back door sensor assembly LH signal ON, OFF or Open ON: Power back door sensor assembly LH pressed
OFF: Power back door sensor assembly LH not pressed
Open: Power back door sensor assembly LH circuit open-
- Body Electrical > Back Door > Data List
-
Tester Display PBD Touch Sensor RH PBD Touch Sensor LH - 50003 489 1057,1058
- Result:
-
Result Proceed to On the GTS screen, ON or OFF is displayed accordingly A On the GTS screen, ON or OFF is not displayed accordingly or Open is displayed for power back door sensor assembly RH B On the GTS screen, ON or OFF is not displayed accordingly or Open is displayed for power back door sensor assembly LH C
A
B
C
Using an oscilloscope, check the waveform of each terminal from the rear of the multiplex network door ECU connector.
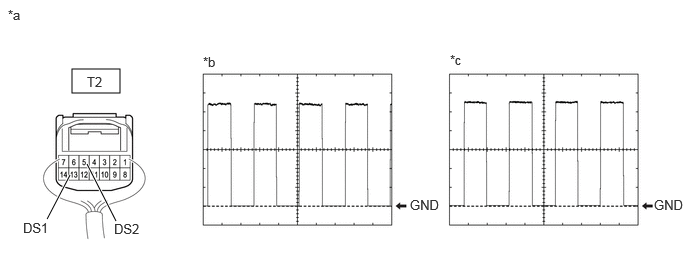
| *a | Component with harness connected (Multiplex Network Door ECU) |
*b | Waveform (CH1) |
| *c | Waveform (CH2) | - | - |
- Measurement Condition:
-
Item Condition Tester Connection ·CH1: T2-13 (DS1) - Body ground
·CH2: T2-5 (DS2) - Body ground
Tool Setting 2 V/DIV., 2 ms./DIV. Vehicle Condition Open and close the back door by hand.
- HINT:
-
The period changes in accordance to the speed at which the back door is opened and closed by hand.
- OK:
-
The waveform displayed is as shown in the illustration.
- Result:
-
Proceed to OK NG
OK
NG
Set the power back door system main switch to "On"
Operate the multi-information display in the combination meter assembly and check the customization status.
- HINT:
-
Select the setting tab to check this.
| Display | Description | Default | Setting | Relevant ECU |
|---|---|---|---|---|
| System Settings | Function that enables or disables the power back door operation. | On | On or Off | Multiplex network door ECU |
Check power back door system operation.
Click hereVehicle Exterior>DOOR / HATCH>POWER BACK DOOR SYSTEM>OPERATION CHECK
- OK:
-
Power back door system operates normally.
- Result:
-
Proceed to OK NG
OK
NG
Using an oscilloscope, check the waveform of each terminal from the rear of the multiplex network door ECU connector.
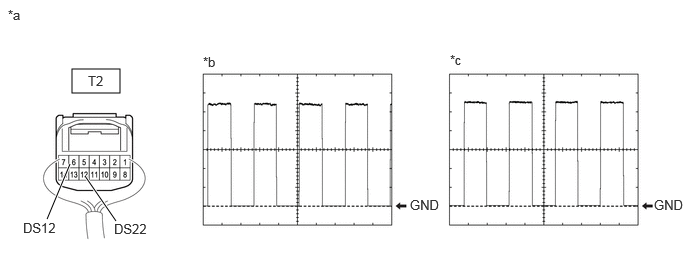
| *a | Component with harness connected (Multiplex Network Door ECU) |
*b | Waveform (CH1) |
| *c | Waveform (CH2) | - | - |
- Measurement Condition:
-
Item Condition Tester Connection ·CH1: T2-6 (DS12) - Body ground
·CH2: T2-12 (DS22) - Body ground
Tool Setting 2 V/DIV., 2 ms./DIV. Vehicle Condition Open and close the back door by hand.
- HINT:
-
The period changes in accordance to the speed at which the back door is opened and closed by hand.
- OK:
-
The waveform displayed is as shown in the illustration.
- Result:
-
Proceed to OK NG
OK
NG
Set the power back door system main switch to "On"
Operate the multi-information display in the combination meter assembly and check the customization status.
- HINT:
-
Select the setting tab to check this.
| Display | Description | Default | Setting | Relevant ECU |
|---|---|---|---|---|
| System Settings | Function that enables or disables the power back door operation. | On | On or Off | Multiplex network door ECU |
Check power back door system operation.
Click hereVehicle Exterior>DOOR / HATCH>POWER BACK DOOR SYSTEM>OPERATION CHECK
- OK:
-
Power back door system operates normally.
- Result:
-
Proceed to OK NG
OK
NG
Click hereVehicle Exterior>DOOR / HATCH>POWER BACK DOOR TOUCH SENSOR>INSPECTION
- Result:
-
Proceed to OK NG
OK
NG
Disconnect the g7 power back door sensor assembly RH connector.
Disconnect the T2 multiplex network door ECU connector.
Measure the resistance according to the value(s) in the table below.
- Standard Resistance:
-
Tester Connection Condition Specified Condition Click Location & Routing(g7,T2)Location & Routingewd_type=routing;type=c,c;code=g7,T2
Click Connector(g7)Body>No. 1 Rear Window Wire / No. 2 Back Door Wire>Power Back Door Sensor Assembly RHewd_type=component;type=c;code=g7;pinno=1,2
Click Connector(T2)Body>No. 3 Floor Wire / Theft Warning Sensor Cord Sub-Assembly>Multiplex Network Door ECUewd_type=component;type=c;code=T2;pinno=8,9
g7-1 (OSR) - T2-8 (OSR) Always Below 1 Ω g7-2 (OSRE) - T2-9 (OSE) Always Below 1 Ω g7-1 (OSR) or T2-8 (OSR) - Body ground Always 10 kΩ or higher g7-2 (OSRE) or T2-9 (OSE) - Body ground Always 10 kΩ or higher
- Result:
-
Proceed to OK NG
OK
NG
Click hereVehicle Exterior>DOOR / HATCH>POWER BACK DOOR TOUCH SENSOR>INSPECTION
- Result:
-
Proceed to OK NG
OK
NG
Disconnect the g8 power back door sensor assembly LH connector.
Disconnect the T2 multiplex network door ECU connector.
Measure the resistance according to the value(s) in the table below.
- Standard Resistance:
-
Tester Connection Condition Specified Condition Click Location & Routing(g8,T2)Location & Routingewd_type=routing;type=c,c;code=g8,T2
Click Connector(g8)Body>No. 1 Rear Window Wire / No. 2 Back Door Wire>Power Back Door Sensor Assembly LHewd_type=component;type=c;code=g8;pinno=1,2
Click Connector(T2)Body>No. 3 Floor Wire / Theft Warning Sensor Cord Sub-Assembly>Multiplex Network Door ECUewd_type=component;type=c;code=T2;pinno=1,9
g8-1 (OSL) - T2-1 (OSL) Always Below 1 Ω g8-2 (OSLE) - T2-9 (OSE) Always Below 1 Ω g8-1 (OSL) or T2-1 (OSL) - Body ground Always 10 kΩ or higher g8-2 (OSLE) or T2-9 (OSE) - Body ground Always 10 kΩ or higher
- Result:
-
Proceed to OK NG
OK
NG