SEAT REAR NO. 2 SEAT ASSEMBLY(for Manual Seat) REASSEMBLY
CAUTION / NOTICE / HINT
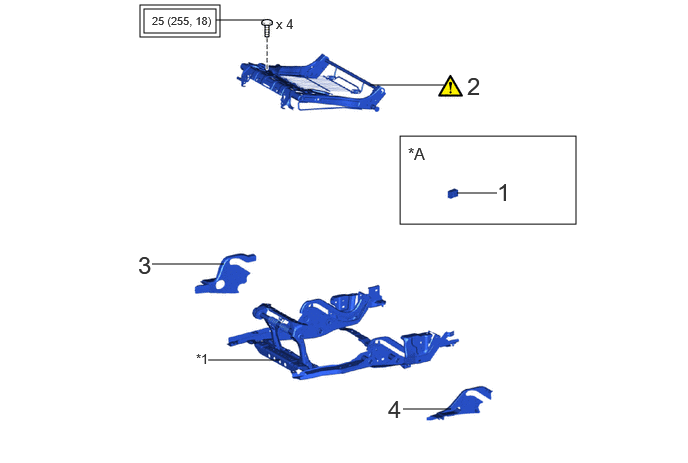
| Procedure | Part Name Code |

|

|

|
|
|---|---|---|---|---|---|
| 1 | REAR NO. 2 SEAT WIRE LH | 82196 | - | - | - |
| 2 | NO. 2 SEAT CUSHION FRAME SUB-ASSEMBLY LH | 79202B | ( ) |
- | - |
| 3 | REAR NO. 2 SEAT LOWER CUSHION HINGE COVER RH | 71693Q | - | - | - |
| 4 | REAR NO. 2 SEAT LOWER CUSHION HINGE COVER LH | 71694J | - | - | - |
| *A | w/ Rear No. 2 Seat Wire LH | - | - |
| *1 | REAR NO. 2 SEAT LEG ASSEMBLY LH | - | - |

|
Tightening torque for "Major areas involving basic vehicle performance such as moving/turning/stopping": N*m (kgf*cm, ft.*lbf) | - | - |
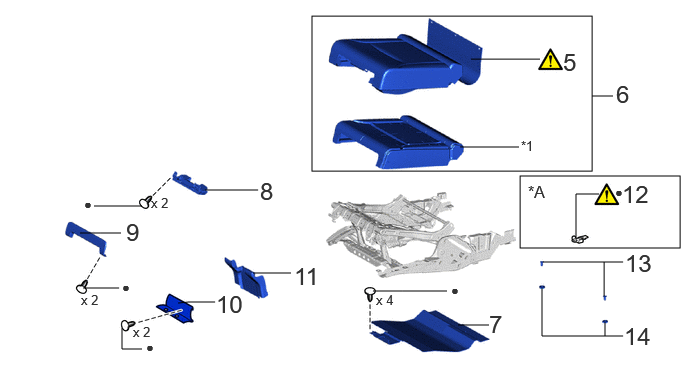
| Procedure | Part Name Code |
|
|
|
|
|---|---|---|---|---|---|
| 5 | NO. 2 SEAT CUSHION COVER SUB-ASSEMBLY LH | 79022B | () |
- | - |
| 6 | SEAT CUSHION COVER WITH PAD | - | - | - | - |
| 7 | NO. 2 SEAT CUSHION UNDER CARPET LH | 79347A | - | - | - |
| 8 | REAR NO. 2 SEAT CUSHION UNDER COVER LH | 72928F | - | - | - |
| 9 | REAR SEAT CUSHION COVER LH | 72998D | - | - | - |
| 10 | REAR NO. 2 SEAT CUSHION CARPET | 79225D | - | - | - |
| 11 | NO. 2 SEAT LEG COVER LH | 79246H | - | - | - |
| 12 | LH SEAT REAR SEAT PLATE | 71779E | () |
- | - |
| 13 | NO. 2 SEAT ADJUSTER COVER CAP LH | 71849M | - | - | - |
| 14 | NO. 2 SEAT LEG BUSH | 72622D | - | - | - |
| *A | w/ Plate | - | - |
| *1 | NO. 2 SEAT CUSHION PAD LH | - | - |
| ● | Non-reusable part | - | - |
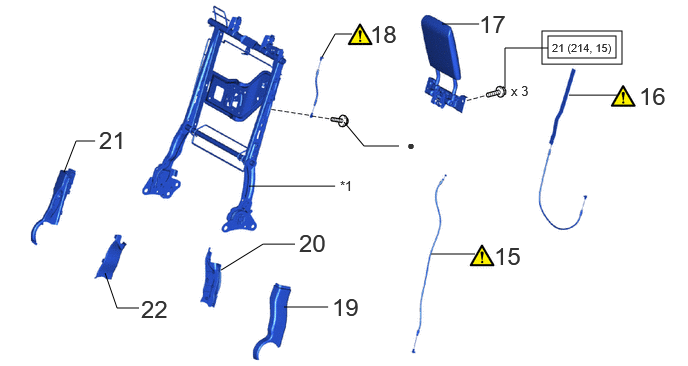
| Procedure | Part Name Code |
|
|
|
|
|---|---|---|---|---|---|
| 15 | FOLD SEAT LOCK CONTROL CABLE ASSEMBLY LH | 78910D | () |
- | - |
| 16 | REAR SEAT LOCK RELEASE STRAP ASSEMBLY | 72690K | () |
- | - |
| 17 | NO. 2 SEAT HEADREST ASSEMBLY LH | 71940J | - | - | - |
| 18 | REAR SEAT HEADREST CABLE | 71987H | () |
- | - |
| 19 | REAR NO. 2 SEAT NO. 4 RECLINING COVER LH | 71844P | - | - | - |
| 20 | REAR NO. 2 SEAT NO. 3 RECLINING COVER LH | 71834N | - | - | - |
| 21 | REAR NO. 2 SEAT NO. 2 RECLINING COVER LH | 71843Q | - | - | - |
| 22 | REAR NO. 2 SEAT NO. 1 RECLINING COVER LH | 71833N | - | - | - |
| *1 | NO. 2 SEATBACK FRAME SUB-ASSEMBLY LH | - | - |
|
|
Tightening torque for "Major areas involving basic vehicle performance such as moving/turning/stopping": N*m (kgf*cm, ft.*lbf) | ● | Non-reusable part |
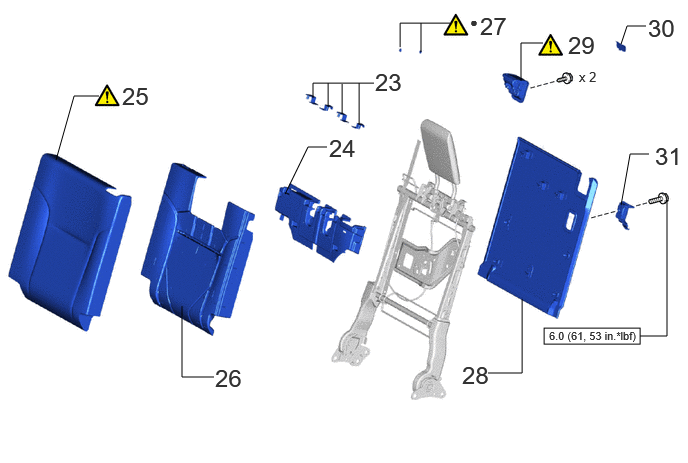
| Procedure | Part Name Code |
|
|
|
|
|---|---|---|---|---|---|
| 23 | REAR SEAT BACK PROTECTOR | 71697M | - | - | - |
| 24 | REAR HEADREST COVER LH | 72985A | - | - | - |
| 25 | NO. 2 SEATBACK COVER SUB-ASSEMBLY LH | 79024D | () |
- | - |
| 26 | NO. 2 SEATBACK PAD LH | 79285C | - | - | - |
| 27 | SEATBACK LOCK HOOK | 72635D | () |
- | - |
| 28 | NO. 2 SEATBACK BOARD SUB-ASSEMBLY LH | 79207C | - | - | - |
| 29 | REAR SEAT LOCK CONTROL LEVER SUB-ASSEMBLY LH | 72057K | () |
- | - |
| 30 | REAR SEATBACK LOCK STRIKER COVER | 72615P | - | - | - |
| 31 | ROPE HOOK ASSEMBLY | 66310P | - | - | - |

|
N*m (kgf*cm, ft.*lbf) : Specified torque | ● | Non-reusable part |
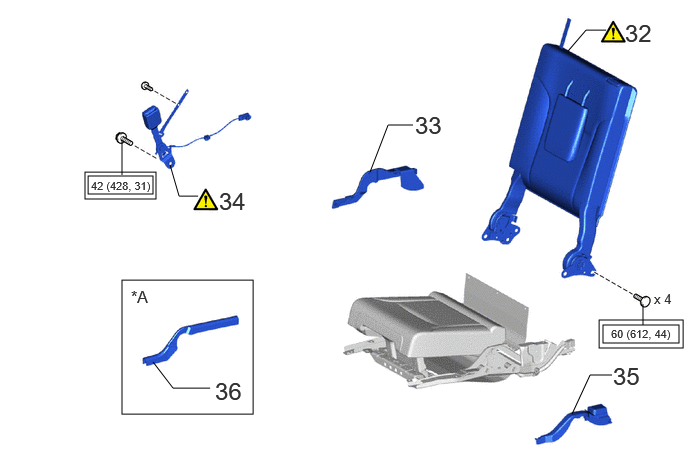
| Procedure | Part Name Code |
|
|
|
|
|---|---|---|---|---|---|
| 32 | NO. 2 SEATBACK ASSEMBLY LH | - | () |
- | - |
| 33 | REAR NO. 2 SEAT UPPER CUSHION HINGE COVER LH | 71692M | - | - | - |
| 34 | REAR NO. 2 SEAT INNER BELT ASSEMBLY LH | 73590 | () |
- | - |
| 35 | REAR NO. 2 SEAT LOWER CUSHION HINGE COVER LH | 71694J | - | - | - |
| 36 | CENTER PROTECTOR COVER | 74865H | - | - | - |
| *A | for RH Seat | - | - |
|
|
Tightening torque for "Major areas involving basic vehicle performance such as moving/turning/stopping": N*m (kgf*cm, ft.*lbf) | - | - |
- CAUTION:
-
·
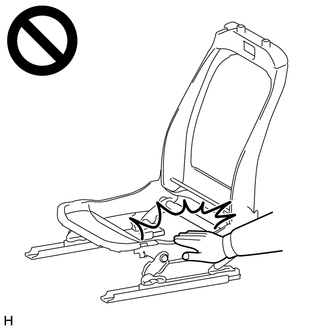
·Wear protective gloves. Sharp areas on the parts may injure your hands.
·There is risk of injury.
- HINT:
-
·
Use the same procedure for the RH and LH sides.
·The following procedure is for the LH side.
PROCEDURE

 82196 1.INSTALL REAR NO. 2 SEAT WIRE LH (w/ Rear No. 2 Seat Wire LH)
79202B 2.INSTALL NO. 2 SEAT CUSHION FRAME SUB-ASSEMBLY LH
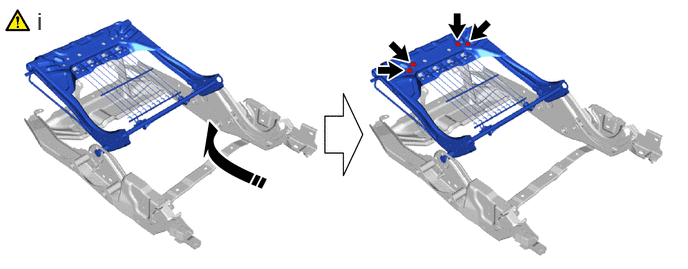
Using a T40 "TORX" socket wrench, install the 4 "TORX" bolts and No. 2 seat cushion frame sub-assembly LH.
- Torque:
- 25 N*m (255 kgf*cm, 18 ft.*lbf)
71693Q 3.INSTALL REAR NO. 2 SEAT LOWER CUSHION HINGE COVER RH
71694J 4.INSTALL REAR NO. 2 SEAT LOWER CUSHION HINGE COVER LH
79022B 5.INSTALL NO. 2 SEAT CUSHION COVER SUB-ASSEMBLY LH
|
|
|
6.INSTALL SEAT CUSHION COVER WITH PAD
79347A 7.INSTALL NO. 2 SEAT CUSHION UNDER CARPET LH
72928F 8.INSTALL REAR NO. 2 SEAT CUSHION UNDER COVER LH
72998D 9.INSTALL REAR SEAT CUSHION COVER LH
79225D 10.INSTALL REAR NO. 2 SEAT CUSHION CARPET
79246H 11.INSTALL NO. 2 SEAT LEG COVER LH
71779E 12.INSTALL LH SEAT REAR SEAT PLATE (w/ Plate)
|
|
|
- Standard Value:
-
Part Temperature Rear No. 2 Seat Leg Assembly LH 20 to 30°C (68 to 86°F) LH seat rear seat plate
- CAUTION:
-
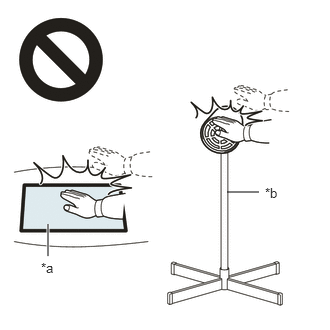 2.365,2 2.698,2 false 0.5,2.333 0.5,2.667 true 0.427,2.708 0.74,2.865 0.313,0.156 10 false *a 2.76,1.927 3.073,2.083 0.313,0.156 10 false *b
*a Heated Part *b Heat Light
-
·
Do not touch the heat light and heated parts.
·Touching the heat light may result in burns.
·Touching heated parts for a long time may result in burns.
- NOTICE:
-
Do not heat the LH seat rear seat plate and rear No. 2 seat leg assembly LH excessively.
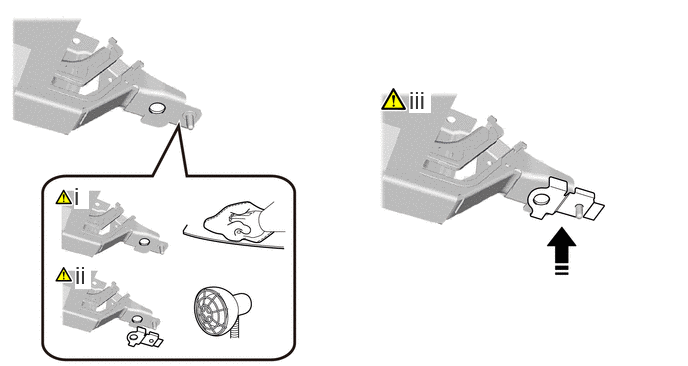
Clean the rear No. 2 seat leg assembly LH surface.
1. When reusing the rear No. 2 seat leg assembly LH, remove remaining double-sided tape from the rear No. 2 seat leg assembly LH.
2. Using a heat light, heat the rear No. 2 seat assembly LH surface.
3. Remove any remaining double-sided tape from the rear No. 2 seat leg assembly LH and wipe off any tape adhesive residue with cleaner.
4. Clean the surface.
- NOTICE:
-
·
Installing the LH seat rear seat plate with some double-sided tape remaining may cause poor adhesion. Perform this procedure until the tape is sufficiently removed.
·Make sure to use a cloth when removing. Using a screwdriver, etc., may cause damage and poor adhesion.
·Also, clean a new rear No. 2 seat leg assembly LH surface.
Using a heat light, heat the rear No. 2 seat leg assembly LH and a new LH seat rear seat plate.
Install the LH seat rear seat plate in the position shown in the illustration.
- NOTICE:
-
·
The application strength of the front bumper pad will weaken if reapplied. If reapplication is necessary, be sure to replace it with a new one.
·Do not overlapping holes.
- HINT:
-
Apply pressure so that it does not lift up from the rear No. 2 seat leg assembly LH.
71849M 13.INSTALL NO. 2 SEAT ADJUSTER COVER CAP LH
72622D 14.INSTALL REAR NO. 2 SEAT LEG BUSH
78910D 15.INSTALL FOLD SEAT LOCK CONTROL CABLE ASSEMBLY LH
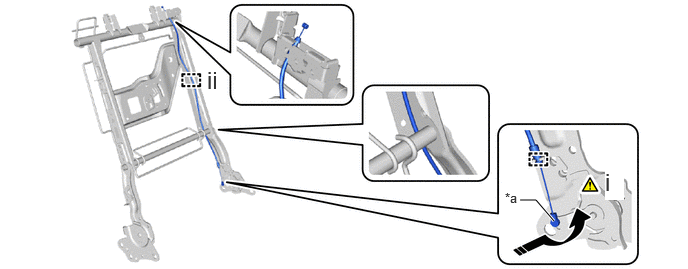
| *a | Cable End | - | - |

|
Install in this Direction | - | - |
Twist the cable end as shown in the illustration and install the fold seat lock control cable assembly LH.
Attach the clamp.
72690K 16.INSTALL REAR SEAT LOCK RELEASE STRAP ASSEMBLY
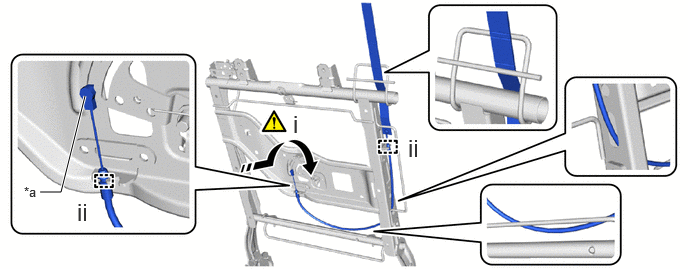
| *a | Cable End | - | - |
|
|
Install in this Direction | - | - |
Twist the cable end as shown in the illustration and install the rear seat lock release strap assembly.
Attach the clamp.
71940J 17.INSTALL NO. 2 SEAT HEADREST ASSEMBLY LH
- Torque:
- 21 N*m (214 kgf*cm, 15 ft.*lbf)
71987H 18.INSTALL REAR SEAT HEADREST CABLE
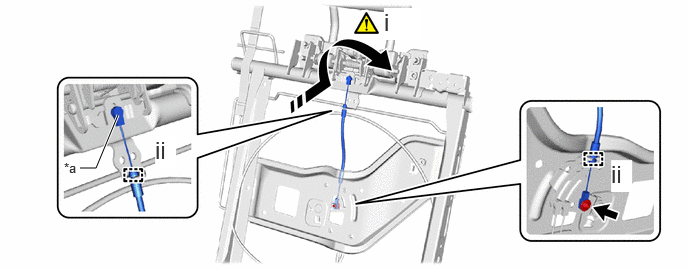
| *a | Cable End | - | - |
|
|
Install in this Direction | - | - |
Twist the cable end as shown in the illustration and install the rear seat headrest cable.
Install the screw and attach the clamp.
71844P 19.INSTALL REAR NO. 2 SEAT NO. 4 RECLINING COVER LH
71834N 20.INSTALL REAR NO. 2 SEAT NO. 3 RECLINING COVER LH
71843Q 21.INSTALL REAR NO. 2 SEAT NO. 2 RECLINING COVER LH
71833N 22.INSTALL REAR NO. 2 SEAT NO. 1 RECLINING COVER LH
71697M 23.INSTALL REAR SEAT BACK PROTECTOR
72985A 24.INSTALL REAR HEADREST COVER LH
79024D 25.INSTALL NO. 2 SEATBACK COVER SUB-ASSEMBLY LH
|
|
|
79285C 26.INSTALL NO. 2 SEATBACK PAD LH
72635D 27.INSTALL SEATBACK LOCK HOOK
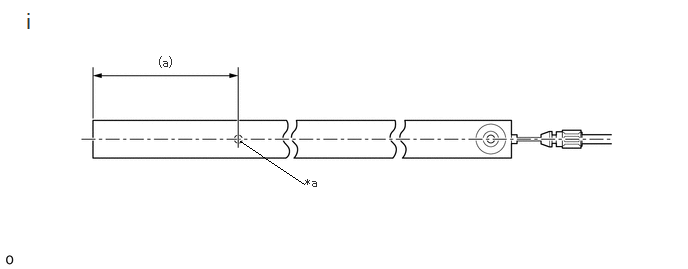
| *a | Hole | - | - |
Measure the length (a) of the rear seat lock release strap assembly and discern the type A or Type B.
- Dimension:
-
Type Length (a) Type A 95 mm (3.74 in.) Type B 75 mm (2.95 in.)
Type A:
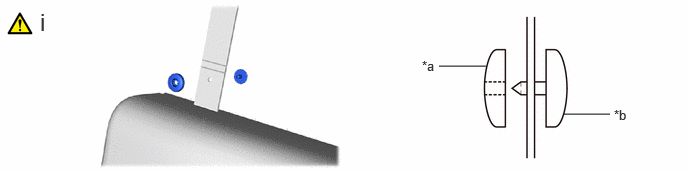
| *a | Front Side | *b | Rear Side |
Install the seatback lock hook as shown in the illustration.
Type B:
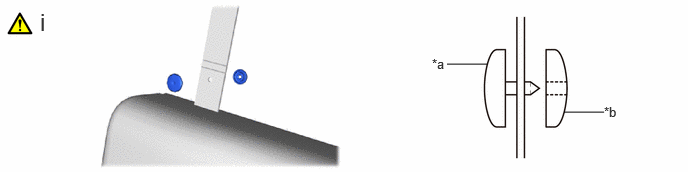
| *a | Front Side | *b | Rear Side |
Install the seatback lock hook as shown in the illustration.
79207C 28.INSTALL NO. 2 SEATBACK BOARD SUB-ASSEMBLY LH
72057K 29.INSTALL REAR SEAT LOCK CONTROL LEVER SUB-ASSEMBLY LH
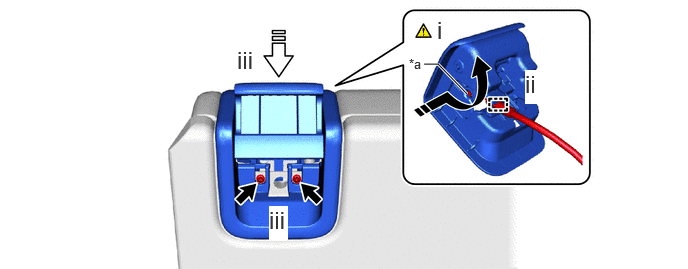
| *a | Cable End | - | - |
|
|
Install in this Direction (1) |

|
Install in this Direction (2) |
Twist the cable end as shown in the illustration connect the fold seat lock control cable assembly LH.
Atach the clamp.
Install the 2 screws and install the rear seat lock control lever sub-assembly LH.
72615P 30.INSTALL REAR SEATBACK LOCK STRIKER COVER
66310P 31.INSTALL ROPE HOOK ASSEMBLY
- Torque:
- 6.0 N*m (61 kgf*cm, 53 in.*lbf)
32.INSTALL NO. 2 SEATBACK ASSEMBLY LH
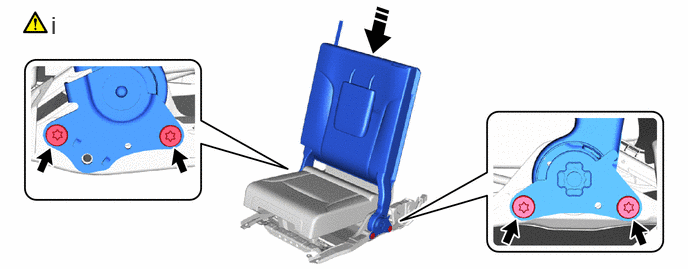
|
|
Install in this Direction | - | - |
Using a T45 "TORX" socket wrench, install the 4 "TORX" bolts and No. 2 seatback assembly LH.
- Torque:
- 60 N*m (612 kgf*cm, 44 ft.*lbf)
71692M 33.INSTALL REAR NO. 2 SEAT UPPER CUSHION HINGE COVER LH
73590 34.INSTALL REAR NO. 2 SEAT INNER BELT ASSEMBLY LH
|
|
() |
71694J 35.INSTALL REAR NO. 2 SEAT LOWER CUSHION HINGE COVER LH
74865H 36.INSTALL CENTER PROTECTOR COVER (for RH Seat)