LIGHTING (EXT) LIGHTING SYSTEM(w/ Headlight ECU) B243900 Headlight LH Circuit B243A00 Headlight RH Circuit
DESCRIPTION
The headlight ECU sub-assembly internally boost the power supply voltage to ensure a constant supplied current for the low beam LED of their respective headlight.
By monitoring the LED power supply voltage, abnormal current and malfunctions can be detected.
| DTC No. | Detection Item | DTC Detection Condition | Trouble Area | DTC Output from | Priority |
|---|---|---|---|---|---|
| B243900 | Headlight LH Circuit |
Detection condition:
All of the following conditions are met:
-
Ignition switch ON
-
Low beam headlights on
Malfunction status:
·
Headlight unit LH malfunction
·
Open/short in Lo/Hi beam circuit
Malfunction duration:
10 seconds or more |
·
Headlight ECU sub-assembly LH
·
Headlight unit LH
·
Headlight unit assembly LH |
Headlight Control | A |
| B243A00 | Headlight RH Circuit |
Detection condition:
All of the following conditions are met:
-
Ignition switch ON
-
Low beam headlights on
Malfunction status:
·
Headlight unit RH malfunction
·
Open/short in Lo/Hi beam circuit
Malfunction duration:
10 seconds or more |
·
Headlight ECU sub-assembly RH
·
Headlight unit RH
·
Headlight unit assembly RH |
Headlight Control (Sub) | A |
WIRING DIAGRAM
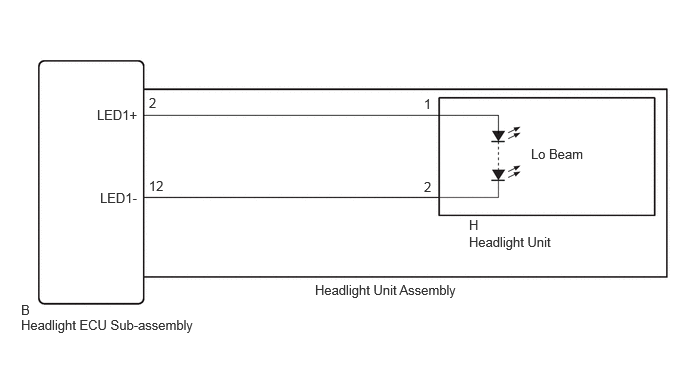
CAUTION / NOTICE / HINT
- NOTICE:
-
·
If the headlight ECU sub-assembly LH has been replaced, it is necessary to synchronize the vehicle information and initialize the headlight ECU sub-assembly LH.
Click hereVehicle Exterior>LIGHTING (EXT)>LIGHTING SYSTEM (w/ Headlight ECU)>REGISTRATION
·When replacing the headlight ECU sub-assembly LH, always replace it with a new one. If a headlight ECU sub-assembly LH which was installed to another vehicle is used, the information stored in it will not match the information from the vehicle and a DTC may be stored.
PROCEDURE
Clear the DTCs.
- Body Electrical > Headlight Control > Clear DTCs
- 50002 462
- Result:
-
Proceed to NEXT
NEXT
Pre-procedure1
Turn ignition switch to ON.
Operate the light control switch to turn on the low beam headlights and wait 10 seconds or more.
Procedure1
Check for DTCs.
- Body Electrical > Headlight Control > Trouble Codes
- 50001 462
- Result:
-
Result Proceed to B243900 is not output A B243900 is output B
Post-procedure1
None
A
B
Clear the DTCs.
- Body Electrical > Headlight Control (Sub) > Clear DTCs
- 50002 463
- Result:
-
Proceed to NEXT
NEXT
Pre-procedure1
Turn ignition switch to ON.
Operate the light control switch to turn on the low beam headlights and wait 10 seconds or more.
Procedure1
Check for DTCs.
- Body Electrical > Headlight Control (Sub) > Trouble Codes
- 50001 463
- Result:
-
Result Proceed to B243A00 is not output A B243A00 is output B
Post-procedure1
None
A
Click hereGeneral>INTRODUCTION>HOW TO TROUBLESHOOT ECU CONTROLLED SYSTEMS>HOW TO PROCEED WITH TROUBLESHOOTING
B
Interchange the headlight unit assembly RH with LH and connect the connectors.
- HINT:
-
Click hereVehicle Exterior>LIGHTING (EXT)>HEADLIGHT ASSEMBLY>DISASSEMBLY
- Result:
-
Proceed to NEXT
NEXT
Clear the DTCs.
- Body Electrical > Headlight Control (Sub) > Clear DTCs
- 50002 463
- Result:
-
Proceed to NEXT
NEXT
Pre-procedure1
Turn ignition switch to ON.
Operate the light control switch to turn on the low beam headlights and wait 10 seconds or more.
Procedure1
Check for DTCs.
- Body Electrical > Headlight Control (Sub) > Trouble Codes
- 50001 463
- Result:
-
Result Proceed to B243A00 is output A B243A00 is not output B
Post-procedure1
None
A
B
Clear the DTCs.
- Body Electrical > Headlight Control > Clear DTCs
- 50002 462
- Result:
-
Proceed to NEXT
NEXT
Pre-procedure1
Turn ignition switch to ON.
Operate the light control switch to turn on the low beam headlights and wait 10 seconds or more.
Procedure1
Check for DTCs.
- Body Electrical > Headlight Control > Trouble Codes
- 50001 462
- Result:
-
Result Proceed to B243900 is output A B243900 is not output B
Post-procedure1
None
A
B
Click hereGeneral>INTRODUCTION>HOW TO TROUBLESHOOT ECU CONTROLLED SYSTEMS>HOW TO PROCEED WITH TROUBLESHOOTING
Pre-procedure1
Remove the headlight unit assembly RH.
- HINT:
-
Click hereVehicle Exterior>LIGHTING (EXT)>HEADLIGHT ASSEMBLY>DISASSEMBLY
Procedure1
Measure the resistance according to the value(s) in the table below.
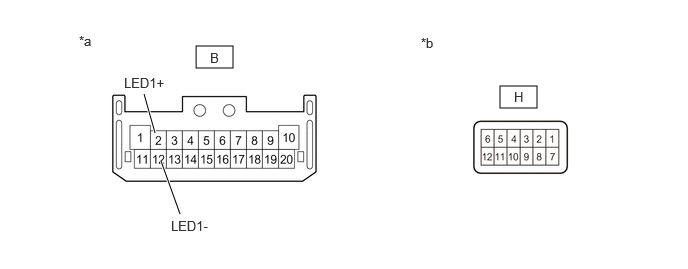
| *a | Component without harness connected (to Headlight ECU Sub-assembly RH) |
*b | Component without harness connected (to Headlight Unit RH) |
- Standard Resistance:
-
Tester Connection Condition Specified Condition B-2 (LED1+) - H-1 Always Below 1 Ω B-12 (LED1-) - H-2 Always Below 1 Ω
- Result:
-
Proceed to OK NG
Post-procedure1
None
OK
NG
Interchange the headlight unit assembly LH with RH and connect the connectors.
- HINT:
-
Click hereVehicle Exterior>LIGHTING (EXT)>HEADLIGHT ASSEMBLY>DISASSEMBLY
- Result:
-
Proceed to NEXT
NEXT
Clear the DTCs.
- Body Electrical > Headlight Control > Clear DTCs
- 50002 462
- Result:
-
Proceed to NEXT
NEXT
Pre-procedure1
Turn ignition switch to ON.
Operate the light control switch to turn on the low beam headlights and wait 10 seconds or more.
Procedure1
Check for DTCs.
- Body Electrical > Headlight Control > Trouble Codes
- 50001 462
- Result:
-
Result Proceed to B243900 is output A B243900 is not output B
Post-procedure1
None
A
B
Clear the DTCs.
- Body Electrical > Headlight Control (Sub) > Clear DTCs
- 50002 463
- Result:
-
Proceed to NEXT
NEXT
Pre-procedure1
Turn ignition switch to ON.
Operate the light control switch to turn on the low beam headlights and wait 10 seconds or more.
Procedure1
Check for DTCs.
- Body Electrical > Headlight Control (Sub) > Trouble Codes
- 50001 463
- Result:
-
Result Proceed to B243A00 is output A B243A00 is not output B
Post-procedure1
None
A
B
Click hereGeneral>INTRODUCTION>HOW TO TROUBLESHOOT ECU CONTROLLED SYSTEMS>HOW TO PROCEED WITH TROUBLESHOOTING
Pre-procedure1
Remove the headlight unit assembly LH.
- HINT:
-
Click hereVehicle Exterior>LIGHTING (EXT)>HEADLIGHT ASSEMBLY>DISASSEMBLY
Procedure1
Measure the resistance according to the value(s) in the table below.
| *a | Component without harness connected (to Headlight ECU Sub-assembly LH) |
*b | Component without harness connected (to Headlight Unit LH) |
- Standard Resistance:
-
Tester Connection Condition Specified Condition B-2 (LED1+) - H-1 Always Below 1 Ω B-12 (LED1-) - H-2 Always Below 1 Ω
- Result:
-
Proceed to OK NG
Post-procedure1
None
OK
NG