PARKING BRAKE ELECTRIC PARKING BRAKE SYSTEM Electric Parking Brake does not Operate
WIRING DIAGRAM
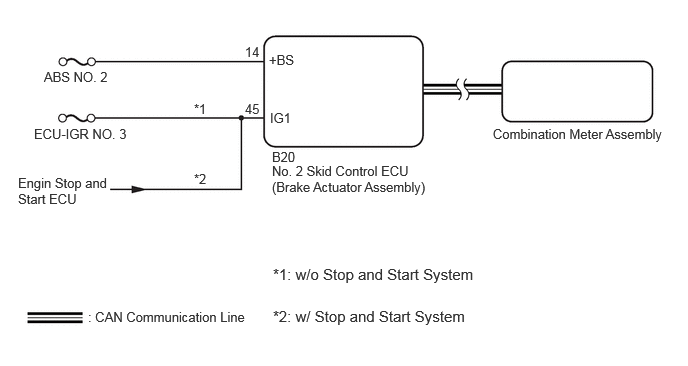
CAUTION / NOTICE / HINT
- NOTICE:
-
·
Inspect the fuses for circuits related to this system before performing the following procedure.
·To ensure that the electric parking brake does not operate, wait for 4 minutes or more with the ignition switch off, the driver door closed, and the brake pedal not depressed, then disconnect each connector, fuse and relay.
·After replacing the No. 2 skid control ECU (brake actuator assembly), perform "Calibration".
Click hereBrake>BRAKE CONTROL / DYNAMIC CONTROL SYSTEMS>ELECTRONICALLY CONTROLLED BRAKE SYSTEM>UTILITY
·When replacing the No. 2 skid control ECU (brake actuator assembly), operate the electric parking brake switch assembly as the parking brake indicator light blinks when the ignition switch is first turned ON.
- HINT:
-
Even if the electric parking brake is operating normally, the parking brake indicator light on the combination meter may be malfunctioning.
PROCEDURE
Check if CAN communication system DTCs are output.
- Chassis > Brake/EPB > Trouble Codes
- 50001 435
- Result:
-
Result Proceed to DTCs are not output A DTCs are output B
A
B
Click herePower Source / Network>NETWORKING>CAN COMMUNICATION SYSTEM>HOW TO PROCEED WITH TROUBLESHOOTING
With the wheels not contacting the ground, check the condition of the rear wheels when the electric parking brake is operating and not operating.
Click hereBrake>PARKING BRAKE>ELECTRIC PARKING BRAKE ACTUATOR>ON-VEHICLE INSPECTION
- Result:
-
Result Proceed to Lock and release operation is normal and parking brake indicator light turns off or blinks A Lock and release operation is malfunctioning and parking brake indicator light illuminates or turns off according to switch operation B Lock and release operation is malfunctioning and parking brake indicator light turns off or blinks C
A
B
C
Perform the Active Test of the combination meter assembly using the GTS.
- Body Electrical > Combination Meter > Active Test
-
Tester Display Indicat. Park - 50004 122 69
Check the combination meter assembly.
- OK:
-
Parking brake indicator light turns on or off in accordance with GTS operation.
- Result:
-
Proceed to OK NG
OK
for LHD: Click hereBrake>BRAKE CONTROL / DYNAMIC CONTROL SYSTEMS>BRAKE ACTUATOR (for LHD)>REMOVAL
for RHD: Click hereBrake>BRAKE CONTROL / DYNAMIC CONTROL SYSTEMS>BRAKE ACTUATOR (for RHD)>REMOVAL
NG
Click hereVehicle Interior>METER / GAUGE / DISPLAY>METER / GAUGE SYSTEM>HOW TO PROCEED WITH TROUBLESHOOTING
Disconnect the B20 No. 2 skid control ECU (brake actuator assembly) connector.
Measure the voltage according to the value(s) in the table below.
- Standard Voltage:
-
Tester Connection Condition Specified Condition Click Location & Routing(B20)Location & Routingewd_type=routing;type=c;code=B20
B20-14 (+BS) - Body ground Always 11 to 14 V
- Result:
-
Proceed to OK NG
OK
NG
Check the vehicle specification.
- Result:
-
Result Proceed to w/o Stop and Start System A w/ Stop and Start System B
A
B
Disconnect the B20 No. 2 skid control ECU (brake actuator assembly) connector.
Measure the voltage according to the value(s) in the table below.
- Standard Voltage:
-
Tester Connection Condition Specified Condition Click Location & Routing(B20)Location & Routingewd_type=routing;type=c;code=B20
B20-45 (IG1) - Body ground Ignition switch ON 11 to 14 V
- Result:
-
Proceed to OK NG
OK
for LHD: Click hereBrake>BRAKE CONTROL / DYNAMIC CONTROL SYSTEMS>BRAKE ACTUATOR (for LHD)>REMOVAL
for RHD: Click hereBrake>BRAKE CONTROL / DYNAMIC CONTROL SYSTEMS>BRAKE ACTUATOR (for RHD)>REMOVAL
NG
Disconnect the B20 No. 2 skid control ECU (brake actuator assembly) connector.
Measure the voltage according to the value(s) in the table below.
- Standard Voltage:
-
Tester Connection Condition Specified Condition Click Location & Routing(B20)Location & Routingewd_type=routing;type=c;code=B20
B20-45 (IG1) - Body ground Ignition switch ON 10.5 to 16 V
- Result:
-
Proceed to OK NG
OK
for LHD: Click hereBrake>BRAKE CONTROL / DYNAMIC CONTROL SYSTEMS>BRAKE ACTUATOR (for LHD)>REMOVAL
for RHD: Click hereBrake>BRAKE CONTROL / DYNAMIC CONTROL SYSTEMS>BRAKE ACTUATOR (for RHD)>REMOVAL
NG
Click hereEngine / Hybrid System>STOP AND START>STOP AND START SYSTEM>Backup Boost Converter Circuit