BRAKE CONTROL / DYNAMIC CONTROL SYSTEMS ELECTRONICALLY CONTROLLED BRAKE SYSTEM Abnormal Brake Pedal Response on First Depression
DESCRIPTION
If the vehicle has been stopped without opening or closing the driver door for a long period of time, the electronically controlled brake system will not be ready and sufficient fluid pressure may not be stored in the accumulator. In this case, the brake pedal response may not be the same as usual the first time the brake pedal is depressed. This is not a malfunction.
WIRING DIAGRAM
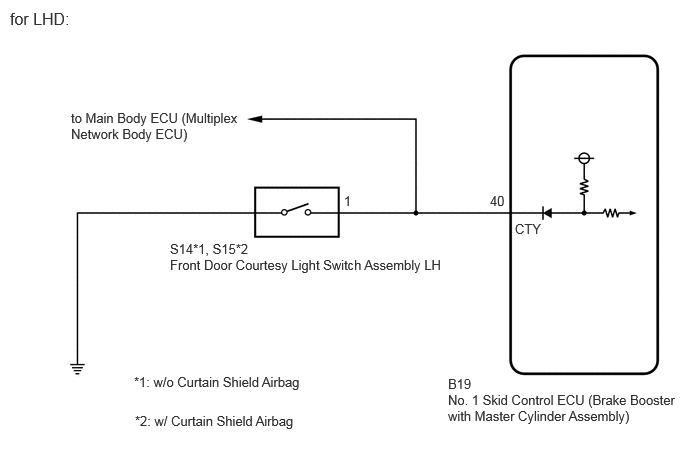
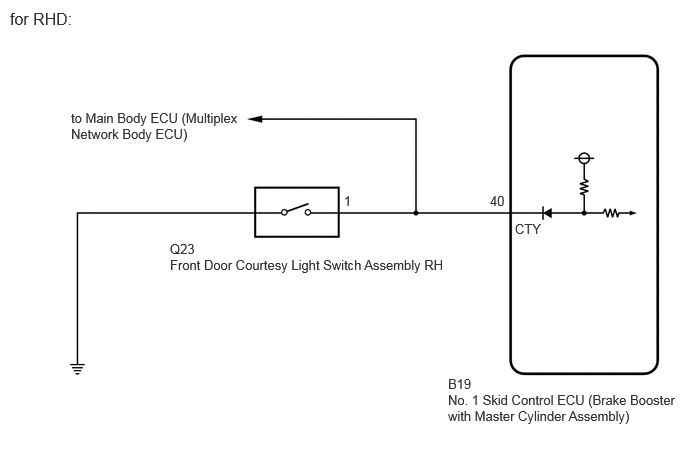
CAUTION / NOTICE / HINT
- NOTICE:
-
After replacing the No. 1 skid control ECU (brake booster with master cylinder assembly), perform "Calibration".
-
Click hereBrake>BRAKE CONTROL / DYNAMIC CONTROL SYSTEMS>ELECTRONICALLY CONTROLLED BRAKE SYSTEM>UTILITY
PROCEDURE
Check the conditions at the time the problem occurred.
Whether a warning light illuminated or the buzzer sounded.
The number of times the ignition switch was turned to ON since the latest symptom occurred.
Frequency of the symptom.
- Result:
-
Proceed to NEXT
NEXT
Check the DTCs (electronically controlled brake system) that are output.
- Chassis > Brake Booster > Trouble Codes
- 50001 466
- Result:
-
Result Proceed to DTCs C125600 and C139100 are not output. A DTCs C125600 and/or C139100 are output. B
A
B
Turn the ignition switch off.
Depress the brake pedal within 3 minutes of opening the driver door and check the response of the brake pedal.
Release the brake pedal and wait for 3 minutes without depressing the brake pedal, opening or closing the driver door or operating the ignition switch.
After 3 minutes or more have elapsed, depress the brake pedal and check that the first depression response is different to successive depression responses.
- HINT:
-
Compare the response of the brake pedal when the system is in sleep mode and when the stroke simulator is operating.
- Result:
-
Result Proceed to The response of the brake pedal does not change. A The response of the brake pedal changed. B
A
B
Set the interior light door switch to ON and check that the map light assembly illuminates, then set the interior light door switch to DOOR.
Check that the map light assembly illuminates when the driver door is opened.
- OK:
-
The map light assembly illuminates when the driver door is opened.
- Result:
-
Proceed to OK NG
OK
NG
Make sure that there is no looseness at the locking part and the connecting part of the connector.
- OK:
-
The connector is securely connected.
Disconnect the B19 No. 1 skid control ECU (brake booster with master cylinder assembly) connector.
Check both the connector case and the terminals for deformation and corrosion.
- OK:
-
No deformation or corrosion.
Measure the voltage according to the value(s) in the table below.
- Standard Voltage:
-
Tester Connection Condition Specified Condition Click Location & Routing(B19)Location & Routingewd_type=routing;type=c;code=B19
B19-40 (CTY) - Body ground Driver door open Below 1.5 V B19-40 (CTY) - Body ground Driver door closed 11 to 14 V
- Result:
-
Proceed to OK NG
OK
for LHD: Click hereBrake>BRAKE SYSTEM (OTHER)>BRAKE BOOSTER (for LHD)>REMOVAL
for RHD: Click hereBrake>BRAKE SYSTEM (OTHER)>BRAKE BOOSTER (for RHD)>REMOVAL
NG