1GR-FE ENGINE MECHANICAL CYLINDER HEAD DISASSEMBLY
CAUTION / NOTICE / HINT
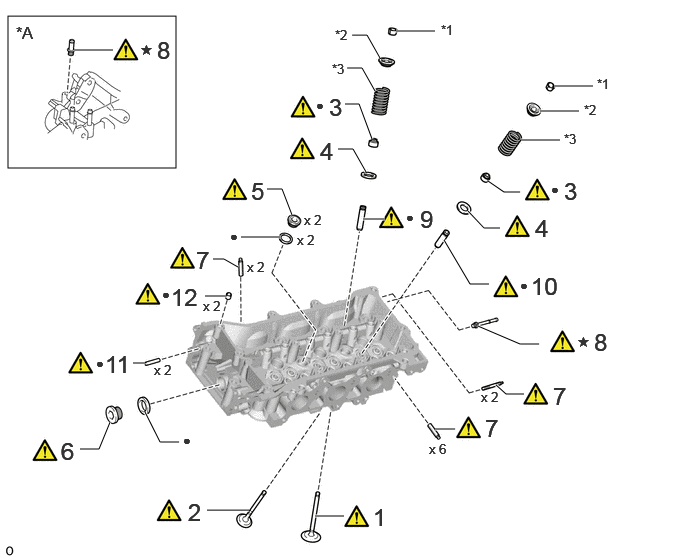
| Procedure | Part Name Code |

|

|

|
|
|---|---|---|---|---|---|
| 1 | INTAKE VALVE | 13711 | ( ) |
- | - |
| 2 | EXHAUST VALVE | 13715 | () |
- | - |
| 3 | VALVE STEM OIL SEAL | 13711E | () |
- | - |
| 4 | VALVE SPRING SEAT | 13734 | () |
- | - |
| 5 | NO. 1 STRAIGHT SCREW PLUG | 11117E | () |
- | - |
| 6 | NO. 2 STRAIGHT SCREW PLUG | 11117F | () |
- | - |
| 7 | STUD BOLT | - | () |
- | - |
| 8 | UNION | - | () |
- | - |
| 9 | INTAKE VALVE GUIDE BUSH | 11122 | () |
- | - |
| 10 | EXHAUST VALVE GUIDE BUSH | 11126 | () |
- | - |
| 11 | STRAIGHT PIN | - | () |
- | - |
| 12 | RING PIN | - | () |
- | - |
| *A | for LH | - | - |
| *1 | VALVE SPRING RETAINER LOCK | *2 | VALVE SPRING RETAINER |
| *3 | INNER COMPRESSION SPRING | - | - |
| ● | Non-reusable part | ★ | Precoated part |
CAUTION / NOTICE / HINT
The necessary procedures (adjustment, calibration, initialization, or registration) that must be performed after parts are removed, installed, or replaced during the cylinder head sub-assembly removal/installation are shown below.
| Replaced Part or Performed Procedure | Necessary Procedure | Effect/Inoperative Function when Necessary Procedure not Performed | Link |
|---|---|---|---|
| Battery terminal is disconnected/reconnected | Memorize steering angle neutral point | Parking assist monitor system | () |
| Multi-terrain monitor system | () |
||
| Panoramic view monitor system | () |
||
| Automatic transmission assembly | Reset memory |
·
Large shift shock
·
Engine overruns |
() |
| Automatic transmission fluid | ATF thermal degradation estimate reset | The value of the Data List item "ATF Thermal Degradation Estimate" is not estimated correctly. | |
|
·
Throttle body with motor assembly
·
Cleaning the deposits from the throttle body with motor assembly
·
Cylinder head sub-assembly
·
Camshaft (for intake or exhaust camshaft)
·
Camshaft timing gear assembly
·
Piston or piston ring
·
Fuel injector assembly
·
Fuel pump
·
Air fuel ratio sensor
·
Engine coolant temperature sensor
·
Spark plug
·
Ignition coil assembly
·
Air leaks from intake system
·
Gas leaks from exhaust system
·
Knock control sensor |
Inspection after repairs |
·
Poor idle, etc.
·
Engine start function, etc. |
() |
| Engine assembly | Inspection after repair |
·
Poor idle, etc.
·
Engine start function, etc. |
() |
| Front bumper assembly (Including removal and installation) | Front television camera view adjustment | Panoramic view monitor system | () |
- HINT:
-
When the cable is disconnected/reconnected to the battery terminal, systems temporarily stop operating. However, each system has a function that completes learning the first time the system is used.
-
·
Learning completes when vehicle is driven
Effect/Inoperative Function When Necessary Procedures are not Performed Necessary Procedures Link Lighting system (EXT) Cornering lights Drive the vehicle straight ahead at 35 km/h (22 mph) or more for 5 seconds or more. ( )Pre-collision system Lane tracing assist system Lane departure alert system Adaptive high beam system
·Learning completes when vehicle is operated normally
Effect/Inoperative Function When Necessary Procedures are not Performed Necessary Procedures Link Power back door system Fully close the back door by hand.
- HINT:
-
Initialization is not necessary if the above procedures are performed while the back door is closed.
( )Air conditioning system After the ignition switch is turned to ON, the servo motor and expansion valve standard position is recognized. -
PROCEDURE

 13711 1.REMOVE INTAKE VALVE
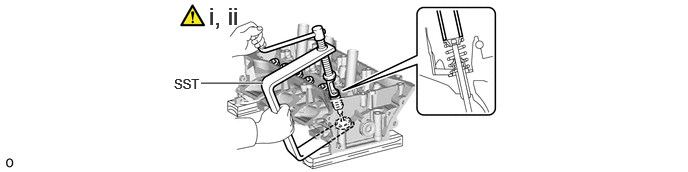
Using SST, compress the inner compression spring and remove the valve spring retainer locks.
- SST
-
09202-70020 (09202-00010)
Remove the valve spring retainer, inner compression spring and intake valve.
- HINT:
-
Arrange the removed parts in the correct order.
13715 2.REMOVE EXHAUST VALVE
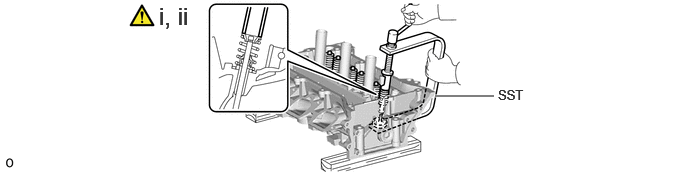
Using SST, compress the inner compression spring and remove the valve spring retainer locks.
- SST
-
09202-70020 (09202-00010)
Remove the valve spring retainer, inner compression spring and exhaust valve.
- HINT:
-
Arrange the removed parts in the correct order.
13711E 3.REMOVE VALVE STEM OIL SEAL
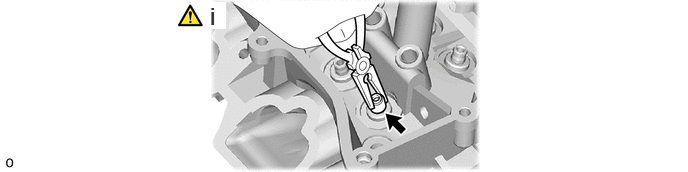
Using needle-nose pliers, remove the valve stem oil seals.
13734 4.REMOVE VALVE SPRING SEAT
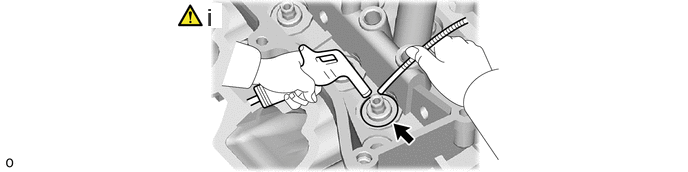
Using compressed air and a magnet hand, remove the valve spring seats by blowing air onto them.
11117E 5.REMOVE NO. 1 STRAIGHT SCREW PLUG
|
|
|
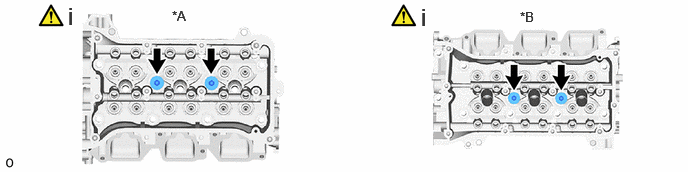
| *A | for Bank 1 | *B | for Bank 2 |
Using a 10 mm hexagon wrench, remove the 4 No. 1 straight screw plugs and 4 gaskets.
11117F 6.REMOVE NO. 2 STRAIGHT SCREW PLUG
|
|
|
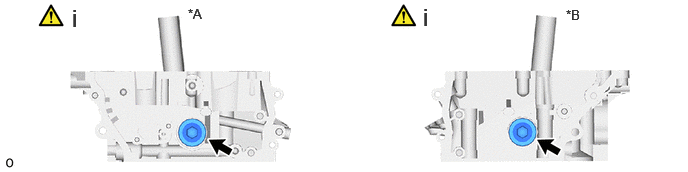
| *A | for Bank 1 | *B | for Bank 2 |
Using a 14 mm hexagon wrench, remove the 2 No. 2 straight screw plugs and 2 gaskets.
7.REMOVE STUD BOLT
|
|
|
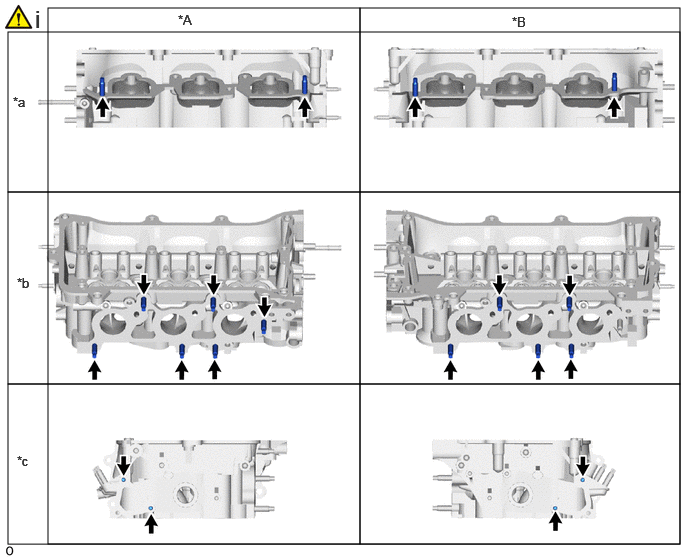
| *A | for Bank 1 | *B | for Bank 2 |
| *a | Intake Side | *b | Exhaust Side |
| *c | Rear Side | - | - |
Using E6 and E8 "TORX" sockets, removel the stud bolts.
8.REMOVE UNION
|
|
|
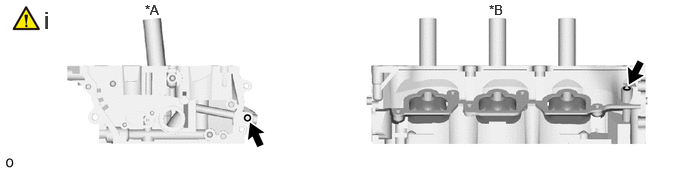
| *A | for Bank 1 | *B | for Bank 2 |
Using a 12 mm deep socket wrench, remove the 2 unions.
11122 9.REMOVE INTAKE VALVE GUIDE BUSH
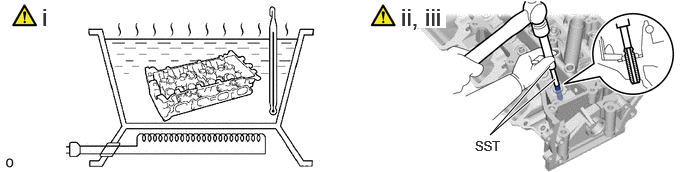
Heat the cylinder head to 80 to 100°C (176 to 212°F).
- CAUTION:
-
·
Do not touch the cylinder head sub-assembly without wearing protective gloves, as it may get very hot during operation.
·Be sure to wear protective gloves to avoid burns.
Place the cylinder head on wooden blocks.
- CAUTION:
-
Be sure to wear protective gloves.
Using SST and a hammer, tap out the intake valve guide bushes.
- SST
-
09201-10000 (09201-01050)
09950-70010 (09951-07100)
11126 10.REMOVE EXHAUST VALVE GUIDE BUSH
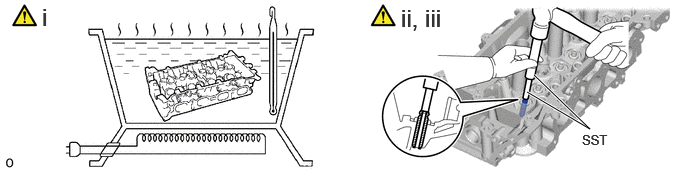
Heat the cylinder head to 80 to 100°C (176 to 212°F).
- CAUTION:
-
·
Do not touch the cylinder head sub-assembly without wearing protective gloves, as it may get very hot during operation.
·Be sure to wear protective gloves to avoid burns.
Place the cylinder head on wooden blocks.
- CAUTION:
-
Be sure to wear protective gloves.
Using SST and a hammer, tap out the exhaust valve guide bushes.
- SST
-
09201-10000 (09201-01050)
09950-70010 (09951-07100)
11.REMOVE STRAIGHT PIN
|
|
|
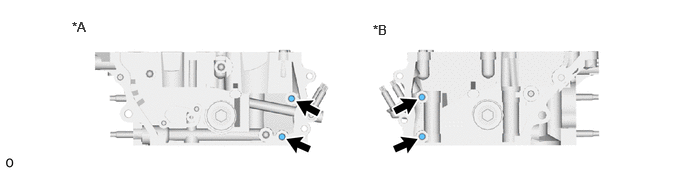
| *A | for Bank 1 | *B | for Bank 2 |
12.REMOVE RING PIN
|
|
|
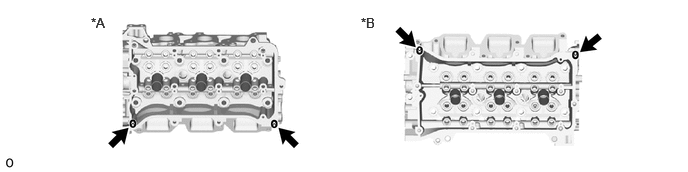
| *A | for Bank 1 | *B | for Bank 2 |