AUDIO / VIDEO AUDIO AND VISUAL SYSTEM(for Radio and Display Type, for 12.3 Inch Display) B15D0 MOST Communication Malfunction
DESCRIPTION
Audio and visual system components communicate with each other via MOST communication.
If a line short or short to ground occurs in a MOST communication line, communication will not be possible and the audio and visual system will not operate normally.
After the ignition switch is turned to ACC, if the MOST communication network cannot be established and MOST communication is determined to not be possible, this DTC will be stored.
- HINT:
-
Electrical noise may cause communication malfunctions between devices in the MOST network.
| DTC No. | Detection Item | DTC Detection Condition | Trouble Area | DTC Output from | Priority |
|---|---|---|---|---|---|
| B15D0 | MOST Communication Malfunction | MOST network cannot be established. |
·
Stereo component amplifier assembly
·
Radio receiver assembly
·
Harness or connector
·
Multi-display controller sub-assembly* |
Navigation System | B |
*: w/ Rear Seat Entertainment System
WIRING DIAGRAM
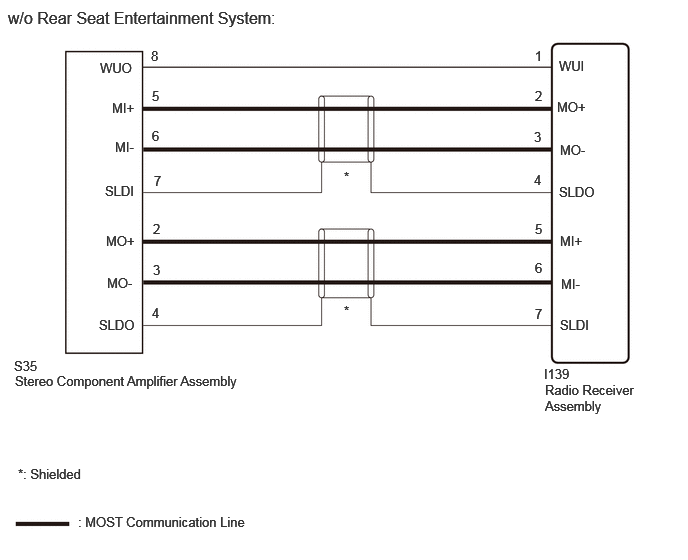
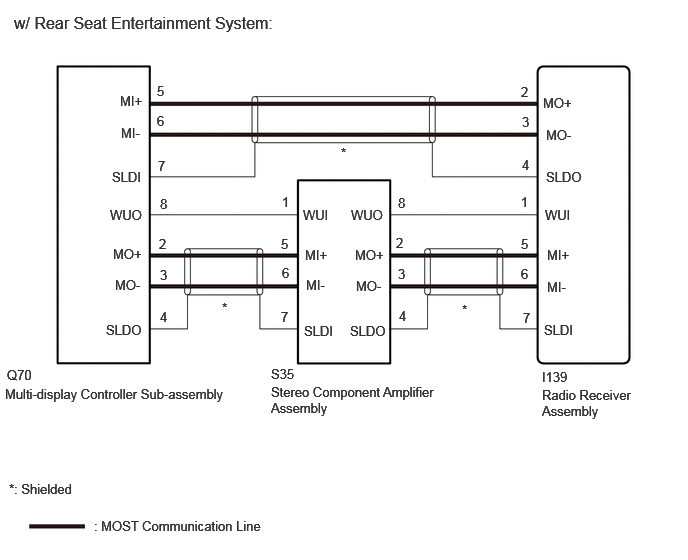
CHECK POINT
Before proceeding with the following procedure, start diagnostic mode, enter the "MOST Line Check" screen and check the results.
The following MOST line check result pattern table can be used to quickly identify trouble areas and inspection procedures.
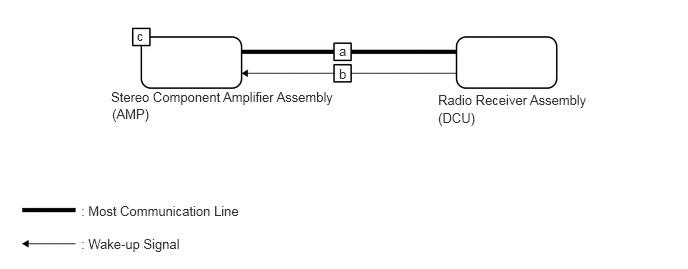
| Pattern | Device Name | Result | Trouble Area | Inspection |
|---|---|---|---|---|
| 1 | DCU | OK | a, c | Inspect MOST communication line between "DCU" and "AMP" |
| AMP | OK | |||
| 2 | DCU | OK | b, c | Inspect wake up communication line between "DCU" and "AMP" |
| AMP | NCON |
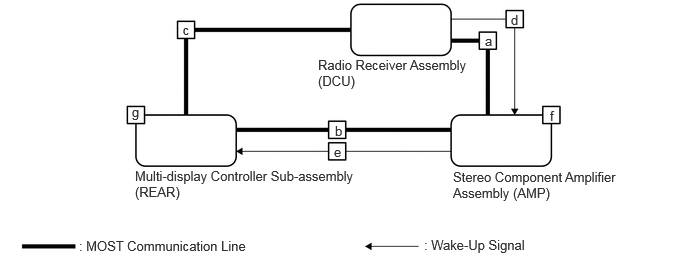
| Pattern | Device Name | Result | Trouble Area | Inspection |
|---|---|---|---|---|
| 1 | DCU | OK | a, b, c, f, g |
1.
Inspect MOST communication line between "DCU" and "AMP"
2.
Inspect MOST communication line between "AMP" and "REAR"
3.
Inspect MOST communication line between "REAR" and "DCU" |
| AMP | OK | |||
| REAR | OK | |||
| 2 | DCU | OK | d, e, f, g |
1.
Inspect wake up communication line between "DCU" and "AMP"
2.
Inspect wake up communication line between "AMP" and "REAR" |
| AMP | NCON | |||
| REAR | NCON | |||
| 3 | DCU | OK | e, g | Inspect wake up communication line between "AMP" and "REAR" |
| AMP | OK | |||
| REAR | NCON |
CAUTION / NOTICE / HINT
- NOTICE:
-
Depending on the parts that are replaced during vehicle inspection or maintenance, performing initialization, registration or calibration may be needed. Refer to Precaution for Audio and Visual System.
PROCEDURE
Check for DTCs.
- Body Electrical > Navigation System > Trouble Codes
- 50001 212
- Result:
-
Result Proceed to B15C3 and B15D3 are not output (w/o Rear Seat Entertainment System) A B15C3 and B15D3 are not output (w/ Rear Seat Entertainment System) B B15C3 is output C B15D3 is output D
- HINT:
-
·
If a short occurs in a speaker circuit, the sound output from the speakers will become very low or will stop and DTC B15C3 will be stored.
In this case, if the audio system volume is increased, current in the speaker circuit will increase more than necessary.
To prevent the current from becoming excessively high, when it increases to a certain amount, operation of the stereo component amplifier assembly will be suspended.
If operation is suspended, MOST communication will become impossible, the audio and visual system will not operate normally and DTC B15D0 will be stored.
-
·
If DTC B15C3 and B15D3 are output at the same time, perform troubleshooting for DTC B15C3 first.
A
B
C
D
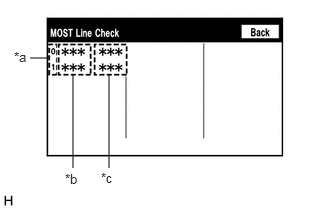
| *a | MOST Network Device Node Position Number |
| *b | Device Name |
| *c | Result |
Enter the "MOST Line Check" screen. Refer to Check DTC (Check Using System Check Mode Screen) in DTC Check / Clear.
- HINT:
-
Click hereAudio / Visual / Telematics>NAVIGATION / MULTI INFO DISPLAY>NAVIGATION SYSTEM>DTC CHECK / CLEAR
- HINT:
-
"MOST" is displayed on "System Check Mode" screen when the MOST network is malfunctioning.
- Result:
-
Result Proceed to "OK" is displayed for all items. A "NCON" is displayed for "AMP". B
A
B
Pre-procedure1
Disconnect the I139 radio receiver assembly connector.
Disconnect the S35 stereo component amplifier assembly connector.
Procedure1
Measure the resistance according to the value(s) in the table below.
- Standard Resistance:
-
Tester Connection Condition Specified Condition Click Location & Routing(I139,S35)Location & Routingewd_type=routing;type=c,c;code=I139,S35
Click Connector(S35)Body>No. 2 Floor Wire / Step Rear Floor Wire LH>Stereo Component Amplifier Assemblyewd_type=component;type=c;code=S35;pinno=5,6,7,2,3,4
I139-2 (MO+) - S35-5 (MI+) Always Below 1 Ω I139-3 (MO-) - S35-6 (MI-) Always Below 1 Ω I139-4 (SLDO) - S35-7 (SLDI) Always Below 1 Ω I139-5 (MI+) - S35-2 (MO+) Always Below 1 Ω I139-6 (MI-) - S35-3 (MO-) Always Below 1 Ω I139-7 (SLDI) - S35-4 (SLDO) Always Below 1 Ω I139-2 (MO+) or S35-5 (MI+) - Body ground Always 10 kΩ or higher I139-3 (MO-) or S35-6 (MI-) - Body ground Always 10 kΩ or higher I139-4 (SLDO) or S35-7 (SLDI) - Body ground Always 10 kΩ or higher I139-5 (MI+) or S35-2 (MO+) - Body ground Always 10 kΩ or higher I139-6 (MI-) or S35-3 (MO-) - Body ground Always 10 kΩ or higher I139-7 (SLDI) or S35-4 (SLDO) - Body ground Always 10 kΩ or higher
- Result:
-
Proceed to OK NG
Post-procedure1
None
OK
NG
Pre-procedure1
Replace the stereo component amplifier assembly with a new or known good one.
Clear the DTCs.
- Body Electrical > Navigation System > Clear DTCs
- 50002 212
Procedure1
Recheck for DTCs and check that no DTCs are output.
- Body Electrical > Navigation System > Trouble Codes
- 50001 212
- Result:
-
Result Proceed to DTCs are not output A DTCs are output B
Post-procedure1
None
A
B
Click hereAudio / Visual / Telematics>AUDIO / VIDEO>RADIO RECEIVER (for Radio Receiver Type)>REMOVAL
Pre-procedure1
Disconnect the S35 stereo component amplifier assembly connector.
Procedure1
Measure the voltage according to the value(s) in the table below.
- Standard Voltage:
-
Tester Connection Switch Condition Specified Condition Click Location & Routing(S35)Location & Routingewd_type=routing;type=c;code=S35
Click Connector(S35)Body>No. 2 Floor Wire / Step Rear Floor Wire LH>Stereo Component Amplifier Assemblyewd_type=component;type=c;code=S35;pinno=8
S35-8 (WUO) - Body ground Ignition switch ACC 4.5 V or higher
- Result:
-
Proceed to OK NG
Post-procedure1
None
OK
NG
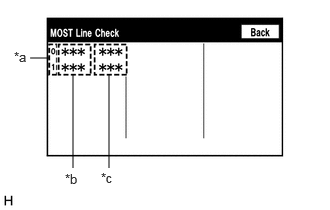
| *a | MOST Network Device Node Position Number |
| *b | Device Name |
| *c | Result |
Enter the "MOST Line Check" screen. Refer to Check DTC (Check Using System Check Mode Screen) in DTC Check / Clear.
- HINT:
-
"MOST" is displayed on "System Check Mode" screen when the MOST network is malfunctioning.
- Result:
-
Result Proceed to "OK" is displayed for all items. A "NCON" is displayed for "REAR". B "NCON" is displayed for "AMP" and "REAR" C
A
B
C
Pre-procedure1
Disconnect the I139 radio receiver assembly connector.
Disconnect the S35 stereo component amplifier assembly connector.
Procedure1
Measure the resistance according to the value(s) in the table below.
- Standard Resistance:
-
Tester Connection Condition Specified Condition Click Location & Routing(I139,S35)Location & Routingewd_type=routing;type=c,c;code=I139,S35
Click Connector(S35)Body>No. 2 Floor Wire / Step Rear Floor Wire LH>Stereo Component Amplifier Assemblyewd_type=component;type=c;code=S35;pinno=2,3,4
I139-5 (MI+) - S35-2 (MO+) Always Below 1 Ω I139-6 (MI-) - S35-3 (MO-) Always Below 1 Ω I139-7 (SLDI) - S35-4 (SLDO) Always Below 1 Ω I139-5 (MI+) or S35-2 (MO+) - Body ground Always 10 kΩ or higher I139-6 (MI-) or S35-3 (MO-) - Body ground Always 10 kΩ or higher I139-7 (SLDI) or S35-4 (SLDO) - Body ground Always 10 kΩ or higher
- Result:
-
Proceed to OK NG
Post-procedure1
None
OK
NG
Pre-procedure1
Replace the stereo component amplifier assembly with a new or known good one.
Clear the DTCs.
- Body Electrical > Navigation System > Clear DTCs
- 50002 212
Procedure1
Recheck for DTCs and check that no DTCs are output.
- Body Electrical > Navigation System > Trouble Codes
- 50001 212
- Result:
-
Result Proceed to DTCs are not output A DTCs are output B
Post-procedure1
None
A
B
Pre-procedure1
Disconnect the Q70 multi-display controller assembly connector.
Disconnect the S35 stereo component amplifier assembly connector.
Procedure1
Measure the resistance according to the value(s) in the table below.
- Standard Resistance:
-
Tester Connection Condition Specified Condition Click Location & Routing(Q70,S35)Location & Routingewd_type=routing;type=c,c;code=Q70,S35
Click Connector(Q70)Seat>Floor Wire>Multi-Display Controllerewd_type=component;type=c;code=Q70;pinno=2,3,4
Click Connector(S35)Body>No. 2 Floor Wire / Step Rear Floor Wire LH>Stereo Component Amplifier Assemblyewd_type=component;type=c;code=S35;pinno=5,6,7
Q70-2 (MO+) - S35-5 (MI+) Always Below 1 Ω Q70-3 (MO-) - S35-6 (MI-) Always Below 1 Ω Q70-4 (SLDO) - S35-7 (SLDI) Always Below 1 Ω Q70-2 (MO+) or S35-5 (MI+) - Body ground Always 10 kΩ or higher Q70-3 (MO-) or S35-6 (MI-) - Body ground Always 10 kΩ or higher Q70-4 (SLDO) or S35-7 (SLDI) - Body ground Always 10 kΩ or higher
- Result:
-
Proceed to OK NG
Post-procedure1
None
OK
NG
Pre-procedure1
Replace the multi-display controller sub-assembly with a new or known good one.
Clear the DTCs.
- Body Electrical > Navigation System > Clear DTCs
- 50002 212
Procedure1
Recheck for DTCs and check that no DTCs are output.
Procedure1
- Body Electrical > Navigation System > Trouble Codes
- 50001 212
- Result:
-
Result Proceed to DTCs are not output A DTCs are output B
Post-procedure1
None
A
Click hereAudio / Visual / Telematics>AUDIO / VIDEO>RADIO RECEIVER (for Radio Receiver Type)>REMOVAL
B
Pre-procedure1
Disconnect the I139 radio receiver assembly connector.
Disconnect the Q70 multi-display controller assembly connector.
Procedure1
Measure the resistance according to the value(s) in the table below.
- Standard Resistance:
-
Tester Connection Condition Specified Condition Click Location & Routing(I139,Q70)Location & Routingewd_type=routing;type=c,c;code=I139,Q70
Click Connector(Q70)Seat>Floor Wire>Multi-Display Controllerewd_type=component;type=c;code=Q70;pinno=5,6,7
I139-2 (MO+) - Q70-5 (MI+) Always Below 1 Ω I139-3 (MO-) - Q70-6 (MI-) Always Below 1 Ω I139-4 (SLDO) - Q70-7 (SLDI) Always Below 1 Ω I139-2 (MO+) or Q70-5 (MI+) - Body ground Always 10 kΩ or higher I139-3 (MO-) or Q70-6 (MI-) - Body ground Always 10 kΩ or higher I139-4 (SLDO) or Q70-7 (SLDI) - Body ground Always 10 kΩ or higher
- Result:
-
Proceed to OK NG
Post-procedure1
None
OK
Click hereAudio / Visual / Telematics>AUDIO / VIDEO>RADIO RECEIVER (for Radio Receiver Type)>REMOVAL
NG
Disconnect the Q70 multi-display controller assembly connector.
Measure the voltage according to the value(s) in the table below.
- Standard Voltage:
-
Tester Connection Switch Condition Specified Condition Click Location & Routing(Q70)Location & Routingewd_type=routing;type=c;code=Q70
Click Connector(Q70)Seat>Floor Wire>Multi-Display Controllerewd_type=component;type=c;code=Q70;pinno=8
Q70-8 (WUO) - Body ground Ignition switch ACC 4.5 V or higher
- Result:
-
Proceed to OK NG
OK
NG
Disconnect the S35 stereo component amplifier assembly connector.
Measure the voltage according to the value(s) in the table below.
- Standard Voltage:
-
Tester Connection Switch Condition Specified Condition Click Location & Routing(S35)Location & Routingewd_type=routing;type=c;code=S35
Click Connector(S35)Body>No. 2 Floor Wire / Step Rear Floor Wire LH>Stereo Component Amplifier Assemblyewd_type=component;type=c;code=S35;pinno=8
S35-8 (WUO) - Body ground Ignition switch ACC 4.5 V or higher
- Result:
-
Proceed to OK NG
OK
NG
Pre-procedure1
Replace the stereo component amplifier assembly with a new or known good one.
Click hereAudio / Visual / Telematics>AUDIO / VIDEO>STEREO COMPONENT AMPLIFIER>REMOVAL
Clear the DTCs.
- Body Electrical > Navigation System > Clear DTCs
- 50002 212
Procedure1
Recheck for DTCs and check that no DTCs are output.
- Body Electrical > Navigation System > Trouble Codes
- 50001 212
- Result:
-
Result Proceed to DTCs are not output A DTCs are output B
Post-procedure1
None
A
B
Disconnect the Q70 multi-display controller assembly connector.
Measure the voltage according to the value(s) in the table below.
- Standard Voltage:
-
Tester Connection Switch Condition Specified Condition Click Location & Routing(Q70)Location & Routingewd_type=routing;type=c;code=Q70
Click Connector(Q70)Seat>Floor Wire>Multi-Display Controllerewd_type=component;type=c;code=Q70;pinno=8
Q70-8 (WUO) - Body ground Ignition switch ACC 4.5 V or higher
- Result:
-
Proceed to OK NG
OK
NG