F33A-FTV ENGINE CONTROL ECD SYSTEM(w/o DPF) Lack of Power (Turbocharger System)
CAUTION / NOTICE / HINT
- HINT:
-
·
The diagnosis flowchart is for lack of power due to turbocharger factors.
·If symptom-specific diagnosis indicates a turbocharger related problem, check using this flowchart.
PROCEDURE
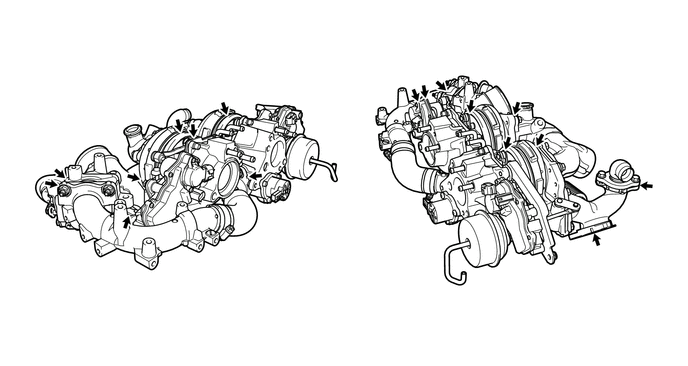
Check that no soot or oil adheres to the turbocharger sub-assembly connectors.
- HINT:
-
If adhering soot or an oil leak exists, air leaking at that position may be the cause of the lack of boost pressure.
- Result:
-
Result Proceed to No adhering soot or an oil A Soot adhering around the turbine housing, flange, or exhaust pipe clamp B Oil leak from the contact surface between the compressor housing and bearing housing C
A
B
C
Enter the following menus: Powertrain / Engine / Active Test / Activate the Air Bypass Valve.
- Powertrain > Engine > Active Test
-
Tester Display Activate the Air Bypass Valve - 50004 372 42039
Turn the Active Test ON and OFF, and check that the air bypass valve makes an operating sound.
- HINT:
-
·
When turning the air bypass valve from ON to OFF, the valve makes a sitting sound.
·If it is difficult to distinguish the operating sound, repeat the Active Test and check again.
·If no DTC related to the air bypass valve is output and an operating sound cannot be confirmed, the air bypass valve is stuck.
- Result:
-
There is an operating sound
Inspect the exhaust control valve (No. 2 turbocharger sub-assembly).
Click hereEngine / Hybrid System>F33A-FTV (INTAKE / EXHAUST)>TURBOCHARGER>ON-VEHICLE INSPECTION
Inspect the intake air control valve.
Click hereEngine / Hybrid System>F33A-FTV (INTAKE / EXHAUST)>INTAKE AIR CONTROL VALVE>ON-VEHICLE INSPECTION
- Result:
-
Proceed to OK NG
OK
NG
Repair or replace malfunctioning parts in the intake/exhaust system.
Check that the turbine shaft rotates smoothly, without catching.
Click hereEngine / Hybrid System>F33A-FTV (INTAKE / EXHAUST)>TURBOCHARGER>INSPECTION
Check for loose turbine mounting nuts and for axial play in the turbine shaft.
Click hereEngine / Hybrid System>F33A-FTV (INTAKE / EXHAUST)>TURBOCHARGER>INSPECTION
- HINT:
-
If the turbine shaft catches or if there no play or excessive play, it could indicate a seal problem due to seizing or poor sliding due to a deposit build up.
- Result:
-
Result Proceed to No turbine shaft malfunction A Turbine shaft malfunction B
A
B
Check for interference between the turbine wheel and the turbine housing.
Click hereEngine / Hybrid System>F33A-FTV (INTAKE / EXHAUST)>TURBOCHARGER>INSPECTION
- HINT:
-
When there is interference between the turbine wheel and turbine housing and the turbine wheel is damaged, check for fragments of the turbine wheel in the exhaust manifold converter sub-assembly.
- Result:
-
Result Proceed to No damage or interference A Damage or interference exists B
A
B
Loosen the installation bolt of the turbocharger nozzle vane control actuator.
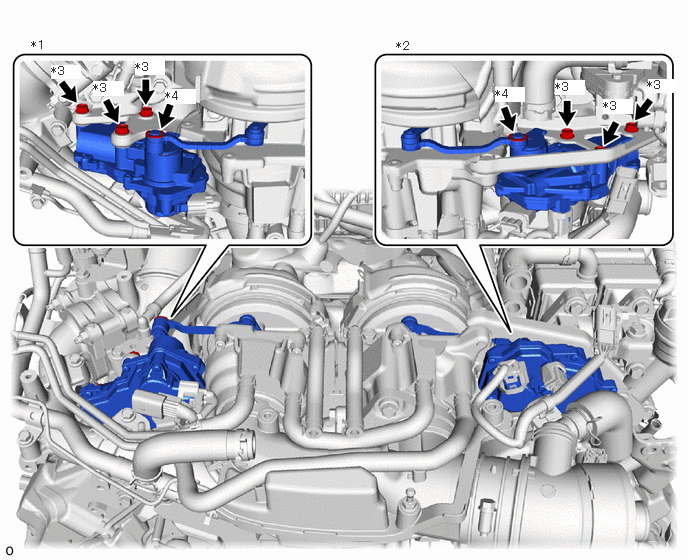
| *1 | No. 1 Turbocharger Sub-assembly | *2 | No. 2 Turbocharger Sub-assembly |
| *3 | Installation Bolt | *4 | E-washer |
Remove the e-washer from the turbocharger nozzle vane control actuator.
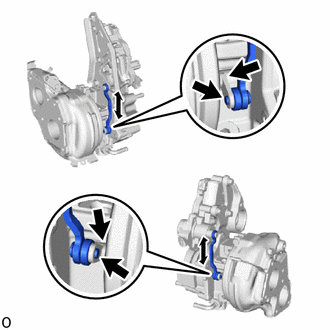
Move the turbocharger vane control rod sub-assembly and check that the turbocharger nozzle vane plate moves.
- Result:
-
Result Proceed to Catches, but operates* OK Gets stuck and does not operate NG
- HINT:
-
*: Check several times.
OK
NG
Check for deformation or cracks in the mounting surfaces on the exhaust manifold converter sub-assembly and the turbocharger sub-assembly.
- HINT:
-
Deformation or cracks on a mounting surface may allow exhaust gas to leak from the damaged position.
- Standard:
-
No deformation or cracks on a mounting surface.
- Result:
-
Result Proceed to No problem with the mounting surface A Deformation or cracks on the exhaust manifold converter sub-assembly mounting surface B Deformation or cracks on the turbocharger sub-assembly mounting surface C
A
B
Click hereEngine / Hybrid System>F33A-FTV (EMISSION CONTROL)>MONOLITHIC CONVERTER (for Front Side)>REMOVAL
C
Replace the exhaust pipe clamp and the gasket.
- Result:
-
Proceed to NEXT
NEXT
Check that the abnormal state has disappeared.
- Result:
-
Proceed to NEXT
NEXT