1HZ ENGINE CONTROL ECD SYSTEM Pre-heating Control Circuit
DESCRIPTION
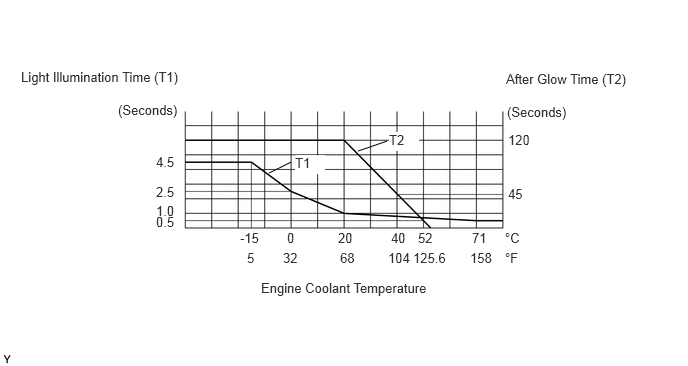
When the ignition switch is turned to ON, the emission control ECU calculates the glow indicator light illumination time and glow plug heating time corresponding to the coolant temperature at that time and turns ON the glow indicator light and glow relay.
As ceramics are used as glow plug material, current control is not performed.
WIRING DIAGRAM
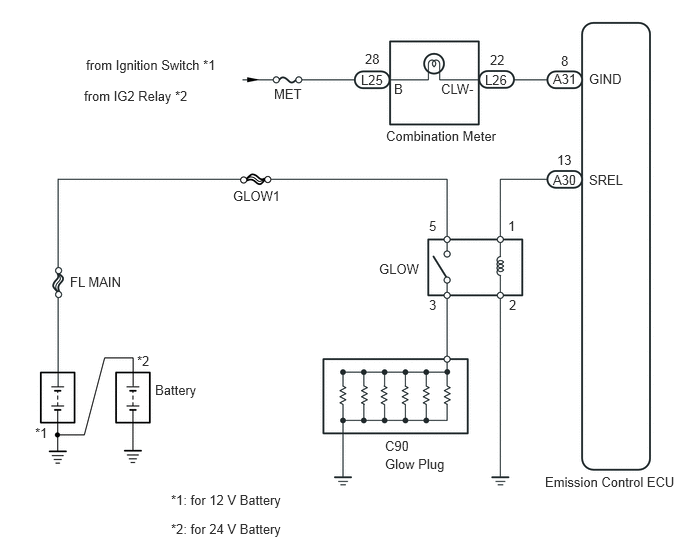
CAUTION / NOTICE / HINT
- NOTICE:
-
Inspect the fuses of circuits related to this system before performing the following inspection procedure.
PROCEDURE
a) Check that the glow indicator light turns on when turning the ignition switch to ON.
- OK:
-
Glow indicator light turns on for 0.5 seconds or more.
- Result:
-
Proceed to OK NG
NG
OK
Disconnect the emission control ECU connector.
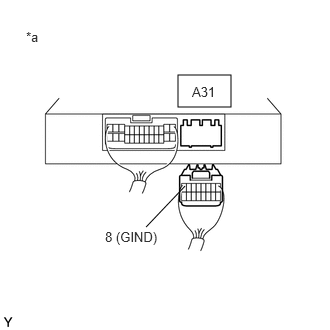
| *a | Rear view of wire harness connector (to Emission Control ECU) |
Measure the voltage according to the value(s) in the table below.
- Standard Voltage:
-
Tester Connection Switch Condition Specified Condition A31-8 (GIND) - Body ground Ignition switch ON 11 to 14 V*1
22 to 28 V*2
*1: for 12 V battery
*2: for 24 V battery
- Result:
-
Proceed to OK NG
OK
NG
Refer to the combination meter troubleshooting procedure.
Click hereVehicle Interior>METER / GAUGE / DISPLAY>METER / GAUGE SYSTEM>HOW TO PROCEED WITH TROUBLESHOOTING
- Result:
-
Proceed to OK NG
OK
NG
- NOTICE:
-
Turn the ignition switch off for 60 seconds or more when repeating the inspection.
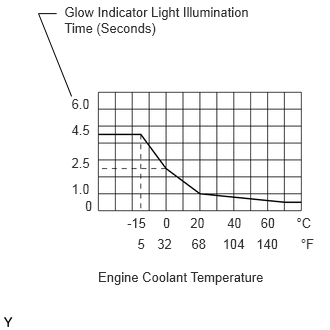
Check the glow indicator light illumination time.
Turn the ignition switch to ON.
Check the amount of time that the glow indicator light illuminates.
- Standard illumination time:
-
The glow indicator light illuminates for the time shown in the illustration according to the engine coolant temperature.
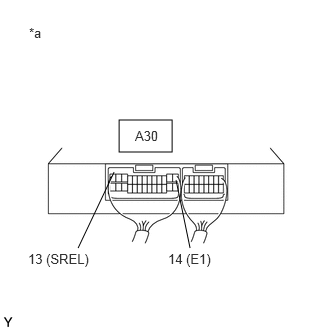
| *a | Rear view of wire harness connector (to Emission Control ECU) |
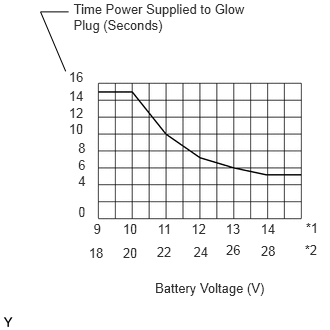
Check the pre-heating control.
Turn the ignition switch to ON.
Check the amount of time that power is supplied to the GLOW relay.
- Standard Glow Time:
-
Tester Connection Engine Coolant Temperature Condition Specified Condition A30-13 (SREL) - A30-14 (E1) Below 40°C (104°F) Approximately 15 seconds (11 to 14 V)*1
Approximately 15 seconds (22 to 28 V)*240°C (104°F) or higher Approximately 1 seconds (11 to 14 V)*1
Approximately 1 seconds (22 to 28 V)*2
*1: for 12 V battery
*2: for 24 V battery
- HINT:
-
The time that power is supplied to the GLOW relay varies according to the emission control ECU voltage as shown in the illustration.
Check the after glow control.
Check the amount of time that power is supplied to the GLOW relay when the engine is cranked and started.
- Standard Glow Time:
-
Tester Connection Engine Coolant Temperature Condition Specified Condition A30-13 (SREL) - A30-14 (E1) Below 20°C (68°F) Approximately 120 seconds (11 to 14 V)*1
Approximately 120 seconds (22 to 28 V)*252°C (125.6°F) or higher Approximately 1 seconds (11 to 14 V)*1
Approximately 1 seconds (22 to 28 V)*2
*1: for 12 V battery
*2: for 24 V battery
- Result:
-
Proceed to OK NG
OK
NG
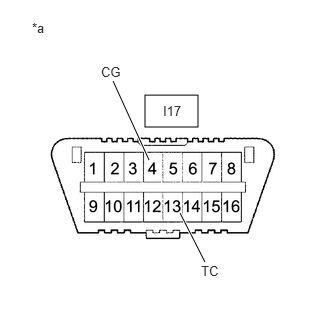
| *a | Front view of wire harness connector (DLC3) |
Connect terminals TC and CG of the DLC3.
Turn the ignition switch to ON.
Read the DTCs.
- Result:
-
Result Proceed to DTC output A No DTC output B
B
A
Inspect the GLOW relay.
Click hereEngine / Hybrid System>1HZ (STARTING)>RELAY>ON-VEHICLE INSPECTION
- Result:
-
Proceed to OK NG
OK
NG
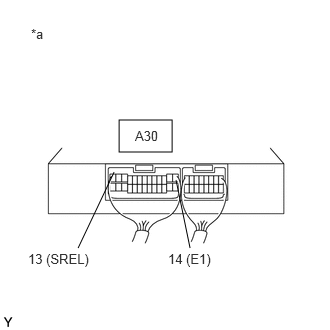
| *a | Rear view of wire harness connector (to Emission Control ECU) |
Measure the voltage according to the value(s) in the table below.
- Standard Voltage:
-
Tester Connection Switch Condition Specified Condition A30-13 (SREL) - A30-14 (E1) Ignition switch ON 11 to 14 V*1
22 to 28 V*2
*1: for 12 V battery
*2: for 24 V battery
- Result:
-
Proceed to OK NG
OK
NG
Remove the glow relay from the engine room relay block assembly.
Disconnect the emission control ECU connector.
Measure the resistance according to the value(s) in the table below.
- Standard Resistance:
-
Tester Connection Condition Specified Condition Glow relay terminal (1) - A30-13 (SREL) Always Below 1 Ω Glow relay terminal (1) or A30-13 (SREL) - Body ground Always 10 kΩ or higher
- Result:
-
Proceed to OK NG
OK
NG
Disconnect the glow plug connector.
Measure the resistance according to the value(s) in the table below.
- Standard Resistance:
-
Tester Connection Condition Specified Condition Glow plug terminal - Body ground 20°C (68°F) Approximately 1 Ω
- HINT:
-
If any of the glow plugs has an open circuit, the engine power will be insufficient only when the engine is cold.
- NOTICE:
-
·
Exercise extreme care not to damage the glow plug pipes. Damaging them could cause an open circuit, or shorten the life of the glow plugs.
·Keep the glow plugs free of oil and fuel while cleaning.
·Wipe any oil off of the terminal and Bakelite washer with a clean, dry cloth during inspection.
·Do not apply more than 11 V to the glow plugs as it may cause an open circuit.
Reconnect the glow plug connector.
- Result:
-
Proceed to OK NG
OK
NG
Check the glow plug installation.
- OK:
-
Glow plugs are installed securely. Torque: 13 N*m (133 kgf*cm, 10 ft.*lbf)
- Result:
-
Proceed to OK NG
OK
NG
Remove the GLOW relay from the .
Disconnect the glow plug connector.
Measure the resistance according to the value(s) in the table below.
- Standard Resistance:
-
Tester Connection Condition Specified Condition Glow relay terminal (3) - C90-1 Always Below 1 Ω Glow relay terminal (5) - Positive (+) battery terminal cable Always Below 1 Ω Glow relay terminal (2) - Body ground Always Below 1 Ω
- Result:
-
Proceed to OK NG
OK
NG