Q710 HYBRID TRANSMISSION / TRANSAXLE HYBRID TRANSAXLE FLUID ADJUSTMENT
PROCEDURE

 52383E
1.REMOVE NO. 1 DIFFERENTIAL SUPPORT PROTECTOR
52384C
2.REMOVE NO. 2 DIFFERENTIAL SUPPORT PROTECTOR
53661B
3.REMOVE REAR SUSPENSION BRACE COVER
4.DRAIN HYBRID TRANSAXLE FLUID
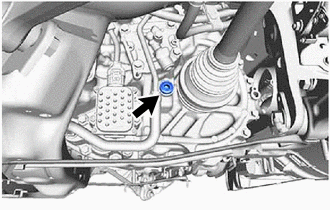
Using a 10 mm hexagon socket wrench, remove the filler plug and gasket from the FCV with motor transaxle assembly.
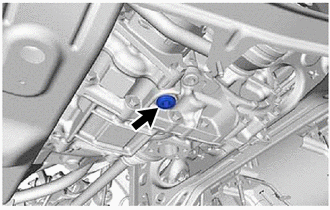
Using a 10 mm hexagon socket wrench, remove the drain plug and gasket from the FCV with motor transaxle assembly and drain the hybrid transaxle fluid.
Using a 10 mm hexagon socket wrench, install the drain plug and a new gasket to the FCV with motor transaxle assembly.
- Torque:
- 50 N*m (510 kgf*cm, 37 ft.*lbf)
Using a 10 mm hexagon socket wrench, temporarily install the filler plug and gasket to the FCV with motor transaxle assembly.
- HINT:
-
Reuse the old gasket as the filler plug will be removed again.
5.ADD HYBRID TRANSAXLE FLUID
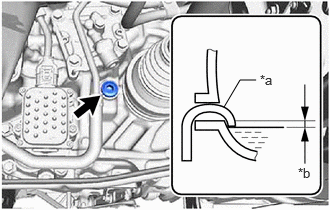
| *a | Filler Nozzle |
| *b | 0 to 8 mm (0 to 0.315 in.) |
Using a 10 mm hexagon socket wrench, remove the filler plug and gasket from the FCV with motor transaxle assembly.
Add hybrid transaxle fluid until the hybrid transaxle fluid level is between 0 to 8 mm (0 to 0.315 in.) from the bottom lip of the filler plug opening. [#]
- NOTICE:
- ·
When adding hybrid transaxle fluid, make sure that the vehicle is level.
·Use Toyota Genuine ATF WS.
Using hybrid transaxle fluid other than the above type may cause abnormal noise or vibration, or ultimately damage the transmission of your vehicle.
·Be sure to fully insert the filler nozzle into the filler plug opening.
·Be sure to add hybrid transaxle fluid slowly. If hybrid transaxle fluid is added quickly, the hybrid transaxle fluid may hit internal parts and bounce back, resulting in hybrid transaxle fluid coming out of the filler plug opening.
·Be sure to directly check that the hybrid transaxle fluid level is within the specified range.
·Driving the vehicle with an insufficient or excessive amount of hybrid transaxle fluid may damage the FCV with motor transaxle assembly.
- Hybrid Transaxle Fluid Standard Capacity (for Reference):
5.6 liters (5.9 US qts, 4.9 Imp. qts)
After adding hybrid transaxle fluid, leave the vehicle for 30 seconds so that the hybrid transaxle fluid surface can become still again, and then check that the hybrid transaxle fluid level is between 0 to 8 mm (0 to 0.315 in.) from the bottom lip of the filler plug opening. (If the hybrid transaxle fluid level is low, repeat this procedure from step [#].)
- NOTICE:
-
After adding hybrid transaxle fluid, make sure to check the hybrid transaxle fluid level.
Using a 10 mm hexagon socket wrench, temporarily install the filler plug and gasket to the FCV with motor transaxle assembly.
- HINT:
-
Reuse the old gasket as the filler plug will be removed again.
6.BLEED AIR FROM HYBRID TRANSAXLE FLUID LINE
- NOTICE:
-
If the oil cooler hose is removed, the oil cooler assembly, the oil pump assembly (for Mechanical Type), the oil pump assembly (for Electric Type) is removed or the FCV with motor transaxle assembly is removed, perform the following work.
Depress and hold the brake pedal.
Turn the ignition switch to ON (READY).
- NOTICE:
-
To reduce load, make sure that all electrical systems, such as the air conditioning, lighting system, electric fan and audio system, are off.
Perform the "Control the Motor/Generator Cooling Oil Pump" Active Test for 30 seconds.
- Powertrain > EV > Active Test
-
Tester Display Control the Motor/Generator Cooling Oil Pump - 50004 397 42002
7.INSPECT HYBRID TRANSAXLE FLUID
8.INSPECT FOR HYBRID TRANSAXLE FLUID LEAK
53661B
9.INSTALL REAR SUSPENSION BRACE COVER
52384C
10.INSTALL NO. 2 DIFFERENTIAL SUPPORT PROTECTOR
52383E
11.INSTALL NO. 1 DIFFERENTIAL SUPPORT PROTECTOR