Home › Vehicle Interior › SUPPLEMENTAL RESTRAINT SYSTEMS › CURTAIN SHIELD AIRBAG ASSEMBLY
RM37H0E _58 Vehicle Interior _095287 SUPPLEMENTAL RESTRAINT SYSTEMS _0448070 CURTAIN SHIELD AIRBAG ASSEMBLY A

SUPPLEMENTAL RESTRAINT SYSTEMS  CURTAIN SHIELD AIRBAG ASSEMBLY  INSTALLATION  


CAUTION / NOTICE / HINT
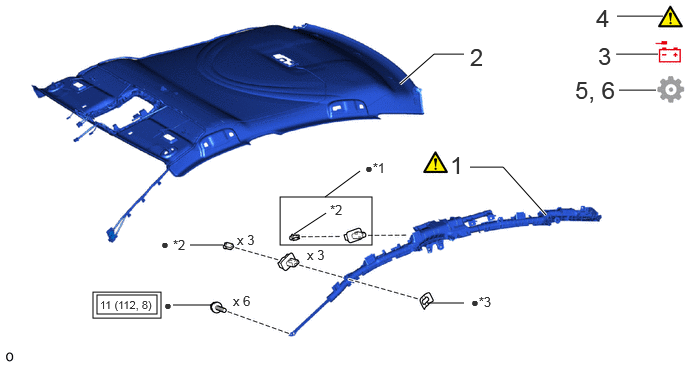
COMPONENTS (INSTALLATION)
B605596N01
2.917,2.052 3.875,2.552 0.958,0.5 1.01,3.073 1.635,3.271 0.625,0.198 0.969,3.042 1.677,3.313 0.708,0.271 6.906,0.167 6.427,0.167 false 6.854,0.563 6.417,0.563 false 4.833,0.563 4.521,0.563 4.521,0.563 4.167,0.875 true 5.688,2.24 5.24,1.74 5.24,1.74 4.896,1.74 true 3.396,2.219 3.063,2.438 false 3.75,1.781 3.385,2.052 false 2.323,2.552 1.979,2.552 false 2.198,3.177 1.802,3.177 false 4.833,3.156 4.448,3.156 false 6.833,0.938 6.448,0.938 false 6.208,0.042 6.396,0.344 0.188,0.302 18 false 4 6.229,0.438 6.417,0.74 0.188,0.302 18 false 3 4.896,0.448 5.083,0.75 0.188,0.302 18 false 2 4.688,1.573 4.875,1.875 0.188,0.302 18 false 1 2.427,3.052 2.688,3.219 0.26,0.167 10 false x 6 3.198,2.573 3.458,2.74 0.26,0.167 10 false x 3 1.708,3.094 1.969,3.26 0.26,0.167 10 false ● 3.802,1.667 4.219,1.896 0.417,0.229 10 false ●*1 1.677,2.458 1.938,2.625 0.26,0.167 10 false ● 2.469,2.417 2.729,2.583 0.26,0.167 10 false x 3 3.438,2.104 3.698,2.271 0.26,0.167 10 false *2 4.906,3.063 5.26,3.302 0.354,0.24 10 false ●*3 1.802,2.469 2.063,2.635 0.26,0.167 10 false *2 5.99,0.792 6.49,1.073 0.5,0.281 18 false 5, 6 1.042,3.104 1.625,3.344 0.583,0.24 8 false 11 (112, 8)

Procedure Part Name Code
Z101186

Z101188

Z101187

1 CURTAIN SHIELD AIRBAG ASSEMBLY LH 62180A (Click here) - -
2 ROOF HEADLINING ASSEMBLY 63310 - - -
3 CONNECT CABLE TO NEGATIVE AUXILIARY BATTERY TERMINAL - (Click here) - -
4 CHECK SRS WARNING LIGHT - (Click here) - -
5 INITIALIZATION AFTER RECONNECTING BATTERY TERMINAL - - - (Click here)
6 PERFORM DIAGNOSTIC SYSTEM CHECK - - - (Click here)

*1 ROOF SIDE INNER GARNISH CLIP *2 PIN
*3 SPACER - -
V111893

Tightening torque for "Major areas involving basic vehicle performance such as moving/turning/stopping": N*m (kgf*cm, ft.*lbf) ● Non-reusable part

CAUTION / NOTICE / HINT

HINT:
·

Use the same procedure for the RH and LH sides.

·

The procedure listed below is for the LH side.


PROCEDURE

Hide 62180A 1.INSTALL CURTAIN SHIELD AIRBAG ASSEMBLY LH
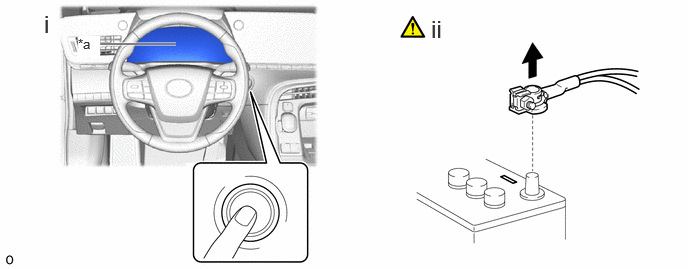
a.
B605562C01
1.042,0.458 1.833,0.458 true 0.458,0.104 0.74,0.458 0.281,0.354 18 false i 4.49,0.156 4.771,0.51 0.281,0.354 18 false ii 0.813,0.375 1.042,0.604 0.229,0.229 10 true *a
*a Turns off - -


i.

Check that the ignition switch is off.


ii.

Check that the cable is disconnected from the negative (-) auxiliary battery terminal.

CAUTION:
·

Do not begin this procedure within 60 seconds after disconnecting the cable from the negative (-) auxiliary battery terminal.

·

If the airbag deploys for any reason, it may cause a serious accident.
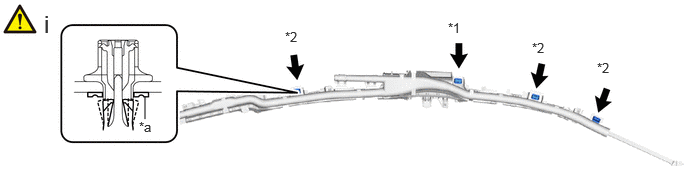


b.
B605594C03
1.51,1.24 1.51,1.01 false 1.448,1.24 1.729,1.594 0.281,0.354 10 false *a 4.667,0.208 4.948,0.469 0.281,0.26 10 false *1 2.969,0.302 3.25,0.563 0.281,0.26 10 false *2 5.542,0.417 5.823,0.677 0.281,0.26 10 false *2 6.219,0.625 6.5,0.885 0.281,0.26 10 false *2 0.458,0.104 0.677,0.458 0.219,0.354 18 false i
*1 Roof Side Inner Garnish Clip *2 Clip
*a Spacer - -


i.

Install the spacer, 3 clips and roof side inner garnish clip.

NOTICE:

Do not push the pin and lock the clip at this time.
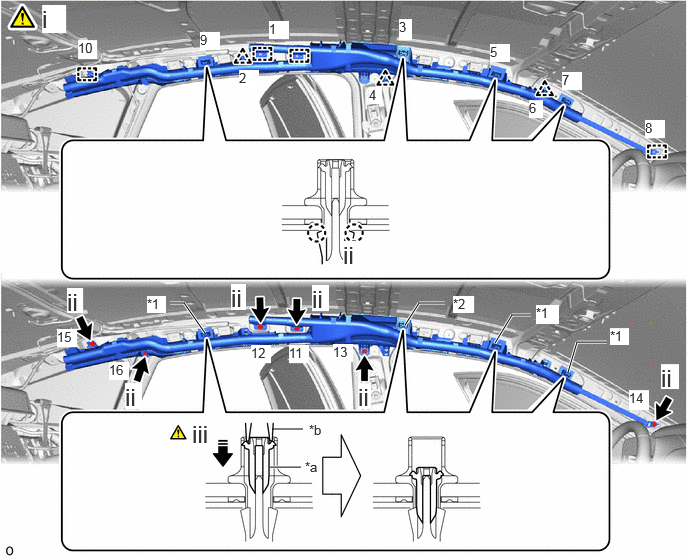


c.
B605597C01
2.813,4.865 3.135,4.865 true 4.219,3.385 4.365,3.156 4.365,3.156 4.635,3.156 true 2.135,3.469 1.917,3.156 1.917,3.156 1.771,3.156 true 5.917,3.875 6.01,3.563 6.01,3.563 6.323,3.563 true 5.156,3.573 5.333,3.281 5.333,3.281 5.531,3.281 true 2.833,4.469 3.156,4.469 false 3.177,4.781 3.49,4.938 0.313,0.156 10 false *a 0.438,0.052 0.688,0.344 0.25,0.292 18 true i 6.885,3.792 7.073,4.052 0.188,0.26 18 true ii 2.406,2.958 2.563,3.229 0.156,0.271 18 true ii 3.573,2.51 3.813,2.771 0.24,0.26 18 true ii 2,4.375 2.219,4.656 0.219,0.281 18 false iii 1.531,3.083 1.729,3.26 0.198,0.177 10 true *1 4.719,3.083 4.938,3.26 0.219,0.177 10 true *2 5.583,3.177 5.823,3.375 0.24,0.198 10 true *1 6.354,3.417 6.552,3.594 0.198,0.177 10 true *1 3.219,4.396 3.531,4.552 0.313,0.156 10 false *b 3.729,3.99 3.865,4.26 0.135,0.271 18 true ii 2.802,0.219 3.01,0.406 0.208,0.188 10 true 1 2.49,0.729 2.698,0.917 0.208,0.188 10 true 2 5.104,0.458 5.313,0.646 0.208,0.188 10 true 5 4.156,0.198 4.292,0.417 0.135,0.219 10 true 3 3.844,0.906 3.979,1.083 0.135,0.177 10 true 4 5.854,0.75 6.063,0.938 0.208,0.188 10 true 7 5.51,1.042 5.656,1.229 0.146,0.188 10 true 6 6.719,1.25 6.927,1.438 0.208,0.188 10 true 8 2.083,0.333 2.292,0.521 0.208,0.188 10 true 9 0.813,0.417 1.01,0.615 0.198,0.198 10 true 10 3.01,3.594 3.219,3.781 0.208,0.188 10 true 11 2.615,3.594 2.823,3.781 0.208,0.188 10 true 12 6.552,4.063 6.76,4.271 0.208,0.208 10 true 14 3.469,3.583 3.677,3.771 0.208,0.188 10 true 13 1.135,3.771 1.344,3.958 0.208,0.188 10 true 16 0.594,3.427 0.802,3.615 0.208,0.188 10 true 15 0.698,3 0.865,3.26 0.167,0.26 18 true ii 3.25,2.969 3.427,3.24 0.177,0.271 18 true ii 1.302,3.99 1.479,4.26 0.177,0.271 18 true ii
*1 Clip *2 Roof Side Inner Garnish Clip
*a Pin *b Needle Nose Pliers No. 2
V113147

Install in this Direction - -


i.

Attach the hook, claw and 3 clips to temporarily install the curtain shield airbag assembly LH in the order shown in the illustration (1 → 10 in illustration).

NOTICE:

Do not twist 360° and install the curtain shield airbag assembly LH.


ii.

Tighten the 6 bolts in the order shown in the illustration (11 → 16 in illustration).

Torque:
11 N*m (112 kgf*cm, 8 ft.*lbf)


iii.

Using needle-nose pliers No. 2, push the pin to lock the 3 clips and roof side inner garnish clip.

HINT:

Use the same procedure for the opposite side.



d.
B607246N02
2.49,0.135 2.667,0.354 0.177,0.219 18 true i

i.

Connect the airbag connector.

HINT:

Refer to How to Connect or Disconnect Airbag Connector:

Click hereVehicle Interior>SUPPLEMENTAL RESTRAINT SYSTEMS>AIRBAG SYSTEM>HOW TO CONNECT OR DISCONNECT AIRBAG CONNECTOR


Hide 63310 2.INSTALL ROOF HEADLINING ASSEMBLY

Hide 3.CONNECT CABLE TO NEGATIVE AUXILIARY BATTERY TERMINAL

Hide 5. INITIALIZATION AFTER RECONNECTING BATTERY TERMINAL

Click hereGeneral>SETUP>WHEN DISCONNECTING OR RECONNECTING BATTERY TERMINAL>WORK PROCEDURE

HINT:

When disconnecting and reconnecting the battery, there is an automatic learning function that completes learning when the respective system is used.

Click hereGeneral>SETUP>WHEN DISCONNECTING OR RECONNECTING BATTERY TERMINAL>AUTOMATIC LEARNING CHART


Hide 6. PERFORM DIAGNOSTIC SYSTEM CHECK